
Owner Manual
Page 1
... FOR HOUSEHOLD ONLY DESCRIPTION 1 air outlet grille 2 control panel 3 remote control receiver 4 castor wheels 5 handles 6 filter 7 air intake grille 8 air exhaust hose housing 9 drainage hose 10 power cable 11 wall flange 12 air exhaust hose 13 window outlet 14 castor locks 15 remote control 16 window bracket with a qualified electrician. • We strongly discourage the...
... FOR HOUSEHOLD ONLY DESCRIPTION 1 air outlet grille 2 control panel 3 remote control receiver 4 castor wheels 5 handles 6 filter 7 air intake grille 8 air exhaust hose housing 9 drainage hose 10 power cable 11 wall flange 12 air exhaust hose 13 window outlet 14 castor locks 15 remote control 16 window bracket with a qualified electrician. • We strongly discourage the...
Owner Manual
Page 2
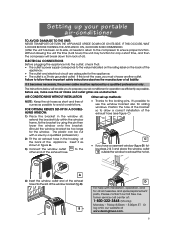
...rating label on its side, oil needs to return to the compressor to ensure proper function. A 4) Insert the window outlet end of the exhaust hose (see figure C) C • If you must be replaced by using the pin then lower the window onto the bracket. (Should the ... our toll free customer service call center at www.delonghiusa.com. 5 B D For help with a saw by a qualified professional.) 2) Fit the air exhaust hose in the window sill, extend the bracket fully within the window frame, fix the bracket by a qualified professional only. B). Setting up methods: • Thanks...
...rating label on its side, oil needs to return to the compressor to ensure proper function. A 4) Insert the window outlet end of the exhaust hose (see figure C) C • If you must be replaced by using the pin then lower the window onto the bracket. (Should the ... our toll free customer service call center at www.delonghiusa.com. 5 B D For help with a saw by a qualified professional.) 2) Fit the air exhaust hose in the window sill, extend the bracket fully within the window frame, fix the bracket by a qualified professional only. B). Setting up methods: • Thanks...
Owner Manual
Page 3
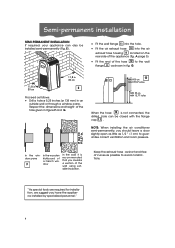
... as little as short and free of the appliance (fig. in the window pane F in the wooden kickboard of the hole given in . Keep the exhaust hose as 1/2 " (1 cm) to guarantee correct ventilation and room pressure. 134 5,27 in figure F and G. A page 5). • Fit the end of the wall ... that you have the appliance installed by specialized personnel." 6 E). • Fit the wall flange 11 into the hole. • Fit the air exhaust hose 12 into the air exhaust hose housing 8 located on the rear side of curves as possible to the wall flange 11 as follows: • Drill a hole ø 5,25...
... as little as short and free of the appliance (fig. in the window pane F in the wooden kickboard of the hole given in . Keep the exhaust hose as 1/2 " (1 cm) to guarantee correct ventilation and room pressure. 134 5,27 in figure F and G. A page 5). • Fit the end of the wall ... that you have the appliance installed by specialized personnel." 6 E). • Fit the wall flange 11 into the hole. • Fit the air exhaust hose 12 into the air exhaust hose housing 8 located on the rear side of curves as possible to the wall flange 11 as follows: • Drill a hole ø 5,25...
Owner Manual
Page 5
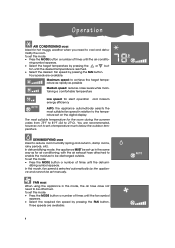
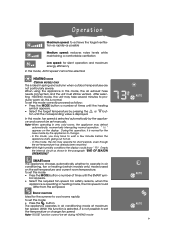
... button a number of times until the dehumi- FAN MODE When using the appliance in the same way as for air conditioning, with the air exhaust hose attached to enable the moisture to be discharged outside. In this mode: • Press the MODE button a number of times until the fan ... desired temperature is selected automatically by pressing the FAN button. Three speeds are recommended, however, not to set this mode, the air hose does not need to reduce room humidity (spring and autumn, damp rooms, rainy periods, etc). You are available: 8 difying symbol appears.
... button a number of times until the dehumi- FAN MODE When using the appliance in the same way as for air conditioning, with the air exhaust hose attached to enable the moisture to be discharged outside. In this mode: • Press the MODE button a number of times until the fan ... desired temperature is selected automatically by pressing the FAN button. Three speeds are recommended, however, not to set this mode, the air hose does not need to reduce room humidity (spring and autumn, damp rooms, rainy periods, etc). You are available: 8 difying symbol appears.
Owner Manual
Page 6
... rooms, the appliance may operate for the summer to wait a few minutes before the appliance starts giving out hot air. - In this mode, the air exhaust hose needs connected, and the unit must still be set manually. While this function is selected, it is ideal in air conditioning mode at maximum fan...
... rooms, the appliance may operate for the summer to wait a few minutes before the appliance starts giving out hot air. - In this mode, the air exhaust hose needs connected, and the unit must still be set manually. While this function is selected, it is ideal in air conditioning mode at maximum fan...
Owner Manual
Page 13
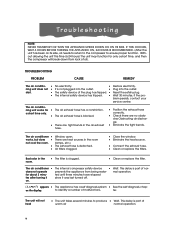
... ning unit does not • It is part of oil). a short time only. • The air exhaust hose is blocked. • There are tight bends in the air exhaust hose. • Position the exhaust hose correctly. • Check there are heat sources in the room. • The filter is clogged. •... air normal operation. 16 to ensure proper function. Troubleshooting NOTE: NEVER TRANSPORT OR TURN THE APPLIANCE UPSIDE DOWN OR ON ITS SIDE. The exhaust hose is part of the plug has tripped. • Reset the safety plug. • The internal safety device has tripped. • Wait...
... ning unit does not • It is part of oil). a short time only. • The air exhaust hose is blocked. • There are tight bends in the air exhaust hose. • Position the exhaust hose correctly. • Check there are heat sources in the room. • The filter is clogged. •... air normal operation. 16 to ensure proper function. Troubleshooting NOTE: NEVER TRANSPORT OR TURN THE APPLIANCE UPSIDE DOWN OR ON ITS SIDE. The exhaust hose is part of the plug has tripped. • Reset the safety plug. • The internal safety device has tripped. • Wait...

