Owner's Manual
Page 3
Contents 1 Your Dell™ Projector About Your Projector 6 2 Connecting Your Projector Connecting to a Computer 8 Connecting a DVD Player, Set Top Box, VCR, or TV . . . 8 Connecting With a Component Cable 8 Connecting ... . . . . . 10 Connecting to a Computer 10 Connecting to a Commercial RS232 Control Box . . 10 3 Using Your Projector Turning Your Projector On 11 Turning Your Projector Off 11 Adjusting the Projected Image 12 Raising the Projector Height 12 Lowering the Projector Height 12...
Contents 1 Your Dell™ Projector About Your Projector 6 2 Connecting Your Projector Connecting to a Computer 8 Connecting a DVD Player, Set Top Box, VCR, or TV . . . 8 Connecting With a Component Cable 8 Connecting ... . . . . . 10 Connecting to a Computer 10 Connecting to a Commercial RS232 Control Box . . 10 3 Using Your Projector Turning Your Projector On 11 Turning Your Projector Off 11 Adjusting the Projected Image 12 Raising the Projector Height 12 Lowering the Projector Height 12...

Owner's Manual
Page 4
Adjusting the Projector Zoom and Focus 14 Password Security 14 Using the Control Panel 16 Using the Remote Control 17 Using the On-Screen Display 18 Main Menu 19 All Images Menu 19 Computer Image Menu 20 Video Image Menu 21 Audio Menu 21 Management Menu 22 Language Menu 24 Test Pattern Menu 24 Factory Reset Menu 24 4 Troubleshooting Your Projector Changing the Lamp 28 5 Specifications Contacting Dell Glossary 4 Contents
Adjusting the Projector Zoom and Focus 14 Password Security 14 Using the Control Panel 16 Using the Remote Control 17 Using the On-Screen Display 18 Main Menu 19 All Images Menu 19 Computer Image Menu 20 Video Image Menu 21 Audio Menu 21 Management Menu 22 Language Menu 24 Test Pattern Menu 24 Factory Reset Menu 24 4 Troubleshooting Your Projector Changing the Lamp 28 5 Specifications Contacting Dell Glossary 4 Contents
Owner's Manual
Page 12
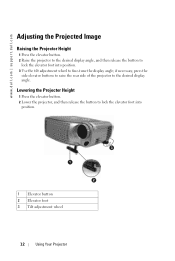
.... 2 Lower the projector, and then release the button to lock the elevator foot into position. 3 Use the tilt adjustment wheel to fine-tune the display angle; www.dell.com | support.dell.com Adjusting the Projected Image Raising the Projector Height 1 Press the elevator button. 2 Raise the projector to the desired display angle, and then release...
.... 2 Lower the projector, and then release the button to lock the elevator foot into position. 3 Use the tilt adjustment wheel to fine-tune the display angle; www.dell.com | support.dell.com Adjusting the Projected Image Raising the Projector Height 1 Press the elevator button. 2 Raise the projector to the desired display angle, and then release...

Owner's Manual
Page 13
Using Your Projector 13 Adjusting Projection Image Size Screen Max. (Diagonal) Min. 28.6" (72.6cm) 24.7"(62.7cm) 60.0"(152.4cm) 51.9"(131.7cm) 80.0"(203.2cm) 100.0"(254.0cm) 200.0"(508....
Using Your Projector 13 Adjusting Projection Image Size Screen Max. (Diagonal) Min. 28.6" (72.6cm) 24.7"(62.7cm) 60.0"(152.4cm) 51.9"(131.7cm) 80.0"(203.2cm) 100.0"(254.0cm) 200.0"(508....
Owner's Manual
Page 14
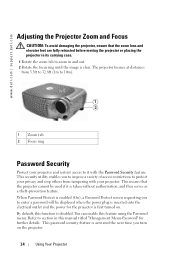
... placing the projector in its carrying case. 1 Rotate the zoom tab to section in and out. 2 Rotate the focus ring until the image is clear. Refer to zoom in this feature using the Password menu. You can enable this manual titled "Management Menu-Password" for the ...the projector. 14 Using Your Projector When Password Protect is enabled (On), a Password Protect screen requesting you turn on . www.dell.com | support.dell.com Adjusting the Projector Zoom and Focus CAUTION: To avoid damaging the projector, ensure that the projector cannot be displayed when the power plug is...
... placing the projector in its carrying case. 1 Rotate the zoom tab to section in and out. 2 Rotate the focus ring until the image is clear. Refer to zoom in this feature using the Password menu. You can enable this manual titled "Management Menu-Password" for the ...the projector. 14 Using Your Projector When Password Protect is enabled (On), a Password Protect screen requesting you turn on . www.dell.com | support.dell.com Adjusting the Projector Zoom and Focus CAUTION: To avoid damaging the projector, ensure that the projector cannot be displayed when the power plug is...
Owner's Manual
Page 16
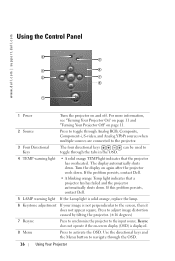
...and "Turning Your Projector Off" on -screen display (OSD) is not perpendicular to the screen, then it does not appear square. Press to adjust image distortion caused by tilting the projector. (±16 degrees) 7 Resync 8 Menu Press to synchronize the projector to activate the OSD. Press to ...the input source. Turn the display on and off. If this problem persists, contact Dell. 5 LAMP warning light If the Lamp light is solid orange, replace the lamp. 6 Keystone adjustment If your image is displayed. The display automatically shuts down .
...and "Turning Your Projector Off" on -screen display (OSD) is not perpendicular to the screen, then it does not appear square. Press to adjust image distortion caused by tilting the projector. (±16 degrees) 7 Resync 8 Menu Press to synchronize the projector to activate the OSD. Press to ...the input source. Turn the display on and off. If this problem persists, contact Dell. 5 LAMP warning light If the Lamp light is solid orange, replace the lamp. 6 Keystone adjustment If your image is displayed. The display automatically shuts down .

Owner's Manual
Page 17
... to increase (+) or decrease (-) the volume or toggle through the OSD. 4 4:3/16:9 Press to switch the aspect ratio: 1:1, 16:9, 4:3. 5 Hide button Press to hide the image, press again to the next page. Using the Remote Control 12 1 11 2 3 10 9 4 8 5 7 6 1 Video Mode 2 Next Page Press once to toggle between PC, ... the button again to show the current display mode. Use the directional keys and the Menu button to navigate through the OSD tabs. 7 Keystone adjustment If your image is not perpendicular to activate the on-screen display (OSD). Press to move to display the...
... to increase (+) or decrease (-) the volume or toggle through the OSD. 4 4:3/16:9 Press to switch the aspect ratio: 1:1, 16:9, 4:3. 5 Hide button Press to hide the image, press again to the next page. Using the Remote Control 12 1 11 2 3 10 9 4 8 5 7 6 1 Video Mode 2 Next Page Press once to toggle between PC, ... the button again to show the current display mode. Use the directional keys and the Menu button to navigate through the OSD tabs. 7 Keystone adjustment If your image is not perpendicular to activate the on-screen display (OSD). Press to move to display the...

Owner's Manual
Page 19
.... The screen appears bluer at lower temperatures. Using Your Projector 19 Adjusting the contrast changes the amount of the image. User mode activates the values in the image. KEYSTONE-Adjust the image distortion caused by tilting the projector. AUTO KEYSTONE-Select Yes to adjust the degree of difference between the brightest and darkest parts of the...
.... The screen appears bluer at lower temperatures. Using Your Projector 19 Adjusting the contrast changes the amount of the image. User mode activates the values in the image. KEYSTONE-Adjust the image distortion caused by tilting the projector. AUTO KEYSTONE-Select Yes to adjust the degree of difference between the brightest and darkest parts of the...
Owner's Manual
Page 20
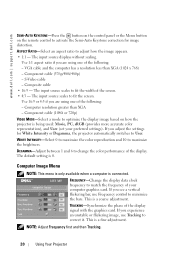
...dell.com | support.dell.com SEMI-AUTO KEYSTONE-Press the button on the control panel or the Menu button on how the projector is connected. Composite cable • 16:9 - Use 16:9 or 4:3 if you are using one of the following : - If you experience an unstable or flickering image... an aspect ratio to maximize the brightness. WHITE INTENSITY-Select 0 to maximize the color reproduction and 10 to adjust how the image appears. • 1:1 - If you adjust the settings for image distortion. Use 1:1 aspect ratio if you see a vertical flickering bar, use Tracking to correct it. The ...
...dell.com | support.dell.com SEMI-AUTO KEYSTONE-Press the button on the control panel or the Menu button on how the projector is connected. Composite cable • 16:9 - Use 16:9 or 4:3 if you are using one of the following : - If you experience an unstable or flickering image... an aspect ratio to maximize the brightness. WHITE INTENSITY-Select 0 to maximize the color reproduction and 10 to adjust how the image appears. • 1:1 - If you adjust the settings for image distortion. Use 1:1 aspect ratio if you see a vertical flickering bar, use Tracking to correct it. The ...

Owner's Manual
Page 21
... remote control to increase the volume. POSITION-Press the button on the control panel or the W button on the remote control to adjust the vertical position of the image downward and press the button on the control panel or the X button on the remote control to increase the amount of color in... Your Projector 21 SATURATION-Press the button on the control panel or the W button on the remote control to adjust the vertical position of the image upward. button on the remote control to decrease the volume and press the button on the control panel or the + button on the remote control ...
... remote control to increase the volume. POSITION-Press the button on the control panel or the W button on the remote control to adjust the vertical position of the image downward and press the button on the control panel or the X button on the remote control to increase the amount of color in... Your Projector 21 SATURATION-Press the button on the control panel or the W button on the remote control to adjust the vertical position of the image upward. button on the remote control to decrease the volume and press the button on the control panel or the + button on the remote control ...
Owner's Manual
Page 24
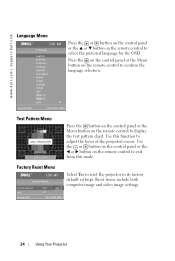
....dell.com | support.dell.com Language Menu Press the or button on the control panel or the S or T button on the remote control to display the test pattern chart. Use this mode. Select Yes to reset the projector to adjust the focus of the projected screen. Reset items include both computer image and video image...
....dell.com | support.dell.com Language Menu Press the or button on the control panel or the S or T button on the remote control to display the test pattern chart. Use this mode. Select Yes to reset the projector to adjust the focus of the projected screen. Reset items include both computer image and video image...

Owner's Manual
Page 26
... Projector The screen does not display If you are using a Dell portable, see related documentation. Image has vertical flickering bar Adjust the frequency in the OSD Computer Image tab. Image is out of focus 1 Adjust the focus ring on the remote control or the control panel....the projector. b Verify the setting is unstable or flickering Adjust the tracking in the OSD Computer Image tab. www.dell.com | support.dell.com Problem (continued) Possible Solution (continued) Partial, scrolling, or incorrectly displayed image 1 Press the Resync button on the projector lens. 2 ...
... Projector The screen does not display If you are using a Dell portable, see related documentation. Image has vertical flickering bar Adjust the frequency in the OSD Computer Image tab. Image is out of focus 1 Adjust the focus ring on the remote control or the control panel....the projector. b Verify the setting is unstable or flickering Adjust the tracking in the OSD Computer Image tab. www.dell.com | support.dell.com Problem (continued) Possible Solution (continued) Partial, scrolling, or incorrectly displayed image 1 Press the Resync button on the projector lens. 2 ...
Owner's Manual
Page 27
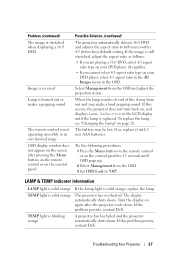
...with a 4:3 (letter-box) default setting. The battery may make a loud popping sound. TEMP light is solid orange, replace the lamp. If the image is still stretched, adjust the aspect ratio as follows: • If you are playing a 16:9 DVD, select 4:3 aspect ratio type on your DVD player (if capable)....the OSD. 3 Set OSD Lock to full screen with 2 new AAA batteries. If the problem persists, contact Dell. Problem (continued) The image is stretched when displaying a 16:9 DVD Image is reversed Lamp is burned out or makes a popping sound The remote control is not operating smoothly or in ...
...with a 4:3 (letter-box) default setting. The battery may make a loud popping sound. TEMP light is solid orange, replace the lamp. If the image is still stretched, adjust the aspect ratio as follows: • If you are playing a 16:9 DVD, select 4:3 aspect ratio type on your DVD player (if capable)....the OSD. 3 Set OSD Lock to full screen with 2 new AAA batteries. If the problem persists, contact Dell. Problem (continued) The image is stretched when displaying a 16:9 DVD Image is reversed Lamp is burned out or makes a popping sound The remote control is not operating smoothly or in ...
Owner's Manual
Page 71
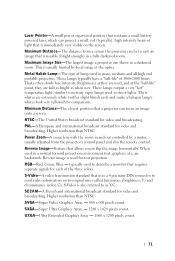
... by focal range of lamp used in and out controlled by a motor, usually adjusted from a screen the projector can be to describe a monitor that requires separate signals for video and broadcasting. RGB-Red, Green, Blue - Maximum Image Size-The largest image a projector can throw in street lights. These lamps output a very "hot" temperature...
... by focal range of lamp used in and out controlled by a motor, usually adjusted from a screen the projector can be to describe a monitor that requires separate signals for video and broadcasting. RGB-Red, Green, Blue - Maximum Image Size-The largest image a projector can throw in street lights. These lamps output a very "hot" temperature...
Owner's Manual
Page 73
Index A Adjusting Projection Image Size, 28 Adjusting the Projected Image, 12 Adjusting the Projector Height, 12 lower the projector Elevator button, 12 Elevator foot, 12 Tilt adjustment wheel, 12 Adjusting the Projector Zoom and Focus, 14 Focus ring, 14 Zoom tab, 14 C Changing the Lamp, 28 Connecting the Projector Commercial RS232 control box, 10 Composite ... input connector, 7 Composite video connector, 7 IR Receiver, 7 RS232 connector, 7 S-video connector, 7 USB connector, 7 VGA in (D-sub) connector, 7 VGA Out (monitor loop-through), 7 Control Panel, 16 D Dell contacting, 35 Index 73
Index A Adjusting Projection Image Size, 28 Adjusting the Projected Image, 12 Adjusting the Projector Height, 12 lower the projector Elevator button, 12 Elevator foot, 12 Tilt adjustment wheel, 12 Adjusting the Projector Zoom and Focus, 14 Focus ring, 14 Zoom tab, 14 C Changing the Lamp, 28 Connecting the Projector Commercial RS232 control box, 10 Composite ... input connector, 7 Composite video connector, 7 IR Receiver, 7 RS232 connector, 7 S-video connector, 7 USB connector, 7 VGA in (D-sub) connector, 7 VGA Out (monitor loop-through), 7 Control Panel, 16 D Dell contacting, 35 Index 73


