
Setup Guide
Page 18
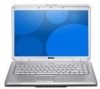
... ensure that it works with the security cable slot on your computer to power the computer and charge the battery when the computer is not in use. 3 USB connectors (2)- Connects to the AC adapter to a network or broadband device. Using Your Inspiron Laptop Left Side ...Features 9 78 56 4 1 23 16 1 Security cable slot - Connects to the computer. Used to attach a commercially available antitheft device to a USB device, such as a mouse, keyboard, printer, external drive, or MP3 player. 4 VGA ...
... ensure that it works with the security cable slot on your computer to power the computer and charge the battery when the computer is not in use. 3 USB connectors (2)- Connects to the AC adapter to a network or broadband device. Using Your Inspiron Laptop Left Side ...Features 9 78 56 4 1 23 16 1 Security cable slot - Connects to the computer. Used to attach a commercially available antitheft device to a USB device, such as a mouse, keyboard, printer, external drive, or MP3 player. 4 VGA ...
Setup Guide
Page 30
... power light is in standby mode. The computer is blinking amber - Press a key on the keyboard, move the pointer on . The computer is on . The computer is either turned off then back...or an internal device malfunction. You may not be malfunctioning or incorrectly installed. For assistance contact Dell, see the Service Manual on page 50. Also temporarily bypass power protection devices, power strips,...cables to verify that the computer turns on properly. • Ensure that the display is working by testing it off or is not receiving power. • Reseat the power cable into...
... power light is in standby mode. The computer is blinking amber - Press a key on the keyboard, move the pointer on . The computer is on . The computer is either turned off then back...or an internal device malfunction. You may not be malfunctioning or incorrectly installed. For assistance contact Dell, see the Service Manual on page 50. Also temporarily bypass power protection devices, power strips,...cables to verify that the computer turns on properly. • Ensure that the display is working by testing it off or is not receiving power. • Reseat the power cable into...

Service Manual
Page 7
Back to Contents Page Button Board Dell™ Inspiron™ 1525/1526 Service Manual CAUTION: Before you begin working inside the computer. NOTICE: To avoid electrostatic discharge, ground yourself by using a wrist grounding strap or by periodically touching an unpainted ...procedures in this section, follow the safety instructions in the Product Information Guide. Replace the center control cover (see Removing the Keyboard). 4. Remove the keyboard (see Replacing the Center Control Cover). Disconnect the button board cable from the battery bay before you must remove the battery ...
Back to Contents Page Button Board Dell™ Inspiron™ 1525/1526 Service Manual CAUTION: Before you begin working inside the computer. NOTICE: To avoid electrostatic discharge, ground yourself by using a wrist grounding strap or by periodically touching an unpainted ...procedures in this section, follow the safety instructions in the Product Information Guide. Replace the center control cover (see Removing the Keyboard). 4. Remove the keyboard (see Replacing the Center Control Cover). Disconnect the button board cable from the battery bay before you must remove the battery ...

Service Manual
Page 9
...control cover 2 scribe 3 media control buttons connector 5. NOTICE: To avoid damage to Contents Page Center Control Cover Dell™ Inspiron™ 1525/1526 Service Manual CAUTION: Before you begin working inside the computer. NOTICE: To help prevent damage to lift the center control cover on the right side and ...board, you must remove the battery from the battery bay before you do not lift the cover on the back of the keyboard. Remove the two screws securing the center control cover from the media control buttons connector located underneath the center control cover. NOTICE...
...control cover 2 scribe 3 media control buttons connector 5. NOTICE: To avoid damage to Contents Page Center Control Cover Dell™ Inspiron™ 1525/1526 Service Manual CAUTION: Before you begin working inside the computer. NOTICE: To help prevent damage to lift the center control cover on the right side and ...board, you must remove the battery from the battery bay before you do not lift the cover on the back of the keyboard. Remove the two screws securing the center control cover from the media control buttons connector located underneath the center control cover. NOTICE...

Service Manual
Page 27
..., you must remove the battery from the keyboard connector on the system board, rotate the keyboard connector latch toward the front of the computer. 6. Removing the Keyboard 1. Be careful when removing and handling the keyboard. 4. Back to Contents Page Keyboard Dell™ Inspiron™ 1525/1526 Service Manual CAUTION: Before you begin working inside the computer. Replace the two...
..., you must remove the battery from the keyboard connector on the system board, rotate the keyboard connector latch toward the front of the computer. 6. Removing the Keyboard 1. Be careful when removing and handling the keyboard. 4. Back to Contents Page Keyboard Dell™ Inspiron™ 1525/1526 Service Manual CAUTION: Before you begin working inside the computer. Replace the two...

Service Manual
Page 37
... area of resistance, until the palm rest is not necessary to remove the Bluetooth cable connector from the system board. 7. Remove the keyboard (see Removing the Center Control Cover). 3. If you begin the following procedure, follow the safety instructions in Before You Begin. 2.... separate the palm rest from the system board. 6. Remove the center control cover (see Removing the Keyboard). 4. Back to Contents Page Palm Rest Dell™ Inspiron™ 1525/1526 Service Manual Removing the Palm Rest CAUTION: Before you encounter resistance, gently flex or apply pressure to...
... area of resistance, until the palm rest is not necessary to remove the Bluetooth cable connector from the system board. 7. Remove the keyboard (see Removing the Center Control Cover). 3. If you begin the following procedure, follow the safety instructions in Before You Begin. 2.... separate the palm rest from the system board. 6. Remove the center control cover (see Removing the Keyboard). 4. Back to Contents Page Palm Rest Dell™ Inspiron™ 1525/1526 Service Manual Removing the Palm Rest CAUTION: Before you encounter resistance, gently flex or apply pressure to...


