
Setup Guide
Page 5
... Setting Up Your Studio Laptop 5 Before Setting Up Your Studio Laptop 5 Connecting the AC Adapter 6 Connecting the Network Cable (optional 7 Turning on Your Studio Laptop 8 Using the Wireless Switch 9 Windows Vista® Setup 9 Connecting to the Internet (Optional 10 Using Your Studio Laptop 12 Right Side Features 14 Left Side Features 18 Computer Base and Keyboard Features 23 Display...
... Setting Up Your Studio Laptop 5 Before Setting Up Your Studio Laptop 5 Connecting the AC Adapter 6 Connecting the Network Cable (optional 7 Turning on Your Studio Laptop 8 Using the Wireless Switch 9 Windows Vista® Setup 9 Connecting to the Internet (Optional 10 Using Your Studio Laptop 12 Right Side Features 14 Left Side Features 18 Computer Base and Keyboard Features 23 Display...

Setup Guide
Page 17
... shape (12 cm) CDs, and DVDs. For more information, see the Dell Technology Guide. 4 USB 2.0 connectors (2) - Connect USB devices, such as a mouse, keyboard, printer, external drive, or MP3 player. 5 AC adapter connector - Ensure that the side with audio programs. Using Your Studio Laptop 3 Optical Drive - The AC adapter converts AC power to a microphone or...
... shape (12 cm) CDs, and DVDs. For more information, see the Dell Technology Guide. 4 USB 2.0 connectors (2) - Connect USB devices, such as a mouse, keyboard, printer, external drive, or MP3 player. 5 AC adapter connector - Ensure that the side with audio programs. Using Your Studio Laptop 3 Optical Drive - The AC adapter converts AC power to a microphone or...

Setup Guide
Page 22
Quickly turns Off or On all digital signal to USB devices, such as a mouse, keyboard, printer, external drive, or MP3 player. 7 Network connector - HDMI-Out (Hi-Definition Mutimedia Interface Out) connector carries outgoing data as uncompressed all ... switch can be read. 6 USB 2.0 connectors (2) - NOTE: For a monitor, only the video signal will be deactivated through Dell QuickSet or the BIOS (system setup program). 4 VGA connector - Using Your Studio Laptop 3 Wireless On/Off switch - The wireless switch may be in the Off position when your computer is shipped to you...
Quickly turns Off or On all digital signal to USB devices, such as a mouse, keyboard, printer, external drive, or MP3 player. 7 Network connector - HDMI-Out (Hi-Definition Mutimedia Interface Out) connector carries outgoing data as uncompressed all ... switch can be read. 6 USB 2.0 connectors (2) - NOTE: For a monitor, only the video signal will be deactivated through Dell QuickSet or the BIOS (system setup program). 4 VGA connector - Using Your Studio Laptop 3 Wireless On/Off switch - The wireless switch may be in the Off position when your computer is shipped to you...

Setup Guide
Page 23
Connects to eSATA compatible storage devices, such as external hard disk drives or optical drives. Also, supports USB devices, such as some digital video cameras. 21 Using Your Studio Laptop 11 10 9 8 8 eSATA/USB combo connector - Connects to high-speed serial multimedia devices that support IEEE 1394, such as a mouse, keyboard, printer, external drive, or MP3 player. 9 IEEE 1394 connector -
Connects to eSATA compatible storage devices, such as external hard disk drives or optical drives. Also, supports USB devices, such as some digital video cameras. 21 Using Your Studio Laptop 11 10 9 8 8 eSATA/USB combo connector - Connects to high-speed serial multimedia devices that support IEEE 1394, such as a mouse, keyboard, printer, external drive, or MP3 player. 9 IEEE 1394 connector -

Setup Guide
Page 25
To change the circular scrolling and zoom settings, double-click the Dell Touch pad icon in camera with dual microphones, this single microphone is used for conferencing and chat. 23 Provide left -click by tapping the surface. Computer Base and Keyboard Features 1 2 3 4 Using Your Studio Laptop 1 Caps Lock light - Provides the functionality of your desktop...
To change the circular scrolling and zoom settings, double-click the Dell Touch pad icon in camera with dual microphones, this single microphone is used for conferencing and chat. 23 Provide left -click by tapping the surface. Computer Base and Keyboard Features 1 2 3 4 Using Your Studio Laptop 1 Caps Lock light - Provides the functionality of your desktop...

Setup Guide
Page 27
... controlled by the Dell Travel Remote (an optional device that can be stored in the ExpressCard slot when not in use Digital Persona Personal, click Start → Programs→ DigitalPersona Personal. Backlit Keyboard Brightness Settings - To activate and use ). 6 Fingerprint reader (optional) - Using Your Studio Laptop 7 Keyboard/ Backlit Keyboard (optional) - The optional backlit keyboard provides visibility in...
... controlled by the Dell Travel Remote (an optional device that can be stored in the ExpressCard slot when not in use Digital Persona Personal, click Start → Programs→ DigitalPersona Personal. Backlit Keyboard Brightness Settings - To activate and use ). 6 Fingerprint reader (optional) - Using Your Studio Laptop 7 Keyboard/ Backlit Keyboard (optional) - The optional backlit keyboard provides visibility in...

Setup Guide
Page 37
... the power light is in standby mode. If necessary, install additional memory (See the Service Manual on the Dell Support website at support. If you are : • Power, keyboard, and mouse extension cables. • Too many devices connected to a power strip. • Multiple power... signals. Some possible causes of interference are following the memory installation guidelines (see the Dell Technology Guide on . If the problem persists, see the Service Manual on the keyboard, move the pointer using to resume normal operation. An unwanted signal is successfully communicating ...
... the power light is in standby mode. If necessary, install additional memory (See the Service Manual on the Dell Support website at support. If you are : • Power, keyboard, and mouse extension cables. • Too many devices connected to a power strip. • Multiple power... signals. Some possible causes of interference are following the memory installation guidelines (see the Dell Technology Guide on . If the problem persists, see the Service Manual on the keyboard, move the pointer using to resume normal operation. An unwanted signal is successfully communicating ...

Setup Guide
Page 38
For more information about the type of memory supported by pressing a key on your keyboard or moving your mouse, press the power button for at support.dell.com) to the electrical outlet. End the program: 1. Click Applications. 3. If necessary, uninstall and then reinstall the program. Solving ... the program that the power cable is successfully communicating with your computer, see "Basic Specifications" on page 58. • Run the Dell Diagnostics (see "Dell Diagnostics" on page 42). • Reseat the memory modules (see the Service Manual on the media (CD or DVD). Check the...
For more information about the type of memory supported by pressing a key on your keyboard or moving your mouse, press the power button for at support.dell.com) to the electrical outlet. End the program: 1. Click Applications. 3. If necessary, uninstall and then reinstall the program. Solving ... the program that the power cable is successfully communicating with your computer, see "Basic Specifications" on page 58. • Run the Dell Diagnostics (see "Dell Diagnostics" on page 42). • Reseat the memory modules (see the Service Manual on the media (CD or DVD). Check the...
Setup Guide
Page 39
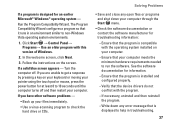
... the program is installed and configured properly. --Verify that the device drivers do not conflict with this version of Windows. 2. Follow the instructions on your keyboard or moving your pointer using the touch pad or mouse, press the power button for an earlier Microsoft® Windows® operating system -
... the program is installed and configured properly. --Verify that the device drivers do not conflict with this version of Windows. 2. Follow the instructions on your keyboard or moving your pointer using the touch pad or mouse, press the power button for an earlier Microsoft® Windows® operating system -

Setup Guide
Page 41
... page 55 for assistance. Possible hard disk drive failure during HDD boot test see "Contacting Dell" on page 55 for assistance. Keyboard failure or loose cable. For help in resolving this problem, please note this system have failed at checkpoint [nnnn]. The computer failed ...to complete the boot routine three consecutive times for the same error see "Contacting Dell" on page 55 for assistance. See ...
... page 55 for assistance. Possible hard disk drive failure during HDD boot test see "Contacting Dell" on page 55 for assistance. Keyboard failure or loose cable. For help in resolving this problem, please note this system have failed at checkpoint [nnnn]. The computer failed ...to complete the boot routine three consecutive times for the same error see "Contacting Dell" on page 55 for assistance. See ...

Setup Guide
Page 47
... Select a keyboard layout and click Next. 5. To access the recovery options, log on . NOTICE: If you may take five or more minutes to complete. The Dell Factory Image Restore welcome screen appears. The restore process begins and may need to select Dell Factory Tools, then Dell Factory Image ...Your Computer. 3. To access the command prompt, type administrator in the User name field, then click OK. 6. Click Dell Factory Image Restore. When the Dell logo appears, press several times to reboot the system. 45 Click Next. The Confirm Data Deletion screen appears. Click Finish ...
... Select a keyboard layout and click Next. 5. To access the recovery options, log on . NOTICE: If you may take five or more minutes to complete. The Dell Factory Image Restore welcome screen appears. The restore process begins and may need to select Dell Factory Tools, then Dell Factory Image ...Your Computer. 3. To access the command prompt, type administrator in the User name field, then click OK. 6. Click Dell Factory Image Restore. When the Dell logo appears, press several times to reboot the system. 45 Click Next. The Confirm Data Deletion screen appears. Click Finish ...

Setup Guide
Page 54
...): • Express Service Code: • Return Material Authorization Number (if provided by Dell support technician): • Operating system and version: • Devices: • Expansion cards: • Are you call more efficiently. Remember to type some commands at the keyboard, relay detailed information during operations, or try other troubleshooting steps possible only at...
...): • Express Service Code: • Return Material Authorization Number (if provided by Dell support technician): • Operating system and version: • Devices: • Expansion cards: • Are you call more efficiently. Remember to type some commands at the keyboard, relay detailed information during operations, or try other troubleshooting steps possible only at...
Setup Guide
Page 65
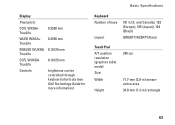
and Canada); 102 (Europe); 105 (Japan); 104 (Brazil) QWERTY/AZERTY/Kanji Touch Pad X/Y position resolution (graphics table mode) Size: Width Height 240 cpi 71.7-mm (2.8-in) sensoractive area 34.0-mm (1.3-in) rectangle 63 Display Pixel pitch: CCFL WXGA+ TrueLife WLED WXGA+ TrueLife RGBLED WUXGA TrueLife CCFL WUXGA TrueLife Controls 0.2550 mm 0.2550 mm 0.19125 mm 0.19125 mm brightness can be controlled through keyboard shortcuts (see Dell Technology Guide for more information) Basic Specifications Keyboard Number of keys Layout 101 (U.S.
and Canada); 102 (Europe); 105 (Japan); 104 (Brazil) QWERTY/AZERTY/Kanji Touch Pad X/Y position resolution (graphics table mode) Size: Width Height 240 cpi 71.7-mm (2.8-in) sensoractive area 34.0-mm (1.3-in) rectangle 63 Display Pixel pitch: CCFL WXGA+ TrueLife WLED WXGA+ TrueLife RGBLED WUXGA TrueLife CCFL WUXGA TrueLife Controls 0.2550 mm 0.2550 mm 0.19125 mm 0.19125 mm brightness can be controlled through keyboard shortcuts (see Dell Technology Guide for more information) Basic Specifications Keyboard Number of keys Layout 101 (U.S.


