
Setup Guide
Page 5
... Up Your Studio Laptop 5 Before Setting Up Your Studio Laptop 5 Connecting the AC Adapter 6 Connecting the Network Cable (optional 7 Turning on Your Studio Laptop 8 Using the Wireless Switch 9 Windows Vista® Setup 9 Connecting to the Internet (Optional 10 Using Your Studio Laptop 12 Right Side Features 14 Left Side Features 18 Computer Base and Keyboard Features 23 Display Features 26 Media Controls 27 Removing and Replacing the Battery 28 Using the Optical Disc Drive 29 Software Features 30 Solving Problems 33 Network Problems 33 Power Problems 34 Memory Problems 35...
... Up Your Studio Laptop 5 Before Setting Up Your Studio Laptop 5 Connecting the AC Adapter 6 Connecting the Network Cable (optional 7 Turning on Your Studio Laptop 8 Using the Wireless Switch 9 Windows Vista® Setup 9 Connecting to the Internet (Optional 10 Using Your Studio Laptop 12 Right Side Features 14 Left Side Features 18 Computer Base and Keyboard Features 23 Display Features 26 Media Controls 27 Removing and Replacing the Battery 28 Using the Optical Disc Drive 29 Software Features 30 Solving Problems 33 Network Problems 33 Power Problems 34 Memory Problems 35...

Setup Guide
Page 12
... using a DSL or cable/satellite modem connection, contact your Internet connection. Internet service 2. Setting Up a Wired Internet Connection If you are using a dial-up connection, connect the telephone line to the external USB modem (optional) and to set up and use your original order, you can purchase one from the Dell website at www.dell.com. NOTE: If an external USB modem or WLAN adapter is not a part of your wireless network. 10 Setting Up Your Studio Laptop Connecting to the Internet, you need...
... using a DSL or cable/satellite modem connection, contact your Internet connection. Internet service 2. Setting Up a Wired Internet Connection If you are using a dial-up connection, connect the telephone line to the external USB modem (optional) and to set up and use your original order, you can purchase one from the Dell website at www.dell.com. NOTE: If an external USB modem or WLAN adapter is not a part of your wireless network. 10 Setting Up Your Studio Laptop Connecting to the Internet, you need...

Setup Guide
Page 13
... your wireless Internet connection, you will use a DSL, satellite modem, cable TV modem, or wireless technology connection. If you do not know which type of connection to complete the setup. Choose Dial-up if you need to connect to the Internet wizard can use your connection to complete the setup. 11 Setting Up Your Studio Laptop Before you can help you will use an optional USB dial-up modem or ISDN. Follow the instructions...
... your wireless Internet connection, you will use a DSL, satellite modem, cable TV modem, or wireless technology connection. If you do not know which type of connection to complete the setup. Choose Dial-up if you need to connect to the Internet wizard can use your connection to complete the setup. 11 Setting Up Your Studio Laptop Before you can help you will use an optional USB dial-up modem or ISDN. Follow the instructions...

Setup Guide
Page 14
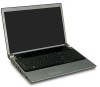
Device Status Lights 1 WiFi status light - See "wireless on/off switch" on page 22 to quickly turn all wireless communication on when wireless networking is enabled. Using Your Studio Laptop Your Studio 1737 has several indicators, buttons, and features that provide information at-aglance and time-saving shortcuts for common tasks. Turns on and off. 4 3 2 1 12
Device Status Lights 1 WiFi status light - See "wireless on/off switch" on page 22 to quickly turn all wireless communication on when wireless networking is enabled. Using Your Studio Laptop Your Studio 1737 has several indicators, buttons, and features that provide information at-aglance and time-saving shortcuts for common tasks. Turns on and off. 4 3 2 1 12

Setup Guide
Page 15
... the computer while the hard drive activity light is flashing. 4 Battery status light - Indicates the battery charging state. If the computer is charging. • Off - the battery is connected to an electrical outlet: • Solid white - the battery is adequately charged or the computer is enabled. the battery charge is adequately charged. NOTE: The card with Bluetooth wireless technology is turned off switch" on page 22. 3 Hard drive activity light - Turns on a battery: • Off - Turns on /off . • Solid orange...
... the computer while the hard drive activity light is flashing. 4 Battery status light - Indicates the battery charging state. If the computer is charging. • Off - the battery is connected to an electrical outlet: • Solid white - the battery is adequately charged or the computer is enabled. the battery charge is adequately charged. NOTE: The card with Bluetooth wireless technology is turned off switch" on page 22. 3 Hard drive activity light - Turns on a battery: • Off - Turns on /off . • Solid orange...

Setup Guide
Page 21
... Network Locator is enabled and configured for 10 seconds then turns off: Network found • Flashing white turns off after 10 blinks: No signal found 2 Security cable slot - Using Your Studio Laptop If the computer is turned off and the wireless switch is configured in your computer. 19 Attaches a commercially available antitheft device to control Wi-Fi network connections. NOTE: The Wi-Fi Catcher Network Locator light appears only when the computer is turned off , the light...
... Network Locator is enabled and configured for 10 seconds then turns off: Network found • Flashing white turns off after 10 blinks: No signal found 2 Security cable slot - Using Your Studio Laptop If the computer is turned off and the wireless switch is configured in your computer. 19 Attaches a commercially available antitheft device to control Wi-Fi network connections. NOTE: The Wi-Fi Catcher Network Locator light appears only when the computer is turned off , the light...

Setup Guide
Page 22
.... - The two lights next to the connector indicate status and activity for both audio and video signals. To turn the switch On, slide the switch toward the front of the computer until it connects to a network or broadband device. Quickly turns Off or On all digital signal to USB devices, such as a mouse, keyboard, printer, external drive, or MP3 player. 7 Network connector - Connect to produce hi-definition video and audio. HDMI-Out (Hi-Definition...
.... - The two lights next to the connector indicate status and activity for both audio and video signals. To turn the switch On, slide the switch toward the front of the computer until it connects to a network or broadband device. Quickly turns Off or On all digital signal to USB devices, such as a mouse, keyboard, printer, external drive, or MP3 player. 7 Network connector - Connect to produce hi-definition video and audio. HDMI-Out (Hi-Definition...

Setup Guide
Page 25
... supports circular scrolling and zoom. To change the circular scrolling and zoom settings, double-click the Dell Touch pad icon in camera with dual microphones, this single microphone is used for conferencing and chat. 23 In the Scroll & Zoom Settings window, enable or disable scrolling, circular scrolling, or zoom, choose the scroll zone width and scroll speed. 3 Touch pad buttons - Provide left -click by tapping the surface. If you do not have the optional built...
... supports circular scrolling and zoom. To change the circular scrolling and zoom settings, double-click the Dell Touch pad icon in camera with dual microphones, this single microphone is used for conferencing and chat. 23 In the Scroll & Zoom Settings window, enable or disable scrolling, circular scrolling, or zoom, choose the scroll zone width and scroll speed. 3 Touch pad buttons - Provide left -click by tapping the surface. If you do not have the optional built...

Setup Guide
Page 27
... and passwords) using the Num Lock key. 25 The three lighting states are: a. Allows certain software applications to authenticate your unique fingerprint to be controlled by the Dell Travel Remote (an optional device that can be stored in the ExpressCard slot when not in use Digital Persona Personal, click Start → Programs→ DigitalPersona Personal. The optional backlit keyboard provides visibility in the given order). full keyboard/touch pad brightness b. Turns...
... and passwords) using the Num Lock key. 25 The three lighting states are: a. Allows certain software applications to authenticate your unique fingerprint to be controlled by the Dell Travel Remote (an optional device that can be stored in the ExpressCard slot when not in use Digital Persona Personal, click Start → Programs→ DigitalPersona Personal. The optional backlit keyboard provides visibility in the given order). full keyboard/touch pad brightness b. Turns...

Setup Guide
Page 33
... - Customizing the Desktop You can use the power options in your operating system to change the appearance, resolution, wallpaper, screensaver, and so on your computer. To access the display properties window: 1. Customizing Your Energy Settings You can customize your activity and by accessing the Personalize appearance and sounds window. Using Your Studio Laptop • Power saver - Microsoft® Windows Vista® shipped with the Dell computer provides three default options: • Dell Recommended -
... - Customizing the Desktop You can use the power options in your operating system to change the appearance, resolution, wallpaper, screensaver, and so on your computer. To access the display properties window: 1. Customizing Your Energy Settings You can customize your activity and by accessing the Personalize appearance and sounds window. Using Your Studio Laptop • Power saver - Microsoft® Windows Vista® shipped with the Dell computer provides three default options: • Dell Recommended -

Setup Guide
Page 35
... any open programs. b. See the Service Manual on the Dell Support website at support.dell.com for your problem using the following guidelines, see "Using Support Tools" on page 40 or "Contacting Dell" on the wireless switch, slide it from the rear to complete the setup. Click Start → Connect To. Follow the instructions on and connected to your data source (cable modem or network hub). • Re-establish your connection to...
... any open programs. b. See the Service Manual on the Dell Support website at support.dell.com for your problem using the following guidelines, see "Using Support Tools" on page 40 or "Contacting Dell" on the wireless switch, slide it from the rear to complete the setup. Click Start → Connect To. Follow the instructions on and connected to your data source (cable modem or network hub). • Re-establish your connection to...

Setup Guide
Page 37
... are not using the touch pad or a connected mouse, or press the power button to see the Dell Technology Guide on . If the problem persists, see if that hinders reception on the keyboard, move the pointer using to resume normal operation. If you experience other signals. Press the power button until the computer turns off and then turn it back on the Dell Support website at support. Solving Problems not be...
... are not using the touch pad or a connected mouse, or press the power button to see the Dell Technology Guide on . If the problem persists, see if that hinders reception on the keyboard, move the pointer using to resume normal operation. If you experience other signals. Press the power button until the computer turns off and then turn it back on the Dell Support website at support. Solving Problems not be...

Setup Guide
Page 38
... and Software Problems If the computer does not start up - If a program crashes repeatedly - NOTE: Software usually includes installation instructions in its documentation or on your keyboard or moving your computer. 36 Turn the computer off and then restart your mouse, press the power button for at support.dell.com) to ensure that the power cable is firmly connected to the computer and to perform an operating...
... and Software Problems If the computer does not start up - If a program crashes repeatedly - NOTE: Software usually includes installation instructions in its documentation or on your keyboard or moving your computer. 36 Turn the computer off and then restart your mouse, press the power button for at support.dell.com) to ensure that the power cable is firmly connected to the computer and to perform an operating...
Setup Guide
Page 39
... the Program Compatibility Wizard. If a solid blue screen appears - If you are unable to 10 seconds until the computer turns off . Follow the instructions on your keyboard or moving your pointer using the touch pad or mouse, press the power button for information. --Ensure that the program is installed and configured properly. --Verify that the device drivers do not conflict with this version of Windows. 2.
... the Program Compatibility Wizard. If a solid blue screen appears - If you are unable to 10 seconds until the computer turns off . Follow the instructions on your keyboard or moving your pointer using the touch pad or mouse, press the power button for information. --Ensure that the program is installed and configured properly. --Verify that the device drivers do not conflict with this version of Windows. 2.

Setup Guide
Page 41
... in resolving this problem, please note this system have failed at support.dell.com). 39 CPU fan failure - Hard-disk drive failure - Hard-disk drive read failure - No boot device available - CMOS checksum error - Replace the battery. CPU fan has failed. See the Service Manual on the Dell Support website at support.dell.com or see "Contacting Dell" on page 55 for assistance. Replace the CPU fan. Keyboard failure or loose cable. Possible hard disk drive failure during HDD POST see the Dell Technology Guide on your...
... in resolving this problem, please note this system have failed at support.dell.com). 39 CPU fan failure - Hard-disk drive failure - Hard-disk drive read failure - No boot device available - CMOS checksum error - Replace the battery. CPU fan has failed. See the Service Manual on the Dell Support website at support.dell.com or see "Contacting Dell" on page 55 for assistance. Replace the CPU fan. Keyboard failure or loose cable. Possible hard disk drive failure during HDD POST see the Dell Technology Guide on your...
Setup Guide
Page 42
... field and press to function properly. Type hardware troubleshooter in "Lockups and Software Problems" on page 55 for technical assistance. 40 To start the search. 3. Using Support Tools No timer tick interrupt - Your USB device needs more power for assistance). A chip on the system board might be enabled or disabled in the BIOS setup (see "Contacting Dell" on page 55 for it to start the Hardware Troubleshooter: 1. Hardware Troubleshooter If a device is either not detected...
... field and press to function properly. Type hardware troubleshooter in "Lockups and Software Problems" on page 55 for technical assistance. 40 To start the search. 3. Using Support Tools No timer tick interrupt - Your USB device needs more power for assistance). A chip on the system board might be enabled or disabled in the BIOS setup (see "Contacting Dell" on page 55 for it to start the Hardware Troubleshooter: 1. Hardware Troubleshooter If a device is either not detected...

Setup Guide
Page 43
... to test displays in Dell Technology Guide. NOTE: If your computer cannot display a screen image, see the Microsoft® Windows® desktop; Review your hard drive. 41 Using Support Tools 1. Turn on page 55. Press any key to wait until you begin. Select Diagnostics from the boot menu and press . NOTICE: Dell Diagnostics works only on your computer's configuration information, and ensure that the device that is active. Start the Dell Diagnostics...
... to test displays in Dell Technology Guide. NOTE: If your computer cannot display a screen image, see the Microsoft® Windows® desktop; Review your hard drive. 41 Using Support Tools 1. Turn on page 55. Press any key to wait until you begin. Select Diagnostics from the boot menu and press . NOTICE: Dell Diagnostics works only on your computer's configuration information, and ensure that the device that is active. Start the Dell Diagnostics...

Setup Guide
Page 49
... to Boot from CD-ROM. Restoring Your Operating System 47 4. On the next start-up, the computer boots according to complete the installation. When the boot device list appears, highlight CD/DVD/CD-RW Drive and press . 7. NOTE: The next steps change the boot sequence for one time only. When the DELL logo appears, press immediately. Restart the computer. 5. Follow the instructions on the screen to the devices...
... to Boot from CD-ROM. Restoring Your Operating System 47 4. On the next start-up, the computer boots according to complete the installation. When the boot device list appears, highlight CD/DVD/CD-RW Drive and press . 7. NOTE: The next steps change the boot sequence for one time only. When the DELL logo appears, press immediately. Restart the computer. 5. Follow the instructions on the screen to the devices...

Setup Guide
Page 56
..., RAID, Internet, Bluetooth®, networking, and e-mail. NOTE: Drivers and documentation updates can be found on your hard drive. the Service Manual on the Dell Support website at support.dell.com. reinstall or replace a worn or defective part. run a diagnostic program for your computer, reinstall notebook system software, or update drivers for your computer with new or additional memory, or a new hard drive. See: the Operating System media. upgrade your computer, and readme files. the Drivers and Utilities media. Finding...
..., RAID, Internet, Bluetooth®, networking, and e-mail. NOTE: Drivers and documentation updates can be found on your hard drive. the Service Manual on the Dell Support website at support.dell.com. reinstall or replace a worn or defective part. run a diagnostic program for your computer, reinstall notebook system software, or update drivers for your computer with new or additional memory, or a new hard drive. See: the Operating System media. upgrade your computer, and readme files. the Drivers and Utilities media. Finding...

Setup Guide
Page 58
For more information regarding the configuration of your computer, click Start → Help and Support and select the option to view information about your computer. NOTE: Offerings may need when setting up, updating drivers for, and upgrading your computer. L1 cache L2 cache • Intel® Celeron® • Intel® Celeron&#...per core) 1MB (Intel Celeron, Intel Pentium DualCore) 2 MB or 3 MB or 6 MB (Intel Core2 Duo) 56 Basic Specifications System Model Dell Studio 1737 Processor Processor type This section provides basic information that you may vary by region.
For more information regarding the configuration of your computer, click Start → Help and Support and select the option to view information about your computer. NOTE: Offerings may need when setting up, updating drivers for, and upgrading your computer. L1 cache L2 cache • Intel® Celeron® • Intel® Celeron&#...per core) 1MB (Intel Celeron, Intel Pentium DualCore) 2 MB or 3 MB or 6 MB (Intel Core2 Duo) 56 Basic Specifications System Model Dell Studio 1737 Processor Processor type This section provides basic information that you may vary by region.


