
Owner's Manual
Page 2
... used in connection with any manner whatsoever without notice. © 2005 Dell Inc. Microsoft and Windows are made by the manufacturer and not by Dell. Other trademarks and trade names may be used in this text: Dell , the DELL logo, Dimension, OptiPlex, Dell Precision, Latitude, Inspiron, DellNet, PowerApp, PowerEdge, PowerConnect, and PowerVault ... that helps you how to either the entities claiming the marks and names or their products. is a registered trademark of Microsoft Corporation; DLP and Texas Instruments are trademarks of your projector. May 2005 Rev.
... used in connection with any manner whatsoever without notice. © 2005 Dell Inc. Microsoft and Windows are made by the manufacturer and not by Dell. Other trademarks and trade names may be used in this text: Dell , the DELL logo, Dimension, OptiPlex, Dell Precision, Latitude, Inspiron, DellNet, PowerApp, PowerEdge, PowerConnect, and PowerVault ... that helps you how to either the entities claiming the marks and names or their products. is a registered trademark of Microsoft Corporation; DLP and Texas Instruments are trademarks of your projector. May 2005 Rev.

Owner's Manual
Page 3
Contents 1 Your Dell Projector About Your Projector 6 2 Connecting Your Projector Connecting to a Computer 8 Connecting to a DVD Player 8 Connecting a DVD Player with an S-video Cable . . 8 Connecting a DVD Player with a Composite Cable . 9 Connecting a DVD Player with a Component Cable 9 3 Using Your Projector Turning Your Projector On 11 Turning Your Projector Off 11 Adjusting the Projected Image 12 Raising the Projector Height 12 Lowering the Projector Height 12 Adjusting the Projector Zoom and Focus 13 Adjusting Projection Image Size 14 Using the Control Panel 15 Contents 3
Contents 1 Your Dell Projector About Your Projector 6 2 Connecting Your Projector Connecting to a Computer 8 Connecting to a DVD Player 8 Connecting a DVD Player with an S-video Cable . . 8 Connecting a DVD Player with a Composite Cable . 9 Connecting a DVD Player with a Component Cable 9 3 Using Your Projector Turning Your Projector On 11 Turning Your Projector Off 11 Adjusting the Projected Image 12 Raising the Projector Height 12 Lowering the Projector Height 12 Adjusting the Projector Zoom and Focus 13 Adjusting Projection Image Size 14 Using the Control Panel 15 Contents 3

Owner's Manual
Page 4
Only 61 NOM Information (Mexico Only 62 8 Glossary 9 Index 4 Contents Using the Remote Control 16 Using the On-Screen Display 18 Image Settings 18 Audio Menu 20 Management Menu 20 Language Menu 21 Factory Reset Menu 21 Computer Source Menu 22 Video Source Menu 22 4 Troubleshooting Your Projector Self-diagnostic for Video 26 Changing the Lamp 26 5 Specifications 6 Contacting Dell 7 Appendix: Regulatory Notices FCC Notices (U.S.
Only 61 NOM Information (Mexico Only 62 8 Glossary 9 Index 4 Contents Using the Remote Control 16 Using the On-Screen Display 18 Image Settings 18 Audio Menu 20 Management Menu 20 Language Menu 21 Factory Reset Menu 21 Computer Source Menu 22 Video Source Menu 22 4 Troubleshooting Your Projector Self-diagnostic for Video 26 Changing the Lamp 26 5 Specifications 6 Contacting Dell 7 Appendix: Regulatory Notices FCC Notices (U.S.

Owner's Manual
Page 5
Package Contents 1.8m power cord (3.0m in Americas) 1.8m M1 to D-sub/USB cable 2.0m S-video cable 1.8m Composite Video cable 1.8m RCA to Audio cable 1.8m mini pin to mini pin cable Batteries (2) Remote control Your Dell Projector 5 1 Your Dell Projector Your projector comes with all the items, and contact Dell if anything is missing. Ensure that you have all the items shown below.
Package Contents 1.8m power cord (3.0m in Americas) 1.8m M1 to D-sub/USB cable 2.0m S-video cable 1.8m Composite Video cable 1.8m RCA to Audio cable 1.8m mini pin to mini pin cable Batteries (2) Remote control Your Dell Projector 5 1 Your Dell Projector Your projector comes with all the items, and contact Dell if anything is missing. Ensure that you have all the items shown below.

Owner's Manual
Page 6
www.dell.com | support.dell.com Package Contents (continued) Documentation Carrying case About Your Projector 1 Control panel 2 Elevator button 3 Remote control receiver 4 Lens 5 Focus ring 6 Zoom tab 6 Your Dell Projector
www.dell.com | support.dell.com Package Contents (continued) Documentation Carrying case About Your Projector 1 Control panel 2 Elevator button 3 Remote control receiver 4 Lens 5 Focus ring 6 Zoom tab 6 Your Dell Projector

Owner's Manual
Page 9
Connecting a DVD Player with a Composite Cable 1 Power cord 2 Composite video cable Connecting a DVD Player with a Component Cable 1 Power cord 2 M1-A to HDTV cable NOTE: The M1-A to HDTV cable is not provided by Dell. Connecting Your Projector 9 Consult a professional installer for the cable.
Connecting a DVD Player with a Composite Cable 1 Power cord 2 Composite video cable Connecting a DVD Player with a Component Cable 1 Power cord 2 M1-A to HDTV cable NOTE: The M1-A to HDTV cable is not provided by Dell. Connecting Your Projector 9 Consult a professional installer for the cable.

Owner's Manual
Page 10
www.dell.com | support.dell.com 10 Connecting Your Projector
www.dell.com | support.dell.com 10 Connecting Your Projector

Owner's Manual
Page 11
...(computer, DVD player, etc.). The cooling fans continue to locate the power button). NOTE: If you have multiple sources connected to the projector, press the Source button on the remote control or control panel to select the desired source. the message disappears after 5 seconds. If the... page 7. 3 Press the power button (see "Using the Control Panel" on your source. The Dell logo displays for signal..." Turning Your Projector Off NOTICE: Do not unplug the projector before you turn on the control panel or ignore the message; The power button light blinks green until pressed. 1 ...
...(computer, DVD player, etc.). The cooling fans continue to locate the power button). NOTE: If you have multiple sources connected to the projector, press the Source button on the remote control or control panel to select the desired source. the message disappears after 5 seconds. If the... page 7. 3 Press the power button (see "Using the Control Panel" on your source. The Dell logo displays for signal..." Turning Your Projector Off NOTICE: Do not unplug the projector before you turn on the control panel or ignore the message; The power button light blinks green until pressed. 1 ...

Owner's Manual
Page 12
Lowering the Projector Height 1 Press the elevator button. 2 Lower the projector, and then release the button to fine-tune the display angle. www.dell.com | support.dell.com Adjusting the Projected Image Raising the Projector Height 1 Press the elevator button. 2 Raise the projector to the desired display angle, and then release the button to lock the elevator foot into position. 3 Use the tilt adjustment wheel to lock the elevator foot into position. 1 Elevator button 2 Elevator foot 3 Tilt adjustment wheel 12 Using Your Projector
Lowering the Projector Height 1 Press the elevator button. 2 Lower the projector, and then release the button to fine-tune the display angle. www.dell.com | support.dell.com Adjusting the Projected Image Raising the Projector Height 1 Press the elevator button. 2 Raise the projector to the desired display angle, and then release the button to lock the elevator foot into position. 3 Use the tilt adjustment wheel to lock the elevator foot into position. 1 Elevator button 2 Elevator foot 3 Tilt adjustment wheel 12 Using Your Projector
Owner's Manual
Page 13
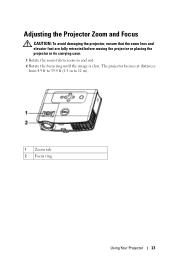
The projector focuses at distances from 4.9 ft to 39.4 ft (1.5 m to zoom in and out. 2 Rotate the focus ring until the image is clear. Adjusting the Projector Zoom and Focus CAUTION: To avoid damaging the projector, ensure that the zoom lens and elevator foot are fully retracted before moving the projector or placing the projector in its carrying case. 1 Rotate the zoom tab to 12 m). 1 Zoom tab 2 Focus ring Using Your Projector 13
The projector focuses at distances from 4.9 ft to 39.4 ft (1.5 m to zoom in and out. 2 Rotate the focus ring until the image is clear. Adjusting the Projector Zoom and Focus CAUTION: To avoid damaging the projector, ensure that the zoom lens and elevator foot are fully retracted before moving the projector or placing the projector in its carrying case. 1 Rotate the zoom tab to 12 m). 1 Zoom tab 2 Focus ring Using Your Projector 13

Owner's Manual
Page 14
....2' (9.8m) 295.5" (750.6cm) 253.6" (644.3cm) 236.4" X 177.3" (600.5cmX 450.3cm) 202.9" X 152.2" (515.4cm X 386.6cm) 39.4' (12.0m) 14 Using Your Projector www.dell.com | support.dell.com Adjusting Projection Image Size Screen (Diagonal) Max.
....2' (9.8m) 295.5" (750.6cm) 253.6" (644.3cm) 236.4" X 177.3" (600.5cmX 450.3cm) 202.9" X 152.2" (515.4cm X 386.6cm) 39.4' (12.0m) 14 Using Your Projector www.dell.com | support.dell.com Adjusting Projection Image Size Screen (Diagonal) Max.

Owner's Manual
Page 15
.... Press to the input source. Press to adjust image distortion caused by tilting the projector. (±16 degrees) Press to synchronize the projector to activate the OSD. Using Your Projector 15 Use the directional keys and Menu button to navigate through Analog RGB, Composite, Component... sources are connected to toggle through the OSD. For more information, see "Turning Your Projector On" on page 11 and "Turning Your Projector Off" on -screen display (OSD) is displayed. Press to the projector. Using the Control Panel 1 Power 2 Source 3 Keystone adjustment 4 Resync 5 Menu Turn...
.... Press to the input source. Press to adjust image distortion caused by tilting the projector. (±16 degrees) Press to synchronize the projector to activate the OSD. Using Your Projector 15 Use the directional keys and Menu button to navigate through Analog RGB, Composite, Component... sources are connected to toggle through the OSD. For more information, see "Turning Your Projector On" on page 11 and "Turning Your Projector Off" on -screen display (OSD) is displayed. Press to the projector. Using the Control Panel 1 Power 2 Source 3 Keystone adjustment 4 Resync 5 Menu Turn...

Owner's Manual
Page 16
... light is solid orange, replace the lamp. Using the Remote Control 16 Using Your Projector The display automatically shuts down . If the LAMP light is blinking orange, a projector fan has failed and the projector automatically shuts down. www.dell.com | support.dell.com 6 TEMP warning light 7 LAMP warning light 8 Enter 9 Keystone adjustment 10 Up and...
... light is solid orange, replace the lamp. Using the Remote Control 16 Using Your Projector The display automatically shuts down . If the LAMP light is blinking orange, a projector fan has failed and the projector automatically shuts down. www.dell.com | support.dell.com 6 TEMP warning light 7 LAMP warning light 8 Enter 9 Keystone adjustment 10 Up and...

Owner's Manual
Page 17
...Press to increase the volume. The mouse function is enabled using the M1 cable to decrease the volume. Using Your Projector 17 Press to connect your computer and the projector. Pressing the Video Mode button once will switch between PC mode, Movie mode, Game Mode, sRGB, or User ...control at the screen, press and hold the laser button to control mouse movement. Mouse right click. Press to previous page. The Dell 3400MP Micro-projector has preset configurations that are optimized for user to next page. Pressing the Video Mode button again will show the current display mode....
...Press to increase the volume. The mouse function is enabled using the M1 cable to decrease the volume. Using Your Projector 17 Press to connect your computer and the projector. Pressing the Video Mode button once will switch between PC mode, Movie mode, Game Mode, sRGB, or User ...control at the screen, press and hold the laser button to control mouse movement. Mouse right click. Press to previous page. The Dell 3400MP Micro-projector has preset configurations that are optimized for user to next page. Pressing the Video Mode button again will show the current display mode....

Owner's Manual
Page 18
Using the On-Screen Display The projector has a multi-language On-Screen Display (OSD) that can be displayed with or without an input source present. When an item is displayed. Use or ... Enter button on the control panel or the remote control. Image Settings 18 Using Your Projector In the Main Menu, press or to select a submenu. Press to synchronize the projector to tilting the projector. www.dell.com | support.dell.com 19 Left click 20 Auto keystone 21 Source 22 Auto adjust Mouse left click Press...
Using the On-Screen Display The projector has a multi-language On-Screen Display (OSD) that can be displayed with or without an input source present. When an item is displayed. Use or ... Enter button on the control panel or the remote control. Image Settings 18 Using Your Projector In the Main Menu, press or to select a submenu. Press to synchronize the projector to tilting the projector. www.dell.com | support.dell.com 19 Left click 20 Auto keystone 21 Source 22 Auto adjust Mouse left click Press...

Owner's Manual
Page 19
...using one of the image. VGA cable and the computer has a resolution less than XGA - Use 16:9 or 4:3 if you adjust the settings for White Intensity or Degamma, the projector automatically switches to adjust the brightness of the following : - DEGAMMA-Adjust between the ...settings). COLOR SETTING-Manually adjust red, green, and blue color. AUTO KEYSTONE-Auto adjust the image distortion by tilting the projector (±16 degrees). Computer resolution greater than XGA (1024 x 768) - Component cable (1080i or 720p) VIDEO MODE-Select a mode to control the degree of difference...
...using one of the image. VGA cable and the computer has a resolution less than XGA - Use 16:9 or 4:3 if you adjust the settings for White Intensity or Degamma, the projector automatically switches to adjust the brightness of the following : - DEGAMMA-Adjust between the ...settings). COLOR SETTING-Manually adjust red, green, and blue color. AUTO KEYSTONE-Auto adjust the image distortion by tilting the projector (±16 degrees). Computer resolution greater than XGA (1024 x 768) - Component cable (1080i or 720p) VIDEO MODE-Select a mode to control the degree of difference...

Owner's Manual
Page 20
...is the amount of the OSD on when it automatically finds the next available input signal. After two hours, the projector turns off the lamp. www.dell.com | support.dell.com Audio Menu VOLUME-Press to decrease the volume and to lock the current input signal. POWER SAVING-Select Yes... to set time, the projector enters power saving mode and turns off and you install a new lamp, select Yes to wait ...
...is the amount of the OSD on when it automatically finds the next available input signal. After two hours, the projector turns off the lamp. www.dell.com | support.dell.com Audio Menu VOLUME-Press to decrease the volume and to lock the current input signal. POWER SAVING-Select Yes... to set time, the projector enters power saving mode and turns off and you install a new lamp, select Yes to wait ...

Owner's Manual
Page 21
...-Select On to its factory default settings. Factory Reset Menu Factory Reset --Select Yes to reset the projector to set one password for the OSD. Using Your Projector 21 CHANGE PASSWORD-Press to use the projector at normal power level (156 Watts). ECO MODE-Select On to change the password as your preference...
...-Select On to its factory default settings. Factory Reset Menu Factory Reset --Select Yes to reset the projector to set one password for the OSD. Using Your Projector 21 CHANGE PASSWORD-Press to use the projector at normal power level (156 Watts). ECO MODE-Select On to change the password as your preference...

Owner's Manual
Page 22
... the bars. If you experience an unstable or flickering image, use Frequency control to increase the amount of green in the image. 22 Using Your Projector POSITION-Press to adjust the vertical position of the image down and to adjust the vertical position of red in the image and to match... of color in the image. If you see a vertical flickering bar, use the Tracking to a computer. This is only available connected to correct it. www.dell.com | support.dell.com Computer Source Menu NOTE: This menu is a coarse adjustment.
... the bars. If you experience an unstable or flickering image, use Frequency control to increase the amount of green in the image. 22 Using Your Projector POSITION-Press to adjust the vertical position of the image down and to adjust the vertical position of red in the image and to match... of color in the image. If you see a vertical flickering bar, use the Tracking to a computer. This is only available connected to correct it. www.dell.com | support.dell.com Computer Source Menu NOTE: This menu is a coarse adjustment.

Owner's Manual
Page 23
... page 26"). • Run Self-diagnostic test. Ensure that the lens cap is removed and the projector turned on page 26. Troubleshooting Your Projector 23 If the problem persists, contact Dell. If you experience problems with your documentation. • Ensure that the lamp is enabled. See "Self-diagnostic for Video" on . • Ensure... Solution • Ensure that the colors of the connectors are not bent or broken. • Ensure that all the cables are securely connected. 4 Troubleshooting Your Projector If you are using a Dell portable computer, press .
... page 26"). • Run Self-diagnostic test. Ensure that the lens cap is removed and the projector turned on page 26. Troubleshooting Your Projector 23 If the problem persists, contact Dell. If you experience problems with your documentation. • Ensure that the lamp is enabled. See "Self-diagnostic for Video" on . • Ensure... Solution • Ensure that the colors of the connectors are not bent or broken. • Ensure that all the cables are securely connected. 4 Troubleshooting Your Projector If you are using a Dell portable computer, press .


