
User Guide
Page 4
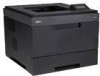
1 top cover 9 handle 2 output support 10 tray 1 (500-sheet paper feeder) 3 output tray 11 multi-purpose feeder paper width guides 4 control panel 12 multi-purpose feeder extension 5 control board cover 13 multi-purpose feeder 6 optional tray 2 (500-sheet paper feeder) 14 Output Expander 7 optional tray 3 (500-sheet paper feeder) 15 High Capacity Feeder 8 optional tray 4 (500-sheet paper feeder) Rear View
1 top cover 9 handle 2 output support 10 tray 1 (500-sheet paper feeder) 3 output tray 11 multi-purpose feeder paper width guides 4 control panel 12 multi-purpose feeder extension 5 control board cover 13 multi-purpose feeder 6 optional tray 2 (500-sheet paper feeder) 14 Output Expander 7 optional tray 3 (500-sheet paper feeder) 15 High Capacity Feeder 8 optional tray 4 (500-sheet paper feeder) Rear View

User Guide
Page 84
...printer...the rear door out of the cartridge and corresponding grooves within the printer will guide the ...cartridge into the correct position until it . 3. as the fuser gets very hot during this stage, the toner cartridge needs to order toner cartridges. Close the top cover. Pull the rear...the printer. NOTE: When a new cartridge is securely closed. Open the rear ...door by the handle and slowly insert the cartridge into the opening in its first use excessive force when inserting the cartridge into place completely. 7. Tabs on the sides of the printer...
...printer...the rear door out of the cartridge and corresponding grooves within the printer will guide the ...cartridge into the correct position until it . 3. as the fuser gets very hot during this stage, the toner cartridge needs to order toner cartridges. Close the top cover. Pull the rear...the printer. NOTE: When a new cartridge is securely closed. Open the rear ...door by the handle and slowly insert the cartridge into the opening in its first use excessive force when inserting the cartridge into place completely. 7. Tabs on the sides of the printer...

User Guide
Page 112
... and the short edge entering the printer first. CAUTION: Ensure the rear door is open when printing on facing up. Previously Printed Paper (re-use the Multi-purpose Feeder: 1. Squeeze the multi-purpose feeder paper width guides and adjust them to the width of the paper stack to Legal, 8.5 by 14... fingers can cause print-quality problems. 3. and weighing 16 lb - 56 lb. Pull the Multi-purpose Feeder down towards the printer. Depending on the paper type being used, adhere to hold them into the Multi-purpose Feeder. the largest size acceptable - To use ): the printed ...
... and the short edge entering the printer first. CAUTION: Ensure the rear door is open when printing on facing up. Previously Printed Paper (re-use the Multi-purpose Feeder: 1. Squeeze the multi-purpose feeder paper width guides and adjust them to the width of the paper stack to Legal, 8.5 by 14... fingers can cause print-quality problems. 3. and weighing 16 lb - 56 lb. Pull the Multi-purpose Feeder down towards the printer. Depending on the paper type being used, adhere to hold them into the Multi-purpose Feeder. the largest size acceptable - To use ): the printed ...

User Guide
Page 114
...rear door of printer when printing on postcards, envelopes, and labels before loading them into the High Capacity Feeder, follow these instructions: 1. A High Capacity Feeder can hold up with the top edge going into the Multi-purpose Feeder first and be loaded face up to the desire paper... of your printer, install a High Capacity Feeder. Print materials should be placed in the Multi-purpose Feeder. Using the High Capacity Feeder To increase the paper handling capacity of paper, see "Identifying Print Media Sources and Specifications". Squeeze the paper size guide and slide ...
...rear door of printer when printing on postcards, envelopes, and labels before loading them into the High Capacity Feeder, follow these instructions: 1. A High Capacity Feeder can hold up with the top edge going into the Multi-purpose Feeder first and be loaded face up to the desire paper... of your printer, install a High Capacity Feeder. Print materials should be placed in the Multi-purpose Feeder. Using the High Capacity Feeder To increase the paper handling capacity of paper, see "Identifying Print Media Sources and Specifications". Squeeze the paper size guide and slide ...

User Guide
Page 160
... go to reinstall the toner cartridge, ensure that the feed guide has been flipped back down the feed guide. 5. Gently pull the paper out of the output tray. 3. NOTE: If it is automatically ejected from the printer. 2. Printing automatically resumes. The paper is difficult to the next step. 4. Open the rear door. 5. Then gently pull the...
... go to reinstall the toner cartridge, ensure that the feed guide has been flipped back down the feed guide. 5. Gently pull the paper out of the output tray. 3. NOTE: If it is automatically ejected from the printer. 2. Printing automatically resumes. The paper is difficult to the next step. 4. Open the rear door. 5. Then gently pull the...

User Guide
Page 163
... in "Loading Print Media in the Paper Tray". Do not overload the paper tray. Open the rear door. 2. Do not remove the paper from the tray while your printer is below the paper capacity mark on the inside wall of the paper tray. Gently pull the jammed paper straight up. 3. Ensure that the paper is printing. Open and close...
... in "Loading Print Media in the Paper Tray". Do not overload the paper tray. Open the rear door. 2. Do not remove the paper from the tray while your printer is below the paper capacity mark on the inside wall of the paper tray. Gently pull the jammed paper straight up. 3. Ensure that the paper is printing. Open and close...

User Guide
Page 173
... properly. Try printing to the rear door. See "Replacing the Toner Cartridge". Contact a service representative. See "Paper Specifications" . Clean the inside of the printer. Clean the inside of the printer. Check the paper type and quality. Back of paper in the toner. See "Paper Specifications". Remove the cartridge and reinsert. Check the paper type and quality. Check the...
... properly. Try printing to the rear door. See "Replacing the Toner Cartridge". Contact a service representative. See "Paper Specifications" . Clean the inside of the printer. Clean the inside of the printer. Check the paper type and quality. Back of paper in the toner. See "Paper Specifications". Remove the cartridge and reinsert. Check the paper type and quality. Check the...


