
RS232 Command Line Interface Guide
Page 2
... Firstly) Enter the following code: 0xbe, 0xef, 0x10, 0x05, 0x00, 0xc6, 0xff, 0x11, 0x11, 0x01, 0x00, 0x01 Header [H] ==> Fixed, "be 0x01. Control Command Syntax (From PC to Value, "06 (Low Byte), 00 (High Byte)". CRC16 [CRC] ==> CRC value, "c6 (Low Byte), ff (High Byte)" MsgID [ID] ==> Fixed, "11 11" MsgSize [SoM...
... Firstly) Enter the following code: 0xbe, 0xef, 0x10, 0x05, 0x00, 0xc6, 0xff, 0x11, 0x11, 0x01, 0x00, 0x01 Header [H] ==> Fixed, "be 0x01. Control Command Syntax (From PC to Value, "06 (Low Byte), 00 (High Byte)". CRC16 [CRC] ==> CRC value, "c6 (Low Byte), ff (High Byte)" MsgID [ID] ==> Fixed, "11 11" MsgSize [SoM...

User's Guide
Page 38
... screen to activate the Wireless Display, USB Display, and USB Viewer. AUTO ADJUST Auto Adjust automatically adjusts the projector's Horizontal, Vertical, Frequency, and Tracking in PC mode. 38 Using Your Projector WIRELESS/USB-Press to Go (PtG) Installation" on page 57. NOTE: The Wireless/USB can be used after the "Wireless...
... screen to activate the Wireless Display, USB Display, and USB Viewer. AUTO ADJUST Auto Adjust automatically adjusts the projector's Horizontal, Vertical, Frequency, and Tracking in PC mode. 38 Using Your Projector WIRELESS/USB-Press to Go (PtG) Installation" on page 57. NOTE: The Wireless/USB can be used after the "Wireless...

User's Guide
Page 41
... menu provides the following options: COLOR TEMPERATURE-Allows you to set the projector dynamic aperture. The options are: Off, Dynamic, and Auto. IMAGE SETTINGS (IN PC MODE)-Select and press to activate image settings. NOTE: If you to select the color space. IMAGE SETTINGS (IN VIDEO MODE)-Select and press to...
... menu provides the following options: COLOR TEMPERATURE-Allows you to set the projector dynamic aperture. The options are: Off, Dynamic, and Auto. IMAGE SETTINGS (IN PC MODE)-Select and press to activate image settings. NOTE: If you to select the color space. IMAGE SETTINGS (IN VIDEO MODE)-Select and press to...
User's Guide
Page 43
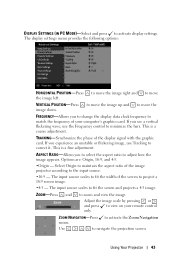
... right and to move the FREQUENCY-Allows you see a vertical flickering wave, use Tracking to activate display settings. This is a coarse adjustment. DISPLAY SETTINGS (IN PC MODE)-Select and press to correct it.
... right and to move the FREQUENCY-Allows you see a vertical flickering wave, use Tracking to activate display settings. This is a coarse adjustment. DISPLAY SETTINGS (IN PC MODE)-Select and press to correct it.

User's Guide
Page 102
...the OSD Image Settings of the Advanced Settings tab. • Use Test Pattern in PC Mode only). b Verify that the colors of the test pattern are correct. 102 Troubleshooting Your Projector For a Dell computer, see your computer. Problem (continued) Possible Solution (continued) Partial, scrolling, ...or incorrectly displayed image 1 Press the Auto Adjust button on the remote control or the control panel. 2 If you are using a Dell™ portable computer, set the signal type to Full HD (1920 x 1080): a Right-click the unused portion of your Microsoft® Windows...
...the OSD Image Settings of the Advanced Settings tab. • Use Test Pattern in PC Mode only). b Verify that the colors of the test pattern are correct. 102 Troubleshooting Your Projector For a Dell computer, see your computer. Problem (continued) Possible Solution (continued) Partial, scrolling, ...or incorrectly displayed image 1 Press the Auto Adjust button on the remote control or the control panel. 2 If you are using a Dell™ portable computer, set the signal type to Full HD (1920 x 1080): a Right-click the unused portion of your Microsoft® Windows...
User's Guide
Page 112
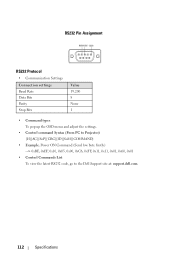
RS232 Pin Assignment RS232 Protocol • Communication Settings Connection settings Baud Rate Data Bits Parity Stop Bits Value 19,200 8 None 1 • Command types To pop up the OSD menu and adjust the settings. • Control command Syntax (From PC to Projector) [H][AC][SoP][CRC][ID][SoM][COMMAND] • Example: Power ON Command (Send low byte firstly) --> 0xBE, 0xEF, 0x10, 0x05, 0x00, 0xC6, 0xFF, 0x11, 0x11, 0x01, 0x00, 0x01 • Control Commands List To view the latest RS232 code, go to the Dell Support site at: support.dell.com. 112 Specifications
RS232 Pin Assignment RS232 Protocol • Communication Settings Connection settings Baud Rate Data Bits Parity Stop Bits Value 19,200 8 None 1 • Command types To pop up the OSD menu and adjust the settings. • Control command Syntax (From PC to Projector) [H][AC][SoP][CRC][ID][SoM][COMMAND] • Example: Power ON Command (Send low byte firstly) --> 0xBE, 0xEF, 0x10, 0x05, 0x00, 0xC6, 0xFF, 0x11, 0x11, 0x01, 0x00, 0x01 • Control Commands List To view the latest RS232 code, go to the Dell Support site at: support.dell.com. 112 Specifications
