
Owner's Manual
Page 3
... in Technical Data and Computer Software clause at DFARS 252.227-7013 and in this text: Dell and the DELL logo are registered trademarks of Dell Inc.; Microsoft and Windows are trademarks of Microsoft Corporation. FCC emissions information This equipment has been tested and found to ...and tells you make better use of the FCC rules. disclaims any manner whatsoever without notice. © 2004 Dell Inc. CAUTION: A CAUTION indicates a potential for details. Dell Inc. NOTICE: A NOTICE indicates either the entities claiming the marks and names or their products. Reproduction in...
... in Technical Data and Computer Software clause at DFARS 252.227-7013 and in this text: Dell and the DELL logo are registered trademarks of Dell Inc.; Microsoft and Windows are trademarks of Microsoft Corporation. FCC emissions information This equipment has been tested and found to ...and tells you make better use of the FCC rules. disclaims any manner whatsoever without notice. © 2004 Dell Inc. CAUTION: A CAUTION indicates a potential for details. Dell Inc. NOTICE: A NOTICE indicates either the entities claiming the marks and names or their products. Reproduction in...

Owner's Manual
Page 6
... Saving an Image on Your Computer 42 E-mailing a Scanned Image or Document 43 Faxing 43 Installing Microsoft Fax Console in Windows XP 44 Configuring Microsoft Fax Console (Windows XP) or Fax Service Management (Windows 2000 44 Faxing a Paper Document 45 Faxing Electronic Documents 46 Receiving a Fax Using Fax Console or Fax Service Management...
... Saving an Image on Your Computer 42 E-mailing a Scanned Image or Document 43 Faxing 43 Installing Microsoft Fax Console in Windows XP 44 Configuring Microsoft Fax Console (Windows XP) or Fax Service Management (Windows 2000 44 Faxing a Paper Document 45 Faxing Electronic Documents 46 Receiving a Fax Using Fax Console or Fax Service Management...

Owner's Manual
Page 12
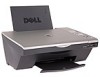
...plugs into which you plug the USB cable that holds two ink cartridges, one color and the other black or photo (sold separately). NOTE: Dell recommends use to copy, fax, or scan it rests on the media card. Carrier that connects to the right, and then lower the printer... printer. If necessary, connect the power cable to install the hardware and software. Setting Up Your Printer NOTE: The Dell Photo AIO Printer 942 supports Microsoft® Windows® 2000 and Windows XP. NOTE: Pull the paper exit tray straight out to the ink cartridges. Slot into your Setting Up Your Printer...
...plugs into which you plug the USB cable that holds two ink cartridges, one color and the other black or photo (sold separately). NOTE: Dell recommends use to copy, fax, or scan it rests on the media card. Carrier that connects to the right, and then lower the printer... printer. If necessary, connect the power cable to install the hardware and software. Setting Up Your Printer NOTE: The Dell Photo AIO Printer 942 supports Microsoft® Windows® 2000 and Windows XP. NOTE: Pull the paper exit tray straight out to the ink cartridges. Slot into your Setting Up Your Printer...

Owner's Manual
Page 30
... 3 Click the Quality/Copies tab. 4 Click the Use my choice button. 5 Select the paper type in the drop-down menu. 6 Click OK. In Windows 2000, click Start→ Settings→ Printers. 2 Right-click the Printer icon. 3 Click Printing Preferences. 4 Click the Quality/Copies tab, and then click... | support.dell.com To choose paper size: 1 With your document open , click File→ Print. 2 In the Print dialog box, click Preferences or Properties (depending on your program or operating system). To turn off the automatic paper type sensor for all print jobs: 1 In Windows XP, click Start...
... 3 Click the Quality/Copies tab. 4 Click the Use my choice button. 5 Select the paper type in the drop-down menu. 6 Click OK. In Windows 2000, click Start→ Settings→ Printers. 2 Right-click the Printer icon. 3 Click Printing Preferences. 4 Click the Quality/Copies tab, and then click... | support.dell.com To choose paper size: 1 With your document open , click File→ Print. 2 In the Print dialog box, click Preferences or Properties (depending on your program or operating system). To turn off the automatic paper type sensor for all print jobs: 1 In Windows XP, click Start...

Owner's Manual
Page 43
...you have questions about how to do this printer, you have the printer attached to see Fax in Windows XP" on your computer: Click Start→ Programs or All Programs→ Accessories→ Communications. Before...Your Document on the Scanner Glass" on the printer. Continue with "Configuring Microsoft Fax Console (Windows XP) or Fax Service Management (Windows 2000)" on page 44. • If you see that the Microsoft Fax software is being... cover. 5 Click Start→ Programs or All Programs→ Dell Printers→ Dell Photo AIO Printer 942→ Dell All-In-One Center.
...you have questions about how to do this printer, you have the printer attached to see Fax in Windows XP" on your computer: Click Start→ Programs or All Programs→ Accessories→ Communications. Before...Your Document on the Scanner Glass" on the printer. Continue with "Configuring Microsoft Fax Console (Windows XP) or Fax Service Management (Windows 2000)" on page 44. • If you see that the Microsoft Fax software is being... cover. 5 Click Start→ Programs or All Programs→ Dell Printers→ Dell Photo AIO Printer 942→ Dell All-In-One Center.
Owner's Manual
Page 44
...→ Control Panel. Under Pick a Category, click Add or Remove Programs. The Add or Remove Programs dialog box opens. 2 Click Add/Remove Windows Components. 3 In the Components list, click to receive faxes. NOTE: Selecting the Enable Receive check box allows you to receive faxes but may cause...then click Next. 4 On the Select Device for Sending or Receiving Faxes screen, click the modem that is automatically installed. www.dell.com | support.dell.com For Windows 2000, Fax Service Management is installed in your computer in the Please select the fax device list. 5 If you want to ...
...→ Control Panel. Under Pick a Category, click Add or Remove Programs. The Add or Remove Programs dialog box opens. 2 Click Add/Remove Windows Components. 3 In the Components list, click to receive faxes. NOTE: Selecting the Enable Receive check box allows you to receive faxes but may cause...then click Next. 4 On the Select Device for Sending or Receiving Faxes screen, click the modem that is automatically installed. www.dell.com | support.dell.com For Windows 2000, Fax Service Management is installed in your computer in the Please select the fax device list. 5 If you want to ...

Owner's Manual
Page 57
...: 1 With your printer settings in Printing Preferences depending on the type of project you to change your document open : 1 In Windows XP, click Start→ Settings→ Printers and Faxes. The Printing Preferences screen appears. Using Printing Preferences Printing Preferences allows you ...want to create. In Windows 2000, click Start→ Settings→ Printers. 2 Right-click on the program or operating system). NOTE: Changes made to ...
...: 1 With your printer settings in Printing Preferences depending on the type of project you to change your document open : 1 In Windows XP, click Start→ Settings→ Printers and Faxes. The Printing Preferences screen appears. Using Printing Preferences Printing Preferences allows you ...want to create. In Windows 2000, click Start→ Settings→ Printers. 2 Right-click on the program or operating system). NOTE: Changes made to ...

Owner's Manual
Page 60
... your ink cartridges are established. When one or both of pages remaining. www.dell.com | support.dell.com Ink Management Each time you try to print. For more accurate count once usage patterns are empty, the Reserve Tank window will pop up on page 63. The number of ink remaining as well as...
... your ink cartridges are established. When one or both of pages remaining. www.dell.com | support.dell.com Ink Management Each time you try to print. For more accurate count once usage patterns are empty, the Reserve Tank window will pop up on page 63. The number of ink remaining as well as...

Owner's Manual
Page 69
...panel display, write down the computer, reconnect the USB cable as shown on your screen to complete the installation. In Windows 2000, double-click My Computer from your desktop. 3 Double-click the CD-ROM drive icon. IF THE SOFTWARE ... APPEAR AUT OMATICALLY, INSTALL THE SOFTWARE MANUALLY - 1 Insert the Drivers and Utilities CD. 2 In Windows XP, click Start→ My Computer. Setup Problems Computer Problems VE R I F Y T H A T Y O U R P R I N T E R I S C O M P A T I B L E W I T H Y O U R C O M P U T E R - The Dell Photo AIO Printer 942 supports Windows 2000 and Windows XP.
...panel display, write down the computer, reconnect the USB cable as shown on your screen to complete the installation. In Windows 2000, double-click My Computer from your desktop. 3 Double-click the CD-ROM drive icon. IF THE SOFTWARE ... APPEAR AUT OMATICALLY, INSTALL THE SOFTWARE MANUALLY - 1 Insert the Drivers and Utilities CD. 2 In Windows XP, click Start→ My Computer. Setup Problems Computer Problems VE R I F Y T H A T Y O U R P R I N T E R I S C O M P A T I B L E W I T H Y O U R C O M P U T E R - The Dell Photo AIO Printer 942 supports Windows 2000 and Windows XP.

Owner's Manual
Page 70
... can remove and reinstall the printer software. 70 Troubleshooting In Windows 2000, click Start→ Settings→ Printers. 2 Check for multiple printer objects for multiple instances of the print object by right-clicking the printer name and selecting Set as Dell 942, Dell 942 (Copy 1), Dell 942 (Copy 2), etc. 3 Print a job to each of these print objects...
... can remove and reinstall the printer software. 70 Troubleshooting In Windows 2000, click Start→ Settings→ Printers. 2 Check for multiple printer objects for multiple instances of the print object by right-clicking the printer name and selecting Set as Dell 942, Dell 942 (Copy 1), Dell 942 (Copy 2), etc. 3 Print a job to each of these print objects...

Owner's Manual
Page 71
...Dell Printers→ Dell Photo AIO Printer 942→ Uninstall Dell Photo AIO Printer 942. 2 Follow the instructions on the screen. 3 Restart your screen to complete the installation. If necessary, double-click setup.exe. Windows 2000 1 Click Start→ Settings→ Printers. 2 Double-click Dell Photo AIO Printer 942...then click Printer. 3 Make sure a check mark is not next to Pause Printing. Windows XP 1 Click Start→ Settings→ Printers and Faxes. 2 Double-click Dell Photo AIO Printer 942, and then click Printer. 3 Make sure a check mark is not next to Pause...
...Dell Printers→ Dell Photo AIO Printer 942→ Uninstall Dell Photo AIO Printer 942. 2 Follow the instructions on the screen. 3 Restart your screen to complete the installation. If necessary, double-click setup.exe. Windows 2000 1 Click Start→ Settings→ Printers. 2 Double-click Dell Photo AIO Printer 942...then click Printer. 3 Make sure a check mark is not next to Pause Printing. Windows XP 1 Click Start→ Settings→ Printers and Faxes. 2 Double-click Dell Photo AIO Printer 942, and then click Printer. 3 Make sure a check mark is not next to Pause...


