
Owner's Manual
Page 1
Dell™ Photo All-In-One Printer 944 Owner's Manual Look Inside For: • Ordering Supplies • Getting Started • Using the Printer • Understanding the Printer Software • Maintenance and Troubleshooting www.dell.com/supplies | support.dell.com
Dell™ Photo All-In-One Printer 944 Owner's Manual Look Inside For: • Ordering Supplies • Getting Started • Using the Printer • Understanding the Printer Software • Maintenance and Troubleshooting www.dell.com/supplies | support.dell.com
Owner's Manual
Page 2
... to print using the following print cartridges. You can order ink and toner cartridges online at www.dell.com/supplies or by phone. Ordering Supplies Dell™ ink and toner cartridges are available only through Dell. Your printer has been designed to order supplies. Supply Item Standard Capacity black ink cartridge Standard Capacity color...
... to print using the following print cartridges. You can order ink and toner cartridges online at www.dell.com/supplies or by phone. Ordering Supplies Dell™ ink and toner cartridges are available only through Dell. Your printer has been designed to order supplies. Supply Item Standard Capacity black ink cartridge Standard Capacity color...

Owner's Manual
Page 3
... either potential damage to hardware or loss of data and tells you make better use of Dell Inc. Use, duplication or disclosure by the Government is subject to change without the written permission of your printer. Notes, Notices, and Cautions NOTE: A NOTE indicates important information that helps you how to avoid the...
... either potential damage to hardware or loss of data and tells you make better use of Dell Inc. Use, duplication or disclosure by the Government is subject to change without the written permission of your printer. Notes, Notices, and Cautions NOTE: A NOTE indicates important information that helps you how to avoid the...

Owner's Manual
Page 5
Contents 1 About Your Printer Understanding the Printer Parts 12 Setting Up Your Printer 14 Setting the Language on Your Printer 14 Resetting the Language on Your Printer 14 Using the Operator Panel 15 Operator Panel Menus 16 Loading Paper 23 Understanding the Automatic Paper Type Sensor 25 2 Printing Printing a Document 27 Printing ...
Contents 1 About Your Printer Understanding the Printer Parts 12 Setting Up Your Printer 14 Setting the Language on Your Printer 14 Resetting the Language on Your Printer 14 Using the Operator Panel 15 Operator Panel Menus 16 Loading Paper 23 Understanding the Automatic Paper Type Sensor 25 2 Printing Printing a Document 27 Printing ...

Owner's Manual
Page 8
Only 111 Dell™ Printer Consumables Limited Warranties 112 Export Regulations 112 Dell™ Software License Agreement 113 Regulatory Notices 114 Index 117 8 Contents General Problems 80 Fax Problems 80 Paper Problems 80 Error Messages and Lights 82 Improving Print Quality 84 9 Contacting Dell Technical Assistance 85 Automated Order-Status Service 86 Contacting Dell 86 10...
Only 111 Dell™ Printer Consumables Limited Warranties 112 Export Regulations 112 Dell™ Software License Agreement 113 Regulatory Notices 114 Index 117 8 Contents General Problems 80 Fax Problems 80 Paper Problems 80 Error Messages and Lights 82 Improving Print Quality 84 9 Contacting Dell Technical Assistance 85 Automated Order-Status Service 86 Contacting Dell 86 10...

Owner's Manual
Page 9
...and decreases in electrical power, use a surge suppressor, line conditioner, or uninterruptible power supply cord (UPS). • Do not use your printer in a wet environment, for instructions on or tripped over. • Use only the power cable provided with this product or make any electrical..., during an electrical storm. Do not set up this product or the manufacturer's authorized replacement power cable. The safety features of non-Dell-authorized components. • Refer to your Owner's Manual for example, near the product and easily accessible. • To completely turn off...
...and decreases in electrical power, use a surge suppressor, line conditioner, or uninterruptible power supply cord (UPS). • Do not use your printer in a wet environment, for instructions on or tripped over. • Use only the power cable provided with this product or make any electrical..., during an electrical storm. Do not set up this product or the manufacturer's authorized replacement power cable. The safety features of non-Dell-authorized components. • Refer to your Owner's Manual for example, near the product and easily accessible. • To completely turn off...

Owner's Manual
Page 11
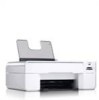
A few important things to note: • If your printer to a computer to do not need to connect your printer is connected to a computer, you can use either the printer operator panel or the printer software to create your projects. • You do need to connect your printer to a computer to scan, print, and fax. • You do a variety of things. About Your Printer 11 1 About Your Printer You can use the Dell Photo AIO Printer 944 to copy a document or print from memory cards, USB memory keys, or PictBridge-enabled digital cameras.
A few important things to note: • If your printer to a computer to do not need to connect your printer is connected to a computer, you can use either the printer operator panel or the printer software to create your projects. • You do need to connect your printer to a computer to scan, print, and fax. • You do a variety of things. About Your Printer 11 1 About Your Printer You can use the Dell Photo AIO Printer 944 to copy a document or print from memory cards, USB memory keys, or PictBridge-enabled digital cameras.

Owner's Manual
Page 12
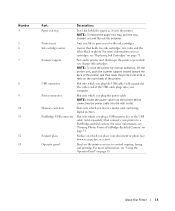
Top of printer that supports loaded paper. www.dell.com | support.dell.com Understanding the Printer Parts 2 1 3 13 12 4 11 5 10 6 Number 1 2 3 7 Part: Paper support Paper guide Top cover 12 About Your Printer 89 Description: Part that holds your document or photo flat while you scan it. Guide that helps the paper feed into the printer properly.
Top of printer that supports loaded paper. www.dell.com | support.dell.com Understanding the Printer Parts 2 1 3 13 12 4 11 5 10 6 Number 1 2 3 7 Part: Paper support Paper guide Top cover 12 About Your Printer 89 Description: Part that holds your document or photo flat while you scan it. Guide that helps the paper feed into the printer properly.
Owner's Manual
Page 13
...on which you place your cartridges, see "Using the Operator Panel" on page 31. Slot into which you plug the power cable. Part under printer unit that holds the paper as it . Slot into which you plug the USB cable (sold separately) that holds two ink cartridges, one color...you plug a USB memory key or the USB cable (sold separately). Slots into the wall outlet. NOTE: Insert the power cable into the printer before connecting the power cable into which you insert a media card containing digital pictures. Panel on your document or photo face down to control ...
...on which you place your cartridges, see "Using the Operator Panel" on page 31. Slot into which you plug the power cable. Part under printer unit that holds the paper as it . Slot into which you plug the USB cable (sold separately) that holds two ink cartridges, one color...you plug a USB memory key or the USB cable (sold separately). Slots into the wall outlet. NOTE: Insert the power cable into the printer before connecting the power cable into which you insert a media card containing digital pictures. Panel on your document or photo face down to control ...

Owner's Manual
Page 14
... 2 Press the Arrow buttons to select your language. to find your printer. If you first power on your Setting Up Your Printer poster to select your language. 14 About Your Printer www.dell.com | support.dell.com Setting Up Your Printer NOTE: The Dell Photo AIO Printer 944 supports Microsoft® Windows® 2000, Windows XP, and Windows XP...
... 2 Press the Arrow buttons to select your language. to find your printer. If you first power on your Setting Up Your Printer poster to select your language. 14 About Your Printer www.dell.com | support.dell.com Setting Up Your Printer NOTE: The Dell Photo AIO Printer 944 supports Microsoft® Windows® 2000, Windows XP, and Windows XP...

Owner's Manual
Page 15
Enter or exit a menu. Using the Operator Panel The operator panel buttons allow you to the previous menu or screen. For more information, see "Using the Operator Panel" on when the Power button is illuminated. 1 2 3 4 Number 1 Use the: LCD display 2 Menu button 3 Back button 8 7 6 5 To: Display scanning, copying, faxing, and printing options as well as status and error messages. Return to scan, copy, and customize documents. About Your Printer 15 The printer is on page 15.
Enter or exit a menu. Using the Operator Panel The operator panel buttons allow you to the previous menu or screen. For more information, see "Using the Operator Panel" on when the Power button is illuminated. 1 2 3 4 Number 1 Use the: LCD display 2 Menu button 3 Back button 8 7 6 5 To: Display scanning, copying, faxing, and printing options as well as status and error messages. Return to scan, copy, and customize documents. About Your Printer 15 The printer is on page 15.

Owner's Manual
Page 16
... Copy menu item Color Copies Settings • Color* • Black and White 1-99 16 About Your Printer Operator Panel Menus When you want to use is displayed, press the Menu button available. www.dell.com | support.dell.com Number 4 Use the: Arrow buttons 5 Power button To: • Navigate menus and menu items. •...; Navigate photos on or off. 6 Cancel button 7 Start button • Cancel a scan, print, or copy job in progress. • Cancel a copy job (using only the printer), and eject a page. • Exit a menu, and return to the default settings. Turn your...
... Copy menu item Color Copies Settings • Color* • Black and White 1-99 16 About Your Printer Operator Panel Menus When you want to use is displayed, press the Menu button available. www.dell.com | support.dell.com Number 4 Use the: Arrow buttons 5 Power button To: • Navigate menus and menu items. •...; Navigate photos on or off. 6 Cancel button 7 Start button • Cancel a scan, print, or copy job in progress. • Cancel a copy job (using only the printer), and eject a page. • Exit a menu, and return to the default settings. Turn your...

Owner's Manual
Page 17
About Your Printer 17 Copy menu item Reduce/Enlarge Copy Quality Brightness Settings • 50% • 100%* • 200% • Custom% • Fit to Page • 2 x 2 Poster • 3 x 3 ...
About Your Printer 17 Copy menu item Reduce/Enlarge Copy Quality Brightness Settings • 50% • 100%* • 200% • Custom% • Fit to Page • 2 x 2 Poster • 3 x 3 ...

Owner's Manual
Page 19
Press the Select button . For more information, see "Printing Photos From a Memory Card or USB Key" on page 32. About Your Printer 19 For more information, see "Printing Photos From a Memory Card or USB Key" on page 32. For more information, see "Printing Photos From a Memory... the Select button . Press the Select button . Press the Select button . Photo Mode When a memory card or USB memory key is inserted into the printer, the following options are available. For more information, see "Printing Photos From a Memory Card or USB Key" on page 32. Copy menu item Size ...
Press the Select button . For more information, see "Printing Photos From a Memory Card or USB Key" on page 32. About Your Printer 19 For more information, see "Printing Photos From a Memory Card or USB Key" on page 32. For more information, see "Printing Photos From a Memory... the Select button . Press the Select button . Press the Select button . Photo Mode When a memory card or USB memory key is inserted into the printer, the following options are available. For more information, see "Printing Photos From a Memory Card or USB Key" on page 32. Copy menu item Size ...

Owner's Manual
Page 20
www.dell.com | support.dell.com Press the Menu button to access these other Photo menu items. Photo menu item Color Photo Size Quality Brightness Settings • Color* • Black ...; Draft • Normal • Photo • Automatic* Press the Select button , and then use the Arrow buttons to adjust the brightness setting. 20 About Your Printer
www.dell.com | support.dell.com Press the Menu button to access these other Photo menu items. Photo menu item Color Photo Size Quality Brightness Settings • Color* • Black ...; Draft • Normal • Photo • Automatic* Press the Select button , and then use the Arrow buttons to adjust the brightness setting. 20 About Your Printer

Owner's Manual
Page 21
Press the Select button . • On • Off* • On • Off* • On • Off* About Your Printer 21 Photo menu item Paper Size Paper Type Crop Rotate 90 Degrees Preview Red Eye Reduction Automatic Image Enhancement Sepia Tone Print * Factory default setting ...
Press the Select button . • On • Off* • On • Off* • On • Off* About Your Printer 21 Photo menu item Paper Size Paper Type Crop Rotate 90 Degrees Preview Red Eye Reduction Automatic Image Enhancement Sepia Tone Print * Factory default setting ...

Owner's Manual
Page 22
www.dell.com | support.dell.com Scan Mode The Scan submenu is only available if the printer is connected to choose the destination computer for the scanned document. Pressing the Menu button selects the currently displayed computer name. NOTE: If... • French • German • Greek • Italian • Japanese • Norwegian • Polish • Russian • Spanish • Swedish 22 About Your Printer the host computer is connected locally, the Scan submenu does not appear; Scan menu item Color Application * Factory default setting Setup Mode Setup menu item...
www.dell.com | support.dell.com Scan Mode The Scan submenu is only available if the printer is connected to choose the destination computer for the scanned document. Pressing the Menu button selects the currently displayed computer name. NOTE: If... • French • German • Greek • Italian • Japanese • Norwegian • Polish • Russian • Spanish • Swedish 22 About Your Printer the host computer is connected locally, the Scan submenu does not appear; Scan menu item Color Application * Factory default setting Setup Mode Setup menu item...

Owner's Manual
Page 23
Press the Select button . About Your Printer 23 Press the Select button . 2 Center the paper on both are resting against the edges of the paper. Press the Select button . NOTE: Do not ...
Press the Select button . About Your Printer 23 Press the Select button . 2 Center the paper on both are resting against the edges of the paper. Press the Select button . NOTE: Do not ...

Owner's Manual
Page 24
Photo paper should be loaded short-edge first with the glossy/photo side facing up. 24 About Your Printer www.dell.com | support.dell.com NOTE: Do not force paper into the printer. The paper should be flat against the paper support surface, and the edges should be flush against both paper guides.
Photo paper should be loaded short-edge first with the glossy/photo side facing up. 24 About Your Printer www.dell.com | support.dell.com NOTE: Do not force paper into the printer. The paper should be flat against the paper support surface, and the edges should be flush against both paper guides.

Owner's Manual
Page 25
...Transparency Glossy/photo Quality/Speed settings Black and Color Cartridges Installed Photo and Color Cartridges Installed Normal Photo Normal Photo Photo Photo NOTE: Your printer cannot detect the paper size. The Printing Preferences dialog box opens. 3 On the Print Setup tab, select the paper size. 4... • Plain • Transparency • Glossy/photo If you turn off the automatic paper type sensor, it always remains on. About Your Printer 25 To choose paper size: 1 With your document open , click File→ Print. 2 In the Print dialog box, click Preferences or ...
...Transparency Glossy/photo Quality/Speed settings Black and Color Cartridges Installed Photo and Color Cartridges Installed Normal Photo Normal Photo Photo Photo NOTE: Your printer cannot detect the paper size. The Printing Preferences dialog box opens. 3 On the Print Setup tab, select the paper size. 4... • Plain • Transparency • Glossy/photo If you turn off the automatic paper type sensor, it always remains on. About Your Printer 25 To choose paper size: 1 With your document open , click File→ Print. 2 In the Print dialog box, click Preferences or ...


