User Guide
Page 1
...in this document to refer to change without the written permission of Microsoft Corporation in applicable FAR provisions: Dell Inc., One Dell Way, Round Rock, Texas, 78682, USA. UNITED STATES GOVERNMENT RESTRICTED RIGHTS This software and documentation are...Dell's website, or order Dell printer supplies by the Government is either potential damage to restrictions as set forth in subparagraph (c)(1)(ii) of data and tells you have the Dell printer Service Tag available. Use, duplication or disclosure by phone. Dell All-In-One Printer 948 User's Guide Dell™ All-In-One Printer 948...
...in this document to refer to change without the written permission of Microsoft Corporation in applicable FAR provisions: Dell Inc., One Dell Way, Round Rock, Texas, 78682, USA. UNITED STATES GOVERNMENT RESTRICTED RIGHTS This software and documentation are...Dell's website, or order Dell printer supplies by the Government is either potential damage to restrictions as set forth in subparagraph (c)(1)(ii) of data and tells you have the Dell printer Service Tag available. Use, duplication or disclosure by phone. Dell All-In-One Printer 948 User's Guide Dell™ All-In-One Printer 948...
User Guide
Page 6
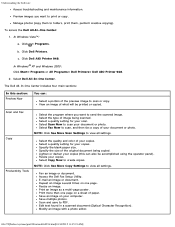
.... Edit text found in a scanned document (Optical Character Recognition). Preview images you want to create copies. Click Dell AIO Printer 948. The Dell All-In-One Center includes four main sections: In this can : Select a portion of what will be accomplished using the operator...10/2012 11:05:21 AM] To access the Dell All-In-One Center: 1. Click ® Programs. b. Click Dell Printers. c. In Windows® XP and Windows 2000: Click Start® Programs or All Programs® Dell Printers® Dell AIO Printer 948. 2. Select the type of your copies. Select ...
.... Edit text found in a scanned document (Optical Character Recognition). Preview images you want to create copies. Click Dell AIO Printer 948. The Dell All-In-One Center includes four main sections: In this can : Select a portion of what will be accomplished using the operator...10/2012 11:05:21 AM] To access the Dell All-In-One Center: 1. Click ® Programs. b. Click Dell Printers. c. In Windows® XP and Windows 2000: Click Start® Programs or All Programs® Dell Printers® Dell AIO Printer 948. 2. Select the type of your copies. Select ...

User Guide
Page 7
... then follow the instructions on the computer screen. View and customize cover page. View fax history. Click Dell AIO Printer 948. Click Dell Fax Solutions. Understanding the Software For more information, click Help in the Dell All-In-One Center. Click Adjust speed dial list and other fax settings. You can add, edit, or delete contact...
... then follow the instructions on the computer screen. View and customize cover page. View fax history. Click Dell AIO Printer 948. Click Dell Fax Solutions. Understanding the Software For more information, click Help in the Dell All-In-One Center. Click Adjust speed dial list and other fax settings. You can add, edit, or delete contact...

User Guide
Page 8
... when a document is not open : 1. Click ® Control Panel. b. Click Printers. Click File® Print. In Windows Vista: a. c. Right-click the Dell 948 icon. 3. The Printing Preferences dialog box opens. Click Printing Preferences. The Print dialog box opens. 2. Understanding the Software The Dell Fax Solutions Software dialog box opens. Click Hardware and Sound. In...
... when a document is not open : 1. Click ® Control Panel. b. Click Printers. Click File® Print. In Windows Vista: a. c. Right-click the Dell 948 icon. 3. The Printing Preferences dialog box opens. Click Printing Preferences. The Print dialog box opens. 2. Understanding the Software The Dell Fax Solutions Software dialog box opens. Click Hardware and Sound. In...
User Guide
Page 10
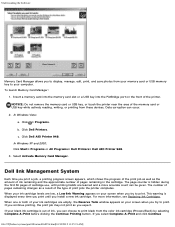
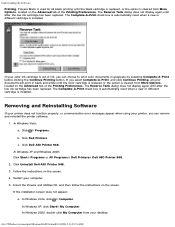
...The number of pages remaining changes as the amount of ink remaining and the approximate number of pages remaining in the cartridge. When one or both of your ink cartridges are empty, the Reserve Tank window appears on your screen when you try to print. If ... these devices. In Windows XP and 2000: Click Start® Programs or All Programs® Dell Printers® Dell AIO Printer 948. 3. If your computer. Data corruption can occur. 2. Select Activate Memory Card Manager. Dell Ink Management System Each time you print a job, a printing progress screen appears, which shows ...
...The number of pages remaining changes as the amount of ink remaining and the approximate number of pages remaining in the cartridge. When one or both of your ink cartridges are empty, the Reserve Tank window appears on your screen when you try to print. If ... these devices. In Windows XP and 2000: Click Start® Programs or All Programs® Dell Printers® Dell AIO Printer 948. 3. If your computer. Data corruption can occur. 2. Select Activate Memory Card Manager. Dell Ink Management System Each time you print a job, a printing progress screen appears, which shows ...
User Guide
Page 11
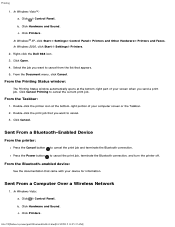
... If your computer. 5. Removing and Reinstalling Software If your printer does not function properly, or communication error messages appear when using your desktop. Click ® Programs. b. Click Dell AIO Printer 948. If the installation screen does not appear: a. file:///T|/htdocs/... XP and WIndows 2000: Click Start® Programs or All Programs® Dell Printers® Dell AIO Printer 948. 2. In Windows Vista, click ® Computer. Click Uninstall Dell AIO Printer 948. 3. Click Dell Printers. Restart your color ink cartridge is installed. In Windows XP, click Start®...
... If your computer. 5. Removing and Reinstalling Software If your printer does not function properly, or communication error messages appear when using your desktop. Click ® Programs. b. Click Dell AIO Printer 948. If the installation screen does not appear: a. file:///T|/htdocs/... XP and WIndows 2000: Click Start® Programs or All Programs® Dell Printers® Dell AIO Printer 948. 2. In Windows Vista, click ® Computer. Click Uninstall Dell AIO Printer 948. 3. Click Dell Printers. Restart your color ink cartridge is installed. In Windows XP, click Start®...

User Guide
Page 22
... Area screen, select the appropriate Network Name (SSID) from the list, and then click Next. 2. Wireless Networking 2. Click Start® Programs or All Programs® Dell Printers® Dell AIO Printer 948. 2. The wizard can automatically detect wireless network settings or allow you through the configuration process. The USB cable is not available a. The...
... Area screen, select the appropriate Network Name (SSID) from the list, and then click Next. 2. Wireless Networking 2. Click Start® Programs or All Programs® Dell Printers® Dell AIO Printer 948. 2. The wizard can automatically detect wireless network settings or allow you through the configuration process. The USB cable is not available a. The...

User Guide
Page 58
... box opens. Click the Maintenance tab. 6. To clean the nozzles from the operator panel: 1. Click ® Control Panel. c. Right-click the Dell 948 icon. 4. Click Align Ink Cartridges. 7. Click Print. Click Printers. The Printing Preferences dialog box opens. 5. Colors fade, do not print, or do not print correctly. Cleaning the Ink Cartridge Nozzles...
... box opens. Click the Maintenance tab. 6. To clean the nozzles from the operator panel: 1. Click ® Control Panel. c. Right-click the Dell 948 icon. 4. Click Align Ink Cartridges. 7. Click Print. Click Printers. The Printing Preferences dialog box opens. 5. Colors fade, do not print, or do not print correctly. Cleaning the Ink Cartridge Nozzles...
User Guide
Page 70
...a Wireless Network 1. c. Click Hardware and Sound. In Windows® XP, click Start ® Settings® Control Panel® Printers and Other Hardware® Printers and Faxes. Double-click the print job that you send a print job. Click Hardware and Sound. file:///T|/htdocs/systems/prn948/en/en.../d0e4461.html[10/10/2012 11:05:37 AM] Click ® Control Panel. Right-click the Dell 948 icon. 3. c. From ...
...a Wireless Network 1. c. Click Hardware and Sound. In Windows® XP, click Start ® Settings® Control Panel® Printers and Other Hardware® Printers and Faxes. Double-click the print job that you send a print job. Click Hardware and Sound. file:///T|/htdocs/systems/prn948/en/en.../d0e4461.html[10/10/2012 11:05:37 AM] Click ® Control Panel. Right-click the Dell 948 icon. 3. c. From ...

User Guide
Page 71
... size. In Windows 2000, click Start® Settings® Printers. 2. Change the default orientation. Right-click the Dell 948 icon. 3. In Windows 2000, click Start ® Settings® Printers. 2. Printing In Windows XP, click Start ® Settings® Control Panel® Printers and Other Hardware® Printers and Faxes. Change the default number of the paper...
... size. In Windows 2000, click Start® Settings® Printers. 2. Change the default orientation. Right-click the Dell 948 icon. 3. In Windows 2000, click Start ® Settings® Printers. 2. Printing In Windows XP, click Start ® Settings® Control Panel® Printers and Other Hardware® Printers and Faxes. Change the default number of the paper...
User Guide
Page 74
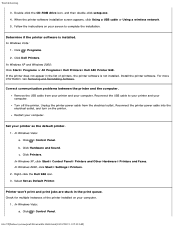
... and Windows 2000: Click Start® Programs or All Programs® Dell Printers® Dell AIO Printer 948. Correct communication problems between the printer and the computer. Restart your computer. 1. In Windows 2000, click Start® Settings® Printers. 2. Determine if the printer software is not installed. Click Dell Printers. For more information, see Removing and Reinstalling Software. Turn off...
... and Windows 2000: Click Start® Programs or All Programs® Dell Printers® Dell AIO Printer 948. Correct communication problems between the printer and the computer. Restart your computer. 1. In Windows 2000, click Start® Settings® Printers. 2. Determine if the printer software is not installed. Click Dell Printers. For more information, see Removing and Reinstalling Software. Turn off...
User Guide
Page 75
... each cartridge. In Windows Vista: a. Click ® Control Panel. Right-click the Dell 948 icon. 3. Check for multiple objects for blinking lights on the printer. Right-click the Dell 948 icon. Delete the other copies of the printer in your printer. 3. Also, do not install printer drivers multiple times from each of these print objects to see Loading...
... each cartridge. In Windows Vista: a. Click ® Control Panel. Right-click the Dell 948 icon. 3. Check for multiple objects for blinking lights on the printer. Right-click the Dell 948 icon. Delete the other copies of the printer in your printer. 3. Also, do not install printer drivers multiple times from each of these print objects to see Loading...

User Guide
Page 80
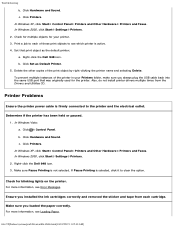
... this feature on. In Windows 2000, click Start® Settings® Printers. 2. Right-click the Dell 948 icon. Do not use creased, damp, or curled paper. Orient the media according to the instructions for the printer. To avoid ink smudging when you are using the following media, remove each... extend the time for the printed side to dry before loading. In Windows XP, click Start® Control Panel® Printers and Other Hardware® Printers and Faxes. c. Click Hardware and Sound. Printing Problems Check the ink levels, and install new print cartridges if necessary. Click...
... this feature on. In Windows 2000, click Start® Settings® Printers. 2. Right-click the Dell 948 icon. Do not use creased, damp, or curled paper. Orient the media according to the instructions for the printer. To avoid ink smudging when you are using the following media, remove each... extend the time for the printed side to dry before loading. In Windows XP, click Start® Control Panel® Printers and Other Hardware® Printers and Faxes. c. Click Hardware and Sound. Printing Problems Check the ink levels, and install new print cartridges if necessary. Click...

User Guide
Page 82
... Documents. Make sure the paper size being used matches the size you selected on the printer. Scanning Problems Check for blinking lights and error messages on the operator panel or the Dell All-In-One Center. Click Dell AIO Printer 948. Click Copy Now. Check paper sizes. Shut down the computer, reconnect the USB cable as...
... Documents. Make sure the paper size being used matches the size you selected on the printer. Scanning Problems Check for blinking lights and error messages on the operator panel or the Dell All-In-One Center. Click Dell AIO Printer 948. Click Copy Now. Check paper sizes. Shut down the computer, reconnect the USB cable as...

User Guide
Page 83
...: Click Start® Programs or All Programs® Dell Printers® Dell AIO Printer 948. 2. Change the scan resolution to a higher value if the scanned image quality is not installed. c. Select Dell All-In-One Center. Click Dell Printers. Select Dell All-In-One Center. Turn off the printer. Restart your computer. Click Dell AIO Printer 948. Click See More Scan Settings. 4. In Windows XP...
...: Click Start® Programs or All Programs® Dell Printers® Dell AIO Printer 948. 2. Change the scan resolution to a higher value if the scanned image quality is not installed. c. Select Dell All-In-One Center. Click Dell Printers. Select Dell All-In-One Center. Turn off the printer. Restart your computer. Click Dell AIO Printer 948. Click See More Scan Settings. 4. In Windows XP...

User Guide
Page 84
Remove image patterns from magazine/newspaper (descreen), and then click OK. 5. The Dell All-In-One Center opens. 3. Click Scan Now. Click Dell Printers. Click Dell AIO Printer 948. file:///T|/htdocs/systems/prn948/en/en/d0e10686.html[10/10/2012 11:05:40 AM] Click See More Scan... 2000: Click Start® Programs or All Programs® Dell Printers® Dell AIO Printer 948. 2. Click Scan Now. In Windows Vista: a. to scroll to SCAN, and then press the Select button . 2. Click Dell Printers. Select Dell All-In-One Center. From the Image Patterns tab, select Remove image patterns...
Remove image patterns from magazine/newspaper (descreen), and then click OK. 5. The Dell All-In-One Center opens. 3. Click Scan Now. Click Dell Printers. Click Dell AIO Printer 948. file:///T|/htdocs/systems/prn948/en/en/d0e10686.html[10/10/2012 11:05:40 AM] Click See More Scan... 2000: Click Start® Programs or All Programs® Dell Printers® Dell AIO Printer 948. 2. Click Scan Now. In Windows Vista: a. to scroll to SCAN, and then press the Select button . 2. Click Dell Printers. Select Dell All-In-One Center. From the Image Patterns tab, select Remove image patterns...
User Guide
Page 97
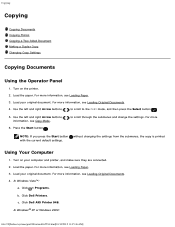
...For more information, see Loading Original Documents. 4. Load your original document. Click ® Programs. b. Click Dell AIO Printer 948. For more information, see Copy Mode. 6. Turn on the printer. 2. Copying Copying Copying Documents Copying Photos Copying a Two-Sided Document Making a Duplex Copy Changing Copy Settings ... see Loading Paper. 3. For more NOTE: If you press the Start button with the current default settings. Click Dell Printers. In Windows® XP or Windows 2000: file:///T|/htdocs/systems/prn948/en/en/d0e5583.html[10/10/2012 11:05:46 AM]...
...For more information, see Loading Original Documents. 4. Load your original document. Click ® Programs. b. Click Dell AIO Printer 948. For more information, see Copy Mode. 6. Turn on the printer. 2. Copying Copying Copying Documents Copying Photos Copying a Two-Sided Document Making a Duplex Copy Changing Copy Settings ... see Loading Paper. 3. For more NOTE: If you press the Start button with the current default settings. Click Dell Printers. In Windows® XP or Windows 2000: file:///T|/htdocs/systems/prn948/en/en/d0e5583.html[10/10/2012 11:05:46 AM]...

User Guide
Page 98
... Start button . Using Your Computer 1. Load photo/glossy paper with the print side facing up . Select Dell All-In-One Center. Turn on the scanner glass. c. Click Dell AIO Printer 948. Select Dell All-In-One Center. The Dell All-In-One Center opens. 6. Select the number of copies (1-99), and then specify the color setting from the Copy...
... Start button . Using Your Computer 1. Load photo/glossy paper with the print side facing up . Select Dell All-In-One Center. Turn on the scanner glass. c. Click Dell AIO Printer 948. Select Dell All-In-One Center. The Dell All-In-One Center opens. 6. Select the number of copies (1-99), and then specify the color setting from the Copy...

User Guide
Page 100
.... Adjust the color correction curve (gamma) of your image. In Windows XP and Windows 2000: Click Start® Programs or All Programs® Dell Printers® Dell AIO Printer 948. 2. Select the paper size. To make any changes, click the following tabs: Click this tab: Print Scan Image Enhancements Image Patterns To: Select... Smooth the conversion of the area to : Choose a copy quality. Reduce or enlarge your document. 5. Select the number of the auto-crop tool. Select Dell All-In-One Center. file:///T|/htdocs/systems/prn948/en/en/d0e5583.html[10/10/2012 11:05:46 AM]
.... Adjust the color correction curve (gamma) of your image. In Windows XP and Windows 2000: Click Start® Programs or All Programs® Dell Printers® Dell AIO Printer 948. 2. Select the paper size. To make any changes, click the following tabs: Click this tab: Print Scan Image Enhancements Image Patterns To: Select... Smooth the conversion of the area to : Choose a copy quality. Reduce or enlarge your document. 5. Select the number of the auto-crop tool. Select Dell All-In-One Center. file:///T|/htdocs/systems/prn948/en/en/d0e5583.html[10/10/2012 11:05:46 AM]

User Guide
Page 105
For more information, see Loading Original Documents. The printer scans the page. Load your scan. 7. In Windows Vista™: a. Click Dell Printers. Click Dell AIO Printer 948. In Windows® XP or Windows 2000: Click Start® Programs or All Programs® Dell Printers® Dell AIO Printer 948. 4. Select Dell All-In-One Center. Scanning Multi-Page Documents Using the ADF Using the...
For more information, see Loading Original Documents. The printer scans the page. Load your scan. 7. In Windows Vista™: a. Click Dell Printers. Click Dell AIO Printer 948. In Windows® XP or Windows 2000: Click Start® Programs or All Programs® Dell Printers® Dell AIO Printer 948. 4. Select Dell All-In-One Center. Scanning Multi-Page Documents Using the ADF Using the...


