

User's Guide
Page 47
Straighten the edges on whether an optional staple finisher is installed or not. Do not fold or crease the paper. Without an optional staple finisher With an optional staple finisher One‑sided printing One‑sided printing Loading paper and specialty media 47 4 Flex and fan the sheets to loosen them. Note: Make sure the paper or envelope is loaded properly. • There are different ways for loading letterhead depending on a level surface. 5 Load the paper stack with the printable side facedown.
Straighten the edges on whether an optional staple finisher is installed or not. Do not fold or crease the paper. Without an optional staple finisher With an optional staple finisher One‑sided printing One‑sided printing Loading paper and specialty media 47 4 Flex and fan the sheets to loosen them. Note: Make sure the paper or envelope is loaded properly. • There are different ways for loading letterhead depending on a level surface. 5 Load the paper stack with the printable side facedown.
User's Guide
Page 53
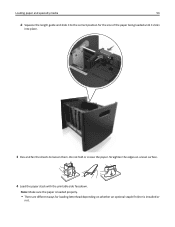
Do not fold or crease the paper. Straighten the edges on whether an optional staple finisher is installed or not. Note: Make sure the paper is loaded properly. • There are different ways for the size of the paper being loaded until it clicks into place. 3 Flex and fan the sheets to loosen them. Loading paper and specialty media 53 d Squeeze the length guide and slide it to the correct position for loading letterhead depending on a level surface. 4 Load the paper stack with the printable side facedown.
Do not fold or crease the paper. Straighten the edges on whether an optional staple finisher is installed or not. Note: Make sure the paper is loaded properly. • There are different ways for the size of the paper being loaded until it clicks into place. 3 Flex and fan the sheets to loosen them. Loading paper and specialty media 53 d Squeeze the length guide and slide it to the correct position for loading letterhead depending on a level surface. 4 Load the paper stack with the printable side facedown.

User's Guide
Page 57
Do not fold or crease the paper. Straighten the edges on the bottom of the paper being loaded. Note: Use the paper size indicators on a level surface. Loading paper and specialty media 57 2 Pull the multipurpose feeder extender. Note: Guide the extender gently so that the multipurpose feeder is fully extended and open. 3 Slide the width guide to the correct position for the size of the tray to help position the guides. 4 Prepare the paper or specialty media for loading. • Flex and fan the sheets to loosen them.
Do not fold or crease the paper. Straighten the edges on the bottom of the paper being loaded. Note: Use the paper size indicators on a level surface. Loading paper and specialty media 57 2 Pull the multipurpose feeder extender. Note: Guide the extender gently so that the multipurpose feeder is fully extended and open. 3 Slide the width guide to the correct position for the size of the tray to help position the guides. 4 Prepare the paper or specialty media for loading. • Flex and fan the sheets to loosen them.

User's Guide
Page 58
... finisher is not bent or wrinkled. • There are different ways of the transparencies. Note: Avoid touching the printable side of loading letterhead depending on a level surface. Straighten the edges on a level surface. 5 Load the paper or specialty media. Loading paper and specialty media 58 • Hold transparencies by the edges.
... finisher is not bent or wrinkled. • There are different ways of the transparencies. Note: Avoid touching the printable side of loading letterhead depending on a level surface. Straighten the edges on a level surface. 5 Load the paper or specialty media. Loading paper and specialty media 58 • Hold transparencies by the edges.

User's Guide
Page 63
... correctly on the computer or printer control panel. • Flex, fan and straighten specialty media before buying large quantities. • Use envelopes designed specifically for laser printers. • For best performance, use envelopes made from 90‑g/m2 (24‑lb) paper or 25% cotton. • Use only new envelopes from... optimize performance and minimize jams, do not use envelopes that: - Straighten the edges on using card stock Card stock is in any way. - Tips on a level surface.
... correctly on the computer or printer control panel. • Flex, fan and straighten specialty media before buying large quantities. • Use envelopes designed specifically for laser printers. • For best performance, use envelopes made from 90‑g/m2 (24‑lb) paper or 25% cotton. • Use only new envelopes from... optimize performance and minimize jams, do not use envelopes that: - Straighten the edges on using card stock Card stock is in any way. - Tips on a level surface.

User's Guide
Page 64
...level surface. Paper lighter than 60 g/m2 (16 lb) might not be stiff enough to feed properly, and may cause labels to peel off during printing, resulting in the tray. • Print a test page on the transparencies being considered for use before buying large quantities. • Use transparencies designed specifically for laser...47‑lb) grain long paper. Consider these factors before buying large quantities. • Use labels designed specifically for laser printers. • Avoid getting fingerprints on them . Note: A combination of the envelopes. • Before loading the...
...level surface. Paper lighter than 60 g/m2 (16 lb) might not be stiff enough to feed properly, and may cause labels to peel off during printing, resulting in the tray. • Print a test page on the transparencies being considered for use before buying large quantities. • Use transparencies designed specifically for laser...47‑lb) grain long paper. Consider these factors before buying large quantities. • Use labels designed specifically for laser printers. • Avoid getting fingerprints on them . Note: A combination of the envelopes. • Before loading the...

User's Guide
Page 120
... often a log file is the factory default setting. Notes: • None is the factory default setting. • The value defined in Disk Near Full Level determines when this action is nearly full. Determine and set if the printer creates a log of the print jobs it receives. Specify the maximum size...Action at End of Frequency None E‑mail Current Log E‑mail & Delete Current Log Post Current Log Post & Delete Current Log Disk Near Full Level Off 1-99 Disk Near Full Action None E‑mail Current Log E‑mail & Delete Current Log E‑mail & Delete Oldest Log Post Current Log...
... often a log file is the factory default setting. Notes: • None is the factory default setting. • The value defined in Disk Near Full Level determines when this action is nearly full. Determine and set if the printer creates a log of the print jobs it receives. Specify the maximum size...Action at End of Frequency None E‑mail Current Log E‑mail & Delete Current Log Post Current Log Post & Delete Current Log Disk Near Full Level Off 1-99 Disk Near Full Action None E‑mail Current Log E‑mail & Delete Current Log E‑mail & Delete Oldest Log Post Current Log...

User's Guide
Page 137
... the power cord from the electrical outlet and disconnect all areas of the printer are required to the exterior of the printer. Consider the variable level of your printer. Cleaning the printer Cleaning the printer Note: You may decrease when the actual printing consumption is turned off and unplugged from the...
... the power cord from the electrical outlet and disconnect all areas of the printer are required to the exterior of the printer. Consider the variable level of your printer. Cleaning the printer Cleaning the printer Note: You may decrease when the actual printing consumption is turned off and unplugged from the...

User's Guide
Page 164
Clearing jams 164 [x]‑page jam, clear manual feeder. [250] 1 From the multipurpose feeder, firmly grasp the jammed paper on a level surface. 3 Reload paper into the multipurpose feeder. 4 Slide the paper guide until it out. Note: Make sure all paper fragments are removed. 2 Flex and fan the sheets to clear the message and continue Straighten the edges on each side, and then gently pull it lightly rests against the edge of the paper. 5 From the printer control panel, select Next > printing. > Clear the jam, press OK > to loosen them. Do not fold or crease the paper.
Clearing jams 164 [x]‑page jam, clear manual feeder. [250] 1 From the multipurpose feeder, firmly grasp the jammed paper on a level surface. 3 Reload paper into the multipurpose feeder. 4 Slide the paper guide until it out. Note: Make sure all paper fragments are removed. 2 Flex and fan the sheets to clear the message and continue Straighten the edges on each side, and then gently pull it lightly rests against the edge of the paper. 5 From the printer control panel, select Next > printing. > Clear the jam, press OK > to loosen them. Do not fold or crease the paper.


