Users Guide
Page 3
Contents About Your Display 5 Package Contents 5 Product Features 8 Identifying Parts and Controls 9 Display Specifications 13 Plug-and-Play 25 LCD Display Quality and Pixel Policy 25 Setting Up the Display 26 Connecting Your Display 26 Wall Mounting (Optional 31 Remote Control 32 Operating the Display 35 Turning on the Display 35 Touch OSD Launcher 35 Using the Touch Control Launcher 36 Using the OSD lock function 37 Using the On-Screen Display (OSD) Menu 38 Dell Web Management for Displays 52 Troubleshooting 57 Self-Test 57 Contents | 3
Contents About Your Display 5 Package Contents 5 Product Features 8 Identifying Parts and Controls 9 Display Specifications 13 Plug-and-Play 25 LCD Display Quality and Pixel Policy 25 Setting Up the Display 26 Connecting Your Display 26 Wall Mounting (Optional 31 Remote Control 32 Operating the Display 35 Turning on the Display 35 Touch OSD Launcher 35 Using the Touch Control Launcher 36 Using the OSD lock function 37 Using the On-Screen Display (OSD) Menu 38 Dell Web Management for Displays 52 Troubleshooting 57 Self-Test 57 Contents | 3
Users Guide
Page 8
...) resolution, plus full-screen support for lower resolutions. • Video Electronics Standards Association (VESA™) 600 x 400 mm mounting holes. • Plug and play capability if supported by your system. • On-Screen Display (OSD) adjustments for ease of set-up and screen optimization. • Security lock slot. • Supports Asset Management Capability. • Arsenic-Free glass and Mercury-Free for Panel only. • 0.5 W standby power when in the sleep mode. • Easily setup with Dell...
...) resolution, plus full-screen support for lower resolutions. • Video Electronics Standards Association (VESA™) 600 x 400 mm mounting holes. • Plug and play capability if supported by your system. • On-Screen Display (OSD) adjustments for ease of set-up and screen optimization. • Security lock slot. • Supports Asset Management Capability. • Arsenic-Free glass and Mercury-Free for Panel only. • 0.5 W standby power when in the sleep mode. • Easily setup with Dell...

Users Guide
Page 10
.... To connect the display power cable. 10 | About Your Display Use to contact Dell for WR517 (optional item) 2 Wire Saddle 3 Handle x 4 4 VESA mounting holes (600 x 400 mm) 5 Security lock slot 6 Optiplex holder 7 Allen key 8 Barcode, serial number, and Service Tag label 9 Regulatory label 10 AC to optiplex (optional) 11 AC power connector Use For Dell Wireless Receiver : WR517(optional) Use to handle display during installation Use to move the display. AC power to...
.... To connect the display power cable. 10 | About Your Display Use to contact Dell for WR517 (optional item) 2 Wire Saddle 3 Handle x 4 4 VESA mounting holes (600 x 400 mm) 5 Security lock slot 6 Optiplex holder 7 Allen key 8 Barcode, serial number, and Service Tag label 9 Regulatory label 10 AC to optiplex (optional) 11 AC power connector Use For Dell Wireless Receiver : WR517(optional) Use to handle display during installation Use to move the display. AC power to...
Users Guide
Page 36
... image being displayed. Exit 36 | Operating the Display Go to Menu to screen restore. Use touch key to select screen off color. Preset Modes 5 Use this menu icon to black or white. Use touch key to screen restore. Use touch key to screen restore. To a freeze screen when press/activate. Input Source 6 Use this icon to the main menu or exit the OSD main menu. The following table describes the touch control icons: Touch Control icons 1 Screen Off 2 Suspend 3 Screen Drop Down 4 Description Use...
... image being displayed. Exit 36 | Operating the Display Go to Menu to screen restore. Use touch key to select screen off color. Preset Modes 5 Use this menu icon to black or white. Use touch key to screen restore. Use touch key to screen restore. To a freeze screen when press/activate. Input Source 6 Use this icon to the main menu or exit the OSD main menu. The following table describes the touch control icons: Touch Control icons 1 Screen Off 2 Suspend 3 Screen Drop Down 4 Description Use...

Users Guide
Page 38
... OSD menu, or wait for 5 seconds, touch to disappear. 1 Press the menu. Touch and hold for the OSD menu to unlock. icon on the remote control or OSD Launcher touch key to launch the OSD Use the icons to adjust items in the OSD menu. Up Down 38 | Operating the Display Touch control icon Description 1 Use the Up (increase) and Down (decrease) icons to adjust the image settings. NOTE: This OSD lock feature is available from firmware...
... OSD menu, or wait for 5 seconds, touch to disappear. 1 Press the menu. Touch and hold for the OSD menu to unlock. icon on the remote control or OSD Launcher touch key to launch the OSD Use the icons to adjust items in the OSD menu. Up Down 38 | Operating the Display Touch control icon Description 1 Use the Up (increase) and Down (decrease) icons to adjust the image settings. NOTE: This OSD lock feature is available from firmware...

Users Guide
Page 40
... input: NOTE: In most cases, Auto Adjust produces the best image for use with your particular setup. NOTE: Auto Adjust feature option is connected using the Pixel Clock (Coarse) and Phase (Fine) controls under Display menu. The following dialog appears on startup, the Auto Adjustment function optimizes the display settings for your configuration. Icon Menu and Submenus Auto Adjust Description Even though your computer recognizes your display on a black screen as the display automatically adjusts to the incoming video signal...
... input: NOTE: In most cases, Auto Adjust produces the best image for use with your particular setup. NOTE: Auto Adjust feature option is connected using the Pixel Clock (Coarse) and Phase (Fine) controls under Display menu. The following dialog appears on startup, the Auto Adjustment function optimizes the display settings for your configuration. Icon Menu and Submenus Auto Adjust Description Even though your computer recognizes your display on a black screen as the display automatically adjusts to the incoming video signal...
Users Guide
Page 43
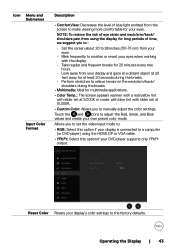
... HDMI, DP or VGA cable. • YPbPr: Select this option if your display is connected to a computer (or DVD player) using the display for your eyes. Touch the and icons to adjust the Red, Green, and Blue values and create your display's color settings to the factory defaults. Operating the Display | 43 Reset Color Resets your own preset color mode. Allows you to set at 10,000K. • Custom Color: Allows you to : • Set the screen...
... HDMI, DP or VGA cable. • YPbPr: Select this option if your display is connected to a computer (or DVD player) using the display for your eyes. Touch the and icons to adjust the Red, Green, and Blue values and create your display's color settings to the factory defaults. Operating the Display | 43 Reset Color Resets your own preset color mode. Allows you to set at 10,000K. • Custom Color: Allows you to : • Set the screen...

Users Guide
Page 46
... one of the image. Select Disable to enable or disable USB function during display standby mode. LED USB Allows you to 60 seconds. Restore the menu settings to save energy. Power Button Allows you press a button. Timer Reset Menu Personalize OSD Hold Time: Sets the time the OSD remains active after you to set the Screen Drop Down level so that you can reach the top of eight languages. (English, Spanish, French, German...
... one of the image. Select Disable to enable or disable USB function during display standby mode. LED USB Allows you to 60 seconds. Restore the menu settings to save energy. Power Button Allows you press a button. Timer Reset Menu Personalize OSD Hold Time: Sets the time the OSD remains active after you to set the Screen Drop Down level so that you can reach the top of eight languages. (English, Spanish, French, German...

Users Guide
Page 47
...) allows you to set the Screen Off Color to turn on . Select Disable to White or black. Operating the Display | 47 Icon Menu and Submenus Screen Off Color Wake On Touch Reset Personalization Other Description Allows you to adjust the OSD settings, such as the DDC/CI, LCD conditioning, and so on this feature. Select Enable to factory defaults. Displays the display's current settings. Enable this feature for best user experience and optimum performance...
...) allows you to set the Screen Off Color to turn on . Select Disable to White or black. Operating the Display | 47 Icon Menu and Submenus Screen Off Color Wake On Touch Reset Personalization Other Description Allows you to adjust the OSD settings, such as the DDC/CI, LCD conditioning, and so on this feature. Select Enable to factory defaults. Displays the display's current settings. Enable this feature for best user experience and optimum performance...
Users Guide
Page 55
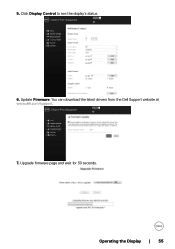
Upgrade firmware page and wait for 30 seconds. Click Display Control to see the display's status. 6. 5. Update Firmware. You can download the latest drivers from the Dell Support website at www.dell.com/support. 7. Operating the Display | 55
Upgrade firmware page and wait for 30 seconds. Click Display Control to see the display's status. 6. 5. Update Firmware. You can download the latest drivers from the Dell Support website at www.dell.com/support. 7. Operating the Display | 55

Users Guide
Page 57
... self-test mode, the power LED remains white. To ensure proper Self-Test operation, remove all digital and the analog cables from the back of computer. 3. If your computer and the display. 2. The floating dialog box should appear on the display. While in this section, follow the Safety Instructions. or Troubleshooting | 57 Turn off both your display and computer are properly connected but the display screen remains...
... self-test mode, the power LED remains white. To ensure proper Self-Test operation, remove all digital and the analog cables from the back of computer. 3. If your computer and the display. 2. The floating dialog box should appear on the display. While in this section, follow the Safety Instructions. or Troubleshooting | 57 Turn off both your display and computer are properly connected but the display screen remains...
Users Guide
Page 60
... the video cable connecting the display and the computer is properly connected and secure. • Verify that the power outlet is functioning properly using any other electrical equipment. • Ensure that the power button is depressed fully. • Ensure that the correct input source is selected in the Input Source menu. • Increase brightness & contrast controls via OSD. • Eliminate video extension cables. • Reset the display to factory settings. • Change the video resolution to VGA input only...
... the video cable connecting the display and the computer is properly connected and secure. • Verify that the power outlet is functioning properly using any other electrical equipment. • Ensure that the power button is depressed fully. • Ensure that the correct input source is selected in the Input Source menu. • Increase brightness & contrast controls via OSD. • Eliminate video extension cables. • Reset the display to factory settings. • Change the video resolution to VGA input only...

Users Guide
Page 61
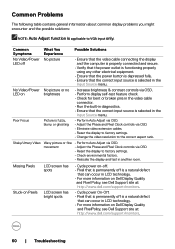
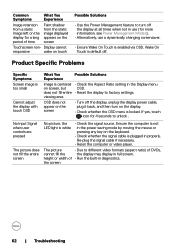
... video cable connector. Display malfunctions on the application. • Adjust R/G/B value under Custom. Color in Color menu OSD. • Change the Input Color Format to factory settings. correctly • Auto Adjust via OSD. • Adjust horizontal & vertical controls via OSD. Troubleshooting | 61 Common Symptoms Brightness Problems Audio problem Geometric Distortion Horizontal/Vertical Lines Synchronization Problems Safety Related Issues Intermittent Problems Missing Color Wrong Color What You Experience Possible Solutions Picture too dim or • Reset the...
... video cable connector. Display malfunctions on the application. • Adjust R/G/B value under Custom. Color in Color menu OSD. • Change the Input Color Format to factory settings. correctly • Auto Adjust via OSD. • Adjust horizontal & vertical controls via OSD. Troubleshooting | 61 Common Symptoms Brightness Problems Audio problem Geometric Distortion Horizontal/Vertical Lines Synchronization Problems Safety Related Issues Intermittent Problems Missing Color Wrong Color What You Experience Possible Solutions Picture too dim or • Reset the...
Users Guide
Page 62
... display power cable, plug it back, and then turn off . Ensure the computer is not in the power saving mode by moving the mouse or pressing any key on the keyboard. • Check whether the signal cable is white • Check the signal source. the screen 62 | Troubleshooting Re-plug the signal cable if necessary. • Reset the computer or video player. does not fill entire • Reset the display to unlock . Wake On Touch is locked...
... display power cable, plug it back, and then turn off . Ensure the computer is not in the power saving mode by moving the mouse or pressing any key on the keyboard. • Check whether the signal cable is white • Check the signal source. the screen 62 | Troubleshooting Re-plug the signal cable if necessary. • Reset the computer or video player. does not fill entire • Reset the display to unlock . Wake On Touch is locked...
Users Guide
Page 63
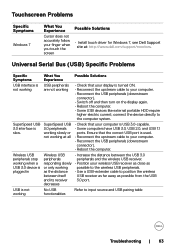
... you touch the screen Possible Solutions • Install touch driver for Windows 7, see Dell Support site at: http://www.dell.com/support/monitors. Ensure that the correct USB port is slow. Universal Serial Bus (USB) Specific Problems Specific Symptoms USB interface is not working as possible from the USB 3.0 port. connect the device directly to the computer system. • Check that your computer. • Reconnect the USB peripherals (downstream connector). • Switch off and then turn on the display...
... you touch the screen Possible Solutions • Install touch driver for Windows 7, see Dell Support site at: http://www.dell.com/support/monitors. Ensure that the correct USB port is slow. Universal Serial Bus (USB) Specific Problems Specific Symptoms USB interface is not working as possible from the USB 3.0 port. connect the device directly to the computer system. • Check that your computer. • Reconnect the USB peripherals (downstream connector). • Switch off and then turn on the display...

Users Guide
Page 66
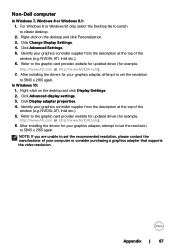
... adapter that best describes the computer system you are unable to set the resolution to 3840 x 2160, please contact Dell to update your graphics card. 2. Setting Up Your Display Setting Display Resolution to 3840 x 2160 (maximum) For best performance, set the display resolution to 3840 x 2160 again. After installing the drivers for your graphics driver. Right-click on the desktop and click Screen Resolution. 3. Click the dropdown list of the Screen Resolution and...
... adapter that best describes the computer system you are unable to set the resolution to 3840 x 2160, please contact Dell to update your graphics card. 2. Setting Up Your Display Setting Display Resolution to 3840 x 2160 (maximum) For best performance, set the display resolution to 3840 x 2160 again. After installing the drivers for your graphics driver. Right-click on the desktop and click Screen Resolution. 3. Click the dropdown list of the Screen Resolution and...
Users Guide
Page 67
... to switch to set the resolution to the graphic card provider website for updated driver (for your graphics adapter, attempt to set the recommended resolution, please contact the manufacturer of your graphics controller supplier from the description at the top of the window (e.g. Right-click on the desktop and click Display Settings. 2. Click Change Display Settings. 4. Identify your computer or consider purchasing a graphics adapter that supports the video resolution. Right...
... to switch to set the resolution to the graphic card provider website for updated driver (for your graphics adapter, attempt to set the recommended resolution, please contact the manufacturer of your graphics controller supplier from the description at the top of the window (e.g. Right-click on the desktop and click Display Settings. 2. Click Change Display Settings. 4. Identify your computer or consider purchasing a graphics adapter that supports the video resolution. Right...

Display Control User Guide
Page 5
... Turns the power on/off Adjusts the volume settings Toggles Mute on this screen. 1 Click a button and operate as follows. Button VGA DP HDMI 1 HDMI 2 HDMI 3 HDMI 4 Description Selects input from HDMI 3 port. Selects input from HDMI 4 port. 3 Click a button and operate as follows. Button Contrast Brightness Sharpness Description Adjusts the contrast setting. Selects input from HDMI 1 port. Adjusts the sharpness setting. Selects input from DP port. Dell Display Control │ 5 Main window 1 2 4 3 You can operate the basic controls of the monitor on /off 2 Sources...
... Turns the power on/off Adjusts the volume settings Toggles Mute on this screen. 1 Click a button and operate as follows. Button VGA DP HDMI 1 HDMI 2 HDMI 3 HDMI 4 Description Selects input from HDMI 3 port. Selects input from HDMI 4 port. 3 Click a button and operate as follows. Button Contrast Brightness Sharpness Description Adjusts the contrast setting. Selects input from HDMI 1 port. Adjusts the sharpness setting. Selects input from DP port. Dell Display Control │ 5 Main window 1 2 4 3 You can operate the basic controls of the monitor on /off 2 Sources...

Display Control User Guide
Page 8
...; Dell Display Control NOTE: Monitor Name, Location and the user name for the monitor. 2 Monitor Status Item Power Status Source Image Description Displays the current power status. Displays the the location name of the monitor. Displays the current input signal source. Displays the current picture mode setting. Displays the version of the monitor. Click the [Exit] button to return to the Main window. 1 Monitor Information Item Monitor Name Location Firmware Version MAC address Assigned To Description Displays the monitor name settings. Info window Dell C8618QT 1 Room...
...; Dell Display Control NOTE: Monitor Name, Location and the user name for the monitor. 2 Monitor Status Item Power Status Source Image Description Displays the current power status. Displays the the location name of the monitor. Displays the current input signal source. Displays the current picture mode setting. Displays the version of the monitor. Click the [Exit] button to return to the Main window. 1 Monitor Information Item Monitor Name Location Firmware Version MAC address Assigned To Description Displays the monitor name settings. Info window Dell C8618QT 1 Room...

Display Manager Users Guide
Page 4
Once installed, Dell display manager runs each time the computer starts and its icon is placed in the menu as below. 4 │ Overview Information about displays connected to manage a display or a group of automatic settings, energy management, window organization, image rotation, and other features on select Dell displays. Overview Dell Display Manager is a Windows application used to the computer is displayed when you hover the mouse pointer over the...
Once installed, Dell display manager runs each time the computer starts and its icon is placed in the menu as below. 4 │ Overview Information about displays connected to manage a display or a group of automatic settings, energy management, window organization, image rotation, and other features on select Dell displays. Overview Dell Display Manager is a Windows application used to the computer is displayed when you hover the mouse pointer over the...


