
Users Guide
Page 3
Contents About your monitor 5 Package contents 5 Product features 6 Identifying features and controls 7 Monitor speci cations 10 Plug and play capability 16 LCD monitor quality and pixel policy 16 Maintenance guidelines 16 Setting up the monitor 17 Connecting the stand 17 Connecting your monitor 18 Removing the stand 19 Operating your monitor 21 Turning on the monitor 21 Using the front panel controls 21 Using the On-Screen Display (OSD) menu 23 Setting up your monitor 35 Using tilt 37 Contents | 3
Contents About your monitor 5 Package contents 5 Product features 6 Identifying features and controls 7 Monitor speci cations 10 Plug and play capability 16 LCD monitor quality and pixel policy 16 Maintenance guidelines 16 Setting up the monitor 17 Connecting the stand 17 Connecting your monitor 18 Removing the stand 19 Operating your monitor 21 Turning on the monitor 21 Using the front panel controls 21 Using the On-Screen Display (OSD) menu 23 Setting up your monitor 35 Using tilt 37 Contents | 3
Users Guide
Page 5
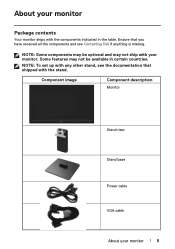
NOTE: Some components may not ship with the components indicated in certain countries. Some features may not be optional and may be available in the table. Ensure that shipped with any other stand, see the documentation that you have received all the components and see Contacting Dell if anything is missing. Component image Component description Monitor Stand riser Stand base Power cable VGA cable About your monitor. About your monitor Package contents Your monitor ships with your monitor | 5 NOTE: To set up with the stand.
NOTE: Some components may not ship with the components indicated in certain countries. Some features may not be optional and may be available in the table. Ensure that shipped with any other stand, see the documentation that you have received all the components and see Contacting Dell if anything is missing. Component image Component description Monitor Stand riser Stand base Power cable VGA cable About your monitor. About your monitor Package contents Your monitor ships with your monitor | 5 NOTE: To set up with the stand.

Users Guide
Page 6
...). HDMI cable Quick Setup Guide Safety and Regulatory Information Product features The Dell D2020H at panel display has an active matrix,Thin-Film Transistor (TFT), Liquid Crystal Display (LCD), anti-static,and LED backlight. Arsenic-free glass and mercury-free panel. The monitor features include: 49.53 cm (19.5 in the sleep mode. BFR / PVC-reduced (the circuit boards inside your monitor HDMI connectivity makes it simple and easy to connect with full-screen support for ease of set...
...). HDMI cable Quick Setup Guide Safety and Regulatory Information Product features The Dell D2020H at panel display has an active matrix,Thin-Film Transistor (TFT), Liquid Crystal Display (LCD), anti-static,and LED backlight. Arsenic-free glass and mercury-free panel. The monitor features include: 49.53 cm (19.5 in the sleep mode. BFR / PVC-reduced (the circuit boards inside your monitor HDMI connectivity makes it simple and easy to connect with full-screen support for ease of set...
Users Guide
Page 10
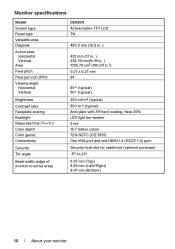
Monitor speci cations Model Screen type Panel type Viewable area Diagonal Active area: Horizontal Vertical Area Pixel pitch Pixel per inch (PPI) Viewing angle: Horizontal Vertical Brightness Contrast ratio Faceplate coating Backlight Response time (TR+TF): Color depth Color gamut Connectivity Security Tilt angle Bezel width (edge of monitor to active area) D2020H Active matrix-TFT LCD TN 495.3 mm (19.5 in. ) 432 mm (17 in. ) 239.76 mm(9.44 in. ) 1035.76 cm2...
Monitor speci cations Model Screen type Panel type Viewable area Diagonal Active area: Horizontal Vertical Area Pixel pitch Pixel per inch (PPI) Viewing angle: Horizontal Vertical Brightness Contrast ratio Faceplate coating Backlight Response time (TR+TF): Color depth Color gamut Connectivity Security Tilt angle Bezel width (edge of monitor to active area) D2020H Active matrix-TFT LCD TN 495.3 mm (19.5 in. ) 432 mm (17 in. ) 239.76 mm(9.44 in. ) 1035.76 cm2...
Users Guide
Page 14
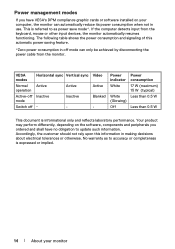
... table shows the power consumption and signaling of this information in o mode can automatically reduce its power consumption when not in use. VESA modes Normal operation Active-off mode Switch o Horizontal sync Vertical sync Active Active Inactive Inactive - - Your product may perform di erently, depending on your monitor No warranty as power save mode*. Power management modes If you have VESA's DPM compliance graphic cards or software installed on the software, components and peripherals...
... table shows the power consumption and signaling of this information in o mode can automatically reduce its power consumption when not in use. VESA modes Normal operation Active-off mode Switch o Horizontal sync Vertical sync Active Active Inactive Inactive - - Your product may perform di erently, depending on your monitor No warranty as power save mode*. Power management modes If you have VESA's DPM compliance graphic cards or software installed on the software, components and peripherals...
Users Guide
Page 16
... white powder when you can select di erent settings if desired. For more information on Dell Monitor Quality and Pixel Policy, see and do not a ect the display quality or usability. Handle your monitor To help maintain the best image quality on your monitor, use a dynamically changing screen saver and turn o your monitor when not in use a special screen-cleaning tissue or solution suitable for one or more pixels to clean...
... white powder when you can select di erent settings if desired. For more information on Dell Monitor Quality and Pixel Policy, see and do not a ect the display quality or usability. Handle your monitor To help maintain the best image quality on your monitor, use a dynamically changing screen saver and turn o your monitor when not in use a special screen-cleaning tissue or solution suitable for one or more pixels to clean...
Users Guide
Page 22
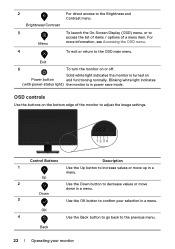
... white light indicates the monitor is in a menu. Blinking white light indicates (with power-status light) the monitor is turned on Power button and functioning normally. Down 3 Use the OK button to the Brightness and Contrast menu. Exit 5 To turn the monitor on the bottom edge of a menu item. 2 For direct access to con rm your monitor Brightness/Contrast 3 To launch the On-Screen Display (OSD) menu, or to increase values or move down in a menu. Control Buttons Description 1 Use the Up button...
... white light indicates the monitor is in a menu. Blinking white light indicates (with power-status light) the monitor is turned on Power button and functioning normally. Down 3 Use the OK button to the Brightness and Contrast menu. Exit 5 To turn the monitor on the bottom edge of a menu item. 2 For direct access to con rm your monitor Brightness/Contrast 3 To launch the On-Screen Display (OSD) menu, or to increase values or move down in a menu. Control Buttons Description 1 Use the Up button...
Users Guide
Page 24
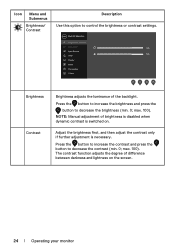
NOTE: Manual adjustment of brightness is disabled when dynamic contrast is necessary. The contrast function adjusts the degree of the backlight. Press the button to increase the contrast and press the button to decrease the brightness (min. 0; Press the button to increase the brightness and press the button to decrease the contrast (min. 0; Dell 20 Monitor Brightness / Contrast Auto Adjust 75% Input Source 75% Color Display Menu Personalize Others Brightness Contrast Brightness adjusts the luminance of di erence between darkness and lightness on...
NOTE: Manual adjustment of brightness is disabled when dynamic contrast is necessary. The contrast function adjusts the degree of the backlight. Press the button to increase the contrast and press the button to decrease the brightness (min. 0; Press the button to increase the brightness and press the button to decrease the contrast (min. 0; Dell 20 Monitor Brightness / Contrast Auto Adjust 75% Input Source 75% Color Display Menu Personalize Others Brightness Contrast Brightness adjusts the luminance of di erence between darkness and lightness on...
Users Guide
Page 26
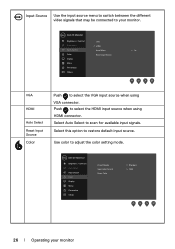
... the HDMI input source when using VGA connector. Push to select the VGA input source when using HDMI connector. Select Auto Select to restore default input source. Dell 20 Monitor Brightness / Contrast Auto Adjust Input Source Color Display Menu Personalize Others Preset Modes Input Color Format Reset Color Standard RGB 26 | Operating your monitor. Select this option to scan for available input signals. Use color to your monitor Input Source Use the input source menu to switch between the di erent video signals that may be connected to adjust the color setting mode.
... the HDMI input source when using VGA connector. Push to select the VGA input source when using HDMI connector. Select Auto Select to restore default input source. Dell 20 Monitor Brightness / Contrast Auto Adjust Input Source Color Display Menu Personalize Others Preset Modes Input Color Format Reset Color Standard RGB 26 | Operating your monitor. Select this option to scan for available input signals. Use color to your monitor Input Source Use the input source menu to switch between the di erent video signals that may be connected to adjust the color setting mode.

Users Guide
Page 27
... the color temperature. The screen appears warmer with a blue tint. Dell 20 Monitor Brightness / Contrast Auto Adjust Input Source Color Display Menu Personalize Others Preset Modes Input Color Format Reset Color Standard Warm Cool Custom Color Operating your own preset color mode. Perform stretches to moisten or lubricate your eyes. The screen appears cooler with a red/yellow tint. Take regular 20-minute breaks every two hours. Press the and buttons to manually adjust the color settings. Preset Modes When you...
... the color temperature. The screen appears warmer with a blue tint. Dell 20 Monitor Brightness / Contrast Auto Adjust Input Source Color Display Menu Personalize Others Preset Modes Input Color Format Reset Color Standard Warm Cool Custom Color Operating your own preset color mode. Perform stretches to moisten or lubricate your eyes. The screen appears cooler with a red/yellow tint. Take regular 20-minute breaks every two hours. Press the and buttons to manually adjust the color settings. Preset Modes When you...

Users Guide
Page 28
Input Color Format Allow you to set the video input mode to: RGB: Select this option if your monitor is connected to the factory settings. 28 | Operating your monitor YPbPr: Select this option if your DVD player supports only YPbPr output. Dell 20 Monitor Brightness / Contrast Auto Adjust Input Source Color Display Menu Personalize Others Preset Modes Input Color Format Reset Color RGB YPbPr Reset Color Reset your monitor color settings to a computer or DVD player using the HDMI cable.
Input Color Format Allow you to set the video input mode to: RGB: Select this option if your monitor is connected to the factory settings. 28 | Operating your monitor YPbPr: Select this option if your DVD player supports only YPbPr output. Dell 20 Monitor Brightness / Contrast Auto Adjust Input Source Color Display Menu Personalize Others Preset Modes Input Color Format Reset Color RGB YPbPr Reset Color Reset your monitor color settings to a computer or DVD player using the HDMI cable.
Users Guide
Page 29
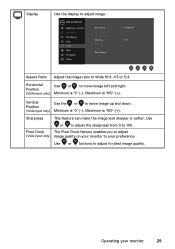
... Use or to adjust for best image quality. Use or buttons to move image up and down. (VGA input only) Minimum is '0' (-). Operating your preference. Sharpness This feature can make the image look sharper or softer. Maximum is '100' (+). Pixel Clock The Pixel Clock feature enables you to adjust (VGA input only) image quality on your monitor to Wide 16:9, 4:3 or 5:4. Dell 20 Monitor Brightness / Contrast Auto Adjust Input Source Color Display Menu Personalize Others Aspect Ratio Horizontal Position Vertical Position Sharpness Pixel Clock Phase Reset Display Wide...
... Use or to adjust for best image quality. Use or buttons to move image up and down. (VGA input only) Minimum is '0' (-). Operating your preference. Sharpness This feature can make the image look sharper or softer. Maximum is '100' (+). Pixel Clock The Pixel Clock feature enables you to adjust (VGA input only) image quality on your monitor to Wide 16:9, 4:3 or 5:4. Dell 20 Monitor Brightness / Contrast Auto Adjust Input Source Color Display Menu Personalize Others Aspect Ratio Horizontal Position Vertical Position Sharpness Pixel Clock Phase Reset Display Wide...

Users Guide
Page 31
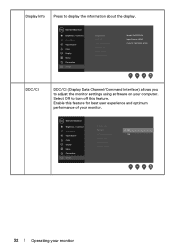
...Preset Modes, Brightness/Contrast, Auto Adjust, Input Source, Aspect Ratio, to save energy. Dell 20 Monitor Brightness / Contrast Auto Adjust Input Source Color Display Menu Personalize Others Shortcut Key 1 Shortcut Key 2 Power Button LED Reset Personalization Preset Modes Brightness/Contrast On During Active Shortcut Key 1 Allow you to set the power LED indicator On During Active LED or O During Active to set it as a shortcut key. Personalization Others Dell 20 Monitor Brightness / Contrast Auto Adjust Input Source Color Display Menu Personalize Others Display Info DDC/CI LCD...
...Preset Modes, Brightness/Contrast, Auto Adjust, Input Source, Aspect Ratio, to save energy. Dell 20 Monitor Brightness / Contrast Auto Adjust Input Source Color Display Menu Personalize Others Shortcut Key 1 Shortcut Key 2 Power Button LED Reset Personalization Preset Modes Brightness/Contrast On During Active Shortcut Key 1 Allow you to set the power LED indicator On During Active LED or O During Active to set it as a shortcut key. Personalization Others Dell 20 Monitor Brightness / Contrast Auto Adjust Input Source Color Display Menu Personalize Others Display Info DDC/CI LCD...
Users Guide
Page 32
... turn o this feature for best user experience and optimum performance of your monitor. Enable this feature. Dell 20 Monitor Brightness / Contrast Auto Adjust Input Source Color Display Menu Personalize Others Display Info DDC/CI LCD Conditioning Service Tag Reset Others Factory Reset Model: Dell D2020H Input Source: HDMI Current: 1600x900, 60Hz DDC/CI DDC/CI (Display Data Channel/Command Interface) allows you to display the information about the display. Dell 20 Monitor Brightness / Contrast Display Info Auto Adjust DDC/CI On Input Source Color Display Menu LCD Conditioning...
... turn o this feature for best user experience and optimum performance of your monitor. Enable this feature. Dell 20 Monitor Brightness / Contrast Auto Adjust Input Source Color Display Menu Personalize Others Display Info DDC/CI LCD Conditioning Service Tag Reset Others Factory Reset Model: Dell D2020H Input Source: HDMI Current: 1600x900, 60Hz DDC/CI DDC/CI (Display Data Channel/Command Interface) allows you to display the information about the display. Dell 20 Monitor Brightness / Contrast Display Info Auto Adjust DDC/CI On Input Source Color Display Menu LCD Conditioning...
Users Guide
Page 33
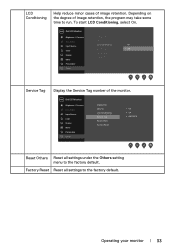
... the factory default. Dell 20 Monitor Brightness / Contrast Auto Adjust Input Source Color Display Menu Personalize Others Display Info DDC/CI LCD Conditioning Service Tag Reset Others Factory Reset On ABCDEFG Reset Others Reset all settings to the factory default. Dell 20 Monitor Brightness / Contrast Display Info Auto Adjust Input Source Color Display Menu DDC/CI LCD Conditioning On Service Tag Reset Others Factory Reset Personalize Others Service Tag Display the Service Tag number of image retention. To start LCD Conditioning, select On. LCD Conditioning Help...
... the factory default. Dell 20 Monitor Brightness / Contrast Auto Adjust Input Source Color Display Menu Personalize Others Display Info DDC/CI LCD Conditioning Service Tag Reset Others Factory Reset On ABCDEFG Reset Others Reset all settings to the factory default. Dell 20 Monitor Brightness / Contrast Display Info Auto Adjust Input Source Color Display Menu DDC/CI LCD Conditioning On Service Tag Reset Others Factory Reset Personalize Others Service Tag Display the Service Tag number of image retention. To start LCD Conditioning, select On. LCD Conditioning Help...

Users Guide
Page 35
... Screen Resolution. 2. Click the drop-down menu under Resolution and select 1600 x 900 4. Operating your graphics adapter, attempt to set the resolution to 1600 x 900 please contact Dell to inquire about a graphics adapter that supports these resolutions. Select the Desktop tile to switch to www.dell.com/support, enter your service tag, and download the latest driver for your monitor | 35 In Windows 10: 1. After installing the drivers for your graphics card...
... Screen Resolution. 2. Click the drop-down menu under Resolution and select 1600 x 900 4. Operating your graphics adapter, attempt to set the resolution to 1600 x 900 please contact Dell to inquire about a graphics adapter that supports these resolutions. Select the Desktop tile to switch to www.dell.com/support, enter your service tag, and download the latest driver for your monitor | 35 In Windows 10: 1. After installing the drivers for your graphics card...

Users Guide
Page 36
... top of the window (e.g. Right-click on the desktop and click Personalization. 2. Click Advanced Settings. 5. After installing the drivers for example, www.AMD.com or www.NVIDIA.com). 7. NVIDIA, AMD, Intel etc.). 5. NVIDIA, AMD, Intel etc.). 5. Select the Desktop tile to switch to the graphic card provider website for updated driver (for your monitor Click Change Display Settings. 4. Click Display adapter properties. 4. Right-click...
... top of the window (e.g. Right-click on the desktop and click Personalization. 2. Click Advanced Settings. 5. After installing the drivers for example, www.AMD.com or www.NVIDIA.com). 7. NVIDIA, AMD, Intel etc.). 5. NVIDIA, AMD, Intel etc.). 5. Select the Desktop tile to switch to the graphic card provider website for updated driver (for your monitor Click Change Display Settings. 4. Click Display adapter properties. 4. Right-click...
Users Guide
Page 39
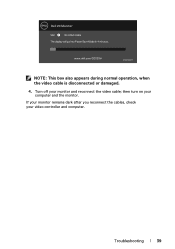
If your monitor remains dark after you reconnect the cables, check your computer and the monitor. then turn on your video controller and computer. No HDMI Cable The display will go into Power Save Mode in 4 minutes. www.dell.com/D2020H D2020H NOTE: This box also appears during normal operation, when the video cable is disconnected or damaged. 4. Troubleshooting | 39 Dell 20 Monitor ? Turn o your monitor and reconnect the video cable;
If your monitor remains dark after you reconnect the cables, check your computer and the monitor. then turn on your video controller and computer. No HDMI Cable The display will go into Power Save Mode in 4 minutes. www.dell.com/D2020H D2020H NOTE: This box also appears during normal operation, when the video cable is disconnected or damaged. 4. Troubleshooting | 39 Dell 20 Monitor ? Turn o your monitor and reconnect the video cable;
Users Guide
Page 41
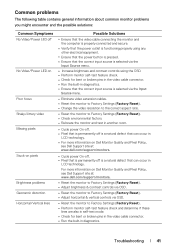
... the video cable connector. Cycle power On-o . For more information on Dell Monitor Quality and Pixel Policy, see Dell Support site at : www.dell.com/support/monitors. Verify that the power outlet is properly connected and secure. Increase brightness and contrast controls using any other electrical equipment. Reset the monitor to Factory Settings (Factory Reset). Pixel that is permanently o is selected via the Input Source menu. Check for bent or broken pins in LCD technology. Perform monitor self-test feature check. Common problems...
... the video cable connector. Cycle power On-o . For more information on Dell Monitor Quality and Pixel Policy, see Dell Support site at : www.dell.com/support/monitors. Verify that the power outlet is properly connected and secure. Increase brightness and contrast controls using any other electrical equipment. Reset the monitor to Factory Settings (Factory Reset). Pixel that is permanently o is selected via the Input Source menu. Check for bent or broken pins in LCD technology. Perform monitor self-test feature check. Common problems...
Users Guide
Page 43
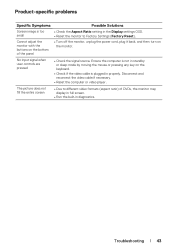
... the panel No input signal when user controls are pressed The picture does not ll the entire screen Possible Solutions Check the Aspect Ratio setting in the Display settings OSD. Troubleshooting | 43 Check if the video cable is plugged in diagnostics. Disconnect and reconnect the video cable if necessary. Screen image is too small Cannot adjust the monitor with the buttons on the bottom of DVDs, the monitor may display in full screen. Check the signal source. Turn o the monitor, unplug the power cord, plug...
... the panel No input signal when user controls are pressed The picture does not ll the entire screen Possible Solutions Check the Aspect Ratio setting in the Display settings OSD. Troubleshooting | 43 Check if the video cable is plugged in diagnostics. Disconnect and reconnect the video cable if necessary. Screen image is too small Cannot adjust the monitor with the buttons on the bottom of DVDs, the monitor may display in full screen. Check the signal source. Turn o the monitor, unplug the power cord, plug...


