

Users Guide
Page 3
Contents About Your Monitor 5 Package Contents 5 Product Features 6 Identifying Parts and Controls 7 Monitor Specifications 9 Plug and Play Capability 12 LCD Monitor Quality & Pixel Policy 16 Maintenance Guidelines 17 Setting Up the Monitor 18 Attaching the Stand 18 Connecting Your Monitor 19 Organizing Your Cables 19 Removing the Monitor Stand 20 Wall Mounting (Optional 21 Operating the Monitor 22 Power On the Monitor 22 Using the Front-Panel Controls 22 Using the On-Screen Display (OSD) Menu 23 Setting the Maximum Resolution 46 Using the Tilt 47 3
Contents About Your Monitor 5 Package Contents 5 Product Features 6 Identifying Parts and Controls 7 Monitor Specifications 9 Plug and Play Capability 12 LCD Monitor Quality & Pixel Policy 16 Maintenance Guidelines 17 Setting Up the Monitor 18 Attaching the Stand 18 Connecting Your Monitor 19 Organizing Your Cables 19 Removing the Monitor Stand 20 Wall Mounting (Optional 21 Operating the Monitor 22 Power On the Monitor 22 Using the Front-Panel Controls 22 Using the On-Screen Display (OSD) Menu 23 Setting the Maximum Resolution 46 Using the Tilt 47 3

Users Guide
Page 6
The monitor's features include: • E1916HV : 47.01 cm (18.51 inches) diagonal viewable image size, 1366 x 768 resolution, plus full-screen support for lower resolutions. • E2016HV: 49.53cm (19.5 inches) diagonal viewable image size, 1600 x 900 resolution, plus full-screen support .... • Energy Gauge shows the energy level being consumed by the monitor in real time. • Analog backlight dimming control for flicker free display. 6 About Your Monitor Product Features The Dell E1916HV / E2016HV / E2216HV flat-panel display has an active matrix, ThinFilm Transistor, Liquid...
The monitor's features include: • E1916HV : 47.01 cm (18.51 inches) diagonal viewable image size, 1366 x 768 resolution, plus full-screen support for lower resolutions. • E2016HV: 49.53cm (19.5 inches) diagonal viewable image size, 1600 x 900 resolution, plus full-screen support .... • Energy Gauge shows the energy level being consumed by the monitor in real time. • Analog backlight dimming control for flicker free display. 6 About Your Monitor Product Features The Dell E1916HV / E2016HV / E2216HV flat-panel display has an active matrix, ThinFilm Transistor, Liquid...
Users Guide
Page 12
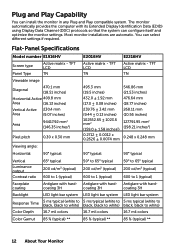
...16.13 inches) Vertical Active 230.4 mm Area (9.07 inches) Area 94417.92 mm2 (146.35 inches2) Pixel pitch 0.30 x 0.30 mm E2016HV Active matrix - TFT LCD TN 495.3 mm (19.5 inches) 432.0 ± 1.92 mm (17.0 ± 0.08 inches) 239.76 ± 3.42 mm (9.44 ± 0.13 ....7 mil colors 16.7 mil colors Color Gamut 85 % (typical) ** 85 % (typical) ** 85 % (typical) ** 12 About Your Monitor Antiglare with hard- You can install the monitor in any Plug and Play compatible system. coating 3H coating 3H coating 3H Backlight LED light bar system LED light bar system...
...16.13 inches) Vertical Active 230.4 mm Area (9.07 inches) Area 94417.92 mm2 (146.35 inches2) Pixel pitch 0.30 x 0.30 mm E2016HV Active matrix - TFT LCD TN 495.3 mm (19.5 inches) 432.0 ± 1.92 mm (17.0 ± 0.08 inches) 239.76 ± 3.42 mm (9.44 ± 0.13 ....7 mil colors 16.7 mil colors Color Gamut 85 % (typical) ** 85 % (typical) ** 85 % (typical) ** 12 About Your Monitor Antiglare with hard- You can install the monitor in any Plug and Play compatible system. coating 3H coating 3H coating 3H Backlight LED light bar system LED light bar system...

Users Guide
Page 19
...power cable. 2. Appearance on the back of your monitor and computer, (See Connecting Your Monitor for the purpose of the procedures in this section, follow the Safety Instructions. Setting Up the Monitor 19 Turn off your monitor to the corresponding video port on the computer may ...vary. Organizing Your Cables After attaching all cables as shown above. Connecting Your Monitor WARNING: Before you begin any of illustration only....
...power cable. 2. Appearance on the back of your monitor and computer, (See Connecting Your Monitor for the purpose of the procedures in this section, follow the Safety Instructions. Setting Up the Monitor 19 Turn off your monitor to the corresponding video port on the computer may ...vary. Organizing Your Cables After attaching all cables as shown above. Connecting Your Monitor WARNING: Before you begin any of illustration only....


