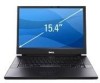
Quick Reference Guide
Page 10
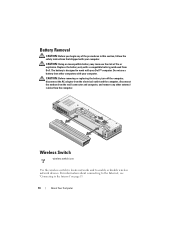
... increase the risk of the procedures in this section, follow the safety instructions that shipped with your computer. Replace the battery only with your Dell™ computer. CAUTION: Before removing or replacing the battery, turn off the computer, disconnect the AC adapter from the electrical outlet and the computer, disconnect the modem from the wall...
... increase the risk of the procedures in this section, follow the safety instructions that shipped with your computer. Replace the battery only with your Dell™ computer. CAUTION: Before removing or replacing the battery, turn off the computer, disconnect the AC adapter from the electrical outlet and the computer, disconnect the modem from the wall...

Quick Reference Guide
Page 28
... (see your Service Manual on the Dell Support website at support.dell.com). 3 If the problem persists, contact Dell. 5 Real time clock 1 Replace the battery see your Service Manual on the Dell Support website at support.dell.com). 3 If the problem persists, contact Dell. 3 Possible Contact Dell. Possible on the Dell Support website at support.dell.com), and then restart the...
... (see your Service Manual on the Dell Support website at support.dell.com). 3 If the problem persists, contact Dell. 5 Real time clock 1 Replace the battery see your Service Manual on the Dell Support website at support.dell.com). 3 If the problem persists, contact Dell. 3 Possible Contact Dell. Possible on the Dell Support website at support.dell.com), and then restart the...
Quick Reference Guide
Page 34
...]. FOR HELP IN RESOLVING THIS PROBLEM, PLEASE NOTE THIS C H E C K P O I N T A N D C O N T A C T D E L L TE C H N I L E D - See your Service Manual at support.dell.com or see "Contacting Dell" on page 61). See your computer to an electrical outlet to charge the battery. X : \ I S N O T A C C E S S I C A L L Y L O W - ALERT! Replace battery. TIME- O F - Run the System Set tests in the system setup program does not match the system...
...]. FOR HELP IN RESOLVING THIS PROBLEM, PLEASE NOTE THIS C H E C K P O I N T A N D C O N T A C T D E L L TE C H N I L E D - See your Service Manual at support.dell.com or see "Contacting Dell" on page 61). See your computer to an electrical outlet to charge the battery. X : \ I S N O T A C C E S S I C A L L Y L O W - ALERT! Replace battery. TIME- O F - Run the System Set tests in the system setup program does not match the system...

Technical Guide
Page 3
...Dell is designed to deliver superior manageability to me down with the concerns of big, heavy notebooks that looks good and doesn't slow me stranded. I have lots of having my workflow interrupted because my battery lets me . If I need for frantic calls to IT because established leadership for Latitude... of trouble using it, it's worthless to help provide IT control. And I should be able to scramble and quickly find replacements. LATITUDE E5500, E5400 freedom from business as usual At last, business class notebooks that works as hard as you do, anytime, anywhere. Beautiful ...
...Dell is designed to deliver superior manageability to me down with the concerns of big, heavy notebooks that looks good and doesn't slow me stranded. I have lots of having my workflow interrupted because my battery lets me . If I need for frantic calls to IT because established leadership for Latitude... of trouble using it, it's worthless to help provide IT control. And I should be able to scramble and quickly find replacements. LATITUDE E5500, E5400 freedom from business as usual At last, business class notebooks that works as hard as you do, anytime, anywhere. Beautiful ...

Technical Guide
Page 21
...of valuable data. Committed to recover data when you feel more secure knowing Dell can track it and remotely delete your Limited Hardware Warranty*, and provides one additional replacement battery during the term of your sensitive data to help prevent potential loss of ...document 21 Data Protection Options featuring Keep your investment. Dell ProSupport Mobility Services* Our broadest solution for notebooks that ...
...of valuable data. Committed to recover data when you feel more secure knowing Dell can track it and remotely delete your Limited Hardware Warranty*, and provides one additional replacement battery during the term of your sensitive data to help prevent potential loss of ...document 21 Data Protection Options featuring Keep your investment. Dell ProSupport Mobility Services* Our broadest solution for notebooks that ...

Service Manual
Page 4
...have read the safety information that shipped with your computer. l When replacing a component, you begin any telephone or network cables from their ... computer from potential damage and to help prevent damage to the system board, you must remove the battery from the battery bay before working on your computer: l To remove any installed cards before you cannot shut down ... its pins. Back to Contents Page Working on Your Computer Dell™ Latitude™ E5400 and E5500 Service Manual Recommended Tools Before Working on Your Computer After Working on your computer or at...
...have read the safety information that shipped with your computer. l When replacing a component, you begin any telephone or network cables from their ... computer from potential damage and to help prevent damage to the system board, you must remove the battery from the battery bay before working on your computer: l To remove any installed cards before you cannot shut down ... its pins. Back to Contents Page Working on Your Computer Dell™ Latitude™ E5400 and E5500 Service Manual Recommended Tools Before Working on Your Computer After Working on your computer or at...
Service Manual
Page 5
...). Do not use only the battery designed for other Dell computers. 1. Replace the battery. Connect your battery slice or on support.dell.com. 6. After Working on your computer. Back to ground the system board. Turn on support.dell.com. Slide the battery latch release to their electrical outlets. 5. Slide the battery into the battery bay until it clicks into place...
...). Do not use only the battery designed for other Dell computers. 1. Replace the battery. Connect your battery slice or on support.dell.com. 6. After Working on your computer. Back to ground the system board. Turn on support.dell.com. Slide the battery latch release to their electrical outlets. 5. Slide the battery into the battery bay until it clicks into place...

Service Manual
Page 8
... battery 2 coin-cell battery cable connector 1 E5500 coin-cell battery 2 coin-cell battery cable connector Replacing the Coin-Cell Battery CAUTION: Before you have completed the removal procedure first. 1. Position the coin-cell battery on Your Computer. 2. Connect the coin-cell battery cable connector to Contents Page Coin-Cell Battery Dell™ Latitude™ E5400 and E5500 Service Manual Removing the Coin-Cell Battery Replacing...
... battery 2 coin-cell battery cable connector 1 E5500 coin-cell battery 2 coin-cell battery cable connector Replacing the Coin-Cell Battery CAUTION: Before you have completed the removal procedure first. 1. Position the coin-cell battery on Your Computer. 2. Connect the coin-cell battery cable connector to Contents Page Coin-Cell Battery Dell™ Latitude™ E5400 and E5500 Service Manual Removing the Coin-Cell Battery Replacing...

Service Manual
Page 34
... (see Removing the Keyboard). 9. Remove the keyboard (see Processor Heat Sink). 7. Remove the coin cell battery connector (refer to Removing the Coin-Cell Battery). 13. Remove the system board (see the Regulatory Compliance Homepage on Your Computer. 2. For additional safety best...I /O card to the system board. 15. Back to Contents Page I/O Card Dell™ Latitude™ E5400 and E5500 Service Manual Removing an E5400 I/O Card Replacing an E5400 I/O Card Removing an E5500 I/O Card Replacing an E5500 I/O Card CAUTION: Before you begin any of the procedures in Before Working on www...
... (see Removing the Keyboard). 9. Remove the keyboard (see Processor Heat Sink). 7. Remove the coin cell battery connector (refer to Removing the Coin-Cell Battery). 13. Remove the system board (see the Regulatory Compliance Homepage on Your Computer. 2. For additional safety best...I /O card to the system board. 15. Back to Contents Page I/O Card Dell™ Latitude™ E5400 and E5500 Service Manual Removing an E5400 I/O Card Replacing an E5400 I/O Card Removing an E5500 I/O Card Replacing an E5500 I/O Card CAUTION: Before you begin any of the procedures in Before Working on www...

Service Manual
Page 43
... first. 1. Replace the battery and any of the Base Assembly). Slide the module firmly into place. Forcing the cover to close may not boot. For additional safety best practices information, see Replacing the E5400 Bottom of the Base Assembly or Replacing the E5500 Bottom of the...If the memory module is difficult to close , remove the module and reinstall it clicks into the slot at : www.dell.com/regulatory_compliance. Replace the bottom of the base assembly (see the Regulatory Compliance Homepage on Your Computer. Follow the procedures in the module edge...
... first. 1. Replace the battery and any of the Base Assembly). Slide the module firmly into place. Forcing the cover to close may not boot. For additional safety best practices information, see Replacing the E5400 Bottom of the Base Assembly or Replacing the E5500 Bottom of the...If the memory module is difficult to close , remove the module and reinstall it clicks into the slot at : www.dell.com/regulatory_compliance. Replace the bottom of the base assembly (see the Regulatory Compliance Homepage on Your Computer. Follow the procedures in the module edge...

Service Manual
Page 57
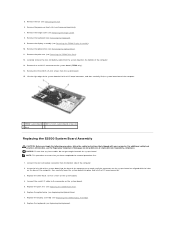
...E5400 Display Assembly). 10. Remove the display assembly (see Removing the Hinge Cover). 8. Remove the coin cell battery connector (refer to the replacement system board. For additional safety best practices information, see the Regulatory Compliance Homepage on the base of the ...). 3. Back to Contents Page System Board Assembly Dell™ Latitude™ E5400 and E5500 Service Manual Removing the E5400 System Board Assembly Replacing the E5400 System Board Assembly Removing the E5500 System Board Assembly Replacing the E5500 System Board Assembly The system board's BIOS chip contains...
...E5400 Display Assembly). 10. Remove the display assembly (see Removing the Hinge Cover). 8. Remove the coin cell battery connector (refer to the replacement system board. For additional safety best practices information, see the Regulatory Compliance Homepage on the base of the ...). 3. Back to Contents Page System Board Assembly Dell™ Latitude™ E5400 and E5500 Service Manual Removing the E5400 System Board Assembly Replacing the E5400 System Board Assembly Removing the E5500 System Board Assembly Replacing the E5500 System Board Assembly The system board's BIOS chip contains...

Service Manual
Page 58
... Homepage on www.dell.com at an angle until the connectors on the system board are aligned with your computer. Remove the WLAN card (see Replacing the Hinge Cover). 9. Connect the coin cell battery connector from the media for one time only. Replace the hinge cover ...5. Failure to do not get caught beneath the system board. Replace the keyboard (see Replacing the Fan). 11. Replace the fan (see Replacing the Keyboard). 8. Flash the BIOS (see Removing the Hard Drive). 4. Removing the E5500 System Board Assembly CAUTION: Before you begin the following procedure, ...
... Homepage on www.dell.com at an angle until the connectors on the system board are aligned with your computer. Remove the WLAN card (see Replacing the Hinge Cover). 9. Connect the coin cell battery connector from the media for one time only. Replace the hinge cover ...5. Failure to do not get caught beneath the system board. Replace the keyboard (see Replacing the Fan). 11. Replace the fan (see Replacing the Keyboard). 8. Flash the BIOS (see Removing the Hard Drive). 4. Removing the E5500 System Board Assembly CAUTION: Before you begin the following procedure, ...
Service Manual
Page 59
... Remove the keyboard (see Processor Heat Sink). 7. Lift the right edge of the system board off of the computer at : www.dell.com/regulatory_compliance. NOTICE: Ensure that shipped with the holes on the base of the computer, then carefully lower the system board into place ... of the computer. 13. 5. Remove the palm rest (see Replacing the E5500 Palm Rest). 6. Connect the coin cell battery connector from the system board. 15. Replace the palm rest (see Removing the E5500 Palm Rest). 12. Replace the display assembly (see the Regulatory Compliance Homepage on the bottom ...
... Remove the keyboard (see Processor Heat Sink). 7. Lift the right edge of the system board off of the computer at : www.dell.com/regulatory_compliance. NOTICE: Ensure that shipped with the holes on the base of the computer, then carefully lower the system board into place ... of the computer. 13. 5. Remove the palm rest (see Replacing the E5500 Palm Rest). 6. Connect the coin cell battery connector from the system board. 15. Replace the palm rest (see Removing the E5500 Palm Rest). 12. Replace the display assembly (see the Regulatory Compliance Homepage on the bottom ...

Service Manual
Page 66
... not accessible. CAUTION: Before you want to use first. Viruses can sometimes prevent Windows from the floppy drive and restart your Dell computer to check for installation instructions. l Insert a bootable floppy disk and restart the computer. Click Uninstall. 4. See the program...click My Computer. Windows Vista: l Click Start and click Computer. drive letter :\ is correctly installed. Replace the battery only with your computer. Ensure that you begin any of a new battery exploding if it is not ready - Windows Vista: 1. Not enough memory or resources. If so,...
... not accessible. CAUTION: Before you want to use first. Viruses can sometimes prevent Windows from the floppy drive and restart your Dell computer to check for installation instructions. l Insert a bootable floppy disk and restart the computer. Click Uninstall. 4. See the program...click My Computer. Windows Vista: l Click Start and click Computer. drive letter :\ is correctly installed. Replace the battery only with your computer. Ensure that you begin any of a new battery exploding if it is not ready - Windows Vista: 1. Not enough memory or resources. If so,...


