

Inspiron 15 3000 Service Manual
Page 4
Replacing the keyboard 25 Procedure 25 Post-requisites 25 Removing the base cover 26 Prerequisites 26 Procedure 26 Replacing the base cover 31 Procedure 31 Post-requisites 33 Removing the optical-drive interposer 34 Prerequisites 34 Procedure 34 Replacing the optical-drive interposer 36 Procedure 36 Post-requisites 36 Removing the hard drive 37 Prerequisites 37 Procedure 37 Replacing the hard drive 40 Procedure 40 Post-requisites 41 Removing the memory modules 42 Prerequisites 42 Procedure 42 4
Replacing the keyboard 25 Procedure 25 Post-requisites 25 Removing the base cover 26 Prerequisites 26 Procedure 26 Replacing the base cover 31 Procedure 31 Post-requisites 33 Removing the optical-drive interposer 34 Prerequisites 34 Procedure 34 Replacing the optical-drive interposer 36 Procedure 36 Post-requisites 36 Removing the hard drive 37 Prerequisites 37 Procedure 37 Replacing the hard drive 40 Procedure 40 Post-requisites 41 Removing the memory modules 42 Prerequisites 42 Procedure 42 4
Inspiron 15 3000 Service Manual
Page 5
Replacing the memory modules 44 Procedure 44 Post-requisites 45 Removing the wireless card 46 Prerequisites 46 Procedure 46 Replacing the wireless card 48 Procedure 48 Post-requisites 50 Removing the power-button board 51 Prerequisites 51 Procedure 51 Replacing the power-button board 54 Procedure 54 Post-requisites 55 Removing the speakers 56 Prerequisites 56 Procedure 56 Replacing the speakers 58 Procedure 58 Post-requisites 58 Removing the I/O board 59 Prerequisites 59 Procedure 59 5
Replacing the memory modules 44 Procedure 44 Post-requisites 45 Removing the wireless card 46 Prerequisites 46 Procedure 46 Replacing the wireless card 48 Procedure 48 Post-requisites 50 Removing the power-button board 51 Prerequisites 51 Procedure 51 Replacing the power-button board 54 Procedure 54 Post-requisites 55 Removing the speakers 56 Prerequisites 56 Procedure 56 Replacing the speakers 58 Procedure 58 Post-requisites 58 Removing the I/O board 59 Prerequisites 59 Procedure 59 5
Inspiron 15 3000 Service Manual
Page 42
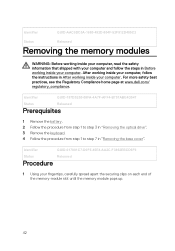
Identifier GUID-AAC0DC5A-1680-492D-804F-52F812D409C2 Status Released Removing the memory modules WARNING: Before working inside your computer, read the safety information that shipped with your computer and follow the instructions in "Removing the base cover". ... the procedure from step 1 to step 7 in After working inside your fingertips, carefully spread apart the securing clips on each end of the memory-module slot until the memory module pops up. 42 After working inside your computer, follow the steps in Before working inside your computer. For more safety best practices...
Identifier GUID-AAC0DC5A-1680-492D-804F-52F812D409C2 Status Released Removing the memory modules WARNING: Before working inside your computer, read the safety information that shipped with your computer and follow the instructions in "Removing the base cover". ... the procedure from step 1 to step 7 in After working inside your fingertips, carefully spread apart the securing clips on each end of the memory-module slot until the memory module pops up. 42 After working inside your computer, follow the steps in Before working inside your computer. For more safety best practices...
Inspiron 15 3000 Service Manual
Page 43
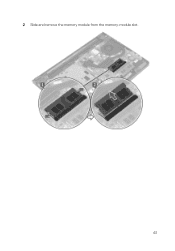
2 Slide and remove the memory module from the memory-module slot. 43
2 Slide and remove the memory module from the memory-module slot. 43
Inspiron 15 3000 Service Manual
Page 44
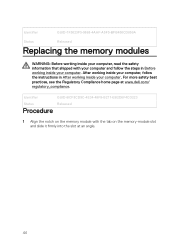
...4AAF-A9F5-BFB400CD890A Status Released Replacing the memory modules WARNING: Before working inside your computer, read the safety information that shipped with the tab on the memory-module slot and slide it firmly into the slot at www.dell.com/ regulatory_compliance. Identifier GUID-BCF8CD9C-4E34...-48F8-B271-EB2D6F4CD223 Status Released Procedure 1 Align the notch on the memory module with your computer and follow the...
...4AAF-A9F5-BFB400CD890A Status Released Replacing the memory modules WARNING: Before working inside your computer, read the safety information that shipped with the tab on the memory-module slot and slide it firmly into the slot at www.dell.com/ regulatory_compliance. Identifier GUID-BCF8CD9C-4E34...-48F8-B271-EB2D6F4CD223 Status Released Procedure 1 Align the notch on the memory module with your computer and follow the...
Inspiron 15 3000 Service Manual
Page 45
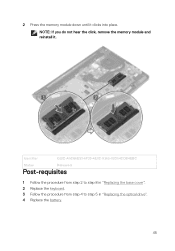
2 Press the memory module down until it . NOTE: If you do not hear the click, remove the memory module and reinstall it clicks into place. Identifier GUID-A5C66E53-6F20-4E0C-8365-03D54CDB4EBC Status Released Post-requisites 1 Follow the procedure from step 2 to step 8 in "Replacing the base cover". 2 Replace the keyboard. 3 Follow the procedure from step 4 to step 5 in "Replacing the optical drive". 4 Replace the battery. 45
2 Press the memory module down until it . NOTE: If you do not hear the click, remove the memory module and reinstall it clicks into place. Identifier GUID-A5C66E53-6F20-4E0C-8365-03D54CDB4EBC Status Released Post-requisites 1 Follow the procedure from step 2 to step 8 in "Replacing the base cover". 2 Replace the keyboard. 3 Follow the procedure from step 4 to step 5 in "Replacing the optical drive". 4 Replace the battery. 45
Inspiron 15 3000 Service Manual
Page 75
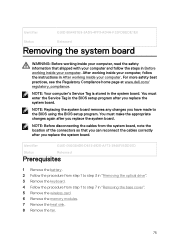
After working inside your computer, follow the steps in "Removing the base cover". 5 Remove the wireless card. 6 Remove the memory modules. 7 Remove the heat sink. 8 Remove the fan. 75 NOTE: Your computer's Service Tag is stored in After working inside your computer. ...procedure from step 1 to the BIOS using the BIOS setup program. For more safety best practices, see the Regulatory Compliance home page at www.dell.com/ regulatory_compliance. NOTE: Replacing the system board removes any changes you replace the system board. Identifier GUID-B54497E8-5AD5-4FF9-AD4A-F32FDBEDE1E8 Status ...
After working inside your computer, follow the steps in "Removing the base cover". 5 Remove the wireless card. 6 Remove the memory modules. 7 Remove the heat sink. 8 Remove the fan. 75 NOTE: Your computer's Service Tag is stored in After working inside your computer. ...procedure from step 1 to the BIOS using the BIOS setup program. For more safety best practices, see the Regulatory Compliance home page at www.dell.com/ regulatory_compliance. NOTE: Replacing the system board removes any changes you replace the system board. Identifier GUID-B54497E8-5AD5-4FF9-AD4A-F32FDBEDE1E8 Status ...
Inspiron 15 3000 Service Manual
Page 81
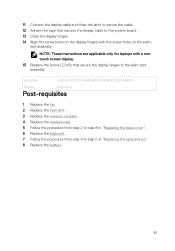
... Replace the battery. 81 Identifier GUID-A301D633-2465-4FFF-B856-2D6531A80875 Status Released Post-requisites 1 Replace the fan. 2 Replace the heat sink. 3 Replace the memory modules. 4 Replace the wireless card. 5 Follow the procedure from step 2 to step 8 in "Replacing the base cover". 6 Replace the keyboard. 7 ...rest assembly. NOTE: These instructions are applicable only for laptops with the screw holes on the display hinges with a nontouch screen display. 15 Replace the screw (2.5x8) that secures the display cable to the system board. 13 Close the display hinges. 14 Align the screw...
... Replace the battery. 81 Identifier GUID-A301D633-2465-4FFF-B856-2D6531A80875 Status Released Post-requisites 1 Replace the fan. 2 Replace the heat sink. 3 Replace the memory modules. 4 Replace the wireless card. 5 Follow the procedure from step 2 to step 8 in "Replacing the base cover". 6 Replace the keyboard. 7 ...rest assembly. NOTE: These instructions are applicable only for laptops with the screw holes on the display hinges with a nontouch screen display. 15 Replace the screw (2.5x8) that secures the display cable to the system board. 13 Close the display hinges. 14 Align the screw...
Inspiron 15 3000 Service Manual
Page 82
... the keyboard. 4 Follow the procedure from step 1 to step 7 in Before working inside your computer, follow the steps in "Removing the base cover". 5 Remove the memory modules. 6 Remove the wireless card. 7 Remove the heat sink. 8 Remove the fan. 9 Remove the system board. After working inside your computer. For more safety best...
... the keyboard. 4 Follow the procedure from step 1 to step 7 in Before working inside your computer, follow the steps in "Removing the base cover". 5 Remove the memory modules. 6 Remove the wireless card. 7 Remove the heat sink. 8 Remove the fan. 9 Remove the system board. After working inside your computer. For more safety best...
Inspiron 15 3000 Service Manual
Page 85
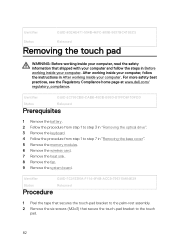
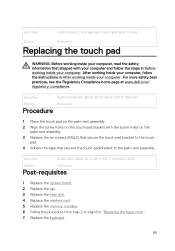
...-1513-4DF8-A4FF-9FD8D4470597 Status Released Post-requisites 1 Replace the system board. 2 Replace the fan. 3 Replace the heat sink. 4 Replace the wireless card. 5 Replace the memory modules. 6 Follow the procedure from step 2 to step 8 in After working inside your computer. Identifier GUID-B55423C5-03BB-46A2-9B5F-B8F3B4C854AB Status Released Replacing the... information that secures the touch-pad bracket to the palm-rest assembly. For more safety best practices, see the Regulatory Compliance home page at www.dell.com/ regulatory_compliance.
...-1513-4DF8-A4FF-9FD8D4470597 Status Released Post-requisites 1 Replace the system board. 2 Replace the fan. 3 Replace the heat sink. 4 Replace the wireless card. 5 Replace the memory modules. 6 Follow the procedure from step 2 to step 8 in After working inside your computer. Identifier GUID-B55423C5-03BB-46A2-9B5F-B8F3B4C854AB Status Released Replacing the... information that secures the touch-pad bracket to the palm-rest assembly. For more safety best practices, see the Regulatory Compliance home page at www.dell.com/ regulatory_compliance.
Inspiron 15 3000 Service Manual
Page 87
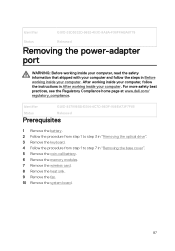
...computer, follow the steps in After working inside your computer. For more safety best practices, see the Regulatory Compliance home page at www.dell.com/ regulatory_compliance. Identifier GUID-35D5032D-9652-403C-9A8A-F98FFABA8776 Status Released Removing the power-adapter port WARNING: Before working inside your computer, ...Remove the keyboard. 4 Follow the procedure from step 1 to step 7 in "Removing the base cover". 5 Remove the coin-cell battery. 6 Remove the memory modules. 7 Remove the wireless card. 8 Remove the heat sink. 9 Remove the fan. 10 Remove the system board. 87
...computer, follow the steps in After working inside your computer. For more safety best practices, see the Regulatory Compliance home page at www.dell.com/ regulatory_compliance. Identifier GUID-35D5032D-9652-403C-9A8A-F98FFABA8776 Status Released Removing the power-adapter port WARNING: Before working inside your computer, ...Remove the keyboard. 4 Follow the procedure from step 1 to step 7 in "Removing the base cover". 5 Remove the coin-cell battery. 6 Remove the memory modules. 7 Remove the wireless card. 8 Remove the heat sink. 9 Remove the fan. 10 Remove the system board. 87
Inspiron 15 3000 Service Manual
Page 89
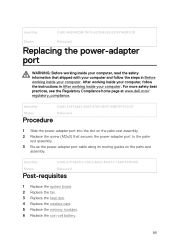
...Released Post-requisites 1 Replace the system board. 2 Replace the fan. 3 Replace the heat sink. 4 Replace the wireless card. 5 Replace the memory modules. 6 Replace the coin-cell battery. 89 Identifier GUID-A99140DB-7AF3-4218-B305-532FF94DF51D Status Released Replacing the power-adapter port WARNING: Before working inside... in Before working inside your computer. For more safety best practices, see the Regulatory Compliance home page at www.dell.com/ regulatory_compliance. After working inside your computer, follow the steps in After working inside your computer.
...Released Post-requisites 1 Replace the system board. 2 Replace the fan. 3 Replace the heat sink. 4 Replace the wireless card. 5 Replace the memory modules. 6 Replace the coin-cell battery. 89 Identifier GUID-A99140DB-7AF3-4218-B305-532FF94DF51D Status Released Replacing the power-adapter port WARNING: Before working inside... in Before working inside your computer. For more safety best practices, see the Regulatory Compliance home page at www.dell.com/ regulatory_compliance. After working inside your computer, follow the steps in After working inside your computer.
Inspiron 15 3000 Service Manual
Page 115
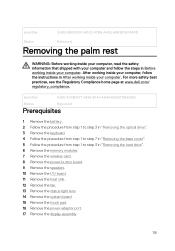
... best practices, see the Regulatory Compliance home page at www.dell.com/ regulatory_compliance. Identifier GUID-DB825F91-AB3C-47B9-A43E-A9B2B38F0AFD Status...the safety information that shipped with your computer and follow the instructions in "Removing the hard drive". 6 Remove the memory modules. 7 Remove the wireless card. 8 Remove the power-button board. 9 Remove the speakers. 10 Remove the...heat sink. 12 Remove the fan. 13 Remove the status-light lens. 14 Remove the system board. 15 Remove the touch pad. 16 Remove the power-adapter port. 17 Remove the display assembly. 115 After ...
... best practices, see the Regulatory Compliance home page at www.dell.com/ regulatory_compliance. Identifier GUID-DB825F91-AB3C-47B9-A43E-A9B2B38F0AFD Status...the safety information that shipped with your computer and follow the instructions in "Removing the hard drive". 6 Remove the memory modules. 7 Remove the wireless card. 8 Remove the power-button board. 9 Remove the speakers. 10 Remove the...heat sink. 12 Remove the fan. 13 Remove the status-light lens. 14 Remove the system board. 15 Remove the touch pad. 16 Remove the power-adapter port. 17 Remove the display assembly. 115 After ...

Inspiron 15 3000 Service Manual
Page 117
... best practices, see the Regulatory Compliance home page at www.dell.com/ regulatory_compliance. After working inside your computer, follow the steps... I/O board. 9 Replace the speakers. 10 Replace the power-button board. 11 Replace the wireless card. 12 Replace the memory modules. 13 Follow the procedure from step 4 to step 6 in "Replacing the hard drive". 14 Follow the procedure from... step 2 to step 8 in "Replacing the base cover". 15 Replace the keyboard. 16 Follow the procedure from step 4 to step 5 in "Replacing the optical drive". 17 ...
... best practices, see the Regulatory Compliance home page at www.dell.com/ regulatory_compliance. After working inside your computer, follow the steps... I/O board. 9 Replace the speakers. 10 Replace the power-button board. 11 Replace the wireless card. 12 Replace the memory modules. 13 Follow the procedure from step 4 to step 6 in "Replacing the hard drive". 14 Follow the procedure from... step 2 to step 8 in "Replacing the base cover". 15 Replace the keyboard. 16 Follow the procedure from step 4 to step 5 in "Replacing the optical drive". 17 ...
Inspiron 15 3000 Service Manual
Page 119
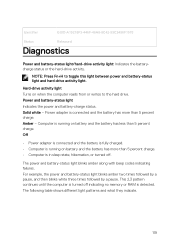
.... Computer is running on battery and the battery has less than 5 percent charge. • Computer is in sleep state, hibernation, or turned off indicating no memory or RAM is turned off . This 2,3 pattern continues until the computer is detected. Power adapter is connected and the battery has more than 5 percent charge...
.... Computer is running on battery and the battery has less than 5 percent charge. • Computer is in sleep state, hibernation, or turned off indicating no memory or RAM is turned off . This 2,3 pattern continues until the computer is detected. Power adapter is connected and the battery has more than 5 percent charge...
Inspiron 15 3000 Service Manual
Page 120
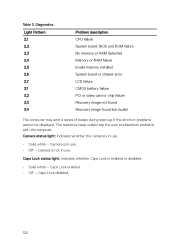
... the computer. Caps Lock enabled. • Off - Diagnostics Light Pattern 2,1 2,2 2,3 2,4 2,5 2,6 2,7 3,1 3,2 3,3 3,4 Problem description CPU failure System board: BIOS and ROM failure No memory or RAM detected Memory or RAM failure Invalid memory installed System board or chipset error LCD failure CMOS battery failure PCI or video card or chip failure Recovery image not found...
... the computer. Caps Lock enabled. • Off - Diagnostics Light Pattern 2,1 2,2 2,3 2,4 2,5 2,6 2,7 3,1 3,2 3,3 3,4 Problem description CPU failure System board: BIOS and ROM failure No memory or RAM detected Memory or RAM failure Invalid memory installed System board or chipset error LCD failure CMOS battery failure PCI or video card or chip failure Recovery image not found...

Inspiron 15 3000 Setup and Specifications
Page 13
System information Table 3. Specifications Dimensions and weight Table 2. System information Computer model Processor Chipset Memory Table 4. Memory specifications Slots Type Speed Configurations supported Per memory module slot Inspiron 15-3565 AMD E2/A6/A9 Processor Integrated in ) 2.30 kg (5.07 lb) NOTE: The weight of your computer varies depending on the configuration ordered and the ...
System information Table 3. Specifications Dimensions and weight Table 2. System information Computer model Processor Chipset Memory Table 4. Memory specifications Slots Type Speed Configurations supported Per memory module slot Inspiron 15-3565 AMD E2/A6/A9 Processor Integrated in ) 2.30 kg (5.07 lb) NOTE: The weight of your computer varies depending on the configuration ordered and the ...
Inspiron 15 3000 Setup and Specifications
Page 14
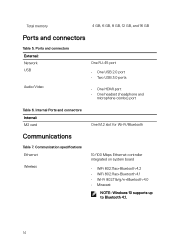
... RJ-45 port • One USB 2.0 port • Two USB 3.0 ports • One HDMI port • One headset (headphone and microphone combo) port Table 6. Total memory 4 GB, 6 GB, 8 GB, 12 GB, and 16 GB Ports and connectors Table 5.
... RJ-45 port • One USB 2.0 port • Two USB 3.0 ports • One HDMI port • One headset (headphone and microphone combo) port Table 6. Total memory 4 GB, 6 GB, 8 GB, 12 GB, and 16 GB Ports and connectors Table 5.

Inspiron 15 3000 Setup and Specifications
Page 18
... system memory Discrete AMD R5 M430 Up to 149°F) CR-2032 Display Table 16. Coin-cell battery • Storage: -40°C to 65°C (-40°F to 2 GB DDR3 Computer environment Airborne contaminant level: G1 as defined by ISA-S71.04-1985 18 Display specifications Type 15-inch HD non-touch... 0.252 mm Dimension: Height (excluding bezel) 193.5 mm (7.62 in) Width (excluding bezel) 344.2 mm (13.55 in) Diagonal (excluding bezel) 394.86 mm (15.55 in) 15-inch HD touch screen 1366 x 768 40/40/10/30 degrees 0.252 mm 193.5 mm (7.62 in) 344.2 mm (13.55 in) 394.86...
... system memory Discrete AMD R5 M430 Up to 149°F) CR-2032 Display Table 16. Coin-cell battery • Storage: -40°C to 65°C (-40°F to 2 GB DDR3 Computer environment Airborne contaminant level: G1 as defined by ISA-S71.04-1985 18 Display specifications Type 15-inch HD non-touch... 0.252 mm Dimension: Height (excluding bezel) 193.5 mm (7.62 in) Width (excluding bezel) 344.2 mm (13.55 in) Diagonal (excluding bezel) 394.86 mm (15.55 in) 15-inch HD touch screen 1366 x 768 40/40/10/30 degrees 0.252 mm 193.5 mm (7.62 in) 344.2 mm (13.55 in) 394.86...


