
Inspiron 3252 Specifications
Page 2
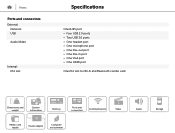
.... 6 Optical drive (optional) Reads from and writes to media cards. 4 Headset port Connect a headphone, a microphone, or a headset (headphone and microphone combo). 5 USB 3.0 ports (2) Connect peripherals such as storage devices, printers, and so on . Press and hold for 4 seconds to CDs and DVDs. For more information, see Me and My Dell at Dell.com/support. 2 Hard-drive activity light Turns on when the computer reads from or writes to the hard drive. 3 Media-card reader...
.... 6 Optical drive (optional) Reads from and writes to media cards. 4 Headset port Connect a headphone, a microphone, or a headset (headphone and microphone combo). 5 USB 3.0 ports (2) Connect peripherals such as storage devices, printers, and so on . Press and hold for 4 seconds to CDs and DVDs. For more information, see Me and My Dell at Dell.com/support. 2 Hard-drive activity light Turns on when the computer reads from or writes to the hard drive. 3 Media-card reader...
Inspiron 3252 Specifications
Page 3
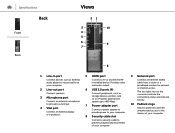
...9 Network port Connect an Ethernet (RJ45) cable from a router or a broadband modem for network or internet access. Specifications Back Front Back Views 21 3 10 4 5 6 9 7 8 1 Line-in port Connect devices such as storage devices, printers, and so on your computer. 2 Line-out port Connect speakers. 3 Microphone port Connect an external microphone to provide sound input. 4 VGA port Connect an external display or a projector. 5 HDMI port Connect a TV or another HDMIin enabled device. Provides video and audio output. 6 USB 2.0 ports (4) Connect peripherals, such as external audio...
...9 Network port Connect an Ethernet (RJ45) cable from a router or a broadband modem for network or internet access. Specifications Back Front Back Views 21 3 10 4 5 6 9 7 8 1 Line-in port Connect devices such as storage devices, printers, and so on your computer. 2 Line-out port Connect speakers. 3 Microphone port Connect an external microphone to provide sound input. 4 VGA port Connect an external display or a projector. 5 HDMI port Connect a TV or another HDMIin enabled device. Provides video and audio output. 6 USB 2.0 ports (4) Connect peripherals, such as external audio...
Inspiron 3252 Specifications
Page 4
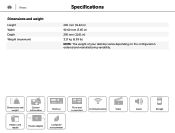
Dimensions and weight System information Memory Ports and connectors Communications Video Media-card reader Power adapter Computer environment Audio Storage Views Dimensions and weight Height Width Depth Weight (maximum) Specifications 290 mm (11.42 in) 92.60 mm (3.65 in) 295 mm (11.61 in) 3.17 kg (6.99 lb) NOTE: The weight of your desktop varies depending on the configuration ordered and manufacturing variability.
Dimensions and weight System information Memory Ports and connectors Communications Video Media-card reader Power adapter Computer environment Audio Storage Views Dimensions and weight Height Width Depth Weight (maximum) Specifications 290 mm (11.42 in) 92.60 mm (3.65 in) 295 mm (11.61 in) 3.17 kg (6.99 lb) NOTE: The weight of your desktop varies depending on the configuration ordered and manufacturing variability.
Inspiron 3252 Specifications
Page 6
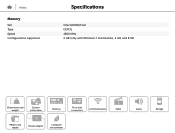
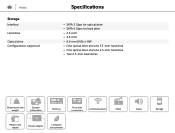
Views Memory Slot Type Speed Configurations supported Specifications One SODIMM slot DDR3L 1600 MHz 2 GB (only with Windows 7 and Ubuntu), 4 GB, and 8 GB Dimensions and weight System information Memory Ports and connectors Communications Video Media-card reader Power adapter Computer environment Audio Storage
Views Memory Slot Type Speed Configurations supported Specifications One SODIMM slot DDR3L 1600 MHz 2 GB (only with Windows 7 and Ubuntu), 4 GB, and 8 GB Dimensions and weight System information Memory Ports and connectors Communications Video Media-card reader Power adapter Computer environment Audio Storage
Inspiron 3252 Specifications
Page 7
Views Ports and connectors External: Network USB Audio/Video Internal: M.2 slot Specifications One RJ45 port • Four USB 2.0 ports • Two USB 3.0 ports • One headset port • One microphone port • One line-out port • One line-in port • One VGA port • One HDMI port One M.2 slot for Wi-Fi and Bluetooth combo card Dimensions and weight System information Memory Ports and connectors Communications Video Media-card reader Power adapter Computer environment Audio Storage
Views Ports and connectors External: Network USB Audio/Video Internal: M.2 slot Specifications One RJ45 port • Four USB 2.0 ports • Two USB 3.0 ports • One headset port • One microphone port • One line-out port • One line-in port • One VGA port • One HDMI port One M.2 slot for Wi-Fi and Bluetooth combo card Dimensions and weight System information Memory Ports and connectors Communications Video Media-card reader Power adapter Computer environment Audio Storage
Inspiron 3252 Specifications
Page 8
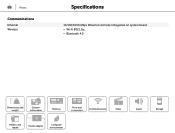
Views Communications Ethernet Wireless Specifications 10/100/1000 Mbps Ethernet controller integrated on system board • Wi-Fi 802.11ac • Bluetooth 4.0 Dimensions and weight System information Memory Ports and connectors Communications Video Media-card reader Power adapter Computer environment Audio Storage
Views Communications Ethernet Wireless Specifications 10/100/1000 Mbps Ethernet controller integrated on system board • Wi-Fi 802.11ac • Bluetooth 4.0 Dimensions and weight System information Memory Ports and connectors Communications Video Media-card reader Power adapter Computer environment Audio Storage
Inspiron 3252 Specifications
Page 11
Views Storage Interface Hard drive Optical drive Configurations supported Specifications • SATA 3 Gbps for optical drive • SATA 6 Gbps for hard drive • 2.5-inch • 3.5-inch • 9.5-mm DVD+/-RW • One optical drive and one 3.5-inch hard drive • One optical drive and one 2.5-inch hard drive • Two 2.5-inch hard drives Dimensions and weight System information Memory Ports and connectors Communications Video Media-card reader Power adapter Computer environment Audio Storage
Views Storage Interface Hard drive Optical drive Configurations supported Specifications • SATA 3 Gbps for optical drive • SATA 6 Gbps for hard drive • 2.5-inch • 3.5-inch • 9.5-mm DVD+/-RW • One optical drive and one 3.5-inch hard drive • One optical drive and one 2.5-inch hard drive • Two 2.5-inch hard drives Dimensions and weight System information Memory Ports and connectors Communications Video Media-card reader Power adapter Computer environment Audio Storage
Inspiron 3252 Specifications
Page 14
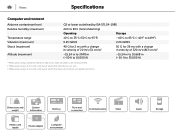
...Memory Ports and connectors Communications Video Media-card reader Power adapter Computer environment Audio Storage Views Specifications Computer environment Airborne contaminant level Relative humidity (maximum) Temperature range Vibration (maximum)* Shock (maximum) Altitude (maximum) G2 or lower as defined by ISA-S71.04-1985 20% to 80% (noncondensing) Operating... using a random vibration spectrum that simulates user environment. † Measured using a 2 ms half-sine pulse when the hard drive is in use. ‡ Measured using a 2 ms half-sine pulse when the hard-drive head...
...Memory Ports and connectors Communications Video Media-card reader Power adapter Computer environment Audio Storage Views Specifications Computer environment Airborne contaminant level Relative humidity (maximum) Temperature range Vibration (maximum)* Shock (maximum) Altitude (maximum) G2 or lower as defined by ISA-S71.04-1985 20% to 80% (noncondensing) Operating... using a random vibration spectrum that simulates user environment. † Measured using a 2 ms half-sine pulse when the hard drive is in use. ‡ Measured using a 2 ms half-sine pulse when the hard-drive head...
Inspiron 3252 Service Manual
Page 4
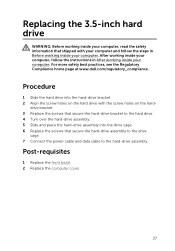
Replacing the front bezel 21 Procedure...21 Post-requisites 21 Removing the fan 22 Prerequisites...22 Procedure...22 Replacing the fan 25 Procedure...25 Post-requisites 25 Removing the heat sink 26 Prerequisites...26 Procedure...26 Replacing the heat sink 28 Procedure...28 Post-requisites 28 Removing the memory module 29 Prerequisites...29 Procedure...29 Replacing the memory module 31 Procedure...31 Post-requisites 32 Removing the 3.5-inch hard drive 33 Prerequisites...33 Procedure...33 4
Replacing the front bezel 21 Procedure...21 Post-requisites 21 Removing the fan 22 Prerequisites...22 Procedure...22 Replacing the fan 25 Procedure...25 Post-requisites 25 Removing the heat sink 26 Prerequisites...26 Procedure...26 Replacing the heat sink 28 Procedure...28 Post-requisites 28 Removing the memory module 29 Prerequisites...29 Procedure...29 Replacing the memory module 31 Procedure...31 Post-requisites 32 Removing the 3.5-inch hard drive 33 Prerequisites...33 Procedure...33 4

Inspiron 3252 Service Manual
Page 8
... tap Start → Power → Shut down . Before working inside your computer CAUTION: To avoid damaging the components and cards, handle them by their electrical outlets. 4 Disconnect all cables such as telephone cables, network cables and so on, from your computer. 5 Disconnect all open files and exit all attached devices and peripherals, such as keyboard, mouse, monitor, and so on the configuration you are using a different operating...
... tap Start → Power → Shut down . Before working inside your computer CAUTION: To avoid damaging the components and cards, handle them by their electrical outlets. 4 Disconnect all cables such as telephone cables, network cables and so on, from your computer. 5 Disconnect all open files and exit all attached devices and peripherals, such as keyboard, mouse, monitor, and so on the configuration you are using a different operating...
Inspiron 3252 Service Manual
Page 9
...: You should only perform troubleshooting and repairs as the metal at the back of the computer. Damage due to avoid bending any installed card from the media-card reader. CAUTION: When you finish working inside your computer, read the safety information that you must disengage before disconnecting the cable. While you work surface is not covered by the Dell technical assistance team. For more...
...: You should only perform troubleshooting and repairs as the metal at the back of the computer. Damage due to avoid bending any installed card from the media-card reader. CAUTION: When you finish working inside your computer, read the safety information that you must disengage before disconnecting the cable. While you work surface is not covered by the Dell technical assistance team. For more...
Inspiron 3252 Service Manual
Page 11
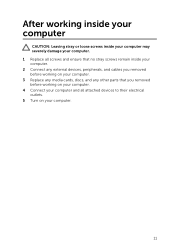
After working inside your computer CAUTION: Leaving stray or loose screws inside your computer may severely damage your computer. 1 Replace all screws and ensure that no stray screws remain inside your computer. 2 Connect any external devices, peripherals, and cables you removed before working on your computer. 3 Replace any media cards, discs, and any other parts that you removed before working on your computer. 4 Connect your computer and all attached devices to their electrical outlets. 5 Turn on your computer. 11
After working inside your computer CAUTION: Leaving stray or loose screws inside your computer may severely damage your computer. 1 Replace all screws and ensure that no stray screws remain inside your computer. 2 Connect any external devices, peripherals, and cables you removed before working on your computer. 3 Replace any media cards, discs, and any other parts that you removed before working on your computer. 4 Connect your computer and all attached devices to their electrical outlets. 5 Turn on your computer. 11

Inspiron 3252 Service Manual
Page 32
2 Insert the memory module into the memory-module slot and press the memory module down until it . 1 memory-module slot 3 memory module 5 notch Post-requisites 1 Replace the front bezel. 2 Replace the computer cover. 2 tab 4 securing clips (2) 32 NOTE: If you do not hear the click, remove the memory module and reinstall it clicks into place.
2 Insert the memory module into the memory-module slot and press the memory module down until it . 1 memory-module slot 3 memory module 5 notch Post-requisites 1 Replace the front bezel. 2 Replace the computer cover. 2 tab 4 securing clips (2) 32 NOTE: If you do not hear the click, remove the memory module and reinstall it clicks into place.
Inspiron 3252 Service Manual
Page 35
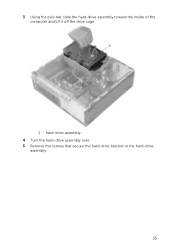
3 Using the pull-tab, slide the hard-drive assembly toward the inside of the computer and lift it off the drive cage. 1 hard-drive assembly 4 Turn the hard-drive assembly over. 5 Remove the screws that secure the hard-drive bracket to the hard-drive assembly. 35
3 Using the pull-tab, slide the hard-drive assembly toward the inside of the computer and lift it off the drive cage. 1 hard-drive assembly 4 Turn the hard-drive assembly over. 5 Remove the screws that secure the hard-drive bracket to the hard-drive assembly. 35
Inspiron 3252 Service Manual
Page 37
.... 2 Replace the computer cover. 37 Replacing the 3.5-inch hard drive WARNING: Before working inside your computer, read the safety information that secure the hard-drive assembly to the drive cage. 7 Connect the power cable and data cable to the hard drive. 4 Turn over the hard-drive assembly. 5 Slide and place the hard-drive assembly into the hard-drive bracket. 2 Align the screw holes on the hard drive with your computer and follow the instructions in Before working inside...
.... 2 Replace the computer cover. 37 Replacing the 3.5-inch hard drive WARNING: Before working inside your computer, read the safety information that secure the hard-drive assembly to the drive cage. 7 Connect the power cable and data cable to the hard drive. 4 Turn over the hard-drive assembly. 5 Slide and place the hard-drive assembly into the hard-drive bracket. 2 Align the screw holes on the hard drive with your computer and follow the instructions in Before working inside...
Inspiron 3252 Service Manual
Page 41
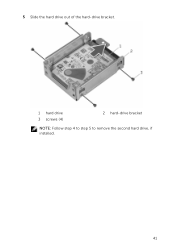
5 Slide the hard drive out of the hard-drive bracket. 1 hard drive 3 screws (4) 2 hard-drive bracket NOTE: Follow step 4 to step 5 to remove the second hard drive, if installed. 41
5 Slide the hard drive out of the hard-drive bracket. 1 hard drive 3 screws (4) 2 hard-drive bracket NOTE: Follow step 4 to step 5 to remove the second hard drive, if installed. 41
Inspiron 3252 Service Manual
Page 63
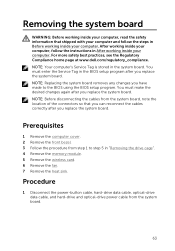
Procedure 1 Disconnect the power-button cable, hard-drive data cable, optical-drive data cable, and hard-drive and optical-drive power cable from step 1 to the BIOS using the BIOS setup program. NOTE: Your computer's Service Tag is stored in After working inside your computer. You must make the desired changes again after you replace the system board. After working inside your computer, follow the steps in the BIOS setup program after you replace the system board. Prerequisites 1 Remove the computer cover. 2 Remove the front bezel...
Procedure 1 Disconnect the power-button cable, hard-drive data cable, optical-drive data cable, and hard-drive and optical-drive power cable from step 1 to the BIOS using the BIOS setup program. NOTE: Your computer's Service Tag is stored in After working inside your computer. You must make the desired changes again after you replace the system board. After working inside your computer, follow the steps in the BIOS setup program after you replace the system board. Prerequisites 1 Remove the computer cover. 2 Remove the front bezel...

Inspiron 3252 Service Manual
Page 66
... make the desired changes again after you replace the system board. For more safety best practices, see the Regulatory Compliance home page at www.dell.com/regulatory_compliance. Post-requisites 1 Replace the heat sink. 2 Replace the fan. 3 Replace the wireless card. 4 Replace the memory module. 5 Follow the procedure from step 4 to the system board. You must enter the Service Tag in Before working inside your computer. Procedure 1 Slide the ports...
... make the desired changes again after you replace the system board. For more safety best practices, see the Regulatory Compliance home page at www.dell.com/regulatory_compliance. Post-requisites 1 Replace the heat sink. 2 Replace the fan. 3 Replace the wireless card. 4 Replace the memory module. 5 Follow the procedure from step 4 to the system board. You must enter the Service Tag in Before working inside your computer. Procedure 1 Slide the ports...
Inspiron 3252 Service Manual
Page 68
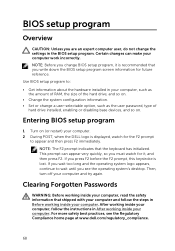
... computer and try again. Use BIOS setup program to: • Get information about the hardware installed in After working inside your computer. Entering BIOS setup program 1 Turn on (or restart) your computer, such as the amount of RAM, the size of the hard drive, and so on. • Change the system configuration information. • Set or change a user-selectable option, such as the user password, type of hard drive installed, enabling or disabling base devices, and so on. NOTE...
... computer and try again. Use BIOS setup program to: • Get information about the hardware installed in After working inside your computer. Entering BIOS setup program 1 Turn on (or restart) your computer, such as the amount of RAM, the size of the hard drive, and so on. • Change the system configuration information. • Set or change a user-selectable option, such as the user password, type of hard drive installed, enabling or disabling base devices, and so on. NOTE...
Inspiron 3252 Service Manual
Page 72
... computer model. 4 Click Drivers & downloads. 5 Select the operating system installed on your computer. 6 Scroll down the page and expand BIOS. 7 Click Download File to www.dell.com/support. 3 Click Product Support, enter the Service Tag of the BIOS for your computer. 8 Save the file and, once the download is available or when you saved the BIOS update file. 9 Double-click the BIOS update file icon and follow the instructions...
... computer model. 4 Click Drivers & downloads. 5 Select the operating system installed on your computer. 6 Scroll down the page and expand BIOS. 7 Click Download File to www.dell.com/support. 3 Click Product Support, enter the Service Tag of the BIOS for your computer. 8 Save the file and, once the download is available or when you saved the BIOS update file. 9 Double-click the BIOS update file icon and follow the instructions...


