
Handling swollen Lithium-ion batteries
Page 1
... an approved shipping container (provided by Dell), to customer preferences for assistance and further instructions. ● Using a non-Dell or incompatible battery may be replaced and disposed of Dell Inc. Dell, EMC, and other computers with your Dell computer. To prevent possible further damage... Release Version: A04 Like most laptops, Dell laptops use tools of any type to pry on battery power. We recommend contacting Dell product support for options to malfunction, discontinue the use a battery from Dell. 1 To discharge the battery, unplug the AC adapter from the system...
... an approved shipping container (provided by Dell), to customer preferences for assistance and further instructions. ● Using a non-Dell or incompatible battery may be replaced and disposed of Dell Inc. Dell, EMC, and other computers with your Dell computer. To prevent possible further damage... Release Version: A04 Like most laptops, Dell laptops use tools of any type to pry on battery power. We recommend contacting Dell product support for options to malfunction, discontinue the use a battery from Dell. 1 To discharge the battery, unplug the AC adapter from the system...

Handling swollen Lithium-ion batteries
Page 2
Frequently Asked Questions. 2 For more information on how to improve the performance and lifespan of the issue, see Dell Laptop Battery - Lithium-ion batteries can swell for various reasons such as age, number of charge cycles, or exposure to minimize the possibility of occurrence of the laptop battery and to high heat.
Frequently Asked Questions. 2 For more information on how to improve the performance and lifespan of the issue, see Dell Laptop Battery - Lithium-ion batteries can swell for various reasons such as age, number of charge cycles, or exposure to minimize the possibility of occurrence of the laptop battery and to high heat.
Service Manual
Page 3
... list...15 6 Removing the base cover...17 Procedure...17 7 Replacing the base cover...19 Procedure...19 8 Removing the battery...21 Lithium-ion battery precautions...21 Prerequisites...21 Procedure...21 9 Replacing the battery...23 Lithium-ion battery precautions...23 Procedure ...23 Post-requisites...24 10 Removing the memory modules 25 Prerequisites...25 Procedure...25 11...
... list...15 6 Removing the base cover...17 Procedure...17 7 Replacing the base cover...19 Procedure...19 8 Removing the battery...21 Lithium-ion battery precautions...21 Prerequisites...21 Procedure...21 9 Replacing the battery...23 Lithium-ion battery precautions...23 Procedure ...23 Post-requisites...24 10 Removing the memory modules 25 Prerequisites...25 Procedure...25 11...
Service Manual
Page 4
Procedure...29 Post-requisites...29 14 Removing the coin-cell battery 30 Prerequisites...30 Procedure...30 Procedure...30 15 Replacing the coin-cell battery 31 Procedure...31 Procedure...31 Post-requisites...31 16 Removing the fan...32 Prerequisites...32 Procedure...32 17 Replacing the fan...34 Procedure...34 Post-...
Procedure...29 Post-requisites...29 14 Removing the coin-cell battery 30 Prerequisites...30 Procedure...30 Procedure...30 15 Replacing the coin-cell battery 31 Procedure...31 Procedure...31 Post-requisites...31 16 Removing the fan...32 Prerequisites...32 Procedure...32 17 Replacing the fan...34 Procedure...34 Post-...
Service Manual
Page 15
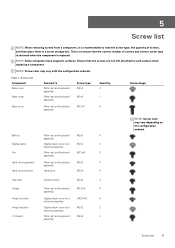
... rest and keyboard assembly Palm rest and keyboard assembly Screw type M2x2 M2x4 Quantity 2 1 Screw image Base cover Palm rest and keyboard M2.5x7 6 assembly Battery Display panel Fan Palm rest and keyboard M2x3 4 assembly Display back-cover and M2x2 4 antenna assembly Palm rest and keyboard M2.5x5 3 assembly Hard-drive...
... rest and keyboard assembly Palm rest and keyboard assembly Screw type M2x2 M2x4 Quantity 2 1 Screw image Base cover Palm rest and keyboard M2.5x7 6 assembly Battery Display panel Fan Palm rest and keyboard M2x3 4 assembly Display back-cover and M2x2 4 antenna assembly Palm rest and keyboard M2.5x5 3 assembly Hard-drive...
Service Manual
Page 18
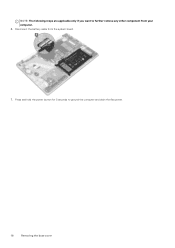
Disconnect the battery cable from your computer. 6. NOTE: The following steps are applicable only if you want to ground the computer and drain the flea power. 18 Removing the base cover Press and hold the power button for 5 seconds to further remove any other component from the system board. 7.
Disconnect the battery cable from your computer. 6. NOTE: The following steps are applicable only if you want to ground the computer and drain the flea power. 18 Removing the base cover Press and hold the power button for 5 seconds to further remove any other component from the system board. 7.
Service Manual
Page 19
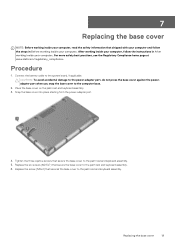
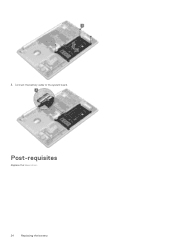
... battery cable to the computer base. 2. Tighten the three captive screws that shipped with your computer and follow the instructions in Before working inside your computer. Snap the base cover into place starting from the power-adapter port. 4. For more safety best practices, see the Regulatory Compliance home page at www.dell...
... battery cable to the computer base. 2. Tighten the three captive screws that shipped with your computer and follow the instructions in Before working inside your computer. Snap the base cover into place starting from the power-adapter port. 4. For more safety best practices, see the Regulatory Compliance home page at www.dell...
Service Manual
Page 21
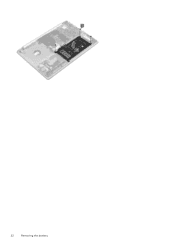
... a result of swelling, do not try to release it from www.dell.com or authorized Dell partners and resellers. Lithium-ion battery precautions CAUTION: • Exercise caution when handling Lithium-ion batteries. • Discharge the battery as much as puncturing, bending, or crushing a Lithium-ion battery can be dangerous. Prerequisites Remove the base cover. Lift the...
... a result of swelling, do not try to release it from www.dell.com or authorized Dell partners and resellers. Lithium-ion battery precautions CAUTION: • Exercise caution when handling Lithium-ion batteries. • Discharge the battery as much as puncturing, bending, or crushing a Lithium-ion battery can be dangerous. Prerequisites Remove the base cover. Lift the...
Service Manual
Page 22
22 Removing the battery
22 Removing the battery
Service Manual
Page 23
..., do not try to release it from www.dell.com or authorized Dell partners and resellers. See www.dell.com/contactdell. • Always purchase genuine batteries from the system. Procedure 1. Replacing the battery 23 For more safety best practices, see the Regulatory Compliance home page at www.dell.com/regulatory_compliance. In such an instance, contact for...
..., do not try to release it from www.dell.com or authorized Dell partners and resellers. See www.dell.com/contactdell. • Always purchase genuine batteries from the system. Procedure 1. Replacing the battery 23 For more safety best practices, see the Regulatory Compliance home page at www.dell.com/regulatory_compliance. In such an instance, contact for...
Service Manual
Page 24
Post-requisites Replace the base cover. 24 Replacing the battery 3. Connect the battery cable to the system board.
Post-requisites Replace the base cover. 24 Replacing the battery 3. Connect the battery cable to the system board.
Service Manual
Page 30
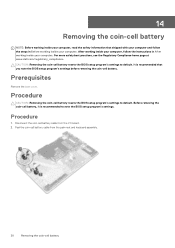
... more safety best practices, see the Regulatory Compliance home page at www.dell.com/regulatory_compliance. Peel the coin-cell battery cable from the I/O board. 2. Disconnect the coin-cell battery cable from the palm rest and keyboard assembly. 30 Removing the coin-cell battery After working inside your computer, follow the steps in After working...
... more safety best practices, see the Regulatory Compliance home page at www.dell.com/regulatory_compliance. Peel the coin-cell battery cable from the I/O board. 2. Disconnect the coin-cell battery cable from the palm rest and keyboard assembly. 30 Removing the coin-cell battery After working inside your computer, follow the steps in After working...
Service Manual
Page 31
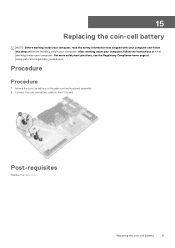
... For more safety best practices, see the Regulatory Compliance home page at www.dell.com/regulatory_compliance. Connect the coin-cell battery cable to the I/O board. 15 Replacing the coin-cell battery NOTE: Before working inside your computer, read the safety information that shipped with your computer and follow the instructions in Before working...
... For more safety best practices, see the Regulatory Compliance home page at www.dell.com/regulatory_compliance. Connect the coin-cell battery cable to the I/O board. 15 Replacing the coin-cell battery NOTE: Before working inside your computer, read the safety information that shipped with your computer and follow the instructions in Before working...
Service Manual
Page 37
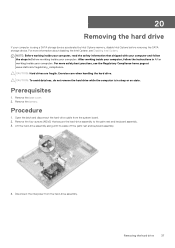
... the hard-drive cable from the hard-drive assembly. Removing the hard drive 37 Prerequisites 1. Remove the battery. For more information about disabling the Intel Optane, see the Regulatory Compliance home page at www.dell.com/regulatory_compliance. Disconnect the interposer from the system board. 2. For more safety best practices, see Disabling Intel...
... the hard-drive cable from the hard-drive assembly. Removing the hard drive 37 Prerequisites 1. Remove the battery. For more information about disabling the Intel Optane, see the Regulatory Compliance home page at www.dell.com/regulatory_compliance. Disconnect the interposer from the system board. 2. For more safety best practices, see Disabling Intel...
Service Manual
Page 40
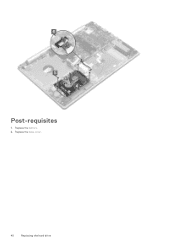
Post-requisites 1. Replace the battery. 2. Replace the base cover. 40 Replacing the hard drive
Post-requisites 1. Replace the battery. 2. Replace the base cover. 40 Replacing the hard drive
Service Manual
Page 41
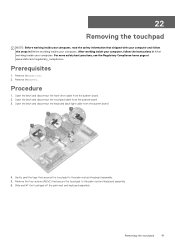
... in Before working inside your computer. Removing the touchpad 41 For more safety best practices, see the Regulatory Compliance home page at www.dell.com/regulatory_compliance. Remove the battery. 22 Removing the touchpad NOTE: Before working inside your computer, read the safety information that secure the touchpad to the palm rest and...
... in Before working inside your computer. Removing the touchpad 41 For more safety best practices, see the Regulatory Compliance home page at www.dell.com/regulatory_compliance. Remove the battery. 22 Removing the touchpad NOTE: Before working inside your computer, read the safety information that secure the touchpad to the palm rest and...
Service Manual
Page 44
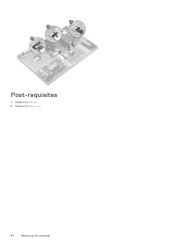
Replace the battery. 2. Post-requisites 1. Replace the base cover. 44 Replacing the touchpad
Replace the battery. 2. Post-requisites 1. Replace the base cover. 44 Replacing the touchpad
Service Manual
Page 60
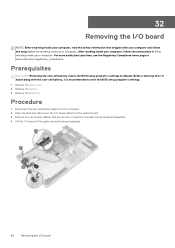
...home page at www.dell.com/regulatory_compliance. Disconnect the coin-cell battery cable from the system board. 3. Open the latch and disconnect the I/O-board cable from the I/O board. 2. Remove the two screws (M2x4) that shipped with the coin-cell battery, it is recommended .... 60 Removing the I /O board to default. After working inside your computer, follow the steps in After working inside your computer. Remove the battery. 3. Procedure 1. Before removing the I /O board NOTE: Before working inside your computer, read the safety information that secure the I /O board...
...home page at www.dell.com/regulatory_compliance. Disconnect the coin-cell battery cable from the system board. 3. Open the latch and disconnect the I/O-board cable from the I/O board. 2. Remove the two screws (M2x4) that shipped with the coin-cell battery, it is recommended .... 60 Removing the I /O board to default. After working inside your computer, follow the steps in After working inside your computer. Remove the battery. 3. Procedure 1. Before removing the I /O board NOTE: Before working inside your computer, read the safety information that secure the I /O board...
Service Manual
Page 61
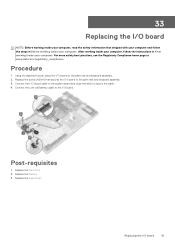
Connect the I /O board on the palm rest and keyboard assembly. 2. Replace the battery. 3. Using the alignment posts, place the I /O-board cable to the system board and close the latch to secure the cable. 4. Post-requisites 1. Procedure 1. ...your computer. Replace the hard drive. 2. For more safety best practices, see the Regulatory Compliance home page at www.dell.com/regulatory_compliance. Replacing the I /O board. Replace the base cover. Connect the coin-cell battery cable to the I /O board 61 33 Replacing the I/O board NOTE: Before working inside your computer, read the...
Connect the I /O board on the palm rest and keyboard assembly. 2. Replace the battery. 3. Using the alignment posts, place the I /O-board cable to the system board and close the latch to secure the cable. 4. Post-requisites 1. Procedure 1. ...your computer. Replace the hard drive. 2. For more safety best practices, see the Regulatory Compliance home page at www.dell.com/regulatory_compliance. Replacing the I /O board. Replace the base cover. Connect the coin-cell battery cable to the I /O board 61 33 Replacing the I/O board NOTE: Before working inside your computer, read the...
Service Manual
Page 66
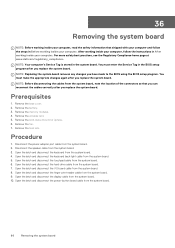
...BIOS setup program after you replace the system board. NOTE: Your computer's Service Tag is stored in After working inside your computer. Remove the battery. 3. Remove the memory modules. 4. Remove the fan. 7. Disconnect the speaker cable from the system board. 5. Open the latch and disconnect... the finger-print reader cable from the system board. 2. For more safety best practices, see the Regulatory Compliance home page at www.dell.com/regulatory_compliance. Remove the wireless card. 5. Open the latch and disconnect the display cable from the system board. 4. You must enter...
...BIOS setup program after you replace the system board. NOTE: Your computer's Service Tag is stored in After working inside your computer. Remove the battery. 3. Remove the memory modules. 4. Remove the fan. 7. Disconnect the speaker cable from the system board. 5. Open the latch and disconnect... the finger-print reader cable from the system board. 2. For more safety best practices, see the Regulatory Compliance home page at www.dell.com/regulatory_compliance. Remove the wireless card. 5. Open the latch and disconnect the display cable from the system board. 4. You must enter...


