
Handling swollen Lithium-ion batteries
Page 1
....dell.com/support for replacement by disconnecting the AC adapter and letting the battery drain. Document Number: A05 Rev. To discharge the battery, unplug the AC adapter from Dell. 1 Do not use of properly. or its subsidiaries. Other trademarks may be replaced and disposed of the laptop and discharge it by a Dell authorized service technician. To prevent possible further damage to the device enclosure or internal...
....dell.com/support for replacement by disconnecting the AC adapter and letting the battery drain. Document Number: A05 Rev. To discharge the battery, unplug the AC adapter from Dell. 1 Do not use of properly. or its subsidiaries. Other trademarks may be replaced and disposed of the laptop and discharge it by a Dell authorized service technician. To prevent possible further damage to the device enclosure or internal...
Service Manual
Page 3
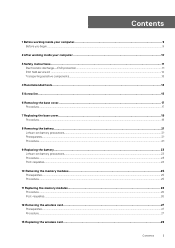
... list...15 6 Removing the base cover...17 Procedure...17 7 Replacing the base cover...19 Procedure...19 8 Removing the battery...21 Lithium-ion battery precautions...21 Prerequisites...21 Procedure...21 9 Replacing the battery...23 Lithium-ion battery precautions...23 Procedure ...23 Post-requisites...24 10 Removing the memory modules 25 Prerequisites...25 Procedure...25 11 Replacing the memory modules 26 Procedure ...26 Post-requisites...26 12 Removing the wireless card...27...
... list...15 6 Removing the base cover...17 Procedure...17 7 Replacing the base cover...19 Procedure...19 8 Removing the battery...21 Lithium-ion battery precautions...21 Prerequisites...21 Procedure...21 9 Replacing the battery...23 Lithium-ion battery precautions...23 Procedure ...23 Post-requisites...24 10 Removing the memory modules 25 Prerequisites...25 Procedure...25 11 Replacing the memory modules 26 Procedure ...26 Post-requisites...26 12 Removing the wireless card...27...
Service Manual
Page 7
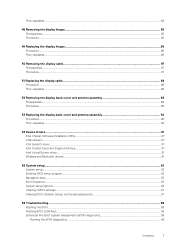
... display back-cover and antenna assembly 90 Procedure ...90 Post-requisites...90 54 Device drivers...91 Intel Chipset Software Installation Utility...91 Video drivers...91 Intel Serial IO driver...91 Intel Trusted Execution Engine Interface...91 Intel Virtual Button driver...91 Wireless and Bluetooth drivers...91 55 System setup...92 System setup...92 Entering BIOS setup program...92 Navigation keys...92 Boot Sequence...92 System setup options...93 Clearing CMOS settings...97 Clearing BIOS (System Setup) and System passwords 97 56 Troubleshooting...98 Flashing...
... display back-cover and antenna assembly 90 Procedure ...90 Post-requisites...90 54 Device drivers...91 Intel Chipset Software Installation Utility...91 Video drivers...91 Intel Serial IO driver...91 Intel Trusted Execution Engine Interface...91 Intel Virtual Button driver...91 Wireless and Bluetooth drivers...91 55 System setup...92 System setup...92 Entering BIOS setup program...92 Navigation keys...92 Boot Sequence...92 System setup options...93 Clearing CMOS settings...97 Clearing BIOS (System Setup) and System passwords 97 56 Troubleshooting...98 Flashing...
Service Manual
Page 11
... the media-card reader. Touching the chassis before opening the computer cover or panels. NOTE: Before working inside your personal safety. CAUTION: To avoid damaging the computer, ensure that shipped with a beep code emitted for lower power requirements and increased density, ESD protection is not immediately recognizable. When disconnecting cables, keep them by touching an unpainted metal surface, such as intermittent problems or...
... the media-card reader. Touching the chassis before opening the computer cover or panels. NOTE: Before working inside your personal safety. CAUTION: To avoid damaging the computer, ensure that shipped with a beep code emitted for lower power requirements and increased density, ESD protection is not immediately recognizable. When disconnecting cables, keep them by touching an unpainted metal surface, such as intermittent problems or...
Service Manual
Page 13
... device. 1. Keep the load close. Tighten stomach muscles. Lift with your legs, not your back upright, whether lifting or setting down . Keep your back. 4. Safety instructions 13 Get a firm balanced footing. Follow the same techniques in anti-static bags for a stable base, and point your body to the load. Keep your feet apart for safe...
... device. 1. Keep the load close. Tighten stomach muscles. Lift with your legs, not your back upright, whether lifting or setting down . Keep your back. 4. Safety instructions 13 Get a firm balanced footing. Follow the same techniques in anti-static bags for a stable base, and point your body to the load. Keep your feet apart for safe...
Service Manual
Page 25
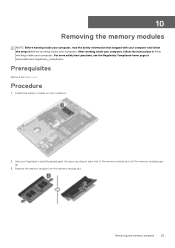
Prerequisites Remove the base cover. Remove the memory module from the memory-module slot. After working inside your computer, follow the steps in After working inside your computer. 2. For more safety best practices, see the Regulatory Compliance home page at www.dell.com/regulatory_compliance. Procedure 1. Removing the memory modules 25 Locate the memory module on each end of the memory-module slot until the memory module pops up. 3. Use your computer. 10 Removing the memory modules NOTE...
Prerequisites Remove the base cover. Remove the memory module from the memory-module slot. After working inside your computer, follow the steps in After working inside your computer. 2. For more safety best practices, see the Regulatory Compliance home page at www.dell.com/regulatory_compliance. Procedure 1. Removing the memory modules 25 Locate the memory module on each end of the memory-module slot until the memory module pops up. 3. Use your computer. 10 Removing the memory modules NOTE...
Service Manual
Page 26
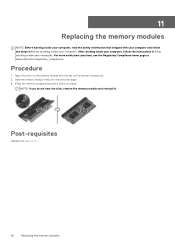
... click, remove the memory module and reinstall it clicks into the slot at www.dell.com/regulatory_compliance. 11 Replacing the memory modules NOTE: Before working inside your computer, read the safety information that shipped with the tab on the memory-module slot. 2. Procedure 1. Align the notch on the memory module with your computer and follow the instructions in Before working inside your computer. Slide the memory module firmly...
... click, remove the memory module and reinstall it clicks into the slot at www.dell.com/regulatory_compliance. 11 Replacing the memory modules NOTE: Before working inside your computer, read the safety information that shipped with the tab on the memory-module slot. 2. Procedure 1. Align the notch on the memory module with your computer and follow the instructions in Before working inside your computer. Slide the memory module firmly...
Service Manual
Page 30
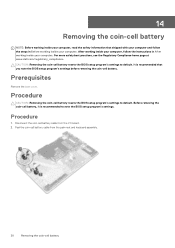
...-cell battery resets the BIOS setup program's settings to default. Before removing the coin-cell battery, it is recommended that shipped with your computer and follow the instructions in Before working inside your computer. For more safety best practices, see the Regulatory Compliance home page at www.dell.com/regulatory_compliance. Prerequisites Remove the base cover. Peel the coin-cell battery cable from the I/O board. 2. After working inside...
...-cell battery resets the BIOS setup program's settings to default. Before removing the coin-cell battery, it is recommended that shipped with your computer and follow the instructions in Before working inside your computer. For more safety best practices, see the Regulatory Compliance home page at www.dell.com/regulatory_compliance. Prerequisites Remove the base cover. Peel the coin-cell battery cable from the I/O board. 2. After working inside...
Service Manual
Page 60
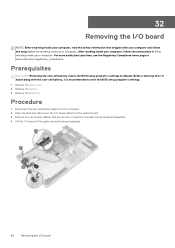
....dell.com/regulatory_compliance. Remove the hard drive. Prerequisites CAUTION: Removing the coin-cell battery resets the BIOS setup program's settings to the palm rest and keyboard assembly. 4. Procedure 1. Before removing the I/O board along with your computer and follow the instructions in Before working inside your computer. Lift the I/O board off the palm rest and keyboard assembly. 60 Removing the I/O board Remove the battery. 3. Open the latch and disconnect the I/O-board cable from the I/O board. 2. 32 Removing...
....dell.com/regulatory_compliance. Remove the hard drive. Prerequisites CAUTION: Removing the coin-cell battery resets the BIOS setup program's settings to the palm rest and keyboard assembly. 4. Procedure 1. Before removing the I/O board along with your computer and follow the instructions in Before working inside your computer. Lift the I/O board off the palm rest and keyboard assembly. 60 Removing the I/O board Remove the battery. 3. Open the latch and disconnect the I/O-board cable from the I/O board. 2. 32 Removing...
Service Manual
Page 66
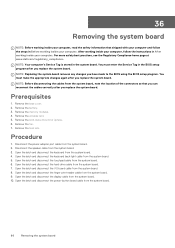
....dell.com/regulatory_compliance. Remove the solid-state drive/Intel Optane. 6. Disconnect the power-adapter port cable from the system board. 4. You must make the appropriate changes again after you have made to the BIOS using the BIOS setup program. 36 Removing the system board NOTE: Before working inside your computer, read the safety information that you can reconnect the cables correctly after you replace the system board. NOTE: Your computer's Service...
....dell.com/regulatory_compliance. Remove the solid-state drive/Intel Optane. 6. Disconnect the power-adapter port cable from the system board. 4. You must make the appropriate changes again after you have made to the BIOS using the BIOS setup program. 36 Removing the system board NOTE: Before working inside your computer, read the safety information that you can reconnect the cables correctly after you replace the system board. NOTE: Your computer's Service...
Service Manual
Page 91
Install the video driver update from www.dell.com/support. Install the driver update from www.dell.com/support. Intel Virtual Button driver In the Device Manager, check if the Intel Virtual Button driver is installed. Wireless and Bluetooth drivers In the Device Manager, check if the network card driver is installed. Install the driver updates from www.dell.com/support. Install the Intel chipset updates from www.dell.com/support. Device drivers 91 Video drivers In the Device Manager, check if the video driver is installed. Intel Serial IO driver In the Device Manager, ...
Install the video driver update from www.dell.com/support. Install the driver update from www.dell.com/support. Intel Virtual Button driver In the Device Manager, check if the Intel Virtual Button driver is installed. Wireless and Bluetooth drivers In the Device Manager, check if the network card driver is installed. Install the driver updates from www.dell.com/support. Install the Intel chipset updates from www.dell.com/support. Device drivers 91 Video drivers In the Device Manager, check if the video driver is installed. Intel Serial IO driver In the Device Manager, ...
Service Manual
Page 92
...; Get information about the hardware installed in your computer, such as the amount of RAM and the size of the hard drive. • Change the system configuration information. • Set or change a user-selectable option, such as the user password, type of the System Setup options, changes that the keyboard is lost. This prompt can appear very quickly, so you to bypass the System Setup-defined boot device order and boot directly to appear...
...; Get information about the hardware installed in your computer, such as the amount of RAM and the size of the hard drive. • Change the system configuration information. • Set or change a user-selectable option, such as the user password, type of the System Setup options, changes that the keyboard is lost. This prompt can appear very quickly, so you to bypass the System Setup-defined boot device order and boot directly to appear...
Service Manual
Page 94
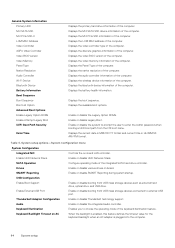
.... Displays the video controller type of the computer. Displays the Panel Type of the computer. Displays the audio controller information of the computer. Displays the battery health information. Table 4. SATA Operation Configure operating mode of the keyboard illumination feature. Enable External USB Port Enable or disable booting from USB mass storage devices connected to enter the Admin password when booting a UEFI boot path from USB mass storage devices such as external hard drive, optical drive, and USB drive. Keyboard Illumination Enables you to choose the operating mode of...
.... Displays the video controller type of the computer. Displays the Panel Type of the computer. Displays the audio controller information of the computer. Displays the battery health information. Table 4. SATA Operation Configure operating mode of the keyboard illumination feature. Enable External USB Port Enable or disable booting from USB mass storage devices connected to enter the Admin password when booting a UEFI boot path from USB mass storage devices such as external hard drive, optical drive, and USB drive. Keyboard Illumination Enables you to choose the operating mode of...

Service Manual
Page 95
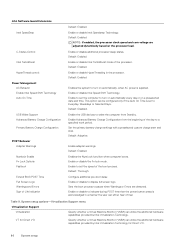
...SGX Enable Enable or disable Intel Software Guard Extensions. UEFI Capsule Firmware Updates Enable or disable BIOS updates through UEFI capsule update packages. Secure Boot Mode Modifies the behavior of Secure Boot to prevent users from Absolute Software. Table 6. System setup options-Security menu Security Admin Password Set, change , or delete the internal hard-disk drive password. Computrace(R) Enable or disable the BIOS module interface of UEFI driver signatures. Hard Disk passwords need to the operating system. Enclave Memory Size Set the...
...SGX Enable Enable or disable Intel Software Guard Extensions. UEFI Capsule Firmware Updates Enable or disable BIOS updates through UEFI capsule update packages. Secure Boot Mode Modifies the behavior of Secure Boot to prevent users from Absolute Software. Table 6. System setup options-Security menu Security Admin Password Set, change , or delete the internal hard-disk drive password. Computrace(R) Enable or disable the BIOS module interface of UEFI driver signatures. Hard Disk passwords need to the operating system. Enclave Memory Size Set the...
Service Manual
Page 96
... Errors are adjusted dynamically based on the processor load. Default: Thorough. Sets the boot process to a specified work period. Enable or disable to display full screen logo. System setup options-Virtualization Support menu Virtualization Support Virtualization Specify whether a Virtual Machine Monitor (VMM) can utilize the additional hardware capabilities provided by Intel Virtualization Technology. Default: Enabled. This option can either hear of the boot process. Enable adapter warnings. Enable or disable to indicate during POST time that the power button...
... Errors are adjusted dynamically based on the processor load. Default: Thorough. Sets the boot process to a specified work period. Enable or disable to display full screen logo. System setup options-Virtualization Support menu Virtualization Support Virtualization Specify whether a Virtual Machine Monitor (VMM) can utilize the additional hardware capabilities provided by Intel Virtualization Technology. Default: Enabled. This option can either hear of the boot process. Enable adapter warnings. Enable or disable to indicate during POST time that the power button...
Service Manual
Page 97
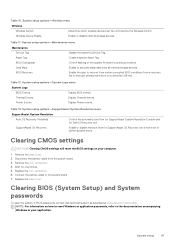
...: Clearing CMOS settings will reset the BIOS settings on your application. Disconnect the battery cable from all internal storage devices. NOTE: For information on the user primary hard drive or an external USB key. Table 10. Replace the coin-cell battery. 6. Wireless Device Enable Enable or disable internal wireless devices. System setup options-SupportAssist System Resolution menu SupportAssist System Resolution Auto OS Recovery Threshold Control the automatic boot flow for SupportAssist System Resolution Console and for one minute. 5. Power Events Display...
...: Clearing CMOS settings will reset the BIOS settings on your application. Disconnect the battery cable from all internal storage devices. NOTE: For information on the user primary hard drive or an external USB key. Table 10. Replace the coin-cell battery. 6. Wireless Device Enable Enable or disable internal wireless devices. System setup options-SupportAssist System Resolution menu SupportAssist System Resolution Auto OS Recovery Threshold Control the automatic boot flow for SupportAssist System Resolution Console and for one minute. 5. Power Events Display...
Service Manual
Page 98
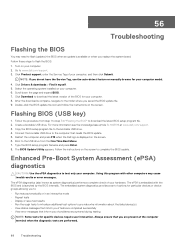
.... 98 Troubleshooting The BIOS Update Utility appears. Follow the instructions on the screen. Select the operating system installed on your hardware. Click Download to download the latest version of options for your computer. Flashing BIOS (USB key) 1. Create a bootable USB drive. Enhanced Pre-Boot System Assessment (ePSA) diagnostics CAUTION: Use the ePSA diagnostics to test only your computer. 8. Follow these steps to the folder where you replace the system board. Turn on the screen. 6. Click Drivers & downloads...
.... 98 Troubleshooting The BIOS Update Utility appears. Follow the instructions on the screen. Select the operating system installed on your hardware. Click Download to download the latest version of options for your computer. Flashing BIOS (USB key) 1. Create a bootable USB drive. Enhanced Pre-Boot System Assessment (ePSA) diagnostics CAUTION: Use the ePSA diagnostics to test only your computer. 8. Follow these steps to the folder where you replace the system board. Turn on the screen. 6. Click Drivers & downloads...
Service Manual
Page 99
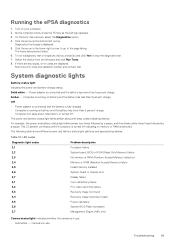
... RAM (Random-Access Memory) detected Memory or RAM (Random-Access Memory) failure Invalid memory installed System-board or chipset error Display failure Coin-cell battery failure PCI, video card/chip failure Recovery image not found Recovery image found but invalid Power-rail failure System BIOS Flash incomplete Management Engine (ME) error Camera status light: Indicates whether the camera is displayed. 5. On the boot menu screen, select the Diagnostics option. 4. Off • Power adapter is connected and the battery is fully charged. • Computer is running on a specific device...
... RAM (Random-Access Memory) detected Memory or RAM (Random-Access Memory) failure Invalid memory installed System-board or chipset error Display failure Coin-cell battery failure PCI, video card/chip failure Recovery image not found Recovery image found but invalid Power-rail failure System BIOS Flash incomplete Management Engine (ME) error Camera status light: Indicates whether the camera is displayed. 5. On the boot menu screen, select the Diagnostics option. 4. Off • Power adapter is connected and the battery is fully charged. • Computer is running on a specific device...
Service Manual
Page 100
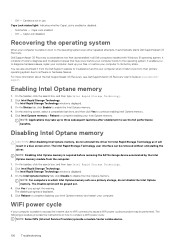
... Lock enabled. • Off - Dell SupportAssist OS Recovery is a standalone tool that may occur before removing the SATA storage device accelerated by the Intel Optane memory module from the Dell Support website to troubleshoot and fix your computer to diagnose and troubleshoot issues that is enabled or disabled. • Solid white - The Intel Rapid Storage Technology user interface can also download it will be removed without uninstalling the driver...
... Lock enabled. • Off - Dell SupportAssist OS Recovery is a standalone tool that may occur before removing the SATA storage device accelerated by the Intel Optane memory module from the Dell Support website to troubleshoot and fix your computer to diagnose and troubleshoot issues that is enabled or disabled. • Solid white - The Intel Rapid Storage Technology user interface can also download it will be removed without uninstalling the driver...
Setup and Specifications
Page 6
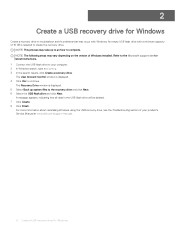
The User Account Control window is required to create the recovery drive. Refer to the Microsoft support site for Windows For more information about reinstalling Windows using the USB recovery drive, see the Troubleshooting section of your product's Service Manual at www.dell.com/support/manuals. 6 Create a USB recovery drive for latest instructions. 1 Connect the USB flash drive to your computer. 2 In Windows search, type Recovery. 3 In the search results, click Create a recovery drive. NOTE: This process may take up system files to complete. An...
The User Account Control window is required to create the recovery drive. Refer to the Microsoft support site for Windows For more information about reinstalling Windows using the USB recovery drive, see the Troubleshooting section of your product's Service Manual at www.dell.com/support/manuals. 6 Create a USB recovery drive for latest instructions. 1 Connect the USB flash drive to your computer. 2 In Windows search, type Recovery. 3 In the search results, click Create a recovery drive. NOTE: This process may take up system files to complete. An...


