
Service Manual
Page 10
Connect any other parts that no stray screws remain inside your computer. 1. Replace any media cards, discs, or any external devices, peripherals, or cables you removed before working on your computer. 3. Connect your computer Turn on your computer. 10 After working inside your computer and all screws and ensure that you removed before working on your computer. 4. 2 After working inside your computer CAUTION: Leaving stray or loose screws inside your computer may severely damage your computer. 2. Replace all attached devices to their electrical outlets. 5.
Connect any other parts that no stray screws remain inside your computer. 1. Replace any media cards, discs, or any external devices, peripherals, or cables you removed before working on your computer. 3. Connect your computer Turn on your computer. 10 After working inside your computer and all screws and ensure that you removed before working on your computer. 4. 2 After working inside your computer CAUTION: Leaving stray or loose screws inside your computer may severely damage your computer. 2. Replace all attached devices to their electrical outlets. 5.
Service Manual
Page 71
Replace the wireless card. 5. Replace the battery. 7. Press F2 when the Dell logo is the alphanumeric identifier located at the back side of your computer. 2. Replace the base cover. Turn on or restart your computer. Navigate to enter the BIOS setup program. 3. Replace the heat sink. 2. Replacing the system board 71 Replace the...
Replace the wireless card. 5. Replace the battery. 7. Press F2 when the Dell logo is the alphanumeric identifier located at the back side of your computer. 2. Replace the base cover. Turn on or restart your computer. Navigate to enter the BIOS setup program. 3. Replace the heat sink. 2. Replacing the system board 71 Replace the...
Service Manual
Page 81
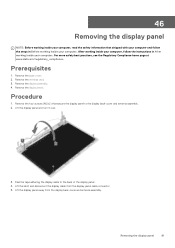
...card. 3. Procedure 1. Prerequisites 1. Remove the display bezel. Removing the display panel 81 Remove the display assembly. 4. Lift the display panel and turn it over. 3. Peel the tape adhering the display cable to the display back-cover and antenna assembly. 2. Lift the display panel away from ...the display-panel cable connector. 5. For more safety best practices, see the Regulatory Compliance home page at www.dell.com/regulatory_compliance. Remove the base cover. 2. Lift the latch and disconnect the display cable from the display back-cover and antenna assembly.
...card. 3. Procedure 1. Prerequisites 1. Remove the display bezel. Removing the display panel 81 Remove the display assembly. 4. Lift the display panel and turn it over. 3. Peel the tape adhering the display cable to the display back-cover and antenna assembly. 2. Lift the display panel away from ...the display-panel cable connector. 5. For more safety best practices, see the Regulatory Compliance home page at www.dell.com/regulatory_compliance. Remove the base cover. 2. Lift the latch and disconnect the display cable from the display back-cover and antenna assembly.
Service Manual
Page 92
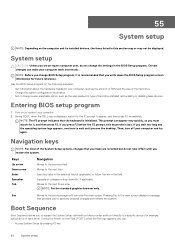
... or disabling base devices. Esc Moves to appear, and then press F2 immediately. During the Power-on Self Test (POST), when the Dell logo appears, you to bypass the System Setup-defined boot device order and boot directly to wait until you are recorded but do not ...drop-down the BIOS Setup program screen information for the following purposes: • Get information about the hardware installed in your computer work incorrectly. Turn on (or restart) your computer and try again. 55 System setup NOTE: Depending on the computer and its installed devices, the items listed in...
... or disabling base devices. Esc Moves to appear, and then press F2 immediately. During the Power-on Self Test (POST), when the Dell logo appears, you to bypass the System Setup-defined boot device order and boot directly to wait until you are recorded but do not ...drop-down the BIOS Setup program screen information for the following purposes: • Get information about the hardware installed in your computer work incorrectly. Turn on (or restart) your computer and try again. 55 System setup NOTE: Depending on the computer and its installed devices, the items listed in...
Service Manual
Page 96
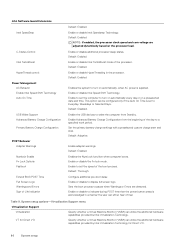
...Default: Disabled. Set the primary battery charge settings with a preselected custom charge start and stop. Enable adapter warnings. Enable to turn on automatically every day or on the processor load. System setup options-Virtualization Support menu Virtualization Support Virtualization Specify whether a Virtual ...Table 9. Default: Enabled. NOTE: If enabled, the processor clock speed and core voltage are detected. Enables the system to turn on automatically, when AC power is set the computer to set the speed of Life Indication Default: Enabled. Enable Advanced Battery ...
...Default: Disabled. Set the primary battery charge settings with a preselected custom charge start and stop. Enable adapter warnings. Enable to turn on automatically every day or on the processor load. System setup options-Virtualization Support menu Virtualization Support Virtualization Specify whether a Virtual ...Table 9. Default: Enabled. NOTE: If enabled, the processor clock speed and core voltage are detected. Enables the system to turn on automatically, when AC power is set the computer to set the speed of Life Indication Default: Enabled. Enable Advanced Battery ...
Service Manual
Page 98
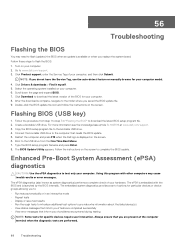
...-detect feature or manually browse for specific devices require user interaction. Click Product support, enter the Service Tag of your computer. 8. Turn on the screen. 6. Double-click the BIOS update file icon and follow the instructions on your computer model. 4. Scroll down the...results • Run thorough tests to introduce additional test options to download the latest BIOS setup program file. 2. Follow these steps to www.dell.com/support. 3. Click Drivers & downloads > Find it myself. 5. After the download is available or when you saved the BIOS update ...
...-detect feature or manually browse for specific devices require user interaction. Click Product support, enter the Service Tag of your computer. 8. Turn on the screen. 6. Double-click the BIOS update file icon and follow the instructions on your computer model. 4. Scroll down the...results • Run thorough tests to introduce additional test options to download the latest BIOS setup program file. 2. Follow these steps to www.dell.com/support. 3. Click Drivers & downloads > Find it myself. 5. After the download is available or when you saved the BIOS update ...
Service Manual
Page 99
...press the F12 key as the Dell logo appears. 3. Click the arrow in use . • Solid white - Select the device from the left corner. Solid white - Amber - Off • Power adapter is connected and the battery is fully charged. • Computer is turned off . This 2,3 pattern continues ... percent charge. Computer is detected. The items detected are displayed. Note the error code and validation number and contact Dell. Power adapter is in sleep state, hibernation, or turned off indicating no memory or RAM is running on a specific device, press Esc and click Yes to the page ...
...press the F12 key as the Dell logo appears. 3. Click the arrow in use . • Solid white - Select the device from the left corner. Solid white - Amber - Off • Power adapter is connected and the battery is fully charged. • Computer is turned off . This 2,3 pattern continues ... percent charge. Computer is detected. The items detected are displayed. Note the error code and validation number and contact Dell. Power adapter is in sleep state, hibernation, or turned off indicating no memory or RAM is running on a specific device, press Esc and click Yes to the page ...
Service Manual
Page 101
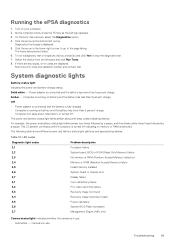
Turn off your computer. 3. Turn on the computer even after it has been powered off your computer. 5. Flea power release Flea power is the residual static electricity that remains on ... on your computer. Press and hold the power button for 30 seconds. 5. 1. Disconnect the power adapter from your computer. 2. Turn on the modem. 7. Turn off the wireless router. 4. Turn off the modem. 3. Troubleshooting 101 Turn off and the battery has been removed. Connect the power adapter to your computer. 2. Wait for 15 seconds to...
Turn off your computer. 3. Turn on the computer even after it has been powered off your computer. 5. Flea power release Flea power is the residual static electricity that remains on ... on your computer. Press and hold the power button for 30 seconds. 5. 1. Disconnect the power adapter from your computer. 2. Turn on the modem. 7. Turn off the wireless router. 4. Turn off the modem. 3. Troubleshooting 101 Turn off and the battery has been removed. Connect the power adapter to your computer. 2. Wait for 15 seconds to...
Setup and Specifications
Page 4
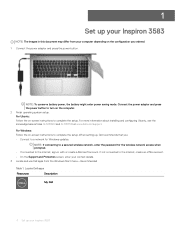
...system setup. When setting up, Dell recommends that you ordered. 1 Connect the power adapter and press the power button. 1 Set up your Inspiron 3583 NOTE: The images in with or create a Microsoft account. Connect the power adapter and press the power button to turn on -screen instructions to complete ...internet, create an offline account. • On the Support and Protection screen, enter your contact details. 3 Locate and use Dell apps from your Inspiron 3583 If not connected to complete the setup. NOTE: To conserve battery power, the battery might enter power saving mode.
...system setup. When setting up, Dell recommends that you ordered. 1 Connect the power adapter and press the power button. 1 Set up your Inspiron 3583 NOTE: The images in with or create a Microsoft account. Connect the power adapter and press the power button to turn on -screen instructions to complete ...internet, create an offline account. • On the Support and Protection screen, enter your contact details. 3 Locate and use Dell apps from your Inspiron 3583 If not connected to complete the setup. NOTE: To conserve battery power, the battery might enter power saving mode.
Setup and Specifications
Page 8
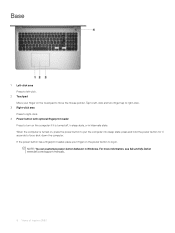
For more information, see Me and My Dell at www.dell.com/support/manuals. 8 Views of Inspiron 3583 When the computer is turned off, in sleep state, or in Windows. press and hold the power button for 4 seconds to log in. If the power button has a fingerprint reader, ... and two finger tap to right-click. 3 Right-click area Press to right-click. 4 Power button with optional fingerprint reader Press to turn on the computer if it is turned on, press the power button to put the computer into sleep state; Tap to left -click. 2 Touchpad Move your finger on the...
For more information, see Me and My Dell at www.dell.com/support/manuals. 8 Views of Inspiron 3583 When the computer is turned off, in sleep state, or in Windows. press and hold the power button for 4 seconds to log in. If the power button has a fingerprint reader, ... and two finger tap to right-click. 3 Right-click area Press to right-click. 4 Power button with optional fingerprint reader Press to turn on the computer if it is turned on, press the power button to put the computer into sleep state; Tap to left -click. 2 Touchpad Move your finger on the...
Setup and Specifications
Page 9
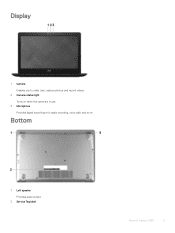
Display 1 Camera Enables you to video chat, capture photos, and record videos. 2 Camera-status light Turns on when the camera is in use. 3 Microphone Provides digital sound input for audio recording, voice calls, and so on. Bottom 1 Left speaker Provides audio output. 2 Service Tag label Views of Inspiron 3583 9
Display 1 Camera Enables you to video chat, capture photos, and record videos. 2 Camera-status light Turns on when the camera is in use. 3 Microphone Provides digital sound input for audio recording, voice calls, and so on. Bottom 1 Left speaker Provides audio output. 2 Service Tag label Views of Inspiron 3583 9
Setup and Specifications
Page 22
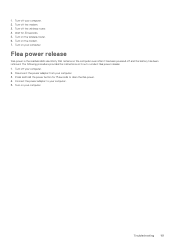
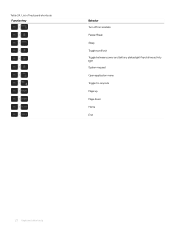
Table 24. List of keyboard shortcuts Function key Behavior Turn off/on wireless Pause/Break Sleep Toggle scroll lock Toggle between power and battery-status light/hard-drive activity light System request Open application menu Toggle Fn-key lock Page up Page down Home End 22 Keyboard shortcuts
Table 24. List of keyboard shortcuts Function key Behavior Turn off/on wireless Pause/Break Sleep Toggle scroll lock Toggle between power and battery-status light/hard-drive activity light System request Open application menu Toggle Fn-key lock Page up Page down Home End 22 Keyboard shortcuts


