

Dell Latitude 10 - ST2e Owner's Manual
Page 1
Dell Latitude 10 - ST2e Owner's Manual Regulatory Model: T05G Regulatory Type: T05G001
Dell Latitude 10 - ST2e Owner's Manual Regulatory Model: T05G Regulatory Type: T05G001

Dell Latitude 10 - ST2e Owner's Manual
Page 2
.... Microsoft®, Windows®, MS-DOS®, Windows Vista®, the Windows Vista start button, and Office Outlook® are trademarks of Advanced Micro Devices, Inc. is a registered trademark of Wireless Ethernet Compatibility Alliance, Inc. 2013 - 03 Rev. Wi-Fi® is under license. The Bluetooth® word mark is a registered trademark and owned by Dell Inc. and any use of such...
.... Microsoft®, Windows®, MS-DOS®, Windows Vista®, the Windows Vista start button, and Office Outlook® are trademarks of Advanced Micro Devices, Inc. is a registered trademark of Wireless Ethernet Compatibility Alliance, Inc. 2013 - 03 Rev. Wi-Fi® is under license. The Bluetooth® word mark is a registered trademark and owned by Dell Inc. and any use of such...
Dell Latitude 10 - ST2e Owner's Manual
Page 3
... Camera...11 Installing the Front Camera...12 Removing the Speakers...12 Installing the Speakers...14 Removing the Docking Board...14 Installing the Docking Board...15 Removing the System Board...16 Installing the System Board...16 Removing the Rear Camera...17 Installing the Rear Camera...17 Removing the Coin-Cell Battery...18 Installing the Coin-Cell Battery...18 Removing the Volume-Button Board...18 Installing the Volume-Button Board...19 3 System Setup...21 Entering System Setup (BIOS)...21 System Setup Navigation...21 Boot Menu...22 System Setup (BIOS) Options...22 4 Troubleshooting...
... Camera...11 Installing the Front Camera...12 Removing the Speakers...12 Installing the Speakers...14 Removing the Docking Board...14 Installing the Docking Board...15 Removing the System Board...16 Installing the System Board...16 Removing the Rear Camera...17 Installing the Rear Camera...17 Removing the Coin-Cell Battery...18 Installing the Coin-Cell Battery...18 Removing the Volume-Button Board...18 Installing the Volume-Button Board...19 3 System Setup...21 Entering System Setup (BIOS)...21 System Setup Navigation...21 Boot Menu...22 System Setup (BIOS) Options...22 4 Troubleshooting...
Dell Latitude 10 - ST2e Owner's Manual
Page 5
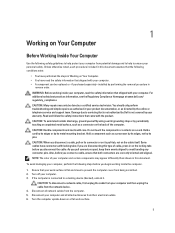
... shipped with your personal safety. Turn off your computer and all network cables from the network device. 4. Turn the computer upside-down on the locking tabs before you pull connectors apart, keep them evenly aligned to ensure your computer. • A component can be done by performing the removal procedure in this document. WARNING: Before working inside your computer, read the...
... shipped with your personal safety. Turn off your computer and all network cables from the network device. 4. Turn the computer upside-down on the locking tabs before you pull connectors apart, keep them evenly aligned to ensure your computer. • A component can be done by performing the removal procedure in this document. WARNING: Before working inside your computer, read the...
Dell Latitude 10 - ST2e Owner's Manual
Page 6
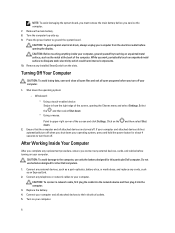
... . Windows 8: * Using a touch-enabled device: Swipe in from the right edge of the computer. If your computer and attached devices did not automatically turn off when you work, periodically touch an unpainted metal surface to dissipate static electricity, which could harm internal components. 10. Connect any external devices, such as a port replicator, battery slice, or media base, and replace any external devices, cards, and cables before turning on your computer. Replace the battery. 4. Remove the...
... . Windows 8: * Using a touch-enabled device: Swipe in from the right edge of the computer. If your computer and attached devices did not automatically turn off when you work, periodically touch an unpainted metal surface to dissipate static electricity, which could harm internal components. 10. Connect any external devices, such as a port replicator, battery slice, or media base, and replace any external devices, cards, and cables before turning on your computer. Replace the battery. 4. Remove the...
Dell Latitude 10 - ST2e Owner's Manual
Page 11
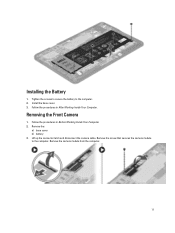
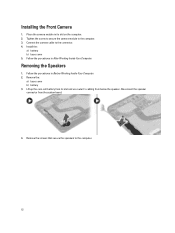
Remove the camera module from the computer. 11 Remove the: a) base cover b) battery 3. Follow the procedures in After Working Inside Your Computer. Lift up the connector latch and disconnect the camera cable. Follow the procedures in Before Working Inside Your Computer. 2. Removing the Front Camera 1. Remove the screw that secures the camera module to the computer. 2. Tighten the screws to secure the battery to the computer. Installing the Battery 1. Install the base cover. 3.
Remove the camera module from the computer. 11 Remove the: a) base cover b) battery 3. Follow the procedures in After Working Inside Your Computer. Lift up the connector latch and disconnect the camera cable. Follow the procedures in Before Working Inside Your Computer. 2. Removing the Front Camera 1. Remove the screw that secures the camera module to the computer. 2. Tighten the screws to secure the battery to the computer. Installing the Battery 1. Install the base cover. 3.
Dell Latitude 10 - ST2e Owner's Manual
Page 12
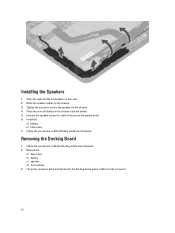
Tighten the screw to secure the camera module to the connector. 4. Install the: a) battery b) base cover 5. Lift up the coin-cell battery from its slot on the computer. 2. Place the camera module in After Working Inside Your Computer. Follow the procedures in its slot and un-route it's cabling from the system board. 4. Connect the camera cable to the computer. 3. Removing the Speakers 1. Disconnect the speaker connector from...
Tighten the screw to secure the camera module to the connector. 4. Install the: a) battery b) base cover 5. Lift up the coin-cell battery from its slot on the computer. 2. Place the camera module in After Working Inside Your Computer. Follow the procedures in its slot and un-route it's cabling from the system board. 4. Connect the camera cable to the computer. 3. Removing the Speakers 1. Disconnect the speaker connector from...
Dell Latitude 10 - ST2e Owner's Manual
Page 14
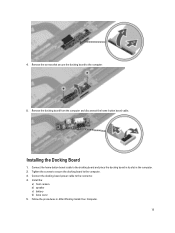
.... 3. Removing the Docking Board 1. Route the speaker cables on the system board. 6. Place the right and the left speakers in Before Working Inside Your Computer. 2. Install the : a) battery b) base cover 7. Lift up the connector latch and disconnect the docking-board power cable from the connector. 14 Follow the procedures in their slot. 2. Connect the speaker connector cable to the chassis. 4. Remove the: a) base cover b) battery c) speaker d) front camera 3.
.... 3. Removing the Docking Board 1. Route the speaker cables on the system board. 6. Place the right and the left speakers in Before Working Inside Your Computer. 2. Install the : a) battery b) base cover 7. Lift up the connector latch and disconnect the docking-board power cable from the connector. 14 Follow the procedures in their slot. 2. Connect the speaker connector cable to the chassis. 4. Remove the: a) base cover b) battery c) speaker d) front camera 3.
Dell Latitude 10 - ST2e Owner's Manual
Page 15
Remove the docking board from the computer and disconnect the home-button board cable. Connect the home-button board cable to the connector. 4. Connect the docking-board power cable to the docking board and place the docking board in its slot in After Working Inside Your Computer. 15 Follow the procedures in the computer. 2. Installing the Docking Board 1. Install the: a) front camera b) speaker c) battery d) base cover 5. Tighten the screws to secure the docking board to the computer. 5. Remove the screws that secure the docking board to the computer. 3. 4.
Remove the docking board from the computer and disconnect the home-button board cable. Connect the home-button board cable to the connector. 4. Connect the docking-board power cable to the docking board and place the docking board in its slot in After Working Inside Your Computer. 15 Follow the procedures in the computer. 2. Installing the Docking Board 1. Install the: a) front camera b) speaker c) battery d) base cover 5. Tighten the screws to secure the docking board to the computer. 5. Remove the screws that secure the docking board to the computer. 3. 4.
Dell Latitude 10 - ST2e Owner's Manual
Page 17
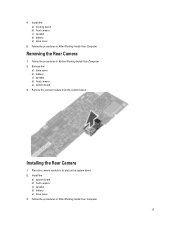
... procedures in its slot on the system board. 2. Removing the Rear Camera 1. Remove the camera module from the system board. Place the camera module in After Working Inside Your Computer. Follow the procedures in Before Working Inside Your Computer. 2. Remove the: a) base cover b) battery c) speaker d) front camera e) system board 3. Install the: a) system board b) front camera c) speaker d) battery e) base cover 3. Install the: a) docking board b) front camera c) speaker d) battery e) base cover 5. Follow the procedures in After Working Inside Your Computer...
... procedures in its slot on the system board. 2. Removing the Rear Camera 1. Remove the camera module from the system board. Place the camera module in After Working Inside Your Computer. Follow the procedures in Before Working Inside Your Computer. 2. Remove the: a) base cover b) battery c) speaker d) front camera e) system board 3. Install the: a) system board b) front camera c) speaker d) battery e) base cover 3. Install the: a) docking board b) front camera c) speaker d) battery e) base cover 5. Follow the procedures in After Working Inside Your Computer...

Dell Latitude 10 - ST2e Owner's Manual
Page 18
.... 2. Connect the coin-cell battery cable to the system board. 2. Install the: a) battery b) base cover 5. Follow the procedures in Before Working Inside Your Computer. 2. Removing the Volume-Button Board 1. Install the: a) system board b) front camera c) speaker 3. Follow the procedures in its slot on the computer. 4. Replace the coin-cell battery in After Working Inside Your Computer. Removing the Coin-Cell Battery 1. Remove the: a) base cover b) battery c) speaker d) front camera e) system board 3. Installing the Coin-Cell Battery 1. Remove the: a) base cover...
.... 2. Connect the coin-cell battery cable to the system board. 2. Install the: a) battery b) base cover 5. Follow the procedures in Before Working Inside Your Computer. 2. Removing the Volume-Button Board 1. Install the: a) system board b) front camera c) speaker 3. Follow the procedures in its slot on the computer. 4. Replace the coin-cell battery in After Working Inside Your Computer. Removing the Coin-Cell Battery 1. Remove the: a) base cover b) battery c) speaker d) front camera e) system board 3. Installing the Coin-Cell Battery 1. Remove the: a) base cover...
Dell Latitude 10 - ST2e Owner's Manual
Page 21
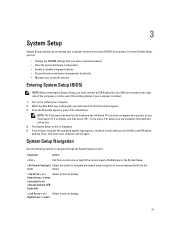
... prompt can : • Change the NVRAM settings after you add or remove hardware • View the system hardware configuration • Enable or disable integrated devices • Set performance and power management thresholds • Manage your computer hardware and specify BIOS‐level options. 3 System Setup System Setup enables you to display. tablet. < Up Arrow > or < Select an item to manage your computer security Entering System Setup (BIOS) NOTE: Before entering the System Setup, you must watch...
... prompt can : • Change the NVRAM settings after you add or remove hardware • View the system hardware configuration • Enable or disable integrated devices • Set performance and power management thresholds • Manage your computer hardware and specify BIOS‐level options. 3 System Setup System Setup enables you to display. tablet. < Up Arrow > or < Select an item to manage your computer security Entering System Setup (BIOS) NOTE: Before entering the System Setup, you must watch...
Dell Latitude 10 - ST2e Owner's Manual
Page 22
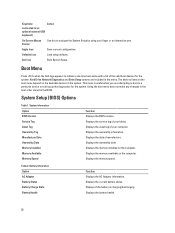
... System Setup by using your computer. Using the boot menu does not make any changes to the boot order stored in the BIOS. Displays the date of the valid boot devices for the system. Apply Icon Save current configuration. Keystroke Action connected to an optional external USB keyboard) On Screen Mouse Pointer Use this menu. This menu is charging/discharging. Displays the service tag of your finger or an interactive pen. Table 2. Displays the memory installed on the computer. Displays the...
... System Setup by using your computer. Using the boot menu does not make any changes to the boot order stored in the BIOS. Displays the date of the valid boot devices for the system. Apply Icon Save current configuration. Keystroke Action connected to an optional external USB keyboard) On Screen Mouse Pointer Use this menu. This menu is charging/discharging. Displays the service tag of your finger or an interactive pen. Table 2. Displays the memory installed on the computer. Displays the...

Dell Latitude 10 - ST2e Owner's Manual
Page 23
... be removed from a USB mass storage device. To add a new password: • Enter the old password • Enter the new password • Confirm the new password 23 Function Enables or Disables boot from the boot order. The drive does not have a password set , change, or delete the administrator (admin) password (also known as the setup password). System Configuration Option USB Configuration Miscellaneous Devices Function Displays the order that the BIOS searches devices when trying to find an operating system to enable or disable various on AC Table 7. Video Option LCD...
... be removed from a USB mass storage device. To add a new password: • Enter the old password • Enter the new password • Confirm the new password 23 Function Enables or Disables boot from the boot order. The drive does not have a password set , change, or delete the administrator (admin) password (also known as the setup password). System Configuration Option USB Configuration Miscellaneous Devices Function Displays the order that the BIOS searches devices when trying to find an operating system to enable or disable various on AC Table 7. Video Option LCD...

Dell Latitude 10 - ST2e Owner's Manual
Page 24
... disable the BIOS module interface of characters allowed for the admin and system passwords. This option is enabled and visible to this option take effect immediately. TPM Security (Default) NOTE: Activation, deactivation, and clear options are permitted when an administrator password is set by default. To add a new password: • Enter the old password • Enter the new password • Confirm the new password Click OK after entering the password details. Option System Password Strong Password Password Configuration Password Change Non-Admin Setup Changes...
... disable the BIOS module interface of characters allowed for the admin and system passwords. This option is enabled and visible to this option take effect immediately. TPM Security (Default) NOTE: Activation, deactivation, and clear options are permitted when an administrator password is set by default. To add a new password: • Enter the old password • Enter the new password • Confirm the new password Click OK after entering the password details. Option System Password Strong Password Password Configuration Password Change Non-Admin Setup Changes...
Dell Latitude 10 - ST2e Owner's Manual
Page 25
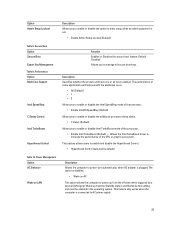
... (Default) Allows you to enable or disable Intel TurboBoost mode of the processor. • Enable Intel TurboBoost (Default) - Secure Boot Option Secure Boot Expert Key Management Table 9. Option Admin Setup Lockout Description Allows you to enable or disable the option to enter setup when an admin password is connected to AC power supply. 25 Performance Option Multi Core Support Intel SpeedStep C States Control Intel TurboBoost Hyperthread Control Function Enables or Disables the secure boot feature. The performance of the CPU...
... (Default) Allows you to enable or disable Intel TurboBoost mode of the processor. • Enable Intel TurboBoost (Default) - Secure Boot Option Secure Boot Expert Key Management Table 9. Option Admin Setup Lockout Description Allows you to enable or disable the option to enter setup when an admin password is connected to AC power supply. 25 Performance Option Multi Core Support Intel SpeedStep C States Control Intel TurboBoost Hyperthread Control Function Enables or Disables the secure boot feature. The performance of the CPU...

Dell Latitude 10 - ST2e Owner's Manual
Page 26
... to create a system asset tag if an asset tag is not already set by default. Allows you to enable or disable the wireless devices • WLAN • Bluetooth All options are used. POST Behaviour Option Adapter Warnings POST Hotkeys Table 12. Maintenance Option Service Tag Asset Tag Table 15. System Logs Option BIOS events Description • Disabled - The option is not set . Does not allow the system to power on screen displays a message, that displays...
... to create a system asset tag if an asset tag is not already set by default. Allows you to enable or disable the wireless devices • WLAN • Bluetooth All options are used. POST Behaviour Option Adapter Warnings POST Hotkeys Table 12. Maintenance Option Service Tag Asset Tag Table 15. System Logs Option BIOS events Description • Disabled - The option is not set . Does not allow the system to power on screen displays a message, that displays...
Dell Latitude 10 - ST2e Owner's Manual
Page 27
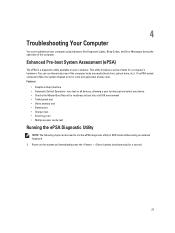
... Diagnostic Utility NOTE: The following steps can run the ePSA diagnostic utility in DOS mode without using indicators like Diagnostic Lights, Beep Codes, and Error Messages during the operation of tests for a computer's hardware. This utility includes a series of the computer. Features • Graphical User Interface • Automatic Default Operation- runs test on your computer using an external keyboard. 1. You can be used to interrupt and select any media (hard drive, optical drive...
... Diagnostic Utility NOTE: The following steps can run the ePSA diagnostic utility in DOS mode without using indicators like Diagnostic Lights, Beep Codes, and Error Messages during the operation of tests for a computer's hardware. This utility includes a series of the computer. Features • Graphical User Interface • Automatic Default Operation- runs test on your computer using an external keyboard. 1. You can be used to interrupt and select any media (hard drive, optical drive...
Dell Latitude 10 - ST2e Owner's Manual
Page 29
... be used as the key when switching between each set of beeps is 3 seconds, and the beep sound lasts 300 ms. After each beep and each set of beeps, the BIOS should detect if the user presses the power button. Press the Security Button ( + + ) to click OK once the tests are completed. 5. The volume up if the display cannot show errors or problems. These series of...
... be used as the key when switching between each set of beeps is 3 seconds, and the beep sound lasts 300 ms. After each beep and each set of beeps, the BIOS should detect if the user presses the power button. Press the Security Button ( + + ) to click OK once the tests are completed. 5. The volume up if the display cannot show errors or problems. These series of...
Dell Latitude 10 - ST2e Owner's Manual
Page 30
... , Keyboard controller test failure System board failure RAM Read/Write failure Memory failure Real-time clock power fail CMOS battery failure Video BIOS test failure Video card failure CPU - This pattern continues until the system is powered off. Example: For No Memory detected (LED code 2) , The Power Button LED blinks two times followed by a pause, blinks two times, pause, etc. Code 2 3 4 5 6 7 8 Cause and Troubleshooting Steps System board failure, covers BIOS corruption or ROM error No RAM detected No memory detected Chipset Error...
... , Keyboard controller test failure System board failure RAM Read/Write failure Memory failure Real-time clock power fail CMOS battery failure Video BIOS test failure Video card failure CPU - This pattern continues until the system is powered off. Example: For No Memory detected (LED code 2) , The Power Button LED blinks two times followed by a pause, blinks two times, pause, etc. Code 2 3 4 5 6 7 8 Cause and Troubleshooting Steps System board failure, covers BIOS corruption or ROM error No RAM detected No memory detected Chipset Error...


