

Owners Manual
Page 3
... Removing microSD card...9 Installing microSD card...9 Base cover...9 Removing base cover...9 Installing base cover...11 Battery...12 Lithium-ion battery precautions...12 Removing battery...12 Installing battery...13 Keyboard...13 Removing keyboard...13 Installing keyboard...16 Solid State Drive (SSD)...17 Removing M.2 Solid... port...21 Removing power connector port...21 Installing power connector port...21 Coin cell battery...22 Removing coin cell battery...22 Installing coin cell battery...23 Speaker...23 Removing speaker...23 Installing speakers...24 Touchpad panel...24 Removing touchpad......
... Removing microSD card...9 Installing microSD card...9 Base cover...9 Removing base cover...9 Installing base cover...11 Battery...12 Lithium-ion battery precautions...12 Removing battery...12 Installing battery...13 Keyboard...13 Removing keyboard...13 Installing keyboard...16 Solid State Drive (SSD)...17 Removing M.2 Solid... port...21 Removing power connector port...21 Installing power connector port...21 Coin cell battery...22 Removing coin cell battery...22 Installing coin cell battery...23 Speaker...23 Removing speaker...23 Installing speakers...24 Touchpad panel...24 Removing touchpad......
Owners Manual
Page 5
... specifications...62 Audio specifications...62 Video specifications...62 Camera specifications...63 Communication specifications...63 Port and connector specifications...63 Keyboard specifications...64 Touchpad specifications...64 Battery specifications...64 AC adapter specifications...64 Physical specifications...65 Environmental specifications...65 7 Troubleshooting...66 Enhanced Pre-Boot System Assessment - ePSA diagnostics 66 Running the ePSA...
... specifications...62 Audio specifications...62 Video specifications...62 Camera specifications...63 Communication specifications...63 Port and connector specifications...63 Keyboard specifications...64 Touchpad specifications...64 Battery specifications...64 AC adapter specifications...64 Physical specifications...65 Environmental specifications...65 7 Troubleshooting...66 Enhanced Pre-Boot System Assessment - ePSA diagnostics 66 Running the ePSA...
Owners Manual
Page 8
CAUTION: To avoid damage to the computer, use batteries designed for other Dell computers. 1 Connect any external devices, such as a port replicator or media base, ...all attached devices to turn off your operating system, press and hold the power button for this particular Dell computer. Turning off your computer CAUTION: To connect a network cable, first plug the cable into the ... turning on your - NOTE: Ensure that you turn them off . Do not use only the battery designed for about 6 seconds to their electrical outlets. 4 Turn on your computer. 8 Working on your computer ...
CAUTION: To avoid damage to the computer, use batteries designed for other Dell computers. 1 Connect any external devices, such as a port replicator or media base, ...all attached devices to turn off your operating system, press and hold the power button for this particular Dell computer. Turning off your computer CAUTION: To connect a network cable, first plug the cable into the ... turning on your - NOTE: Ensure that you turn them off . Do not use only the battery designed for about 6 seconds to their electrical outlets. 4 Turn on your computer. 8 Working on your computer ...
Owners Manual
Page 12
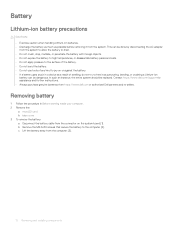
... assistance and further instructions. • Always purchase genuine batteries from the computer [3]. 12 Removing and installing components c Lift the battery away from https://www.dell.com or authorized Dell partners and re-sellers. Removing battery 1 Follow the procedure in a device as puncturing, bending, or crushing a Lithium-ion battery can be done by disconnecting the AC adapter...
... assistance and further instructions. • Always purchase genuine batteries from the computer [3]. 12 Removing and installing components c Lift the battery away from https://www.dell.com or authorized Dell partners and re-sellers. Removing battery 1 Follow the procedure in a device as puncturing, bending, or crushing a Lithium-ion battery can be done by disconnecting the AC adapter...
Owners Manual
Page 13
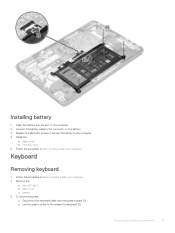
... cover b microSD card 5 Follow the procedure in Before working inside your computer. Installing battery 1 Insert the battery into the slot on the computer. 2 Connect the battery cable to the connector on the battery. 3 Replace the M2.0x3.0 screws to secure the battery to the release the keyboard [2]. Keyboard Removing keyboard 1 Follow the procedure in After...
... cover b microSD card 5 Follow the procedure in Before working inside your computer. Installing battery 1 Insert the battery into the slot on the computer. 2 Connect the battery cable to the connector on the battery. 3 Replace the M2.0x3.0 screws to secure the battery to the release the keyboard [2]. Keyboard Removing keyboard 1 Follow the procedure in After...
Owners Manual
Page 17
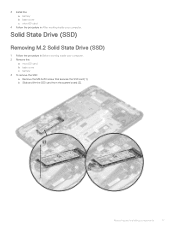
Solid State Drive (SSD) Removing M.2 Solid State Drive (SSD) 1 Follow the procedure in After working inside your computer. 2 Remove the: a microSD card b base cover c battery 3 To remove the SSD: a Remove the M2.0x3.0 screw that secures the SSD card [1]. b Slide and lift the SSD card from the system board [2]. 3 Install the: a battery b base cover c microSD card 4 Follow the procedure in Before working inside your computer. Removing and installing components 17
Solid State Drive (SSD) Removing M.2 Solid State Drive (SSD) 1 Follow the procedure in After working inside your computer. 2 Remove the: a microSD card b base cover c battery 3 To remove the SSD: a Remove the M2.0x3.0 screw that secures the SSD card [1]. b Slide and lift the SSD card from the system board [2]. 3 Install the: a battery b base cover c microSD card 4 Follow the procedure in Before working inside your computer. Removing and installing components 17
Owners Manual
Page 18
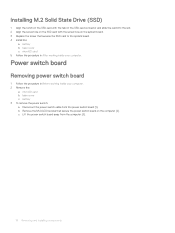
... secure the power switch board on the system board. 3 Replace the screw that secures the SSD card to the system board. 4 Install the: a battery b base cover c microSD card 5 Follow the procedure in Before working inside your computer. c Lift the power switch board away from the power switch board...Power switch board Removing power switch board 1 Follow the procedure in After working inside your computer. 2 Remove the: a microSD card b base cover c battery 3 To remove the power switch: a Disconnect the power switch cable from the computer [3]. 18 Removing and installing components
... secure the power switch board on the system board. 3 Replace the screw that secures the SSD card to the system board. 4 Install the: a battery b base cover c microSD card 5 Follow the procedure in Before working inside your computer. c Lift the power switch board away from the power switch board...Power switch board Removing power switch board 1 Follow the procedure in After working inside your computer. 2 Remove the: a microSD card b base cover c battery 3 To remove the power switch: a Disconnect the power switch cable from the computer [3]. 18 Removing and installing components
Owners Manual
Page 19
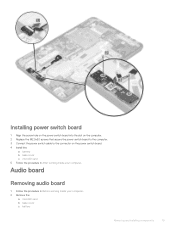
Installing power switch board 1 Align the screw hole on the power switch board into the slot on the computer. 2 Replace the M2.0x3.0 screws that secure the power switch board to the computer. 3 Connect the power switch cable to the connector on the power switch board. 4 Install the: a battery b base cover c microSD card 5 Follow the procedure in Before working inside your computer. Audio board Removing audio board 1 Follow the procedure in After working inside your computer. 2 Remove the: a microSD card b base cover c battery Removing and installing components 19
Installing power switch board 1 Align the screw hole on the power switch board into the slot on the computer. 2 Replace the M2.0x3.0 screws that secure the power switch board to the computer. 3 Connect the power switch cable to the connector on the power switch board. 4 Install the: a battery b base cover c microSD card 5 Follow the procedure in Before working inside your computer. Audio board Removing audio board 1 Follow the procedure in After working inside your computer. 2 Remove the: a microSD card b base cover c battery Removing and installing components 19
Owners Manual
Page 20
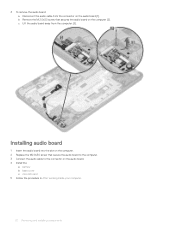
... M2.0x3.0 screw that secures the audio board on the computer [2]. c Lift the audio board away from the connector on the audio board. 4 Install the: a battery b base cover c microSD card 5 Follow the procedure in After working inside your computer. 20 Removing and installing components 3 To remove the audio board: a Disconnect the...
... M2.0x3.0 screw that secures the audio board on the computer [2]. c Lift the audio board away from the connector on the audio board. 4 Install the: a battery b base cover c microSD card 5 Follow the procedure in After working inside your computer. 20 Removing and installing components 3 To remove the audio board: a Disconnect the...
Owners Manual
Page 21
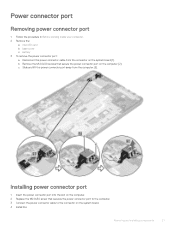
Power connector port Removing power connector port 1 Follow the procedure in Before working inside your computer. 2 Remove the: a microSD card b base cover c battery 3 To remove the power connector port: a Disconnect the power connector cable from the computer [3]. Installing power connector port 1 Insert the power connector port into the ...
Power connector port Removing power connector port 1 Follow the procedure in Before working inside your computer. 2 Remove the: a microSD card b base cover c battery 3 To remove the power connector port: a Disconnect the power connector cable from the computer [3]. Installing power connector port 1 Insert the power connector port into the ...
Owners Manual
Page 22
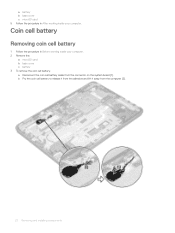
Coin cell battery Removing coin cell battery 1 Follow the procedure in After working inside your computer. 2 Remove the: a microSD card b base cover c battery 3 To remove the coin cell battery: a Disconnect the coin cell battery cable from the computer [2]. 22 Removing and installing components a battery b base cover c microSD card 5 Follow the procedure in Before working inside your computer. b Pry the coin cell battery to release it from the adhesive and lift it away from the connector on the system board [1].
Coin cell battery Removing coin cell battery 1 Follow the procedure in After working inside your computer. 2 Remove the: a microSD card b base cover c battery 3 To remove the coin cell battery: a Disconnect the coin cell battery cable from the computer [2]. 22 Removing and installing components a battery b base cover c microSD card 5 Follow the procedure in Before working inside your computer. b Pry the coin cell battery to release it from the adhesive and lift it away from the connector on the system board [1].
Owners Manual
Page 23
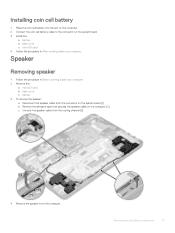
... Remove the: a microSD card b base cover c battery 3 To remove the speaker: a Disconnect the speaker cable from the computer. Installing coin cell battery 1 Place the coin cell battery into the slot on the computer. 2 Connect the coin cell battery cable to the connector on the system board. 3 Install... the: a battery b base cover c microSD card 4 Follow the procedure in ...
... Remove the: a microSD card b base cover c battery 3 To remove the speaker: a Disconnect the speaker cable from the computer. Installing coin cell battery 1 Place the coin cell battery into the slot on the computer. 2 Connect the coin cell battery cable to the connector on the system board. 3 Install... the: a battery b base cover c microSD card 4 Follow the procedure in ...
Owners Manual
Page 24
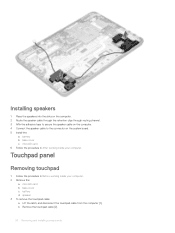
.... 3 Affix the adhesive tape to secure the speaker cable on the computer. 4 Connect the speaker cable to the connector on the system board. 5 Install the: a battery b base cover c microSD card 6 Follow the procedure in Before working inside your computer. Touchpad panel Removing touchpad 1 Follow the procedure in After working inside your...
.... 3 Affix the adhesive tape to secure the speaker cable on the computer. 4 Connect the speaker cable to the connector on the system board. 5 Install the: a battery b base cover c microSD card 6 Follow the procedure in Before working inside your computer. Touchpad panel Removing touchpad 1 Follow the procedure in After working inside your...
Owners Manual
Page 27
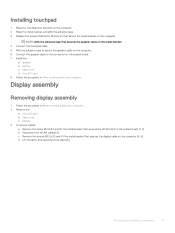
... tape. 3 Replace the screws (M2.0x3.0, M.2.0x2.0) that secure the metal bracket on the system board. 7 Install the: a speaker b battery c base cover d microSD card 8 Follow the procedure in Before working inside your computer. Display assembly Removing display assembly 1 Follow the procedure in After... working inside your computer. 2 Remove the: a microSD card b base cover c battery 3 To remove cables: a Remove the screw M2.0x3.0 and lift the metal bracket that secures the WLAN card on the computer [4, 5]. b...
... tape. 3 Replace the screws (M2.0x3.0, M.2.0x2.0) that secure the metal bracket on the system board. 7 Install the: a speaker b battery c base cover d microSD card 8 Follow the procedure in Before working inside your computer. Display assembly Removing display assembly 1 Follow the procedure in After... working inside your computer. 2 Remove the: a microSD card b base cover c battery 3 To remove cables: a Remove the screw M2.0x3.0 and lift the metal bracket that secures the WLAN card on the computer [4, 5]. b...
Owners Manual
Page 30
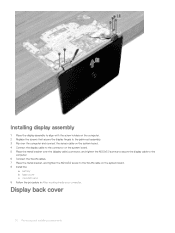
... computer. 6 Connect the WLAN cables. 7 Place the metal bracket, and tighten the M2.0x3.0 screw to the WLAN cable on the system board. 8 Install the: a battery b base cover c microSD card 9 Follow the procedure in After working inside your computer.
... computer. 6 Connect the WLAN cables. 7 Place the metal bracket, and tighten the M2.0x3.0 screw to the WLAN cable on the system board. 8 Install the: a battery b base cover c microSD card 9 Follow the procedure in After working inside your computer.
Owners Manual
Page 32
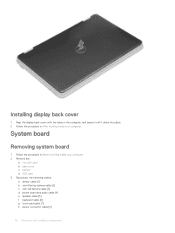
... Removing system board 1 Follow the procedure in After working inside your computer. 2 Remove the: a microSD card b base cover c battery d SSD card 3 Disconnect the following cables: a sensor cable [1] b world facing camera cable [2] c coin cell battery cable [3] d power board and audio cable [4] e speaker cable [5] f keyboard cable [6] g touch pad cable [7] h power connector cable [8] 32 Removing...
... Removing system board 1 Follow the procedure in After working inside your computer. 2 Remove the: a microSD card b base cover c battery d SSD card 3 Disconnect the following cables: a sensor cable [1] b world facing camera cable [2] c coin cell battery cable [3] d power board and audio cable [4] e speaker cable [5] f keyboard cable [6] g touch pad cable [7] h power connector cable [8] 32 Removing...
Owners Manual
Page 36
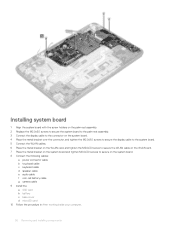
....0 screws to secure on the system board. 8 Connect the following cables: a power connector cable b touchpad cable c keyboard cable d speaker cable e audio cable f coin cell battery cable g camera cable 9 Install the: a SSD card b battery c base cover d microSD card 10 Follow the procedure in After working inside your computer. 36 Removing and installing components
....0 screws to secure on the system board. 8 Connect the following cables: a power connector cable b touchpad cable c keyboard cable d speaker cable e audio cable f coin cell battery cable g camera cable 9 Install the: a SSD card b battery c base cover d microSD card 10 Follow the procedure in After working inside your computer. 36 Removing and installing components
Owners Manual
Page 37
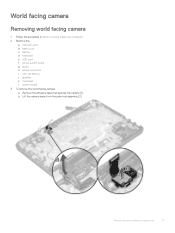
Removing and installing components 37 World facing camera Removing world facing camera 1 Follow the procedure in Before working inside your computer. 2 Remove the: a microSD card b base cover c battery d keyboard e SSD card f power switch board g audio h power connector i coin cell battery j speaker k touchpad l system board 3 To remove the world facing camera: a Remove the adhesive tape that secures the camera [1]. b Lift the camera away from the palm rest assembly [2].
Removing and installing components 37 World facing camera Removing world facing camera 1 Follow the procedure in Before working inside your computer. 2 Remove the: a microSD card b base cover c battery d keyboard e SSD card f power switch board g audio h power connector i coin cell battery j speaker k touchpad l system board 3 To remove the world facing camera: a Remove the adhesive tape that secures the camera [1]. b Lift the camera away from the palm rest assembly [2].
Owners Manual
Page 38
...Follow the procedure in After working inside your computer. 2 Remove the: a microSD card b base cover c battery d keyboard e SSD card f power switch board g audio h power connector i coin cell battery j speaker k touchpad l display assembly m system board n world facing camera NOTE: The component you are ...secure the camera on the palm rest assembly. 3 Install the: a system board b touchpad c speaker d coin cell battery e power connector f audio g power switch board h SSD card i keyboard j battery k base cover l microSD card 4 Follow the procedure in Before working inside your computer.
...Follow the procedure in After working inside your computer. 2 Remove the: a microSD card b base cover c battery d keyboard e SSD card f power switch board g audio h power connector i coin cell battery j speaker k touchpad l display assembly m system board n world facing camera NOTE: The component you are ...secure the camera on the palm rest assembly. 3 Install the: a system board b touchpad c speaker d coin cell battery e power connector f audio g power switch board h SSD card i keyboard j battery k base cover l microSD card 4 Follow the procedure in Before working inside your computer.
Owners Manual
Page 39
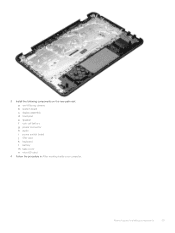
Removing and installing components 39 3 Install the following components on the new palm rest: a world facing camera b system board c display assembly d touchpad e speaker f coin cell battery g power connector h audio i power switch board j SSD card k keyboard l battery m base cover n microSD card 4 Follow the procedure in After working inside your computer.
Removing and installing components 39 3 Install the following components on the new palm rest: a world facing camera b system board c display assembly d touchpad e speaker f coin cell battery g power connector h audio i power switch board j SSD card k keyboard l battery m base cover n microSD card 4 Follow the procedure in After working inside your computer.


