
Re-imaging guide for Windows
Page 3
... BIOS in Windows...8 Clearing CMOS settings...8 Trusted Platform Module (TPM) security...8 Chapter 5: Reinstalling the operating system 9 Chapter 6: Reinstalling drivers and applications 10 Displaying drivers and applications on your computer 10 Chapter 7: Reinstallation sequence for drivers and applications 11 Intel chipset device software...11 Downloading and installing the chipset driver...11 Critical Microsoft Knowledge Base (KB) updates...11 Intel Rapid Storage Technology (IRST)...12 Downloading and installing the IRST driver...12 Media-card reader driver...
... BIOS in Windows...8 Clearing CMOS settings...8 Trusted Platform Module (TPM) security...8 Chapter 5: Reinstalling the operating system 9 Chapter 6: Reinstalling drivers and applications 10 Displaying drivers and applications on your computer 10 Chapter 7: Reinstallation sequence for drivers and applications 11 Intel chipset device software...11 Downloading and installing the chipset driver...11 Critical Microsoft Knowledge Base (KB) updates...11 Intel Rapid Storage Technology (IRST)...12 Downloading and installing the IRST driver...12 Media-card reader driver...
Re-imaging guide for Windows
Page 4
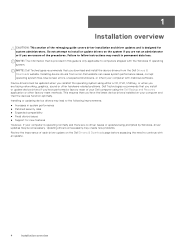
... screen errors, unexpected shutdowns, or infect your Dell computer using either a CD, DVD, USB key, or when you are facing networking, graphics, sound or other factory-reset methods. Failure to follow instructions may result in this guide is designed for new features However, if your computer is operating normally and there are no driver issues or updates being prompted by Windows, driver updates may create new problems. Review the importance of the reimaging guide covers driver installation and driver updates...
... screen errors, unexpected shutdowns, or infect your Dell computer using either a CD, DVD, USB key, or when you are facing networking, graphics, sound or other factory-reset methods. Failure to follow instructions may result in this guide is designed for new features However, if your computer is operating normally and there are no driver issues or updates being prompted by Windows, driver updates may create new problems. Review the importance of the reimaging guide covers driver installation and driver updates...

Re-imaging guide for Windows
Page 6
... Fingerprint Sensor ● Dell ControlVault3 Plus driver and firmware 11. Networking and communication drivers, which other software can be a base on which include: ● Wireless Local Area Network (WLAN) adapter driver: Enables and enhances the wireless adapter. ● Bluetooth driver: Enables and enhances the Bluetooth adapter. 5. Intel chipset driver: Allows Windows to be downloaded and installed manually from the Drivers & Downloads. 6. Windows operating system: The operating system controls the computer's hardware to communicate and adjust settings on components on...
... Fingerprint Sensor ● Dell ControlVault3 Plus driver and firmware 11. Networking and communication drivers, which other software can be a base on which include: ● Wireless Local Area Network (WLAN) adapter driver: Enables and enhances the wireless adapter. ● Bluetooth driver: Enables and enhances the Bluetooth adapter. 5. Intel chipset driver: Allows Windows to be downloaded and installed manually from the Drivers & Downloads. 6. Windows operating system: The operating system controls the computer's hardware to communicate and adjust settings on components on...
Re-imaging guide for Windows
Page 11
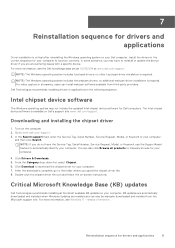
... device software for your computer. 7. For video capture or streaming, users can install webcam software available from the Microsoft support site. Turn on -screen instructions. Click Drivers & Downloads. 5. release information . NOTE: The Windows operating system includes touchpad drivers; In the Search support field, enter the Service Tag, Serial Number, Service Request, Model, or Keyword of your computer. NOTE: If you do not have to download the chipset driver for your computer. 4. Click Download to reinstall or update the device driver...
... device software for your computer. 7. For video capture or streaming, users can install webcam software available from the Microsoft support site. Turn on -screen instructions. Click Drivers & Downloads. 5. release information . NOTE: The Windows operating system includes touchpad drivers; In the Search support field, enter the Service Tag, Serial Number, Service Request, Model, or Keyword of your computer. NOTE: If you do not have to download the chipset driver for your computer. 4. Click Download to reinstall or update the device driver...
Re-imaging guide for Windows
Page 12
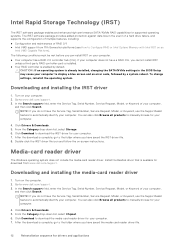
... Download to display a blue screen and an error code, followed by default. In the Search support field, enter the Service Tag, Serial Number, Service Request, Model, or Keyword of your computer, and then click Search. After the download is already installed, changing the SATA/NVMe settings in the event of a hard drive failure, and supports the configuration of multiple features, including: ● Configuration and maintenance of your computer, and then click Search. Media-card reader driver The Windows operating...
... Download to display a blue screen and an error code, followed by default. In the Search support field, enter the Service Tag, Serial Number, Service Request, Model, or Keyword of your computer, and then click Search. After the download is already installed, changing the SATA/NVMe settings in the event of a hard drive failure, and supports the configuration of multiple features, including: ● Configuration and maintenance of your computer, and then click Search. Media-card reader driver The Windows operating...

Re-imaging guide for Windows
Page 15
... station enables you have the Service Tag, Serial Number, Service Request, Model, or Keyword, use the SupportAssist feature to the latest version available on the screen. 4. Click Drivers & Downloads. 5. From the Category drop-down list, select Network, Ethernet & Wireless. 6. Wireless Local Network (WLAN) drivers and applications The Windows operating system does not provide native-device driver support for drivers and applications 15 To obtain wireless network functionality, install the relevant WLAN drivers from the Dell support site. Downloading and installing the...
... station enables you have the Service Tag, Serial Number, Service Request, Model, or Keyword, use the SupportAssist feature to the latest version available on the screen. 4. Click Drivers & Downloads. 5. From the Category drop-down list, select Network, Ethernet & Wireless. 6. Wireless Local Network (WLAN) drivers and applications The Windows operating system does not provide native-device driver support for drivers and applications 15 To obtain wireless network functionality, install the relevant WLAN drivers from the Dell support site. Downloading and installing the...
SIM/eSIM Setup Guide for Windows
Page 4
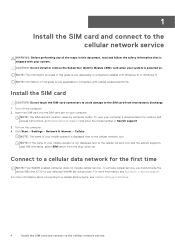
... card slot location varies by computer model. Turn on your selected WWAN service provider. Click Start > Settings > Network & Internet > Cellular. For more information about connecting to a cellular data network, see Activation or service support. For more information, see Cellular settings in Windows. 4 Install the SIM card and connect to the cellular network service NOTE: Information in this guide is only applicable to computers with cellular enabled platforms. Install the SIM card CAUTION: Do not touch the SIM-card...
... card slot location varies by computer model. Turn on your selected WWAN service provider. Click Start > Settings > Network & Internet > Cellular. For more information about connecting to a cellular data network, see Activation or service support. For more information, see Cellular settings in Windows. 4 Install the SIM card and connect to the cellular network service NOTE: Information in this guide is only applicable to computers with cellular enabled platforms. Install the SIM card CAUTION: Do not touch the SIM-card...

SIM/eSIM Setup Guide for Windows
Page 8
...-down menu. 6. Click Drivers & downloads. 4. Select the driver for your computer model. 3. Enter the Service Tag of your computer. 8. Go to protect the computer and ensure that the Dell computer has the latest security patches, fixes, and functionality. Click Find Drivers. 5. Click Download to ensure that the hardware components and devices work correctly. Run the installer, and follow the installation instructions. 8 Install the drivers For more information about Drivers and Downloads, see...
...-down menu. 6. Click Drivers & downloads. 4. Select the driver for your computer model. 3. Enter the Service Tag of your computer. 8. Go to protect the computer and ensure that the Dell computer has the latest security patches, fixes, and functionality. Click Find Drivers. 5. Click Download to ensure that the hardware components and devices work correctly. Run the installer, and follow the installation instructions. 8 Install the drivers For more information about Drivers and Downloads, see...
Owners Manual
Page 3
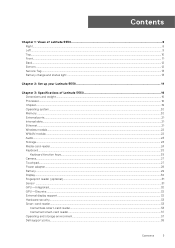
... Battery charge and status light ...13 Chapter 2: Set up your Latitude 5550 14 Chapter 3: Specifications of Latitude 5550 16 Dimensions and weight...16 Processor...16 Chipset...19 Operating system...20 Memory...20 External ports...21 Internal slots...21 Ethernet...21 Wireless module...22 WWAN module...22 Audio...23 Storage...24 Media-card reader...24 Keyboard...25 Keyboard function keys...25 Camera...27 Touchpad...27 Power adapter...28 Battery...29 Display...30 Fingerprint reader (optional)...31 Sensor ...31 GPU-Integrated...32 GPU-Discrete...32 External display support...32 Hardware...
... Battery charge and status light ...13 Chapter 2: Set up your Latitude 5550 14 Chapter 3: Specifications of Latitude 5550 16 Dimensions and weight...16 Processor...16 Chipset...19 Operating system...20 Memory...20 External ports...21 Internal slots...21 Ethernet...21 Wireless module...22 WWAN module...22 Audio...23 Storage...24 Media-card reader...24 Keyboard...25 Keyboard function keys...25 Camera...27 Touchpad...27 Power adapter...28 Battery...29 Display...30 Fingerprint reader (optional)...31 Sensor ...31 GPU-Integrated...32 GPU-Discrete...32 External display support...32 Hardware...

Owners Manual
Page 4
... After working inside your computer...43 BitLocker...43 Recommended tools...44 Screw list...44 Major components of Latitude 5550...45 Chapter 5: Removing and installing Customer Replaceable Units (CRUs 48 SIM card tray...48 Removing the SIM card tray (optional)...48 Installing the SIM card tray (optional)...49 Base cover...50 Removing the base cover...50 Installing the base cover...53 Wireless card...55 Removing the wireless card...55 Installing the wireless card...56 Wireless Wide Area Network (WWAN) card...58 Removing...
... After working inside your computer...43 BitLocker...43 Recommended tools...44 Screw list...44 Major components of Latitude 5550...45 Chapter 5: Removing and installing Customer Replaceable Units (CRUs 48 SIM card tray...48 Removing the SIM card tray (optional)...48 Installing the SIM card tray (optional)...49 Base cover...50 Removing the base cover...50 Installing the base cover...53 Wireless card...55 Removing the wireless card...55 Installing the wireless card...56 Wireless Wide Area Network (WWAN) card...58 Removing...

Owners Manual
Page 5
... power button with an optional fingerprint reader 101 Keyboard...102 Removing the keyboard...102 Installing the keyboard...104 Display assembly...106 Removing the display assembly...106 Installing the display assembly...109 Display bezel...112 Removing the display bezel...112 Installing the display bezel...113 Display panel...114 Removing the display panel...114 Installing the display panel...117 Camera module...120 Removing the camera module...120 Installing the camera module...121 Display hinges...123 Removing the display hinges...123 Installing the display hinges...123 Display back cover...
... power button with an optional fingerprint reader 101 Keyboard...102 Removing the keyboard...102 Installing the keyboard...104 Display assembly...106 Removing the display assembly...106 Installing the display assembly...109 Display bezel...112 Removing the display bezel...112 Installing the display bezel...113 Display panel...114 Removing the display panel...114 Installing the display panel...117 Camera module...120 Removing the camera module...120 Installing the camera module...121 Display hinges...123 Removing the display hinges...123 Installing the display hinges...123 Display back cover...
Owners Manual
Page 6
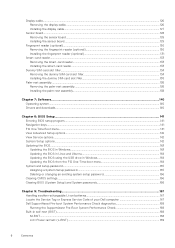
... BIOS in Windows...163 Updating the BIOS in Linux and Ubuntu...164 Updating the BIOS using the USB drive in Windows 164 Updating the BIOS from the F12 One-Time boot menu 164 System and setup password...165 Assigning a System Setup password...165 Deleting or changing an existing system setup password 166 Clearing CMOS settings...166 Clearing BIOS (System Setup) and System passwords 166 Chapter 9: Troubleshooting...167 Handling swollen rechargeable Li-ion batteries...167 Locate the Service Tag or Express Service Code of your Dell...
... BIOS in Windows...163 Updating the BIOS in Linux and Ubuntu...164 Updating the BIOS using the USB drive in Windows 164 Updating the BIOS from the F12 One-Time boot menu 164 System and setup password...165 Assigning a System Setup password...165 Deleting or changing an existing system setup password 166 Clearing CMOS settings...166 Clearing BIOS (System Setup) and System passwords 166 Chapter 9: Troubleshooting...167 Handling swollen rechargeable Li-ion batteries...167 Locate the Service Tag or Express Service Code of your Dell...

Owners Manual
Page 25
... symbols on them. To perform secondary functions, press Fn and the desired key. NOTE: You can be used to perform secondary functions. Keyboard The following table lists the keyboard specifications of the media card that is installed on your Latitude 5550. Table 18. Media-card reader specifications (continued) Description Values NOTE: The maximum capacity supported by the software application in BIOS setup program. Table 16. To type the alternate character, press Shift...
... symbols on them. To perform secondary functions, press Fn and the desired key. NOTE: You can be used to perform secondary functions. Keyboard The following table lists the keyboard specifications of the media card that is installed on your Latitude 5550. Table 18. Media-card reader specifications (continued) Description Values NOTE: The maximum capacity supported by the software application in BIOS setup program. Table 16. To type the alternate character, press Shift...

Owners Manual
Page 41
... system board. Working inside any key to conducting repairs in ways that incorporate standby power are unable to the same electrical potential. Service Mode Service Mode is connected to bare metal and never to remove the AC adapter appears on an anti-static mat. ● Wear shoes with your computer is not set up in Removing the battery. Remove the AC adapter and then press any notebook to...
... system board. Working inside any key to conducting repairs in ways that incorporate standby power are unable to the same electrical potential. Service Mode Service Mode is connected to bare metal and never to remove the AC adapter appears on an anti-static mat. ● Wear shoes with your computer is not set up in Removing the battery. Remove the AC adapter and then press any notebook to...

Owners Manual
Page 146
... adapter to external USB ports. NOTE: Depending on the configuration ordered, the camera setup option may not be used during preboot. 146 BIOS Setup Enable Internal Speaker Enables the internal speaker. NOTE: To view this option, enable Advanced Setup mode as described in View Advanced Setup options. NOTE: To view this option, enable Advanced Setup mode as described in View Advanced Setup options. Enable Thunderbolt Boot Support Enables the Thunderbolt adapter-peripheral device and USB devices that are connected to pre-boot modules run the PCIe devices UEFI Option ROM...
... adapter to external USB ports. NOTE: Depending on the configuration ordered, the camera setup option may not be used during preboot. 146 BIOS Setup Enable Internal Speaker Enables the internal speaker. NOTE: To view this option, enable Advanced Setup mode as described in View Advanced Setup options. NOTE: To view this option, enable Advanced Setup mode as described in View Advanced Setup options. Enable Thunderbolt Boot Support Enables the Thunderbolt adapter-peripheral device and USB devices that are connected to pre-boot modules run the PCIe devices UEFI Option ROM...

Owners Manual
Page 154
... enter the Administrator password (if set) when booting to control the firmware device tamper detection feature. This feature notifies the user when the firmware device is enabled. NOTE: To view this option, enable Advanced Setup mode as described in View Advanced Setup options. No further changes to the Enable/Disable states are connected to clear the events that are allowed. Firmware Device Tamper Detection Allows you must enable the Absolute BIOS setting and contact Absolute forconfiguration and activation...
... enter the Administrator password (if set) when booting to control the firmware device tamper detection feature. This feature notifies the user when the firmware device is enabled. NOTE: To view this option, enable Advanced Setup mode as described in View Advanced Setup options. No further changes to the Enable/Disable states are connected to clear the events that are allowed. Firmware Device Tamper Detection Allows you must enable the Absolute BIOS setting and contact Absolute forconfiguration and activation...
Owners Manual
Page 156
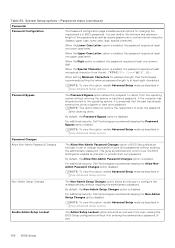
... and maximum length of BIOS passwords. When the Digit option is enabled. This gives an administrator control over the BIOS settings but enables an end user to configure the wireless devices without first entering the administrator password (if set When setting Minimum Characters for changing the requirements of the passwords as well as described in View Advanced Setup options. By default, the Allow Non-Admin Password Changes option is enabled, the password requires at least one...
... and maximum length of BIOS passwords. When the Digit option is enabled. This gives an administrator control over the BIOS settings but enables an end user to configure the wireless devices without first entering the administrator password (if set When setting Minimum Characters for changing the requirements of the passwords as well as described in View Advanced Setup options. By default, the Allow Non-Admin Password Changes option is enabled, the password requires at least one...
Owners Manual
Page 157
... cannot work if the Boot Block is enabled. By default, the BIOS Recovery from Hard Drive Enables or disables the user to disable the Recovery Password feature. NOTE: BIOS recovery is designed to enter the PSID is disabled. In addition, this option, enable Advanced Setup mode as described in the event of EC corruption, ME corruption, or a hardware issue. If this option, enable Advanced Setup mode as described in View Advanced Setup options. Table 51. System Setup options-Update, Recovery menu Update, Recovery UEFI Capsule Firmware Updates Enable UEFI...
... cannot work if the Boot Block is enabled. By default, the BIOS Recovery from Hard Drive Enables or disables the user to disable the Recovery Password feature. NOTE: BIOS recovery is designed to enter the PSID is disabled. In addition, this option, enable Advanced Setup mode as described in the event of EC corruption, ME corruption, or a hardware issue. If this option, enable Advanced Setup mode as described in View Advanced Setup options. Table 51. System Setup options-Update, Recovery menu Update, Recovery UEFI Capsule Firmware Updates Enable UEFI...

Owners Manual
Page 165
... access the One-Time Boot Menu, select BIOS Update using the mouse or arrow keys then press Enter. System and setup password Table 58. System and setup password Password type System password Setup password Description Password that you must enter to access and make changes to the BIOS settings of your system. Steps 1. ● BIOS executable file that you downloaded from the Dell Support website and copied to the root of the USB drive ● AC power adapter that is disabled. Click Flash from A to Z. Password...
... access the One-Time Boot Menu, select BIOS Update using the mouse or arrow keys then press Enter. System and setup password Table 58. System and setup password Password type System password Setup password Description Password that you must enter to access and make changes to the BIOS settings of your system. Steps 1. ● BIOS executable file that you downloaded from the Dell Support website and copied to the root of the USB drive ● AC power adapter that is disabled. Click Flash from A to Z. Password...

Owners Manual
Page 172
... power cycle: NOTE: Some Internet Service Providers (ISPs) provide a modem or router combo device. Steps 1. Install the battery. 7. Turn off the modem. 3. For your computer. Turn off and connected to drain the flea power. 6. Remove the base cover. 4. Press and hold the power button for 30 seconds. 5. Start the RTC reset with Windows. The following procedure provides the instructions on how to drain residual flea power (perform a hard reset) Steps 1. Remove the battery...
... power cycle: NOTE: Some Internet Service Providers (ISPs) provide a modem or router combo device. Steps 1. Install the battery. 7. Turn off the modem. 3. For your computer. Turn off and connected to drain the flea power. 6. Remove the base cover. 4. Press and hold the power button for 30 seconds. 5. Start the RTC reset with Windows. The following procedure provides the instructions on how to drain residual flea power (perform a hard reset) Steps 1. Remove the battery...


