
Dell Owners Manual
Page 3
... Removing the Base Cover...14 Installing the Base Cover...14 Removing the Memory...14 Installing the Memory...15 Removing the Hard Drive...15 Installing the Hard Drive...16 Removing the Optical Drive...16 Installing the Optical Drive...17 Removing the Keyboard Trim...17 Installing the Keyboard Trim...18 Removing the Keyboard...18 Installing the Keyboard...19...
... Removing the Base Cover...14 Installing the Base Cover...14 Removing the Memory...14 Installing the Memory...15 Removing the Hard Drive...15 Installing the Hard Drive...16 Removing the Optical Drive...16 Installing the Optical Drive...17 Removing the Keyboard Trim...17 Installing the Keyboard Trim...18 Removing the Keyboard...18 Installing the Keyboard...19...

Dell Owners Manual
Page 12
Keyboard and Palmrest Assembly removed 1. I/O board Removing the Secure Digital (SD) Card 1. Installing the Secure Digital (SD) Card 1. ExpressCard cage 3. speakers 4. Follow the procedures in Before Working Inside Your Computer. 2. Figure 2. Slide the SD card out of the computer. system board 6. Follow the procedures in After Working Inside Your Computer. 12 Top View - Slide the SD card into place. 2. hard-drive bay 5. Press in on the SD card to release it clicks into its slot until it from the computer. WiFi-switch board 2.
Keyboard and Palmrest Assembly removed 1. I/O board Removing the Secure Digital (SD) Card 1. Installing the Secure Digital (SD) Card 1. ExpressCard cage 3. speakers 4. Follow the procedures in Before Working Inside Your Computer. 2. Figure 2. Slide the SD card out of the computer. system board 6. Follow the procedures in After Working Inside Your Computer. 12 Top View - Slide the SD card into place. 2. hard-drive bay 5. Press in on the SD card to release it clicks into its slot until it from the computer. WiFi-switch board 2.

Dell Owners Manual
Page 15
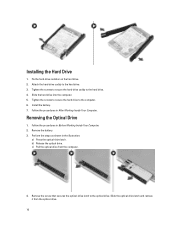
... cover b) battery 4. Remove the hard-drive caddy from the hard drive. 15 Flex the hard-drive isolation. Installing the Memory 1. Removing the Hard Drive 1. Remove the screw that secure the hard drive to the computer. Peel off the hard-drive isolation from the hard drive. 5. Remove the battery. 3. Follow the procedures in After Working Inside Your Computer. Slide the hard drive out of the computer. 4. Insert...
... cover b) battery 4. Remove the hard-drive caddy from the hard drive. 15 Flex the hard-drive isolation. Installing the Memory 1. Removing the Hard Drive 1. Remove the screw that secure the hard drive to the computer. Peel off the hard-drive isolation from the hard drive. 5. Remove the battery. 3. Follow the procedures in After Working Inside Your Computer. Slide the hard drive out of the computer. 4. Insert...
Dell Owners Manual
Page 16
... the hard-drive caddy to the optical drive. Slide the hard drive into the computer. 5. Follow the procedures in the illustration: a) Press the optical-drive latch. Fix the hard-drive isolation on the hard drive. 2. Attach the hard-drive caddy to the computer. 6. Tighten the screws to secure the hard drive to the hard drive. 3. c) Pull the optical drive from the optical-drive. 16 b) Release the optical drive. Follow...
... the hard-drive caddy to the optical drive. Slide the hard drive into the computer. 5. Follow the procedures in the illustration: a) Press the optical-drive latch. Fix the hard-drive isolation on the hard drive. 2. Attach the hard-drive caddy to the computer. 6. Tighten the screws to secure the hard drive to the hard drive. 3. c) Pull the optical drive from the optical-drive. 16 b) Release the optical drive. Follow...
Dell Owners Manual
Page 21
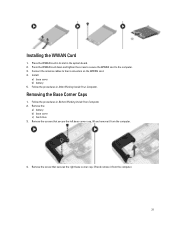
... corner cap, lift and remove it from the computer. 4. Place the WWAN card in its slot in the system board. 2. Remove the: a) battery b) base cover c) hard drive 3. Install: a) base cover b) battery 5. Remove the screws that secures the right base corner cap, lift and remove it from the computer. 21
... corner cap, lift and remove it from the computer. 4. Place the WWAN card in its slot in the system board. 2. Remove the: a) battery b) base cover c) hard drive 3. Install: a) base cover b) battery 5. Remove the screws that secures the right base corner cap, lift and remove it from the computer. 21

Dell Owners Manual
Page 28
... After Working Inside Your Computer. Removing the Palmrest Assembly 1. Install the battery. 4. Removing the Display-Hinge Cover 1. Remove: a) SD card b) ExpressCard c) battery d) keyboard trim e) keyboard f) hard drive g) optical drive h) display-hinge cover i) base cover j) base corner caps 3.
... After Working Inside Your Computer. Removing the Palmrest Assembly 1. Install the battery. 4. Removing the Display-Hinge Cover 1. Remove: a) SD card b) ExpressCard c) battery d) keyboard trim e) keyboard f) hard drive g) optical drive h) display-hinge cover i) base cover j) base corner caps 3.

Dell Owners Manual
Page 30
Installing the Palmrest Assembly 1. Align the palmrest assembly to the base of the computer. 5. Install: a) base corner caps b) base cover c) display-hinge cover d) optical drive e) hard drive f) keyboard g) keyboard trim h) battery i) ExpressCard j) SD card 6. Follow the procedures in After Working Inside Your Computer. Follow the procedures in Before Working Inside Your Computer. 2. ...
Installing the Palmrest Assembly 1. Align the palmrest assembly to the base of the computer. 5. Install: a) base corner caps b) base cover c) display-hinge cover d) optical drive e) hard drive f) keyboard g) keyboard trim h) battery i) ExpressCard j) SD card 6. Follow the procedures in After Working Inside Your Computer. Follow the procedures in Before Working Inside Your Computer. 2. ...
Dell Owners Manual
Page 31
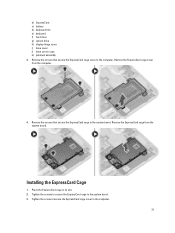
... system board. 3. Installing the ExpressCard Cage 1. Remove the ExpressCard cage from the computer. 4. Place the ExpressCard cage in its slot. 2. b) ExpressCard c) battery d) keyboard trim e) keyboard f) hard drive g) optical drive h) display-hinge cover i) base cover j) base corner caps k) palmrest assembly 3. Tighten the screw to secure the ExpressCard cage cover to the system board.
... system board. 3. Installing the ExpressCard Cage 1. Remove the ExpressCard cage from the computer. 4. Place the ExpressCard cage in its slot. 2. b) ExpressCard c) battery d) keyboard trim e) keyboard f) hard drive g) optical drive h) display-hinge cover i) base cover j) base corner caps k) palmrest assembly 3. Tighten the screw to secure the ExpressCard cage cover to the system board.

Dell Owners Manual
Page 32
Remove: a) SD Card b) ExpressCard c) battery d) keyboard trim e) keyboard f) hard drive g) optical drive h) display-hinge cover i) base cover j) base corner caps k) palmrest assembly 3. Follow the procedures in the illustration: a) Disconnect the WiFi-... shown in Before Working Inside Your Computer. 2. 4. Install: a) palmrest assembly b) base corner caps c) base cover d) display-hinge cover e) optical drive f) hard drive g) keyboard h) keyboard trim i) battery j) ExpressCard k) SD Card 5. Removing the WiFi-Switch Board 1. Follow the procedures in After Working Inside Your Computer.
Remove: a) SD Card b) ExpressCard c) battery d) keyboard trim e) keyboard f) hard drive g) optical drive h) display-hinge cover i) base cover j) base corner caps k) palmrest assembly 3. Follow the procedures in the illustration: a) Disconnect the WiFi-... shown in Before Working Inside Your Computer. 2. 4. Install: a) palmrest assembly b) base corner caps c) base cover d) display-hinge cover e) optical drive f) hard drive g) keyboard h) keyboard trim i) battery j) ExpressCard k) SD Card 5. Removing the WiFi-Switch Board 1. Follow the procedures in After Working Inside Your Computer.

Dell Owners Manual
Page 33
...to secure the WiFi-switch board to the system board. 4. Remove: a) SD Card b) ExpressCard c) battery d) keyboard trim e) keyboard f) hard drive g) optical drive h) display-hinge cover i) base cover j) base corner caps k) power connector l) coin-cell battery m) memory n) WLAN card o) WWAN card...switch board cable to the computer. 3. Install: a) palmrest assembly b) base cover c) base corner caps d) display-hinge cap e) optical drive f) hard drive g) keyboard h) keyboard trim i) battery j) ExpressCard k) SD Card 5. Follow the procedures in Before Working Inside Your Computer. 2. Follow ...
...to secure the WiFi-switch board to the system board. 4. Remove: a) SD Card b) ExpressCard c) battery d) keyboard trim e) keyboard f) hard drive g) optical drive h) display-hinge cover i) base cover j) base corner caps k) power connector l) coin-cell battery m) memory n) WLAN card o) WWAN card...switch board cable to the computer. 3. Install: a) palmrest assembly b) base cover c) base corner caps d) display-hinge cap e) optical drive f) hard drive g) keyboard h) keyboard trim i) battery j) ExpressCard k) SD Card 5. Follow the procedures in Before Working Inside Your Computer. 2. Follow ...
Dell Owners Manual
Page 35
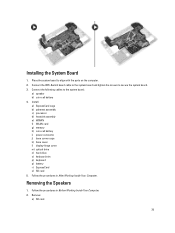
...: a) ExpressCard cage b) palmrest assembly c) processor d) heatsink assembly e) WWAN f) WLAN card g) memory h) coin-cell battery i) power connector j) base corner caps k) base cover l) display-hinge cover m) optical drive n) hard drive o) keyboard trim p) keyboard q) battery r) ExpressCard s) SD card 5. Place the system board to align with the ports on the computer. 2.
...: a) ExpressCard cage b) palmrest assembly c) processor d) heatsink assembly e) WWAN f) WLAN card g) memory h) coin-cell battery i) power connector j) base corner caps k) base cover l) display-hinge cover m) optical drive n) hard drive o) keyboard trim p) keyboard q) battery r) ExpressCard s) SD card 5. Place the system board to align with the ports on the computer. 2.
Dell Owners Manual
Page 36
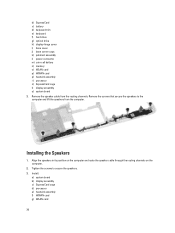
Installing the Speakers 1. Install: a) system board b) display assembly c) ExpressCard cage d) processor e) heatsink assembly f) WWAN card g) WLAN card 36 b) ExpressCard c) battery d) keyboard trim e) keyboard f) hard drive g) optical drive h) display-hinge cover i) base cover j) base corner caps k) palmrest assembly l) power connector m) coin-cell battery n) memory o) WLAN card p) WWAN card q) heatsink assembly r) processor s) ExpressCard cage t) ...
Installing the Speakers 1. Install: a) system board b) display assembly c) ExpressCard cage d) processor e) heatsink assembly f) WWAN card g) WLAN card 36 b) ExpressCard c) battery d) keyboard trim e) keyboard f) hard drive g) optical drive h) display-hinge cover i) base cover j) base corner caps k) palmrest assembly l) power connector m) coin-cell battery n) memory o) WLAN card p) WWAN card q) heatsink assembly r) processor s) ExpressCard cage t) ...
Dell Owners Manual
Page 37
Follow the procedures in After Working Inside Your Computer. Remove: a) SD card b) express card c) battery d) keyboard trim e) keyboard f) hard drive g) optical drive h) display-hinge cover i) base cover j) memory k) WLAN card l) WWAN card m) base corner covers n) palmrest o) speaker p) display assembly q) system board 3..../O Board 1. h) memory i) coin-cell battery j) power connector k) palmrest assembly l) base corner caps m) base cover n) display-hinge cover o) optical drive p) hard drive q) keyboard r) battery s) ExpressCard t) SD card 4. Removing the I /O board to the computer.
Follow the procedures in After Working Inside Your Computer. Remove: a) SD card b) express card c) battery d) keyboard trim e) keyboard f) hard drive g) optical drive h) display-hinge cover i) base cover j) memory k) WLAN card l) WWAN card m) base corner covers n) palmrest o) speaker p) display assembly q) system board 3..../O Board 1. h) memory i) coin-cell battery j) power connector k) palmrest assembly l) base corner caps m) base cover n) display-hinge cover o) optical drive p) hard drive q) keyboard r) battery s) ExpressCard t) SD card 4. Removing the I /O board to the computer.

Dell Owners Manual
Page 38
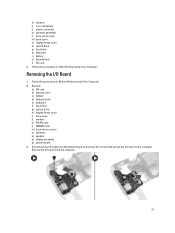
...speaker d) palmrest e) base corner covers f) WWAN card g) WLAN card h) memory i) base cover j) display-hinge cover k) optical drive l) keyboard m) keyboard trim n) hard drive o) battery p) express cage q) SD card 5. Tighten the screws to secure the I /O cable to wireless solutions from the routing...1. Installing the I /O board in its slot and snap it in place. 2. Remove: a) battery b) keyboard trim c) keyboard d) hard drive e) optical drive f) display-hinge cover g) base cover h) base corner caps i) power connector j) palmrest assembly 3. Remove the antenna cables connected to the ...
...speaker d) palmrest e) base corner covers f) WWAN card g) WLAN card h) memory i) base cover j) display-hinge cover k) optical drive l) keyboard m) keyboard trim n) hard drive o) battery p) express cage q) SD card 5. Tighten the screws to secure the I /O cable to wireless solutions from the routing...1. Installing the I /O board in its slot and snap it in place. 2. Remove: a) battery b) keyboard trim c) keyboard d) hard drive e) optical drive f) display-hinge cover g) base cover h) base corner caps i) power connector j) palmrest assembly 3. Remove the antenna cables connected to the ...
Dell Owners Manual
Page 40
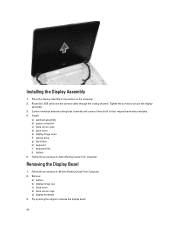
... wireless antennas along the edges to release the display bezel. 40 Install: a) palmrest assembly b) power connector c) base corner caps d) base cover e) display-hinge cover f) optical drive g) hard drive h) keyboard i) keyboard trim j) battery 5. Removing the Display Bezel 1. Tighten the screws to their channels and connect them back to secure the display assembly. 3. Pry up...
... wireless antennas along the edges to release the display bezel. 40 Install: a) palmrest assembly b) power connector c) base corner caps d) base cover e) display-hinge cover f) optical drive g) hard drive h) keyboard i) keyboard trim j) battery 5. Removing the Display Bezel 1. Tighten the screws to their channels and connect them back to secure the display assembly. 3. Pry up...

Dell Owners Manual
Page 47
... boot directly to the previous field. Table 1. Down arrow Moves to access the System Setup screen. During the Power-on Self Test (POST), when the Dell logo appears, you can: • Access System Setup by pressing key • Bring up the one-time boot menu by pressing key The one-time... thresholds • Manage your computer hardware and specify BIOS‐level options. Navigation Keys Keys Navigation Up arrow Moves to a specific device (for example: optical drive or hard drive).
... boot directly to the previous field. Table 1. Down arrow Moves to access the System Setup screen. During the Power-on Self Test (POST), when the Dell logo appears, you can: • Access System Setup by pressing key • Bring up the one-time boot menu by pressing key The one-time... thresholds • Manage your computer hardware and specify BIOS‐level options. Navigation Keys Keys Navigation Up arrow Moves to a specific device (for example: optical drive or hard drive).

Dell Owners Manual
Page 48
...and 64-Bit Technology. • Device Information - Moves to the previous page till you to the next focus area. Displays Primary Hard Drive, Modular Bay Device, LOM MAC Address, Audio Controller , Video Controller, and Wi-Fi Device. All the below options are selected. • Diskette... Drive • Internal HDD • Onboard NIC • USB Storage Device • CD/DVD/CD-RW Drive 48 Table 2. Pressing in the main screen displays a message that prompts you view the main screen...
...and 64-Bit Technology. • Device Information - Moves to the previous page till you to the next focus area. Displays Primary Hard Drive, Modular Bay Device, LOM MAC Address, Audio Controller , Video Controller, and Wi-Fi Device. All the below options are selected. • Diskette... Drive • Internal HDD • Onboard NIC • USB Storage Device • CD/DVD/CD-RW Drive 48 Table 2. Pressing in the main screen displays a message that prompts you view the main screen...

Dell Owners Manual
Page 49
...; Disabled • Enabled • Enabled w/PXE (Default Setting) • Enable UEFI Network Stack - If this option is disabled. Allows you to configure the internal SATA hard-drive controller. System Configuration Option Integrated NIC Parallel Port Serial Port SATA Operation Description You can set the serial port to define and set the date...
...; Disabled • Enabled • Enabled w/PXE (Default Setting) • Enable UEFI Network Stack - If this option is disabled. Allows you to configure the internal SATA hard-drive controller. System Configuration Option Integrated NIC Parallel Port Serial Port SATA Operation Description You can set the serial port to define and set the date...
Dell Owners Manual
Page 50
...100% The options are enabled. This field controls if the hard drive errors for the integrated drives are enabled. The options are: • SATA-0 • SATA-1 • SATA-2 • SATA-4 Default Setting: All drives are reported during system startup. The options are: • ...USB PowerShare feature. Allows you to configure the behavior of the SMART (Self Monitoring Analysis and Reporting Technology) specification. Option Drives SMART Reporting USB Configuration USB PowerShare Audio Keyboard Illumination 50 Description • AHCI • RAID On (Default Setting) NOTE...
...100% The options are enabled. This field controls if the hard drive errors for the integrated drives are enabled. The options are: • SATA-0 • SATA-1 • SATA-2 • SATA-4 Default Setting: All drives are reported during system startup. The options are: • ...USB PowerShare feature. Allows you to configure the behavior of the SMART (Self Monitoring Analysis and Reporting Technology) specification. Option Drives SMART Reporting USB Configuration USB PowerShare Audio Keyboard Illumination 50 Description • AHCI • RAID On (Default Setting) NOTE...

Dell Owners Manual
Page 51
...: • Enable Internal Modem • Enable Microphone • Enable Camera • Enable Module Bay • Enable ExpressCard • Enable Hard Drive Free Fall Protection Default Setting: All devices are : • Enable Media Card (Default Setting) • Disable Media Card Description Allows you ...the admin password before you want to set by default. NOTE: Deleting the admin password automatically deletes the system password and the hard drive password. The options are enabled You can select if you set , change, or delete the administrator (admin) password (sometimes...
...: • Enable Internal Modem • Enable Microphone • Enable Camera • Enable Module Bay • Enable ExpressCard • Enable Hard Drive Free Fall Protection Default Setting: All devices are : • Enable Media Card (Default Setting) • Disable Media Card Description Allows you ...the admin password before you want to set by default. NOTE: Deleting the admin password automatically deletes the system password and the hard drive password. The options are enabled You can select if you set , change, or delete the administrator (admin) password (sometimes...


