

User Guide
Page 2
...Trademarks used in this document is strictly forbidden. Microsoft, and Windows are either trademarks or registered trademarks of Dell Inc.; A00 Dell Inc. DLP and DLP® logo are trademarks of Microsoft Corporation in trademarks and trade names other countries. disclaims any manner ... United States and/or other than its own. Model M109S August 2008 Rev. NOTICE: A NOTICE indicates either the entities claiming the marks and names or their products. All rights reserved. Reproduction of your projector. CAUTION: A CAUTION indicates a potential for property damage...
...Trademarks used in this document is strictly forbidden. Microsoft, and Windows are either trademarks or registered trademarks of Dell Inc.; A00 Dell Inc. DLP and DLP® logo are trademarks of Microsoft Corporation in trademarks and trade names other countries. disclaims any manner ... United States and/or other than its own. Model M109S August 2008 Rev. NOTICE: A NOTICE indicates either the entities claiming the marks and names or their products. All rights reserved. Reproduction of your projector. CAUTION: A CAUTION indicates a potential for property damage...

User Guide
Page 3
Contents 1 Your Dell™ Projector 5 About Your Projector 6 2 Connecting Your Projector 7 Connecting a Computer 8 Connecting a Computer using a VGA Cable . . . . . 8 Connecting a DVD Player 9 Connecting a DVD Player using a Composite Cable . 9 3 Using Your Projector 11 Turning Your Projector On 11 Turning Your Projector Off 11 Adjusting the Projector Focus 12 Adjusting Projection Image Size 13 Using the Control Panel 14 Using the On-Screen Display 16 Main Menu 16 AUTO-ADJUST 16 INPUT SOURCE 16 PICTURE (in PC Mode 17 PICTURE (in Video Mode 18 Contents 3
Contents 1 Your Dell™ Projector 5 About Your Projector 6 2 Connecting Your Projector 7 Connecting a Computer 8 Connecting a Computer using a VGA Cable . . . . . 8 Connecting a DVD Player 9 Connecting a DVD Player using a Composite Cable . 9 3 Using Your Projector 11 Turning Your Projector On 11 Turning Your Projector Off 11 Adjusting the Projector Focus 12 Adjusting Projection Image Size 13 Using the Control Panel 14 Using the On-Screen Display 16 Main Menu 16 AUTO-ADJUST 16 INPUT SOURCE 16 PICTURE (in PC Mode 17 PICTURE (in Video Mode 18 Contents 3

User Guide
Page 4
DISPLAY (in PC Mode 19 DISPLAY (in Video Mode 20 SET UP 20 OTHERS 22 4 Troubleshooting Your Projector 23 5 Specifications 25 6 Contacting Dell 29 7 Appendix: Glossary 31 4 Contents
DISPLAY (in PC Mode 19 DISPLAY (in Video Mode 20 SET UP 20 OTHERS 22 4 Troubleshooting Your Projector 23 5 Specifications 25 6 Contacting Dell 29 7 Appendix: Glossary 31 4 Contents

User Guide
Page 5
Your Dell™ Projector Your projector comes with all the items, contact Dell if anything is missing. Package Contents Multi-input cable AC adapter User's guide media & Documentation Power cable Pouch Your Dell™ Projector 5 Ensure that you have all the items shown below.
Your Dell™ Projector Your projector comes with all the items, contact Dell if anything is missing. Package Contents Multi-input cable AC adapter User's guide media & Documentation Power cable Pouch Your Dell™ Projector 5 Ensure that you have all the items shown below.

User Guide
Page 6
...-ventilated area. 4 Do not block the ventilation slots and openings on the projector. 5 Ensure the projector operates between ambient temperatures (5oC to 35oC). NOTE: For more information, see the Product Information Guide that ships with your projector. 6 Your Dell™ Projector About Your Projector 1 2 3 1 Control panel 2 Focus ring 3 Lens CAUTION: Safety Instructions 1 Do not use the...
...-ventilated area. 4 Do not block the ventilation slots and openings on the projector. 5 Ensure the projector operates between ambient temperatures (5oC to 35oC). NOTE: For more information, see the Product Information Guide that ships with your projector. 6 Your Dell™ Projector About Your Projector 1 2 3 1 Control panel 2 Focus ring 3 Lens CAUTION: Safety Instructions 1 Do not use the...

User Guide
Page 7
Connecting Your Projector 1 1 Multi-input connector CAUTION: Before you begin any of the procedures in this section, follow the Safety Instructions as described on page 6. Connecting Your Projector 7
Connecting Your Projector 1 1 Multi-input connector CAUTION: Before you begin any of the procedures in this section, follow the Safety Instructions as described on page 6. Connecting Your Projector 7

User Guide
Page 8
Connecting a Computer Connecting a Computer using a VGA Cable 1 Multi-input cable 2 AC adapter 3 Power cord 8 Connecting Your Projector
Connecting a Computer Connecting a Computer using a VGA Cable 1 Multi-input cable 2 AC adapter 3 Power cord 8 Connecting Your Projector
User Guide
Page 9
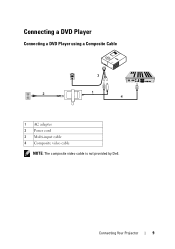
Connecting a DVD Player Connecting a DVD Player using a Composite Cable 1 AC adapter 2 Power cord 3 Multi-input cable 4 Composite video cable NOTE: The composite video cable is not provided by Dell. Connecting Your Projector 9
Connecting a DVD Player Connecting a DVD Player using a Composite Cable 1 AC adapter 2 Power cord 3 Multi-input cable 4 Composite video cable NOTE: The composite video cable is not provided by Dell. Connecting Your Projector 9

User Guide
Page 10
10 Connecting Your Projector
10 Connecting Your Projector

User Guide
Page 11
...continue to select the desired source. To clear the message, press the Menu button on the source. Using Your Projector 11 For information about connecting the projector, see "Connecting Your Projector" on page 7. 3 Press the Power button (see "Using the Control Panel" on page 14 to locate the...you press the Power button while the projector is running, the "Press Power Button to the projector, press the Source button on your source. 5 The Dell Logo will continue for 10 seconds while power on. Turning Your Projector Off NOTICE: Unplug the projector after 30 seconds. the message disappears ...
...continue to select the desired source. To clear the message, press the Menu button on the source. Using Your Projector 11 For information about connecting the projector, see "Connecting Your Projector" on page 7. 3 Press the Power button (see "Using the Control Panel" on page 14 to locate the...you press the Power button while the projector is running, the "Press Power Button to the projector, press the Source button on your source. 5 The Dell Logo will continue for 10 seconds while power on. Turning Your Projector Off NOTICE: Unplug the projector after 30 seconds. the message disappears ...
User Guide
Page 12
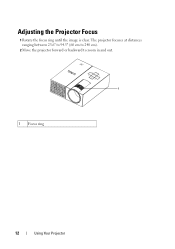
Adjusting the Projector Focus 1 Rotate the focus ring until the image is clear. The projector focuses at distances ranging between 23.6" to 94.5" (60 cm to 240 cm). 2 Move the projector forward or backward to zoom in and out. 1 1 Focus ring 12 Using Your Projector
Adjusting the Projector Focus 1 Rotate the focus ring until the image is clear. The projector focuses at distances ranging between 23.6" to 94.5" (60 cm to 240 cm). 2 Move the projector forward or backward to zoom in and out. 1 1 Focus ring 12 Using Your Projector
User Guide
Page 13
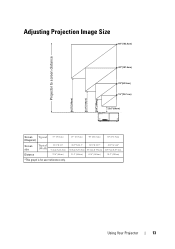
Projector to screen distance 94.5"(240cm) 63.0"(160cm) 39.4"(100cm) Adjusting Projection Image Size 60"(152.4cm) 40"(101.6cm) 25"(63.5cm) 15 "(38.1cm) 23.6"(60cm) Screen Typical (Diagonal) 15" (38.1cm) Screen size Typical 12.3" X 8.6" (WxH) 31.2cm X 21.8cm Distance 23.6" (60cm) *This graph is for user reference only. 25" (63.5cm) 40" (101.6cm) 60" (152.4cm) 20.5" X 14.3" 32.8" X 22.9" 49.2" X 34.4" 52.0cm X 36.4cm 83.3cm X 58.2cm 124.9cm X 87.3cm 39.4" (100cm) 63.0" (160cm) 94.5" (240cm) Using Your Projector 13
Projector to screen distance 94.5"(240cm) 63.0"(160cm) 39.4"(100cm) Adjusting Projection Image Size 60"(152.4cm) 40"(101.6cm) 25"(63.5cm) 15 "(38.1cm) 23.6"(60cm) Screen Typical (Diagonal) 15" (38.1cm) Screen size Typical 12.3" X 8.6" (WxH) 31.2cm X 21.8cm Distance 23.6" (60cm) *This graph is for user reference only. 25" (63.5cm) 40" (101.6cm) 60" (152.4cm) 20.5" X 14.3" 32.8" X 22.9" 49.2" X 34.4" 52.0cm X 36.4cm 83.3cm X 58.2cm 124.9cm X 87.3cm 39.4" (100cm) 63.0" (160cm) 94.5" (240cm) Using Your Projector 13

User Guide
Page 14
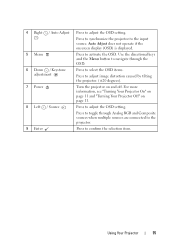
...;20 degrees) A solid amber indicates air vents might be blocked or ambient temperature over 35oC. The projector will automatically shut down . If the problem persists, contact Dell™. Ensure air vents are not blocked and ambient temperature is blinking amber, one of the fans has failed. Using the Control Panel 2 1 3 9 8 4 7 5 1 Error LED...
...;20 degrees) A solid amber indicates air vents might be blocked or ambient temperature over 35oC. The projector will automatically shut down . If the problem persists, contact Dell™. Ensure air vents are not blocked and ambient temperature is blinking amber, one of the fans has failed. Using the Control Panel 2 1 3 9 8 4 7 5 1 Error LED...
User Guide
Page 15
...button to navigate through Analog RGB and Composite sources when multiple sources are connected to the projector. 9 Enter Press to adjust image distortion caused by tilting the projector. (±20 degrees). 7 Power Turn the projector on page 11. 8 Left / Source Press to adjust the OSD setting. 4 ... / Auto Adjust Press to adjust the OSD setting. Using Your Projector 15 For more information, see "Turning Your Projector On" on page 11 and "Turning Your Projector Off" on and off. Press to synchronize the projector to activate the OSD. Auto Adjust does not operate if the ...
...button to navigate through Analog RGB and Composite sources when multiple sources are connected to the projector. 9 Enter Press to adjust image distortion caused by tilting the projector. (±20 degrees). 7 Power Turn the projector on page 11. 8 Left / Source Press to adjust the OSD setting. 4 ... / Auto Adjust Press to adjust the OSD setting. Using Your Projector 15 For more information, see "Turning Your Projector On" on page 11 and "Turning Your Projector Off" on and off. Press to synchronize the projector to activate the OSD. Auto Adjust does not operate if the ...

User Guide
Page 16
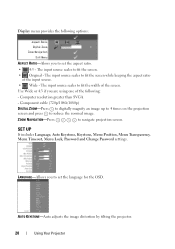
... signals. While Auto Adjustment is selected, the color changes to lock the current input signal. Main Menu AUTO-ADJUST Auto Adjust automatically adjusts the projector's Frequency and Tracking in the Main Menu, press the or button on , it automatically finds the next available input signal. If you press ...the Source button when the Auto Source mode is on the control panel. Using the On-Screen Display The projector has a multi-language On-Screen Display (OSD) that can manually select the input signal. To navigate through the tabs in PC mode. ...
... signals. While Auto Adjustment is selected, the color changes to lock the current input signal. Main Menu AUTO-ADJUST Auto Adjust automatically adjusts the projector's Frequency and Tracking in the Main Menu, press the or button on , it automatically finds the next available input signal. If you press ...the Source button when the Auto Source mode is on the control panel. Using the On-Screen Display The projector has a multi-language On-Screen Display (OSD) that can manually select the input signal. To navigate through the tabs in PC mode. ...

User Guide
Page 17
... TEMP-Allows you adjust the settings for White Intensity or Degamma, the projector automatically switches to optimize the projector's display mode: PC, Bright, sRGB (provides more accurate color representation), Movie, and Custom (set your projectors. WHITE INTENSITY-Set 0 to maximize the color reproduction and 10 to ..., the Custom mode is activated. PICTURE (in Video Mode) Using the Picture menu, you can adjust the display settings of your projectors. NOTE: If you to change the color performance of the image. The screen appears cooler at higher color temperatures and warmer at ...
... TEMP-Allows you adjust the settings for White Intensity or Degamma, the projector automatically switches to optimize the projector's display mode: PC, Bright, sRGB (provides more accurate color representation), Movie, and Custom (set your projectors. WHITE INTENSITY-Set 0 to maximize the color reproduction and 10 to ..., the Custom mode is activated. PICTURE (in Video Mode) Using the Picture menu, you can adjust the display settings of your projectors. NOTE: If you to change the color performance of the image. The screen appears cooler at higher color temperatures and warmer at ...

User Guide
Page 18
... color reproduction and 10 to fully saturated color. NOTE: If you adjust the settings for White Intensity or Degamma, the projector automatically switches to optimize the projector's display mode: PC, Bright, sRGB (provides more accurate color representation), Movie, and Custom (set your preferred settings)....Custom mode is activated. COLOR ADJUST-Allows you to Custom. If you adjust the settings for White Intensity or Degamma, the projector automatically switches to adjust the color temperature. SATURATION-Allows you to Custom. COLOR TEMP-Allows you to adjust the video source...
... color reproduction and 10 to fully saturated color. NOTE: If you adjust the settings for White Intensity or Degamma, the projector automatically switches to optimize the projector's display mode: PC, Bright, sRGB (provides more accurate color representation), Movie, and Custom (set your preferred settings)....Custom mode is activated. COLOR ADJUST-Allows you to Custom. If you adjust the settings for White Intensity or Degamma, the projector automatically switches to adjust the color temperature. SATURATION-Allows you to Custom. COLOR TEMP-Allows you to adjust the video source...
User Guide
Page 19
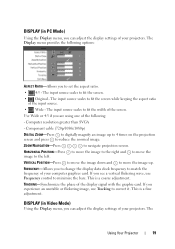
... correct it. The input source scales to move the image down and to fit the screen while keeping the aspect ratio of your projectors. DISPLAY (in PC Mode) Using the Display menu, you can adjust the display settings of the input source. • Wide - The Using...the screen. TRACKING-Synchronize the phase of your computer graphics card. This is a coarse adjustment. ZOOM NAVIGATION-Press to fit the width of your projectors. This is a fine adjustment. If you to match the frequency of the display signal with the graphic card. The input source scales to ...
... correct it. The input source scales to move the image down and to fit the screen while keeping the aspect ratio of your projectors. DISPLAY (in PC Mode) Using the Display menu, you can adjust the display settings of the input source. • Wide - The Using...the screen. TRACKING-Synchronize the phase of your computer graphics card. This is a coarse adjustment. ZOOM NAVIGATION-Press to fit the width of your projectors. This is a fine adjustment. If you to match the frequency of the display signal with the graphic card. The input source scales to ...
User Guide
Page 20
... the screen while keeping the aspect ratio of the input source. • Wide - AUTO KEYSTONE-Auto adjusts the image distortion by tilting the projector. 20 Using Your Projector The input source scales to navigate projection screen. Component cable (720p/1080i/1080p) DIGITAL ZOOM-Press to digitally magnify an image up to 4 times...
... the screen while keeping the aspect ratio of the input source. • Wide - AUTO KEYSTONE-Auto adjusts the image distortion by tilting the projector. 20 Using Your Projector The input source scales to navigate projection screen. Component cable (720p/1080i/1080p) DIGITAL ZOOM-Press to digitally magnify an image up to 4 times...
User Guide
Page 21
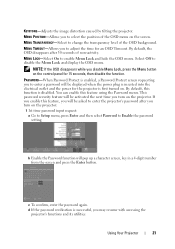
... to enable Menu Lock and hide the OSD menu. This password security feature will be asked to Enable the password setting. Using Your Projector 21 NOTE: If the OSD disappears while you turn on the screen. By default, the OSD disappears after you disable Menu Lock, press...is enabled, a Password Protect screen requesting you will be displayed when the power plug is inserted into the electrical outlet and the power for the projector is disabled. b Enable the Password function will be activated the next time you to enter a password will pop up a character screen, key ...
... to enable Menu Lock and hide the OSD menu. This password security feature will be asked to Enable the password setting. Using Your Projector 21 NOTE: If the OSD disappears while you turn on the screen. By default, the OSD disappears after you disable Menu Lock, press...is enabled, a Password Protect screen requesting you will be displayed when the power plug is inserted into the electrical outlet and the power for the projector is disabled. b Enable the Password function will be activated the next time you to enter a password will pop up a character screen, key ...


