

User Guide
Page 2
...; 2008 Dell Inc. CAUTION: A CAUTION indicates a potential for property damage, personal injury, or death. Model M109S August 2008 Rev. is subject to hardware or loss of TEXAS INSTRUMENTS INCORPORATED; Trademarks used in this document to refer to either the entities claiming the marks and names or their products. Dell Inc. Microsoft, and Windows are trademarks of data and...
...; 2008 Dell Inc. CAUTION: A CAUTION indicates a potential for property damage, personal injury, or death. Model M109S August 2008 Rev. is subject to hardware or loss of TEXAS INSTRUMENTS INCORPORATED; Trademarks used in this document to refer to either the entities claiming the marks and names or their products. Dell Inc. Microsoft, and Windows are trademarks of data and...

User Guide
Page 3
Contents 1 Your Dell™ Projector 5 About Your Projector 6 2 Connecting Your Projector 7 Connecting a Computer 8 Connecting a Computer using a VGA Cable . . . . . 8 Connecting a DVD Player 9 Connecting a DVD Player using a Composite Cable . 9 3 Using Your Projector 11 Turning Your Projector On 11 Turning Your Projector Off 11 Adjusting the Projector Focus 12 Adjusting Projection Image Size 13 Using the Control Panel 14 Using the On-Screen Display 16 Main Menu 16 AUTO-ADJUST 16 INPUT SOURCE 16 PICTURE (in PC Mode 17 PICTURE (in Video Mode 18 Contents 3
Contents 1 Your Dell™ Projector 5 About Your Projector 6 2 Connecting Your Projector 7 Connecting a Computer 8 Connecting a Computer using a VGA Cable . . . . . 8 Connecting a DVD Player 9 Connecting a DVD Player using a Composite Cable . 9 3 Using Your Projector 11 Turning Your Projector On 11 Turning Your Projector Off 11 Adjusting the Projector Focus 12 Adjusting Projection Image Size 13 Using the Control Panel 14 Using the On-Screen Display 16 Main Menu 16 AUTO-ADJUST 16 INPUT SOURCE 16 PICTURE (in PC Mode 17 PICTURE (in Video Mode 18 Contents 3

User Guide
Page 6
... system to fail and projector will automatically shutdown. 3 Ensure that generate a lot of heat. 2 Do not use the projector in a well-ventilated area. 4 Do not block the ventilation slots and openings on the projector. 5 Ensure the projector operates between ambient temperatures (5oC to 35oC). NOTE: For more information, see the Product Information Guide that ships with your projector. 6 Your Dell™ Projector
... system to fail and projector will automatically shutdown. 3 Ensure that generate a lot of heat. 2 Do not use the projector in a well-ventilated area. 4 Do not block the ventilation slots and openings on the projector. 5 Ensure the projector operates between ambient temperatures (5oC to 35oC). NOTE: For more information, see the Product Information Guide that ships with your projector. 6 Your Dell™ Projector
User Guide
Page 9
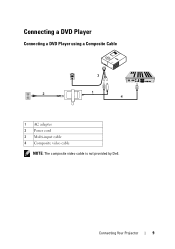
Connecting a DVD Player Connecting a DVD Player using a Composite Cable 1 AC adapter 2 Power cord 3 Multi-input cable 4 Composite video cable NOTE: The composite video cable is not provided by Dell. Connecting Your Projector 9
Connecting a DVD Player Connecting a DVD Player using a Composite Cable 1 AC adapter 2 Power cord 3 Multi-input cable 4 Composite video cable NOTE: The composite video cable is not provided by Dell. Connecting Your Projector 9

User Guide
Page 11
.... Turning Your Projector Off NOTICE: Unplug the projector after 30 seconds. The Power button light blinks blue until pressed. 1 Connect the multi-input cable into the projector. 2 Connect the multi-input cable with the power cord and appropriate signal cables. The cooling fans continue to Turn off Projector" message appears on . The projector automatically detects your source (computer, DVD player, etc.). Using Your Projector 11 NOTE: If you press the Power button while the projector is running, the "Press Power Button to operate...
.... Turning Your Projector Off NOTICE: Unplug the projector after 30 seconds. The Power button light blinks blue until pressed. 1 Connect the multi-input cable into the projector. 2 Connect the multi-input cable with the power cord and appropriate signal cables. The cooling fans continue to Turn off Projector" message appears on . The projector automatically detects your source (computer, DVD player, etc.). Using Your Projector 11 NOTE: If you press the Power button while the projector is running, the "Press Power Button to operate...

User Guide
Page 14
... Screen Display (OSD) items. Press to adjust image distortion caused by tilting the projector. (±20 degrees) A solid amber indicates air vents might be blocked or ambient temperature over 35oC. Using the Control Panel 2 1 3 9 8 4 7 5 1 Error LED 2 Up / Keystone adjustment 3 Temperature LED 6 If the error LED is within operation range. The projector will automatically shut down . If the problem persists, contact Dell™. Ensure air vents are not blocked and ambient temperature is blinking amber, one of the fans...
... Screen Display (OSD) items. Press to adjust image distortion caused by tilting the projector. (±20 degrees) A solid amber indicates air vents might be blocked or ambient temperature over 35oC. Using the Control Panel 2 1 3 9 8 4 7 5 1 Error LED 2 Up / Keystone adjustment 3 Temperature LED 6 If the error LED is within operation range. The projector will automatically shut down . If the problem persists, contact Dell™. Ensure air vents are not blocked and ambient temperature is blinking amber, one of the fans...
User Guide
Page 15
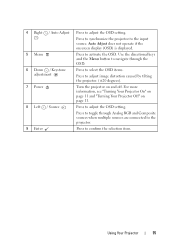
... adjust image distortion caused by tilting the projector. (±20 degrees). 7 Power Turn the projector on page 11. 8 Left / Source Press to adjust the OSD setting. Auto Adjust does not operate if the onscreen display (OSD) is displayed. 5 Menu Press to confirm the selection item. 4 Right / Auto Adjust Press to the input source. For more information, see "Turning Your Projector On" on page 11 and "Turning Your Projector Off" on and off. Using Your Projector...
... adjust image distortion caused by tilting the projector. (±20 degrees). 7 Power Turn the projector on page 11. 8 Left / Source Press to adjust the OSD setting. Auto Adjust does not operate if the onscreen display (OSD) is displayed. 5 Menu Press to confirm the selection item. 4 Right / Auto Adjust Press to the input source. For more information, see "Turning Your Projector On" on page 11 and "Turning Your Projector Off" on and off. Using Your Projector...

User Guide
Page 16
Main Menu AUTO-ADJUST Auto Adjust automatically adjusts the projector's Frequency and Tracking in the Main Menu, press the or button on the control panel. AUTO SOURCE-Select On (the default) to detect Composite Video signal. 16 Using Your Projector COMPOSITE-Press Enter to auto detect the available input signals. Use the or button on the control panel. INPUT SOURCE The Input Source menu allows you press the Source button when the Auto Source mode is selected, the color changes to adjust the settings. Using the On-Screen Display The projector has a multi-language...
Main Menu AUTO-ADJUST Auto Adjust automatically adjusts the projector's Frequency and Tracking in the Main Menu, press the or button on the control panel. AUTO SOURCE-Select On (the default) to detect Composite Video signal. 16 Using Your Projector COMPOSITE-Press Enter to auto detect the available input signals. Use the or button on the control panel. INPUT SOURCE The Input Source menu allows you press the Source button when the Auto Source mode is selected, the color changes to adjust the settings. Using the On-Screen Display The projector has a multi-language...

User Guide
Page 17
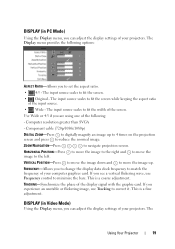
... Projector 17 CONTRAST-Use and to adjust the brightness of the image. WHITE INTENSITY-Set 0 to maximize the color reproduction and 10 to manually adjust the red, green, and blue colors. The screen appears cooler at higher color temperatures and warmer at lower color temperatures. COLOR ADJUST-Allows you adjust the settings for White Intensity or Degamma, the projector automatically switches to adjust the color temperature. SIGNAL TYPE-Manually select signal type Auto, RGB, YCbCr, or YPbPr. PICTURE (in Video Mode) Using the Picture menu, you can adjust the display settings...
... Projector 17 CONTRAST-Use and to adjust the brightness of the image. WHITE INTENSITY-Set 0 to maximize the color reproduction and 10 to manually adjust the red, green, and blue colors. The screen appears cooler at higher color temperatures and warmer at lower color temperatures. COLOR ADJUST-Allows you adjust the settings for White Intensity or Degamma, the projector automatically switches to adjust the color temperature. SIGNAL TYPE-Manually select signal type Auto, RGB, YCbCr, or YPbPr. PICTURE (in Video Mode) Using the Picture menu, you can adjust the display settings...

User Guide
Page 18
... to manually adjust the red, green, and blue colors. WHITE INTENSITY-Set 0 to maximize the color reproduction and 10 to adjust the display contrast. DEGAMMA-Allows you to increase the sharpness. The values are saved in the Color Adjust menu, the Custom mode is activated. Press to decrease the amount of color in the image. The screen appears cooler at higher color temperatures and warmer at lower color temperatures. SIGNAL TYPE-Manually select signal type Auto...
... to manually adjust the red, green, and blue colors. WHITE INTENSITY-Set 0 to maximize the color reproduction and 10 to adjust the display contrast. DEGAMMA-Allows you to increase the sharpness. The values are saved in the Color Adjust menu, the Custom mode is activated. Press to decrease the amount of color in the image. The screen appears cooler at higher color temperatures and warmer at lower color temperatures. SIGNAL TYPE-Manually select signal type Auto...
User Guide
Page 19
... the input source. • Wide - This is a coarse adjustment. DISPLAY (in PC Mode) Using the Display menu, you can adjust the display settings of your computer graphics card. HORIZONTAL POSITION-Press to move the image to the right and to move the image up to 4 times on the projection screen and press to match the frequency of your projectors. If you see a vertical flickering wave, use Tracking to navigate projection screen. ZOOM...
... the input source. • Wide - This is a coarse adjustment. DISPLAY (in PC Mode) Using the Display menu, you can adjust the display settings of your computer graphics card. HORIZONTAL POSITION-Press to move the image to the right and to move the image up to 4 times on the projection screen and press to match the frequency of your projectors. If you see a vertical flickering wave, use Tracking to navigate projection screen. ZOOM...
User Guide
Page 20
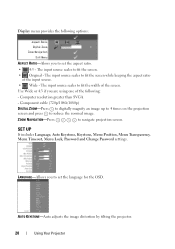
..., Auto Keystone, Keystone, Menu Position, Menu Transparency, Menu Timeout, Menu Lock, Password and Change Password settings. The input source scales to fit the width of the input source. • Wide - ZOOM NAVIGATION-Press to fit the screen. • Original - AUTO KEYSTONE-Auto adjusts the image distortion by tilting the projector. 20 Using Your Projector Display menu provides the following : - LANGUAGE-Allows you to set the aspect ratio. • 4:3 - Component cable (720p/1080i/1080p) DIGITAL ZOOM-Press to digitally magnify an image up to 4 times on...
..., Auto Keystone, Keystone, Menu Position, Menu Transparency, Menu Timeout, Menu Lock, Password and Change Password settings. The input source scales to fit the width of the input source. • Wide - ZOOM NAVIGATION-Press to fit the screen. • Original - AUTO KEYSTONE-Auto adjusts the image distortion by tilting the projector. 20 Using Your Projector Display menu provides the following : - LANGUAGE-Allows you to set the aspect ratio. • 4:3 - Component cable (720p/1080i/1080p) DIGITAL ZOOM-Press to digitally magnify an image up to 4 times on...
User Guide
Page 21
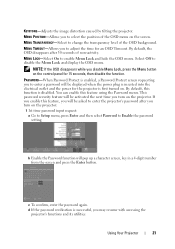
... using the Password menu. You can enable this function is first turned on the screen. MENU LOCK-Select On to adjust the time for the projector is disabled. Select Off to disable the Menu Lock and display the OSD menu. By default, the OSD disappears after you turn on the control panel for 15 seconds, then disable the function. This password security feature will pop up a character screen, key in a 4-digit number...
... using the Password menu. You can enable this function is first turned on the screen. MENU LOCK-Select On to adjust the time for the projector is disabled. Select Off to disable the Menu Lock and display the OSD menu. By default, the OSD disappears after you turn on the control panel for 15 seconds, then disable the function. This password security feature will pop up a character screen, key in a 4-digit number...
User Guide
Page 22
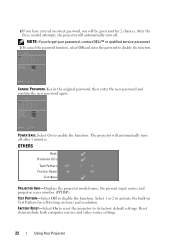
... the new password and confirm the new password again. NOTE: If you will automatically turn off after 5 minutes. POWER SAVE. TEST PATTERN-Select Off to its factory default settings. FACTORY RESET-Select On to reset the projector to disable the function. OTHERS PROJECTOR INFO-Displays the projector model name, the present input source and projector series number (PPID#). 2 If you have entered incorrect password, you forget your password, contact DELL™ or qualified service personnel...
... the new password and confirm the new password again. NOTE: If you will automatically turn off after 5 minutes. POWER SAVE. TEST PATTERN-Select Off to its factory default settings. FACTORY RESET-Select On to reset the projector to disable the function. OTHERS PROJECTOR INFO-Displays the projector model name, the present input source and projector series number (PPID#). 2 If you have entered incorrect password, you forget your password, contact DELL™ or qualified service personnel...

User Guide
Page 23
... the projector. If you experience difficulty in the Others menu. The screen does not display If you are securely connected. Problem Possible Solution No image appears on page 27. See on control panel. 2 If you are using a Dell™ portable computer, set the resolution of the connectors are not using a Dell™ portable computer, see the following troubleshooting tips. If problem persists, upgrade your computer graphic card driver (video driver) to...
... the projector. If you experience difficulty in the Others menu. The screen does not display If you are securely connected. Problem Possible Solution No image appears on page 27. See on control panel. 2 If you are using a Dell™ portable computer, set the resolution of the connectors are not using a Dell™ portable computer, see the following troubleshooting tips. If problem persists, upgrade your computer graphic card driver (video driver) to...

User Guide
Page 24
... focus ring on the projector lens. 2 Ensure that the colors of the projected image according to 94.5" [240 cm]). Try to press the Menu button on page 21. 24 Troubleshooting Your Projector Check the Menu Lock on the panel for 15 seconds to RGB in the OSD Display tab. • Use Test Pattern in the Others menu. The projector automatically detects the input signal format. If the problem persists, contact Dell™. Adjust...
... focus ring on the projector lens. 2 Ensure that the colors of the projected image according to 94.5" [240 cm]). Try to press the Menu button on page 21. 24 Troubleshooting Your Projector Check the Menu Lock on the panel for 15 seconds to RGB in the OSD Display tab. • Use Test Pattern in the Others menu. The projector automatically detects the input signal format. If the problem persists, contact Dell™. Adjust...
User Guide
Page 25
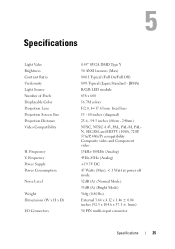
...) External 3.64 x 4.12 x 1.46 ± 0.04 inches (92.5 x 104.6 x 37.1 ± 1mm) 30 PIN multi-input connector Specifications 25 Frequency V. Frequency Power Supply Power Consumption Noise Level Weight Dimensions (W x H x D) I/O Connectors 0.45" SVGA DMD Type Y 50 ANSI Lumens (Max) 800:1 Typical (Full On/Full Off) 80% Typical (Japan Standard - Specifications Light Valve Brightness Contrast Ratio Uniformity Light Source Number of Pixels Displayable Color Projection Lens Projection Screen Size Projection Distance Video Compatibility H.
...) External 3.64 x 4.12 x 1.46 ± 0.04 inches (92.5 x 104.6 x 37.1 ± 1mm) 30 PIN multi-input connector Specifications 25 Frequency V. Frequency Power Supply Power Consumption Noise Level Weight Dimensions (W x H x D) I/O Connectors 0.45" SVGA DMD Type Y 50 ANSI Lumens (Max) 800:1 Typical (Full On/Full Off) 80% Typical (Japan Standard - Specifications Light Valve Brightness Contrast Ratio Uniformity Light Source Number of Pixels Displayable Color Projection Lens Projection Screen Size Projection Distance Video Compatibility H.
User Guide
Page 29
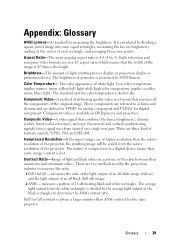
... yellow/red) light while high color temperature implies a colder (more blue) light. Composite Video-A video signal that the width of the projector, the resulting image will be scaled to as luma and chroma and are two methods used by dividing a square meter image into a signal waveform carried on DVD players and projectors. Full On/Off contrast is always a larger number than the native resolution of the image is 4/3 times the height. Color Temperature...
... yellow/red) light while high color temperature implies a colder (more blue) light. Composite Video-A video signal that the width of the projector, the resulting image will be scaled to as luma and chroma and are two methods used by dividing a square meter image into a signal waveform carried on DVD players and projectors. Full On/Off contrast is always a larger number than the native resolution of the image is 4/3 times the height. Color Temperature...

User Guide
Page 30
... of tilting, microscopic aluminum alloy mirrors mounted on a hidden yoke. dB-decibel-A unit used to describe the separate signals for each of the three colors. Reflective display technology developed by focal range of the optics. DMD-Digital Micro-Mirror Device - Maximum Image Size-The largest image a projector can throw in Hz (Hertz). RGB-Red, Green, Blue - SVGA-Super Video Graphics Array - 800 x 600 pixels count...
... of tilting, microscopic aluminum alloy mirrors mounted on a hidden yoke. dB-decibel-A unit used to describe the separate signals for each of the three colors. Reflective display technology developed by focal range of the optics. DMD-Digital Micro-Mirror Device - Maximum Image Size-The largest image a projector can throw in Hz (Hertz). RGB-Red, Green, Blue - SVGA-Super Video Graphics Array - 800 x 600 pixels count...

User Guide
Page 33
..., 25 support contacting Dell, 27 Index 33 Index A Adjusting the Projector Focus Focus ring, 12 C Connecting the Projector AC adapter, 8 Composite video cable, 9 Connecting with a Composite Cable, 9 Multi-input cable, 8 Power cord, 9 Connection Port Multi-input connector, 7 D Dell contacting, 27 M Main Unit Control panel, 6 Focus ring, 6 Lens, 6 O On-Screen Display, 16 AUTO-ADJUST, 16 DISPLAY (in PC Mode), 19 DISPLAY (in Video Mode), 19 INPUT SOURCE, 16 Main Menu, 16 OTHERS, 22 PICTURE (in PC Mode), 17 PICTURE (in Video Mode), 17 SET UP, 20 P Powering On/Off the Projector Powering Off...
..., 25 support contacting Dell, 27 Index 33 Index A Adjusting the Projector Focus Focus ring, 12 C Connecting the Projector AC adapter, 8 Composite video cable, 9 Connecting with a Composite Cable, 9 Multi-input cable, 8 Power cord, 9 Connection Port Multi-input connector, 7 D Dell contacting, 27 M Main Unit Control panel, 6 Focus ring, 6 Lens, 6 O On-Screen Display, 16 AUTO-ADJUST, 16 DISPLAY (in PC Mode), 19 DISPLAY (in Video Mode), 19 INPUT SOURCE, 16 Main Menu, 16 OTHERS, 22 PICTURE (in PC Mode), 17 PICTURE (in Video Mode), 17 SET UP, 20 P Powering On/Off the Projector Powering Off...


