

User's Guide
Page 1
Trademarks used in trademarks and trade names other than its own. Dell™ P2012H Flat Panel Monitor User Guide Setting the display resolution to 1600 x 900 (maximum) Information in this document is subject to either trademarks or registered trademarks of ..., Intel is a registered trademark of Advanced Micro Devices, Inc. has determined that this document to refer to change without the written permission of Dell Inc; Model P2012Ht November 2011 Rev. Reproduction of Microsoft Corporation in the United States and/or other countries; Other trademarks and trade names may ...
Trademarks used in trademarks and trade names other than its own. Dell™ P2012H Flat Panel Monitor User Guide Setting the display resolution to 1600 x 900 (maximum) Information in this document is subject to either trademarks or registered trademarks of ..., Intel is a registered trademark of Advanced Micro Devices, Inc. has determined that this document to refer to change without the written permission of Dell Inc; Model P2012Ht November 2011 Rev. Reproduction of Microsoft Corporation in the United States and/or other countries; Other trademarks and trade names may ...

User's Guide
Page 2
... a registered trademark of Intel Corporation in this document is a trademark of the U.S. Microsoft and Windows are trademarks of Dell Inc. Dell™ P2012H Flat Panel Monitor User's Guide About Your Monitor Setting Up the Monitor Operating the Monitor Troubleshooting Appendix Notes, Cautions, and Warnings NOTE: A NOTE indicates important information that this product meets the ENERGY STAR guidelines...
... a registered trademark of Intel Corporation in this document is a trademark of the U.S. Microsoft and Windows are trademarks of Dell Inc. Dell™ P2012H Flat Panel Monitor User's Guide About Your Monitor Setting Up the Monitor Operating the Monitor Troubleshooting Appendix Notes, Cautions, and Warnings NOTE: A NOTE indicates important information that this product meets the ENERGY STAR guidelines...

User's Guide
Page 3
Back to Contents Page Setting Up Your Monitor Dell™ P2012H Flat Panel Monitor Setting the display resolution to 1600 x 900 (maximum) For maximum display performance with internet access. 2: If you have a Dell™ desktop or a Dell™ portable computer with Microsoft® Windows® operating systems, set the ...and click Personalization. 2. Select the Settings tab. 3. If you do not see 1600 x 900 as an option, you have a non Dell™ desktop, portable computer, or graphics card. In Windows Vista® or Windows® 7: 1. Please choose the scenario below that best...
Back to Contents Page Setting Up Your Monitor Dell™ P2012H Flat Panel Monitor Setting the display resolution to 1600 x 900 (maximum) For maximum display performance with internet access. 2: If you have a Dell™ desktop or a Dell™ portable computer with Microsoft® Windows® operating systems, set the ...and click Personalization. 2. Select the Settings tab. 3. If you do not see 1600 x 900 as an option, you have a non Dell™ desktop, portable computer, or graphics card. In Windows Vista® or Windows® 7: 1. Please choose the scenario below that best...

User's Guide
Page 4
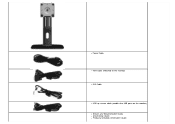
...Contents Page About Your Monitor Dell™ P2012H Flat Panel Monitor User's Guide Package Contents Product Features Identifying Parts and Controls Monitor Specifications Plug and Play Capability Universal Serial Bus (USB) Interface LCD Monitor Quality and Pixel Policy Maintenance Guidelines Package Contents Your monitor ships with the components... be optional and may be available in certain countries. NOTE: To set up with your Monitor. Back to the respective stand setup guide for setup instructions. Ensure that you have received all the components and contact Dell if something is missing...
...Contents Page About Your Monitor Dell™ P2012H Flat Panel Monitor User's Guide Package Contents Product Features Identifying Parts and Controls Monitor Specifications Plug and Play Capability Universal Serial Bus (USB) Interface LCD Monitor Quality and Pixel Policy Maintenance Guidelines Package Contents Your monitor ships with the components... be optional and may be available in certain countries. NOTE: To set up with your Monitor. Back to the respective stand setup guide for setup instructions. Ensure that you have received all the components and contact Dell if something is missing...
User's Guide
Page 5
Power Cable VGA Cable (Attached to the monitor) DVI Cable USB up stream cable (enables the USB ports on the monitor) Drivers and Documentation media Quick Setup Guide Product and Safety Information Guide
Power Cable VGA Cable (Attached to the monitor) DVI Cable USB up stream cable (enables the USB ports on the monitor) Drivers and Documentation media Quick Setup Guide Product and Safety Information Guide

User's Guide
Page 6
Product Features The Dell Professional P2012H flat panel display has an active matrix, Thin-Film Transistor (TFT), Liquid Crystal Display (LCD). The monitor features include: ■ 20-inch (50.80 cm) viewable area display (Measured diagonally), 1600 x 900 resolution, plus full-screen support for lower resolutions. ■ Wide... and Dynamic Contrast Ratio of 2 Million:1. ■ 0.1W standby power when in sleep mode. ■ Energy Gauge shows the energy level being consumed by the monitor in real time. ■ PowerNap and Dynamic Dimming Software included (comes in the CD attached with the...
Product Features The Dell Professional P2012H flat panel display has an active matrix, Thin-Film Transistor (TFT), Liquid Crystal Display (LCD). The monitor features include: ■ 20-inch (50.80 cm) viewable area display (Measured diagonally), 1600 x 900 resolution, plus full-screen support for lower resolutions. ■ Wide... and Dynamic Contrast Ratio of 2 Million:1. ■ 0.1W standby power when in sleep mode. ■ Energy Gauge shows the energy level being consumed by the monitor in real time. ■ PowerNap and Dynamic Dimming Software included (comes in the CD attached with the...

User's Guide
Page 8
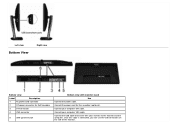
... Lists the regulatory approvals. 3 Stand release button Release stand from monitor. 4 Security lock slot Secures monitor with monitor stand Label Description Use 1 VESA mounting holes (100 mm x 100 mm - Back view Back view with security cable lock. 5 Dell Soundbar mounting brackets Attaches the optional Dell Soundbar. 6 Barcode serial number label Refer to this label if...
... Lists the regulatory approvals. 3 Stand release button Release stand from monitor. 4 Security lock slot Secures monitor with monitor stand Label Description Use 1 VESA mounting holes (100 mm x 100 mm - Back view Back view with security cable lock. 5 Dell Soundbar mounting brackets Attaches the optional Dell Soundbar. 6 Barcode serial number label Refer to this label if...
User's Guide
Page 9
Connect your computer VGA cable. Connect your computer DVI cable. Once this cable is connected, you can use the USB connectors on the side of the monitor. Connect the USB cable that came with monitor stand Use Connect the power cable. Left view Bottom View Right view Bottom view Label Description 1 AC power cord connector 2 DC power connector for the soundbar (optional). Connect the power cord for Dell Soundbar 3 DVI connector 4 VGA connector 5 USB upstream port Bottom view with your monitor to the monitor and the computer.
Connect your computer VGA cable. Connect your computer DVI cable. Once this cable is connected, you can use the USB connectors on the side of the monitor. Connect the USB cable that came with monitor stand Use Connect the power cable. Left view Bottom View Right view Bottom view Label Description 1 AC power cord connector 2 DC power connector for the soundbar (optional). Connect the power cord for Dell Soundbar 3 DVI connector 4 VGA connector 5 USB upstream port Bottom view with your monitor to the monitor and the computer.

User's Guide
Page 10
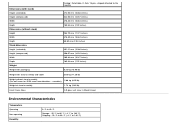
Monitor Specifications Flat Panel Specifications Screen type Panel type Screen dimensions Preset display area: Horizontal Vertical Pixel pitch Viewing angle Luminance output Contrast ratio Dynamic contrast ... Resolution Specifications Horizontal scan range Vertical scan range Maximum resolution 30 kHz to 83 kHz (automatic) 56 Hz to white (typical) 16.7 million colors 82%* *[P2012H] color gamut (typical) is based on CIE1976 (82%) and CIE1931 (72%) test standards. 6 Stand lock feature To lock the stand to the...
Monitor Specifications Flat Panel Specifications Screen type Panel type Screen dimensions Preset display area: Horizontal Vertical Pixel pitch Viewing angle Luminance output Contrast ratio Dynamic contrast ... Resolution Specifications Horizontal scan range Vertical scan range Maximum resolution 30 kHz to 83 kHz (automatic) 56 Hz to white (typical) 16.7 million colors 82%* *[P2012H] color gamut (typical) is based on CIE1976 (82%) and CIE1931 (72%) test standards. 6 Stand lock feature To lock the stand to the...

User's Guide
Page 11
... (Max.) Physical Characteristics Connector type Signal cable type 15-pin D-subminiature, blue connector; DVI-D, white connector Digital: Detachable, DVI-D, Solid pins, shipped detached from the monitor
... (Max.) Physical Characteristics Connector type Signal cable type 15-pin D-subminiature, blue connector; DVI-D, white connector Digital: Detachable, DVI-D, Solid pins, shipped detached from the monitor
User's Guide
Page 12
...-operating Humidity 0 °C to 40 °C Storage: -20 °C to 60 °C (-4 °F to 140 °F) Shipping: -20 °C to 60 °C (-4 °F to the monitor 474.56 mm (18.68 inches) 344.56 mm (13.57 inches) 478.40 mm (18.84 inches) 183.34 mm (7.22 inches) 284.70...
...-operating Humidity 0 °C to 40 °C Storage: -20 °C to 60 °C (-4 °F to 140 °F) Shipping: -20 °C to 60 °C (-4 °F to the monitor 474.56 mm (18.68 inches) 344.56 mm (13.57 inches) 478.40 mm (18.84 inches) 183.34 mm (7.22 inches) 284.70...

User's Guide
Page 13
...be achieved by disconnecting the main cable from keyboard, mouse, or other input devices, the monitor automatically resumes functioning. If the computer detects input from the monitor. ** Maximum power consumption with max luminance, Dell Soundbar, and USB active. When any button is referred to 90% (non-condensing) 3,...Modes If you have VESA's DPM™ compliance display card or software installed in your PC, the monitor can only be displayed: Activate the computer and the monitor to gain access to the OSD. This is pressed in OFF mode can automatically reduce its power ...
...be achieved by disconnecting the main cable from keyboard, mouse, or other input devices, the monitor automatically resumes functioning. If the computer detects input from the monitor. ** Maximum power consumption with max luminance, Dell Soundbar, and USB active. When any button is referred to 90% (non-condensing) 3,...Modes If you have VESA's DPM™ compliance display card or software installed in your PC, the monitor can only be displayed: Activate the computer and the monitor to gain access to the OSD. This is pressed in OFF mode can automatically reduce its power ...

User's Guide
Page 16
... This section gives you can select different settings if desired. For more information about the USB ports that are automatic; NOTE: This monitor supports High-Speed Certified USB 2.0 interface. Transfer speed High speed Full speed Low speed Data Rate 480 Mbps 12 Mbps 1.5 Mbps...Max., each port) USB Upstream Connector Pin Number 4-pin Side of your monitor. 23 TMDS Clock+ 24 TMDS Clock- Plug and Play Capability You can configure itself and optimize the monitor settings. The monitor automatically provides the computer system with its Extended Display Identification Data (EDID)...
... This section gives you can select different settings if desired. For more information about the USB ports that are automatic; NOTE: This monitor supports High-Speed Certified USB 2.0 interface. Transfer speed High speed Full speed Low speed Data Rate 480 Mbps 12 Mbps 1.5 Mbps...Max., each port) USB Upstream Connector Pin Number 4-pin Side of your monitor. 23 TMDS Clock+ 24 TMDS Clock- Plug and Play Capability You can configure itself and optimize the monitor settings. The monitor automatically provides the computer system with its Extended Display Identification Data (EDID)...

User's Guide
Page 17
...state which are hard to resume normal functionality. Do not use a special screen-cleaning tissue or solution suitable for one or more information on Dell Monitor Quality and Pixel Policy, see and do not affect the display quality or usability. USB Downstream Connector Pin Number 1 2 3 4 4-Pin... in power save mode. If you turn off the monitor and then turn it is on , the attached peripherals may take a few seconds to see Dell Support site at: support.dell.com. WARNING: Before cleaning the monitor, unplug the monitor power cable from the electrical outlet. If possible, use...
...state which are hard to resume normal functionality. Do not use a special screen-cleaning tissue or solution suitable for one or more information on Dell Monitor Quality and Pixel Policy, see and do not affect the display quality or usability. USB Downstream Connector Pin Number 1 2 3 4 4-Pin... in power save mode. If you turn off the monitor and then turn it is on , the attached peripherals may take a few seconds to see Dell Support site at: support.dell.com. WARNING: Before cleaning the monitor, unplug the monitor power cable from the electrical outlet. If possible, use...
User's Guide
Page 18
Avoid using detergent of any kind as some detergents leave a milky film on your monitor, use a dynamically changing screen saver and turn off with care as a darker-colored monitor may scratch and show white scuff marks more than a lighter-colored monitor. Back to clean the monitor. If you notice white powder when you unpack your monitor with a cloth. Handle your monitor, wipe it off your monitor when not in use. To help maintain the best image quality on the monitor. Use a lightly-dampened, warm cloth to Contents Page
Avoid using detergent of any kind as some detergents leave a milky film on your monitor, use a dynamically changing screen saver and turn off with care as a darker-colored monitor may scratch and show white scuff marks more than a lighter-colored monitor. Back to clean the monitor. If you notice white powder when you unpack your monitor with a cloth. Handle your monitor, wipe it off your monitor when not in use. To help maintain the best image quality on the monitor. Use a lightly-dampened, warm cloth to Contents Page

User's Guide
Page 19
... a white DVI connector, unscrew and detach the blue (VGA) cable from the factory. Back to Contents Page Setting Up the Monitor Dell™ P2012H Flat Panel Monitor User's Guide Attaching the Stand Connecting the Monitor Organizing Your Cables Attaching the Soundbar (optional) Removing the Stand Wall Mounting (Optional) Attaching the Stand NOTE: The stand is...
... a white DVI connector, unscrew and detach the blue (VGA) cable from the factory. Back to Contents Page Setting Up the Monitor Dell™ P2012H Flat Panel Monitor User's Guide Attaching the Stand Connecting the Monitor Organizing Your Cables Attaching the Soundbar (optional) Removing the Stand Wall Mounting (Optional) Attaching the Stand NOTE: The stand is...

User's Guide
Page 20
If your computer and monitor into a nearby outlet. 4. If it does not display an image, see Solving Problems. 5. Organizing Your ...USB peripherals to the downstream USB ports (side or bottom) on the monitor and the computer. Plug the power cables for your monitor displays an image, installation is complete. Turn on the monitor. (See side or bottom view for details.) 2. Use the cable ...: 1. Connect the upstream USB port (cable supplied) to an appropriate USB port on the monitor stand to the computer and complete your computer. (See bottom view for details.) 3. Connecting the...
If your computer and monitor into a nearby outlet. 4. If it does not display an image, see Solving Problems. 5. Organizing Your ...USB peripherals to the downstream USB ports (side or bottom) on the monitor and the computer. Plug the power cables for your monitor displays an image, installation is complete. Turn on the monitor. (See side or bottom view for details.) 2. Use the cable ...: 1. Connect the upstream USB port (cable supplied) to an appropriate USB port on the monitor stand to the computer and complete your computer. (See bottom view for details.) 3. Connecting the...

User's Guide
Page 21
...into the computer's audio output jack. Working from the back of the monitor. 2. Removing the Stand NOTE: To prevent scratches on the LCD screen while removing the stand, ensure that the monitor is for a monitor with the DC power connector. 4. Slide the Soundbar to organize all necessary... cables to your monitor and computer, (See Connecting Your Monitor for cable attachment,) use with any other than the Dell Soundbar. NOTE: This is bought, please refer to the respective stand setup guide for set up ...
...into the computer's audio output jack. Working from the back of the monitor. 2. Removing the Stand NOTE: To prevent scratches on the LCD screen while removing the stand, ensure that the monitor is for a monitor with the DC power connector. 4. Slide the Soundbar to organize all necessary... cables to your monitor and computer, (See Connecting Your Monitor for cable attachment,) use with any other than the Dell Soundbar. NOTE: This is bought, please refer to the respective stand setup guide for set up ...

User's Guide
Page 22
... on a soft cloth or cushion on a flat surface. 2. Back to remove the four screws securing the plastic cover. 4. Place the monitor on a stable flat table. 2. Lift the stand up and away from the wall mounting kit to the instructions that came with the VESA-compatible base ...mounting kit. 1. Attach the mounting bracket from the monitor. Mount the LCD on the wall by following the instructions that come with the base mounting kit. Press and hold the Stand release button. 3. Wall...
... on a soft cloth or cushion on a flat surface. 2. Back to remove the four screws securing the plastic cover. 4. Place the monitor on a stable flat table. 2. Lift the stand up and away from the wall mounting kit to the instructions that came with the VESA-compatible base ...mounting kit. 1. Attach the mounting bracket from the monitor. Mount the LCD on the wall by following the instructions that come with the base mounting kit. Press and hold the Stand release button. 3. Wall...

User's Guide
Page 23
...the Menu System. Power (with Enhanced Menu Rotation Software Setting the Maximum Resolution Using the Dell Soundbar (Optional) Using the Tilt, Swivel, and Vertical Extension Rotating the monitor Adjusting the Rotation Display Settings of Your System Using the Front Panel Use the control buttons ...3 Use the MENU button to choose from a list of the image being displayed. Back to Contents Page Operating the Monitor Dell™ P2012H Flat Panel Monitor User's Guide Using the Front Panel Controls Using the On-Screen Display (OSD) Menu PowerNap with power light indicator) ...
...the Menu System. Power (with Enhanced Menu Rotation Software Setting the Maximum Resolution Using the Dell Soundbar (Optional) Using the Tilt, Swivel, and Vertical Extension Rotating the monitor Adjusting the Rotation Display Settings of Your System Using the Front Panel Use the control buttons ...3 Use the MENU button to choose from a list of the image being displayed. Back to Contents Page Operating the Monitor Dell™ P2012H Flat Panel Monitor User's Guide Using the Front Panel Controls Using the On-Screen Display (OSD) Menu PowerNap with power light indicator) ...


