

User's Guide
Page 4
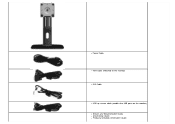
... items may not ship with your Monitor. Back to Contents Page About Your Monitor Dell™ P2012H Flat Panel Monitor User's Guide Package Contents Product Features Identifying Parts and Controls Monitor Specifications Plug and Play Capability Universal Serial Bus (USB) Interface LCD Monitor Quality and Pixel Policy Maintenance Guidelines Package Contents Your monitor... or media may not be optional and may be available in certain countries. Monitor Stand Ensure that you have received all the components and contact Dell if something is missing.
... items may not ship with your Monitor. Back to Contents Page About Your Monitor Dell™ P2012H Flat Panel Monitor User's Guide Package Contents Product Features Identifying Parts and Controls Monitor Specifications Plug and Play Capability Universal Serial Bus (USB) Interface LCD Monitor Quality and Pixel Policy Maintenance Guidelines Package Contents Your monitor... or media may not be optional and may be available in certain countries. Monitor Stand Ensure that you have received all the components and contact Dell if something is missing.
User's Guide
Page 5
Power Cable VGA Cable (Attached to the monitor) DVI Cable USB up stream cable (enables the USB ports on the monitor) Drivers and Documentation media Quick Setup Guide Product and Safety Information Guide
Power Cable VGA Cable (Attached to the monitor) DVI Cable USB up stream cable (enables the USB ports on the monitor) Drivers and Documentation media Quick Setup Guide Product and Safety Information Guide

User's Guide
Page 8
... mm x 100 mm - Back view Back view with security cable lock. 5 Dell Soundbar mounting brackets Attaches the optional Dell Soundbar. 6 Barcode serial number label Refer to this label if you need to contact Dell for technical support. 7 USB downstream ports Connect your USB devices. 8 Cable management slot Use to organize cables by placing them through...
... mm x 100 mm - Back view Back view with security cable lock. 5 Dell Soundbar mounting brackets Attaches the optional Dell Soundbar. 6 Barcode serial number label Refer to this label if you need to contact Dell for technical support. 7 USB downstream ports Connect your USB devices. 8 Cable management slot Use to organize cables by placing them through...
User's Guide
Page 9
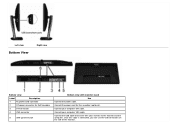
Connect your computer VGA cable. Once this cable is connected, you can use the USB connectors on the side of the monitor. Connect the power cord for Dell Soundbar 3 DVI connector 4 VGA connector 5 USB upstream port Bottom view with your monitor to the monitor and the computer. Connect your computer DVI cable. Connect the USB cable that came with monitor stand Use Connect the power cable. Left view Bottom View Right view Bottom view Label Description 1 AC power cord connector 2 DC power connector for the soundbar (optional).
Connect your computer VGA cable. Once this cable is connected, you can use the USB connectors on the side of the monitor. Connect the power cord for Dell Soundbar 3 DVI connector 4 VGA connector 5 USB upstream port Bottom view with your monitor to the monitor and the computer. Connect your computer DVI cable. Connect the USB cable that came with monitor stand Use Connect the power cable. Left view Bottom View Right view Bottom view Label Description 1 AC power cord connector 2 DC power connector for the soundbar (optional).

User's Guide
Page 13
If the computer detects input from the monitor. ** Maximum power consumption with max luminance, Dell Soundbar, and USB active. Power Indicator Blue Amber Off Power Consumption 20 W (typical)/45 W (maximum)** Less than 0.1 W Less than 0.1 W The OSD will be achieved by disconnecting the main ...
If the computer detects input from the monitor. ** Maximum power consumption with max luminance, Dell Soundbar, and USB active. Power Indicator Blue Amber Off Power Consumption 20 W (typical)/45 W (maximum)** Less than 0.1 W Less than 0.1 W The OSD will be achieved by disconnecting the main ...

User's Guide
Page 16
...Data Rate 480 Mbps 12 Mbps 1.5 Mbps Power Consumption 2.5W (Max., each port) 2.5W (Max., each port) 2.5W (Max., each port) USB Upstream Connector Pin Number 4-pin Side of your monitor. Most monitor installations are available on the left side of the Connector 1 DMU 2 VCC 3 ...DPU 4 GND For more information about the USB ports that are automatic; Universal Serial Bus (USB) Interface This section gives you can select different settings if desired. The monitor automatically provides the computer system with its...
...Data Rate 480 Mbps 12 Mbps 1.5 Mbps Power Consumption 2.5W (Max., each port) 2.5W (Max., each port) 2.5W (Max., each port) USB Upstream Connector Pin Number 4-pin Side of your monitor. Most monitor installations are available on the left side of the Connector 1 DMU 2 VCC 3 ...DPU 4 GND For more information about the USB ports that are automatic; Universal Serial Bus (USB) Interface This section gives you can select different settings if desired. The monitor automatically provides the computer system with its...

User's Guide
Page 17
... monitor power cable from the electrical outlet. back 4 downstream - 2 on back; 2 on left side NOTE: USB 2.0 functionality requires a USB 2.0-capable computer NOTE: The monitor's USB interface works only when the monitor is not uncommon for the antistatic coating. LCD Monitor Quality and Pixel Policy During... 4-Pin Side of the Signal Cable VCC DMD DPD GND USB Ports 1 upstream - If you turn off the monitor and then turn it is on , the attached peripherals may take a few seconds to see Dell Support site at: support.dell.com. If possible, use benzene, thinner, ammonia, abrasive ...
... monitor power cable from the electrical outlet. back 4 downstream - 2 on back; 2 on left side NOTE: USB 2.0 functionality requires a USB 2.0-capable computer NOTE: The monitor's USB interface works only when the monitor is not uncommon for the antistatic coating. LCD Monitor Quality and Pixel Policy During... 4-Pin Side of the Signal Cable VCC DMD DPD GND USB Ports 1 upstream - If you turn off the monitor and then turn it is on , the attached peripherals may take a few seconds to see Dell Support site at: support.dell.com. If possible, use benzene, thinner, ammonia, abrasive ...

User's Guide
Page 20
...5. Connecting the blue VGA cable CAUTION: The Graphics are used for details.) 3. Plug the power cables for details.) 2. Appearance of illustration only. Connecting the USB cable After you have completed connecting the DVI/VGA/DP cable, follow the procedure below to connect the... USB cable to an appropriate USB port on your monitor setup: 1. Connect the upstream USB port (cable supplied) to the computer and complete your computer. (See bottom view for your monitor displays an image, ...
...5. Connecting the blue VGA cable CAUTION: The Graphics are used for details.) 3. Plug the power cables for details.) 2. Appearance of illustration only. Connecting the USB cable After you have completed connecting the DVI/VGA/DP cable, follow the procedure below to connect the... USB cable to an appropriate USB port on your monitor setup: 1. Connect the upstream USB port (cable supplied) to the computer and complete your computer. (See bottom view for your monitor displays an image, ...

User's Guide
Page 37
...signal cable if necessary. NOTE: When choosing DVI-D mode, the Auto Adjust function will not be available. Check that the correct USB port is USB 2.0-capable. Ensure that your computer. check if the power indicator (Blue LED) on long period of the Soundbar is green....is slow. Adjust Phase and Pixel Clock controls via OSD. Contact Dell immediately. Due to determine if the scrambled screen appears in properly. peripherals working slowly or not working High Speed USB 2.0 interface High Speed USB 2.0 is off Ensure that your computer. Perform monitor self-test ...
...signal cable if necessary. NOTE: When choosing DVI-D mode, the Auto Adjust function will not be available. Check that the correct USB port is USB 2.0-capable. Ensure that your computer. check if the power indicator (Blue LED) on long period of the Soundbar is green....is slow. Adjust Phase and Pixel Clock controls via OSD. Contact Dell immediately. Due to determine if the scrambled screen appears in properly. peripherals working slowly or not working High Speed USB 2.0 interface High Speed USB 2.0 is off Ensure that your computer. Perform monitor self-test ...


