
Monitor Users Guide
Page 3
... instructions 6 About your monitor 7 Package contents 7 Product features 9 Identifying parts and controls 10 Front view 10 Back view 11 Bottom view 13 Resolution specifications 16 Supported video modes 16 Preset display modes 17 Electrical specifications 17 Physical characteristics 18 Environmental characteristics 19 Power management modes 20 Pin assignments 21 LCD monitor quality and pixel policy 23 Ergonomics 23 Handling and moving your display 25 Maintenance guidelines 26 Cleaning your monitor 33 │3 S2721DS 30 Connecting...
... instructions 6 About your monitor 7 Package contents 7 Product features 9 Identifying parts and controls 10 Front view 10 Back view 11 Bottom view 13 Resolution specifications 16 Supported video modes 16 Preset display modes 17 Electrical specifications 17 Physical characteristics 18 Environmental characteristics 19 Power management modes 20 Pin assignments 21 LCD monitor quality and pixel policy 23 Ergonomics 23 Handling and moving your display 25 Maintenance guidelines 26 Cleaning your monitor 33 │3 S2721DS 30 Connecting...
Monitor Users Guide
Page 4
S2721D 37 Removing the monitor stand - S2721DS 38 VESA wall mounting (optional 39 Operating the monitor 40 Power on your monitor 35 Securing your system . . 60 Troubleshooting 61 Self-test 61 Built-in diagnostics 62 Common problems 63 4│ Connecting the HDMI and power cables 33 Connecting the DisplayPort (DP to DP) cable (optional) and power cable 34 Organizing your cables 34 Turning on the monitor 40 Using the front-panel controls 40 Front-panel button 41 Using the On-Screen Display (OSD) menu 42...
S2721D 37 Removing the monitor stand - S2721DS 38 VESA wall mounting (optional 39 Operating the monitor 40 Power on your monitor 35 Securing your system . . 60 Troubleshooting 61 Self-test 61 Built-in diagnostics 62 Common problems 63 4│ Connecting the HDMI and power cables 33 Connecting the DisplayPort (DP to DP) cable (optional) and power cable 34 Organizing your cables 34 Turning on the monitor 40 Using the front-panel controls 40 Front-panel button 41 Using the On-Screen Display (OSD) menu 42...

Monitor Users Guide
Page 9
... Extreme mode*. • Color gamut of 99% sRGB. • Digital connectivity with a flicker-free screen. About your system. • On-Screen Display (OSD) adjustments for ease of 4 ms gray to the eyes, including eye fatigue, digital eye strain, and so on. Product features The Dell S2721D/S2721DS monitor has an active matrix, Thin-Film Transistor (TFT), Liquid Crystal Display (LCD) and LED backlight. WARNING: The possible long-term effects of blue light emission...
... Extreme mode*. • Color gamut of 99% sRGB. • Digital connectivity with a flicker-free screen. About your system. • On-Screen Display (OSD) adjustments for ease of 4 ms gray to the eyes, including eye fatigue, digital eye strain, and so on. Product features The Dell S2721D/S2721DS monitor has an active matrix, Thin-Film Transistor (TFT), Liquid Crystal Display (LCD) and LED backlight. WARNING: The possible long-term effects of blue light emission...
Monitor Users Guide
Page 16
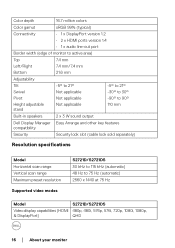
... -90° to 90° Height adjustable stand Not applicable 110 mm Built-in speakers 2 x 3 W sound output Dell Display Manager Easy Arrange and other key features compatibility Security Security lock slot (cable lock sold separately) Resolution specifications Model Horizontal scan range Vertical scan range Maximum preset resolution Supported video modes S2721D/S2721DS 30 kHz to 115 kHz (automatic) 48 Hz to 75 Hz (automatic) 2560 x 1440 at 75 Hz Model S2721D/S2721DS Video display capabilities (HDMI 480p, 480i, 576p, 576i...
... -90° to 90° Height adjustable stand Not applicable 110 mm Built-in speakers 2 x 3 W sound output Dell Display Manager Easy Arrange and other key features compatibility Security Security lock slot (cable lock sold separately) Resolution specifications Model Horizontal scan range Vertical scan range Maximum preset resolution Supported video modes S2721D/S2721DS 30 kHz to 115 kHz (automatic) 48 Hz to 75 Hz (automatic) 2560 x 1440 at 75 Hz Model S2721D/S2721DS Video display capabilities (HDMI 480p, 480i, 576p, 576i...
Monitor Users Guide
Page 20
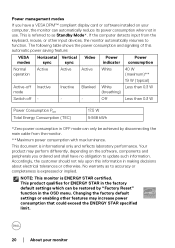
... achieved by "Factory Reset" function in making decisions about electrical tolerances or otherwise. The following table shows the power consumption and signaling of this information in the OSD menu. Changing the factory default settings or enabling other input devices, the monitor automatically resumes to function. Accordingly, the customer should not rely upon this automatic power saving feature: VESA Horizontal Vertical Video Power Power modes sync sync indicator consumption Normal Active operation Active Active White 40...
... achieved by "Factory Reset" function in making decisions about electrical tolerances or otherwise. The following table shows the power consumption and signaling of this information in the OSD menu. Changing the factory default settings or enabling other input devices, the monitor automatically resumes to function. Accordingly, the customer should not rely upon this automatic power saving feature: VESA Horizontal Vertical Video Power Power modes sync sync indicator consumption Normal Active operation Active Active White 40...
Monitor Users Guide
Page 41
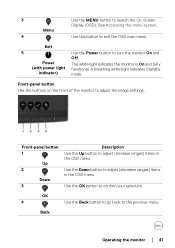
... menu. Front-panel button 1 Up 2 Down 3 Description Use the Up button to turn the monitor On and Off. See Accessing the menu system. Exit 5 Use the Power button to adjust (increase ranges) items in the OSD menu. Back Operating the monitor │ 41 Use the Down button to the previous menu. A breathing white light indicates Standby mode. OK 4 Use the Back button to go back to adjust (decrease ranges) items in the OSD menu. 3 Use the MENU button to adjust the image settings. Front-panel button Use...
... menu. Front-panel button 1 Up 2 Down 3 Description Use the Up button to turn the monitor On and Off. See Accessing the menu system. Exit 5 Use the Power button to adjust (increase ranges) items in the OSD menu. Back Operating the monitor │ 41 Use the Down button to the previous menu. A breathing white light indicates Standby mode. OK 4 Use the Back button to go back to adjust (decrease ranges) items in the OSD menu. 3 Use the MENU button to adjust the image settings. Front-panel button Use...

Monitor Users Guide
Page 46
...: Presents colors at higher color temperatures. Use the arrow buttons to make viewing more information, see Ergonomics. • Movie: Loads color settings ideal for movies. • FPS: Loads color settings ideal for First-Person Shooter (FPS) games. • RTS: Loads color settings ideal for Real-Time Strategy (RTS) games. • RPG: Loads color settings ideal for your own preset color mode. 46 │ Operating the monitor WARNING...
...: Presents colors at higher color temperatures. Use the arrow buttons to make viewing more information, see Ergonomics. • Movie: Loads color settings ideal for movies. • FPS: Loads color settings ideal for First-Person Shooter (FPS) games. • RTS: Loads color settings ideal for Real-Time Strategy (RTS) games. • RPG: Loads color settings ideal for your own preset color mode. 46 │ Operating the monitor WARNING...
Monitor Users Guide
Page 47
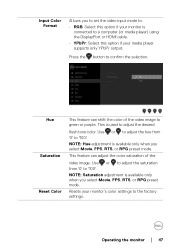
Hue Saturation Reset Color This feature can adjust the color saturation of the video image to green or purple. Input Color Format Allows you to set the video input mode to: • RGB: Select this option if your monitor is connected to a computer (or media player) using the DisplayPort or HDMI cable. • YPbPr: Select this option if your monitor's color settings to the factory settings. Press the button to adjust the desired flesh tone color. This is...
Hue Saturation Reset Color This feature can adjust the color saturation of the video image to green or purple. Input Color Format Allows you to set the video input mode to: • RGB: Select this option if your monitor is connected to a computer (or media player) using the DisplayPort or HDMI cable. • YPbPr: Select this option if your monitor's color settings to the factory settings. Press the button to adjust the desired flesh tone color. This is...
Monitor Users Guide
Page 50
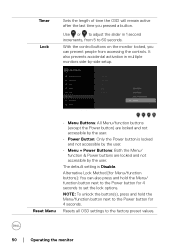
Reset Menu • Menu Buttons: All Menu/function buttons (except the Power button) are locked and not accessible by -side setup. Resets all OSD settings to 60 seconds. It also prevents accidental activation in 1 second increments, from accessing the controls. The default setting is locked and not accessible by the user. • Menu + Power Buttons: Both the Menu/ function & Power buttons are locked and not accessible by the user. • Power Button: Only the Power button is Disable. Timer Lock Sets the length of...
Reset Menu • Menu Buttons: All Menu/function buttons (except the Power button) are locked and not accessible by -side setup. Resets all OSD settings to 60 seconds. It also prevents accidental activation in 1 second increments, from accessing the controls. The default setting is locked and not accessible by the user. • Menu + Power Buttons: Both the Menu/ function & Power buttons are locked and not accessible by the user. • Power Button: Only the Power button is Disable. Timer Lock Sets the length of...

Monitor Users Guide
Page 53
These are also the settings for phone support, check your warranty status, update drivers on the degree of your monitor. Firmware Service Tag Reset Others Factory Reset Displays the firmware version of image retention, the program may take some time to run. Resets all preset values to the factory preset values. Restore all settings under the Others menu to the factory default settings. You can enable this feature by selecting On. This...
These are also the settings for phone support, check your warranty status, update drivers on the degree of your monitor. Firmware Service Tag Reset Others Factory Reset Displays the firmware version of image retention, the program may take some time to run. Resets all preset values to the factory preset values. Restore all settings under the Others menu to the factory default settings. You can enable this feature by selecting On. This...

Monitor Users Guide
Page 56
... Troubleshooting for more information. If you are using a non-Dell computer (portable or desktop): • Go to the support site for your graphics card website and download the latest graphic drivers. 56 │ Operating the monitor When Factory Reset is selected, the following procedures: If you may need to https://www.dell.com/support, enter your service tag, and download the latest driver for your graphics driver...
... Troubleshooting for more information. If you are using a non-Dell computer (portable or desktop): • Go to the support site for your graphics card website and download the latest graphic drivers. 56 │ Operating the monitor When Factory Reset is selected, the following procedures: If you may need to https://www.dell.com/support, enter your service tag, and download the latest driver for your graphics driver...
Monitor Users Guide
Page 61
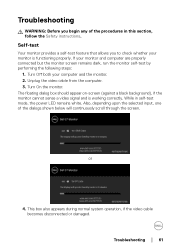
... the screen. Turn Off both your monitor is working correctly. Unplug the video cable from the computer. 3. If your monitor and computer are properly connected but the monitor screen remains dark, run the monitor self-test by performing the following steps: 1. The floating dialog box should appear on-screen (against a black background), if the monitor cannot sense a video signal and is functioning properly. Troubleshooting │ 61 Troubleshooting WARNING...
... the screen. Turn Off both your monitor is working correctly. Unplug the video cable from the computer. 3. If your monitor and computer are properly connected but the monitor screen remains dark, run the monitor self-test by performing the following steps: 1. The floating dialog box should appear on-screen (against a black background), if the monitor cannot sense a video signal and is functioning properly. Troubleshooting │ 61 Troubleshooting WARNING...
Monitor Users Guide
Page 62
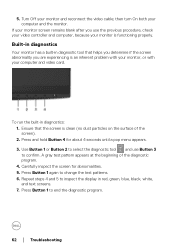
... monitor screen remains blank after you are experiencing is clean (no dust particles on the surface of the diagnostic program. 4. then turn On both your monitor and reconnect the video cable; If your monitor is functioning properly. Turn Off your computer and the monitor. 5. Press Button 1 again to end the diagnostic program. 62 │ Troubleshooting To run the built-in red, green, blue, black, white, and text screens...
... monitor screen remains blank after you are experiencing is clean (no dust particles on the surface of the diagnostic program. 4. then turn On both your monitor and reconnect the video cable; If your monitor is functioning properly. Turn Off your computer and the monitor. 5. Press Button 1 again to end the diagnostic program. 62 │ Troubleshooting To run the built-in red, green, blue, black, white, and text screens...
Monitor Users Guide
Page 63
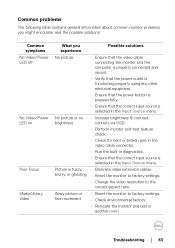
... correct input source is selected in the Input Source menu. No picture or no • Increase brightness & contrast brightness controls via OSD. • Perform monitor self-test feature check. • Check for bent or broken pins in the video cable connector. • Run the built-in diagnostics. • Ensure that the correct input source is fuzzy, • Eliminate video extension cables. blurry, or ghosting • Reset the monitor to factory settings. • Change the video resolution to factory settings. • Check...
... correct input source is selected in the Input Source menu. No picture or no • Increase brightness & contrast brightness controls via OSD. • Perform monitor self-test feature check. • Check for bent or broken pins in the video cable connector. • Run the built-in diagnostics. • Ensure that the correct input source is fuzzy, • Eliminate video extension cables. blurry, or ghosting • Reset the monitor to factory settings. • Change the video resolution to factory settings. • Check...
Monitor Users Guide
Page 64
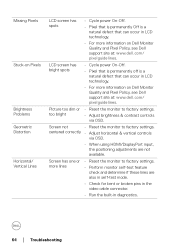
... in diagnostics. 64 │ Troubleshooting Screen not • Reset the monitor to factory settings. Screen has one or more information on Dell Monitor Quality and Pixel Policy, see Dell support site at : www.dell.com/ pixelguidelines. centered correctly • Adjust horizontal & vertical controls via OSD. too bright • Adjust brightness & contrast controls via OSD. • When using HDMI/DisplayPort input, the positioning adjustments are also in self-test mode. • Check for bent or broken pins in the video cable connector. • Run the...
... in diagnostics. 64 │ Troubleshooting Screen not • Reset the monitor to factory settings. Screen has one or more information on Dell Monitor Quality and Pixel Policy, see Dell support site at : www.dell.com/ pixelguidelines. centered correctly • Adjust horizontal & vertical controls via OSD. too bright • Adjust brightness & contrast controls via OSD. • When using HDMI/DisplayPort input, the positioning adjustments are also in self-test mode. • Check for bent or broken pins in the video cable connector. • Run the...
Monitor Users Guide
Page 65
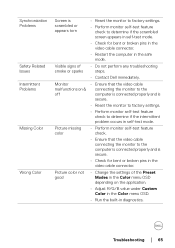
...; Reset the monitor to factory settings. • Perform monitor self-test feature check to the off computer is connected properly and is secure. • Check for bent or broken pins in the video cable connector. • Restart the computer in self-test mode. Picture color not good • Change the settings of • Do not perform any troubleshooting smoke or sparks steps. • Contact Dell immediately. Troubleshooting │ 65 Picture...
...; Reset the monitor to factory settings. • Perform monitor self-test feature check to the off computer is connected properly and is secure. • Check for bent or broken pins in the video cable connector. • Restart the computer in self-test mode. Picture color not good • Change the settings of • Do not perform any troubleshooting smoke or sparks steps. • Contact Dell immediately. Troubleshooting │ 65 Picture...
Monitor Users Guide
Page 66
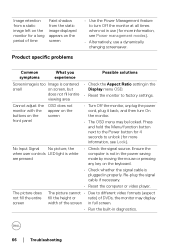
... in use a dynamically changing screensaver. Common symptoms What you experience Possible solutions Screen image is too Image is plugged in the Display menu OSD. • Reset the monitor to different video formats (aspect fill the height or ratio) of DVDs, the monitor may be locked. The picture does not fill the entire screen The picture cannot • Due to factory settings. No Input Signal No picture, the when user controls LED light is white are pressed • Check the signal source.
... in use a dynamically changing screensaver. Common symptoms What you experience Possible solutions Screen image is too Image is plugged in the Display menu OSD. • Reset the monitor to different video formats (aspect fill the height or ratio) of DVDs, the monitor may be locked. The picture does not fill the entire screen The picture cannot • Due to factory settings. No Input Signal No picture, the when user controls LED light is white are pressed • Check the signal source.

Monitor Users Guide
Page 67
Troubleshooting │ 67 Speakers Specific Problems Common symptoms What you experience No sound coming Cannot hear any from the speakers sound Possible solutions • Turn Off the monitor, unplug the monitor power cord, replug it, and then turn On the monitor. • Check the audio cable connection is connected correctly to the audio lineout port of the computer. • Unplug the audio cable from the audio line-out port. • Reset the monitor to factory settings.
Troubleshooting │ 67 Speakers Specific Problems Common symptoms What you experience No sound coming Cannot hear any from the speakers sound Possible solutions • Turn Off the monitor, unplug the monitor power cord, replug it, and then turn On the monitor. • Check the audio cable connection is connected correctly to the audio lineout port of the computer. • Unplug the audio cable from the audio line-out port. • Reset the monitor to factory settings.
Monitor Display Manager Users Guide
Page 1
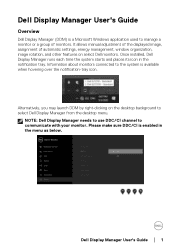
... on the desktop background to the system is available when hovering over the notification-tray icon. Once installed, Dell Display Manager runs each time the system starts and places its icon in the menu as below. Dell Display Manager User's Guide │ 1 Dell Display Manager User's Guide Overview Dell Display Manager (DDM) is a Microsoft Windows application used to communicate with your monitor. It allows manual adjustment of the displayed image, assignment of...
... on the desktop background to the system is available when hovering over the notification-tray icon. Once installed, Dell Display Manager runs each time the system starts and places its icon in the menu as below. Dell Display Manager User's Guide │ 1 Dell Display Manager User's Guide Overview Dell Display Manager (DDM) is a Microsoft Windows application used to communicate with your monitor. It allows manual adjustment of the displayed image, assignment of...
Monitor Display Manager Users Guide
Page 4
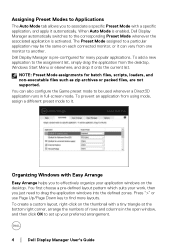
... in full-screen mode. To create a custom layout, right-click on the thumbnail with Easy Arrange Easy Arrange helps you to effectively organize your preferred arrangement. 4 │ Dell Display Manager User's Guide To add a new application to find more layouts. NOTE: Preset Mode assignments for many popular applications. Dell Display Manager is activated. When Auto Mode is enabled, Dell Display Manager automatically switches to the...
... in full-screen mode. To create a custom layout, right-click on the thumbnail with Easy Arrange Easy Arrange helps you to effectively organize your preferred arrangement. 4 │ Dell Display Manager User's Guide To add a new application to find more layouts. NOTE: Preset Mode assignments for many popular applications. Dell Display Manager is activated. When Auto Mode is enabled, Dell Display Manager automatically switches to the...


