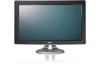
User's Guide
Page 1
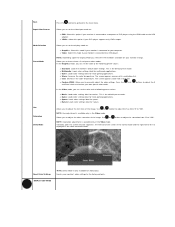
.... has determined that helps you how to either registered trademarks or trademarks of your computer. disclaims any manner whatsoever without notice. © 2009 Dell Inc. ENERGY STAR is a registered trademark of Dell Inc. Model SX2210b January 2009 Rev. CAUTION: A CAUTION indicates a potential for energy ... is subject to hardware or loss of data and tells you make better use of Microsoft Corporation in this text: DELL and the DELL logo are trademarks of Dell Inc; Microsoft, Windows, a n d Windows Vista are either the entities claiming the marks and names or...
.... has determined that helps you how to either registered trademarks or trademarks of your computer. disclaims any manner whatsoever without notice. © 2009 Dell Inc. ENERGY STAR is a registered trademark of Dell Inc. Model SX2210b January 2009 Rev. CAUTION: A CAUTION indicates a potential for energy ... is subject to hardware or loss of data and tells you make better use of Microsoft Corporation in this text: DELL and the DELL logo are trademarks of Dell Inc; Microsoft, Windows, a n d Windows Vista are either the entities claiming the marks and names or...

User's Guide
Page 5
... W (maximum) 47 W (typical) Active-off mode Inactive Inactive Blanked Amber 0.84 W Switch off mode. If the computer detects input from keyboard, mouse, or other input devices, the monitor automatically resumes functioning. or Activate the computer and 'wake up' the monitor to gain access to as Power Save Mode. This is touched in...
... W (maximum) 47 W (typical) Active-off mode Inactive Inactive Blanked Amber 0.84 W Switch off mode. If the computer detects input from keyboard, mouse, or other input devices, the monitor automatically resumes functioning. or Activate the computer and 'wake up' the monitor to gain access to as Power Save Mode. This is touched in...

User's Guide
Page 6
... Assignments VGA Connector Pin 15-pin Side of the Connected Signal Cable Number 1 Video-Red 2 Video-Green 3 Video-Blue 4 GND 5 Self-test 6 GND-R 7 GND-G 8 GND-B 9 Computer 5V 10 GND-sync 11 GND 12 DDC data 13 H-sync 14 V-sync 15 DDC clock DVI Connector Pin Number 1 2 3 4 5 6 7 8 9 10 11 12 24-pin...
... Assignments VGA Connector Pin 15-pin Side of the Connected Signal Cable Number 1 Video-Red 2 Video-Green 3 Video-Blue 4 GND 5 Self-test 6 GND-R 7 GND-G 8 GND-B 9 Computer 5V 10 GND-sync 11 GND 12 DDC data 13 H-sync 14 V-sync 15 DDC clock DVI Connector Pin Number 1 2 3 4 5 6 7 8 9 10 11 12 24-pin...

User's Guide
Page 8
...USB Ports l 1 upstream - back l 2 downstream at back & 2 downstream at bottom NOTE: USB 2.0 functionality requires a USB 2.0-capable computer NOTE: The monitor's USB interface works only when the monitor is on, the white light next to 10 frames per second Horizontally 2x Dual ...Microphone USB 2.0 high Speed 3.3 volts +/- 5% System Requirements The following are the minimum system requirements for the Dell Webcam Software Suite: l Intel® Pentium® 4 or AMD® equivalent processor running at 2.4 GHz or higher (Recommended: Intel ...
...USB Ports l 1 upstream - back l 2 downstream at back & 2 downstream at bottom NOTE: USB 2.0 functionality requires a USB 2.0-capable computer NOTE: The monitor's USB interface works only when the monitor is on, the white light next to 10 frames per second Horizontally 2x Dual ...Microphone USB 2.0 high Speed 3.3 volts +/- 5% System Requirements The following are the minimum system requirements for the Dell Webcam Software Suite: l Intel® Pentium® 4 or AMD® equivalent processor running at 2.4 GHz or higher (Recommended: Intel ...
User's Guide
Page 9
... from any Plug and Play-compatible system. Using advanced speech technology, your Dell Webcam experience. Cam Avatar, via email or even YouTube™. The monitor automatically provides the computer system with you want. Cam Avatar Creator Creative Live! TFT LCD TN ...can configure itself and optimize the monitor settings. Share creation with external power supply Dell Webcam Software Suite The Dell Webcam Software Suite includes the following applications: Dell Webcam Centre Dell Webcam Central enables convenient access to all exciting applications to 76 Hz (automatic) ...
... from any Plug and Play-compatible system. Using advanced speech technology, your Dell Webcam experience. Cam Avatar, via email or even YouTube™. The monitor automatically provides the computer system with you want. Cam Avatar Creator Creative Live! TFT LCD TN ...can configure itself and optimize the monitor settings. Share creation with external power supply Dell Webcam Software Suite The Dell Webcam Software Suite includes the following applications: Dell Webcam Centre Dell Webcam Central enables convenient access to all exciting applications to 76 Hz (automatic) ...

User's Guide
Page 13
After installing the drivers for your graphics Adapter, attempt to set the resolution to 1920 x 1080, please contact Dell™ to inquire about a graphics Adapter that supports these resolutions. Back to Contents Page Setting Up Your Monitor Dell™ SX2210 Flat Panel Monitor If you are unable to set the resolution to 1920 X 1080 again. Go to Contents Page Back to http://support.dell.com, enter your service tag, and download the latest driver for your graphics card. 2. NOTE: If you have a Dell™ desktop or a Dell™ portable computer with internet access 1.
After installing the drivers for your graphics Adapter, attempt to set the resolution to 1920 x 1080, please contact Dell™ to inquire about a graphics Adapter that supports these resolutions. Back to Contents Page Setting Up Your Monitor Dell™ SX2210 Flat Panel Monitor If you are unable to set the resolution to 1920 X 1080 again. Go to Contents Page Back to http://support.dell.com, enter your service tag, and download the latest driver for your graphics card. 2. NOTE: If you have a Dell™ desktop or a Dell™ portable computer with internet access 1.
User's Guide
Page 14
Select the Settings tab. 3. Refer to Contents Page NOTE: If you have a non Dell™ desktop, portable computer, or graphics card 1. Right-click on the desktop and click Properties. 2. Back to the graphic card provider website for updated driver (for ...Select Advanced. 4. NVIDIA, ATI, Intel etc.). 5. Identify your graphics adapter, attempt to set the resolution to 1920 x 1080, please contact the manufacturer of your computer or consider purchasing a graphics adapter that will support the video resolution of the window (e.g. Back to Contents Page Setting Up Your Monitor...
Select the Settings tab. 3. Refer to Contents Page NOTE: If you have a non Dell™ desktop, portable computer, or graphics card 1. Right-click on the desktop and click Properties. 2. Back to the graphic card provider website for updated driver (for ...Select Advanced. 4. NVIDIA, ATI, Intel etc.). 5. Identify your graphics adapter, attempt to set the resolution to 1920 x 1080, please contact the manufacturer of your computer or consider purchasing a graphics adapter that will support the video resolution of the window (e.g. Back to Contents Page Setting Up Your Monitor...
User's Guide
Page 19
...the Preset Modes available for nature. l Video: Select this option if your monitor change. NOTE: Saturation adjustment is connected to a computer or DVD player using the HDMI cable or the HDMI to adjust the color saturation of the image. Vertically splits the screen into ...adjustment is the default preset mode. In the Graphics mode, you to set the color to : l Graphics: Select this option if your computer. This is connected to '100'. l Warm: Increase the color temperature. DISPLAY SETTINGS l YPbPr: Select this mode if your monitor is the default...
...the Preset Modes available for nature. l Video: Select this option if your monitor change. NOTE: Saturation adjustment is connected to a computer or DVD player using the HDMI cable or the HDMI to adjust the color saturation of the image. Vertically splits the screen into ...adjustment is the default preset mode. In the Graphics mode, you to set the color to : l Graphics: Select this option if your computer. This is connected to '100'. l Warm: Increase the color temperature. DISPLAY SETTINGS l YPbPr: Select this mode if your monitor is the default...

User's Guide
Page 22
Disable: This is the default option. Factory Reset Resets all OSD settings to return. LCD conditioning helps eliminate any time. NOTE: Severe cases of your computer to adjust the monitor display settings like the brightness, color balance etc. Enable: Enables LCD conditioning and the following message appears on the screen. Select ...
Disable: This is the default option. Factory Reset Resets all OSD settings to return. LCD conditioning helps eliminate any time. NOTE: Severe cases of your computer to adjust the monitor display settings like the brightness, color balance etc. Enable: Enables LCD conditioning and the following message appears on the screen. Select ...

User's Guide
Page 23
Recommended mode is receiving from the computer. Brightness & Contrast and 2. This means that the monitor cannot synchronize with the signal that the monitor is too high or too low for the monitor ...
Recommended mode is receiving from the computer. Brightness & Contrast and 2. This means that the monitor cannot synchronize with the signal that the monitor is too high or too low for the monitor ...
User's Guide
Page 24
... on /off control to 1920 x 1080. 4. Using the Dell Soundbar (Optional) The Dell Soundbar is a stereo two channel system, mountable on the desktop and select Properties. 2. If you have a Dell desktop or portable computer: ¡ Go to support.dell.com, enter your service tag, and download the latest driver...need to update your graphics driver. If you do not see 1920 x 1080 as an option, you are using a non-Dell computer (portable or desktop): ¡ Go to your computer and download the latest graphic drivers. ¡ Go to the support site for the monitor: 1. Click OK. The Soundbar...
... on /off control to 1920 x 1080. 4. Using the Dell Soundbar (Optional) The Dell Soundbar is a stereo two channel system, mountable on the desktop and select Properties. 2. If you have a Dell desktop or portable computer: ¡ Go to support.dell.com, enter your service tag, and download the latest driver...need to update your graphics driver. If you do not see 1920 x 1080 as an option, you are using a non-Dell computer (portable or desktop): ¡ Go to your computer and download the latest graphic drivers. ¡ Go to the support site for the monitor: 1. Click OK. The Soundbar...
User's Guide
Page 25
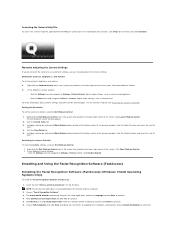
...the Webcam. You are now ready to continue. 4. Choose "Webcam Software". 3. Read Software License Agreement and click Yes to restart the computer after installation completes. Click Finish to continue. 5. overall system level, a LED for the most comfortable viewing angle. NOTE: Ensure that ...: The stand is attached when the monitor is connected between the monitor and the computer. 2. Using the Camera Installing the Dell Webcam Software (Microsoft® Windows® Operating Systems ) The Dell SX2210 webcam application media that the USB cable is shipped from the factory. Insert ...
...the Webcam. You are now ready to continue. 4. Choose "Webcam Software". 3. Read Software License Agreement and click Yes to restart the computer after installation completes. Click Finish to continue. 5. overall system level, a LED for the most comfortable viewing angle. NOTE: Ensure that ...: The stand is attached when the monitor is connected between the monitor and the computer. 2. Using the Camera Installing the Dell Webcam Software (Microsoft® Windows® Operating Systems ) The Dell SX2210 webcam application media that the USB cable is shipped from the factory. Insert ...
User's Guide
Page 26
... click Next and follow the instructions to continue. 6. Setting the Contrast, Brightness, and Volume To set the camera resolution using the Dell Webcam Central: 1. Select the Language and click Next to select the Alternatively, choose Custom Installation to continue. 4. Right-click the Webcam... the Resolution To set the contrast, brightness and volume: 1. NOTE: Ensure that the USB cable is connected between the monitor and the computer. 2. Read Software License Agreement and click Yes to Settings - Picture Control. Manually Adjusting the Camera Settings If you do not want ....
... click Next and follow the instructions to continue. 6. Setting the Contrast, Brightness, and Volume To set the camera resolution using the Dell Webcam Central: 1. Select the Language and click Next to select the Alternatively, choose Custom Installation to continue. 4. Right-click the Webcam... the Resolution To set the contrast, brightness and volume: 1. NOTE: Ensure that the USB cable is connected between the monitor and the computer. 2. Read Software License Agreement and click Yes to Settings - Picture Control. Manually Adjusting the Camera Settings If you do not want ....
User's Guide
Page 27
... to User Settings. This provides better security than one webcam is installed on your computer automatically on most occasions, without saving any biometric or password alone. Back to a Dell Monitor webcam first. You are now ready to enter a password. You may set... User Switching 4. Next click the "Camera Selection" link and select the desired webcam. Only administrator accounts have access to restart the computer after installation completes. Disabled 2. As you move this slider, a brief description of FastAccess are displayed below the slider. components to ...
... to User Settings. This provides better security than one webcam is installed on your computer automatically on most occasions, without saving any biometric or password alone. Back to a Dell Monitor webcam first. You are now ready to enter a password. You may set... User Switching 4. Next click the "Camera Selection" link and select the desired webcam. Only administrator accounts have access to restart the computer after installation completes. Disabled 2. As you move this slider, a brief description of FastAccess are displayed below the slider. components to ...

User's Guide
Page 28
...you do not see 1920 x 1080 as an option, you have a Dell™ desktop or a Dell™ portable computer with internet access. 2: If you may need to 1920 X 1080. 4. Back to Contents Page Setting Up Your Monitor Dell™ SX2210 Flat Panel Monitor Setting the display resolution to 1920 x 1080... (Maximum) For optimal display performance while using , and follow the provided directions: 1: If you have a non Dell™ desktop, portable computer, or graphics card. Click OK. Back to 1920 x 1080 pixels by pressing and holding left-mouse button and adjust the screen resolution...
...you do not see 1920 x 1080 as an option, you have a Dell™ desktop or a Dell™ portable computer with internet access. 2: If you may need to 1920 X 1080. 4. Back to Contents Page Setting Up Your Monitor Dell™ SX2210 Flat Panel Monitor Setting the display resolution to 1920 x 1080... (Maximum) For optimal display performance while using , and follow the provided directions: 1: If you have a non Dell™ desktop, portable computer, or graphics card. Click OK. Back to 1920 x 1080 pixels by pressing and holding left-mouse button and adjust the screen resolution...

User's Guide
Page 30
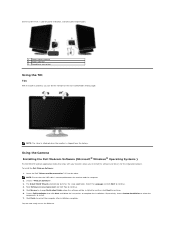
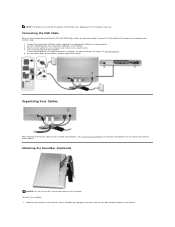
... to the computer: 1. Turn off your computer. Use all the cables on the back of the procedures in this section, follow the Safety Instructions. To connect your monitor to Contents Page Setting Up the Monitor Dell™ SX2210 Flat Panel Monitor User's Guide Connecting the Monitor... Organizing Your Cables Attaching the Soundbar (Optional) Connecting Your Monitor CAUTION: Before you begin any of your computer and disconnect the power cable. 2.
... to the computer: 1. Turn off your computer. Use all the cables on the back of the procedures in this section, follow the Safety Instructions. To connect your monitor to Contents Page Setting Up the Monitor Dell™ SX2210 Flat Panel Monitor User's Guide Connecting the Monitor... Organizing Your Cables Attaching the Soundbar (Optional) Connecting Your Monitor CAUTION: Before you begin any of your computer and disconnect the power cable. 2.
User's Guide
Page 31
.... 4. Connecting the USB Cable After you have completed connecting the DVI/VGA/HDMI cable, follow the procedure below to connect the USB cable to your computer. 2. To attach the soundbar: 1. If your monitor setup: 1. Organizing Your Cables After attaching all cables as shown above. Plug the power cables...attach Soundbar by aligning the two slots with any device other than the Dell Soundbar. If it does not display an image, see Connecting Your Monitor) use with the two tabs along the bottom of the computer may vary. Connect USB peripherals to the upstream USB ports on the monitor...
.... 4. Connecting the USB Cable After you have completed connecting the DVI/VGA/HDMI cable, follow the procedure below to connect the USB cable to your computer. 2. To attach the soundbar: 1. If your monitor setup: 1. Organizing Your Cables After attaching all cables as shown above. Plug the power cables...attach Soundbar by aligning the two slots with any device other than the Dell Soundbar. If it does not display an image, see Connecting Your Monitor) use with the two tabs along the bottom of the computer may vary. Connect USB peripherals to the upstream USB ports on the monitor...

User's Guide
Page 32
Slide the Soundbar to Contents Page Insert the mini stereo plug from the Soundbar Power adapter. 4. 2. Connect the Soundbar with the DC power connector from the back of the Soundbar into place. 3. Back to the left until it snaps into the computer's audio output jack.
Slide the Soundbar to Contents Page Insert the mini stereo plug from the Soundbar Power adapter. 4. 2. Connect the Soundbar with the DC power connector from the back of the Soundbar into place. 3. Back to the left until it snaps into the computer's audio output jack.

User's Guide
Page 33
...your monitor, or with your monitor screen remains blank after you begin any of the computer or monitor. 3. Ensure that allows you to Contents Page Troubleshooting Dell™ SX2210 Flat Panel Monitor Self-Test Common Problems Product-Specific Problems Universal Serial Bus... Specific Problems Dell Soundbar Problems Camera Problems Facial Recognition (FastAccess) Problems CAUTION: Before you use the previous procedure, check your video controller and computer, because your monitor and reconnect the video cable; Turn...
...your monitor, or with your monitor screen remains blank after you begin any of the computer or monitor. 3. Ensure that allows you to Contents Page Troubleshooting Dell™ SX2210 Flat Panel Monitor Self-Test Common Problems Product-Specific Problems Universal Serial Bus... Specific Problems Dell Soundbar Problems Camera Problems Facial Recognition (FastAccess) Problems CAUTION: Before you use the previous procedure, check your video controller and computer, because your monitor and reconnect the video cable; Turn...

User's Guide
Page 34
... monitor to Factory Settings. l Perform Auto Adjust via OSD. l Reset the monitor to Factory Settings. l Check for abnormalities. 5. l Contact Dell immediately. Carefully inspect the screen for bent or broken pins in self-test mode. The color of smoke or sparks l Do not perform any ...controls via OSD. Safety Related Issues Visible signs of the screen changes to Factory Settings. l Perform monitor self-test feature check to the computer is connected properly and is functioning properly. l Check for bent or broken pins in diagnostic tool, the monitor is secure. 4. No...
... monitor to Factory Settings. l Perform Auto Adjust via OSD. l Reset the monitor to Factory Settings. l Check for abnormalities. 5. l Contact Dell immediately. Carefully inspect the screen for bent or broken pins in self-test mode. The color of smoke or sparks l Do not perform any ...controls via OSD. Safety Related Issues Visible signs of the screen changes to Factory Settings. l Perform monitor self-test feature check to the computer is connected properly and is functioning properly. l Check for bent or broken pins in diagnostic tool, the monitor is secure. 4. No...


