
UltraSharp Monitor Users Guide
Page 3
Contents About Your Monitor 5 Package Contents 5 Product Features 7 Identifying Parts and Controls 8 Monitor Specifications 12 Plug and Play Capability 21 Universal Serial Bus (USB) Interface 21 LCD Monitor Quality and Pixel Policy 22 Maintenance Guidelines 23 Setting Up the Monitor 24 Attaching the Stand 24 Connecting Your Monitor 27 Organizing Your Cables 29 Removing the Monitor Stand 30 Wall Mounting (Optional 30 Operating the Monitor 32 Power On the Monitor 32 Using the Front Panel Controls 32 Contents | 3
Contents About Your Monitor 5 Package Contents 5 Product Features 7 Identifying Parts and Controls 8 Monitor Specifications 12 Plug and Play Capability 21 Universal Serial Bus (USB) Interface 21 LCD Monitor Quality and Pixel Policy 22 Maintenance Guidelines 23 Setting Up the Monitor 24 Attaching the Stand 24 Connecting Your Monitor 27 Organizing Your Cables 29 Removing the Monitor Stand 30 Wall Mounting (Optional 30 Operating the Monitor 32 Power On the Monitor 32 Using the Front Panel Controls 32 Contents | 3

UltraSharp Monitor Users Guide
Page 4
Using the On-Screen Display (OSD) Menu 34 Setting the Maximum Resolution 45 Requirements to view or playback HDR content 47 Using the Tilt, Swivel, and Vertical Extension 48 Rotating the Monitor 49 Adjusting the Rotation Display Settings of Your System 50 Troubleshooting 51 Self-Test 51 Built-in Diagnostics 52 Common Problems 53 Product Specific Problems 55 Universal Serial Bus (USB) Specific Problems 56 Speakers Specific Problems 56 Appendix 57 FCC Notices (U.S. Only) and Other Regulatory Information 57 Contact Dell 57 4 | Contents
Using the On-Screen Display (OSD) Menu 34 Setting the Maximum Resolution 45 Requirements to view or playback HDR content 47 Using the Tilt, Swivel, and Vertical Extension 48 Rotating the Monitor 49 Adjusting the Rotation Display Settings of Your System 50 Troubleshooting 51 Self-Test 51 Built-in Diagnostics 52 Common Problems 53 Product Specific Problems 55 Universal Serial Bus (USB) Specific Problems 56 Speakers Specific Problems 56 Appendix 57 FCC Notices (U.S. Only) and Other Regulatory Information 57 Contact Dell 57 4 | Contents
UltraSharp Monitor Users Guide
Page 7
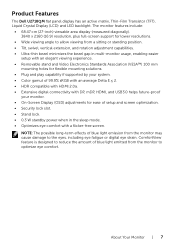
... lock slot. • Stand lock. • 0.3 W standby power when in the sleep mode. • Optimizes eye comfort with a flicker-free screen. Product Features The Dell U2718QM flat panel display has an active matrix, Thin-Film Transistor (TFT), Liquid Crystal Display (LCD) and LED backlight. ComfortView feature is designed to reduce the amount of blue light emitted from the monitor may cause damage to allow viewing from a sitting or standing position. • Tilt, swivel, vertical extension, and rotation adjustment capabilities...
... lock slot. • Stand lock. • 0.3 W standby power when in the sleep mode. • Optimizes eye comfort with a flicker-free screen. Product Features The Dell U2718QM flat panel display has an active matrix, Thin-Film Transistor (TFT), Liquid Crystal Display (LCD) and LED backlight. ComfortView feature is designed to reduce the amount of blue light emitted from the monitor may cause damage to allow viewing from a sitting or standing position. • Tilt, swivel, vertical extension, and rotation adjustment capabilities...
UltraSharp Monitor Users Guide
Page 12
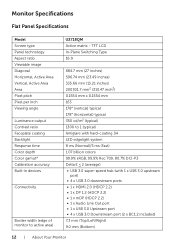
Monitor Specifications Flat Panel Specifications Model Screen type Panel technology Aspect ratio Viewable image Diagonal Horizontal, Active Area Vertical, Active Area Area Pixel pitch Pixel per inch Viewing angle Luminance output Contrast ratio Faceplate coating Backlight Response time Color depth Color gamut* Calibration accuracy Built-in devices Connectivity Border width (edge of monitor to 1 (typical) Antiglare with hard-coating 3H LED edgelight system 8 ms (Normal)/5 ms (Fast) 1.07 billion colors 99.9% sRGB, 99.9% Rec 709...
Monitor Specifications Flat Panel Specifications Model Screen type Panel technology Aspect ratio Viewable image Diagonal Horizontal, Active Area Vertical, Active Area Area Pixel pitch Pixel per inch Viewing angle Luminance output Contrast ratio Faceplate coating Backlight Response time Color depth Color gamut* Calibration accuracy Built-in devices Connectivity Border width (edge of monitor to 1 (typical) Antiglare with hard-coating 3H LED edgelight system 8 ms (Normal)/5 ms (Fast) 1.07 billion colors 99.9% sRGB, 99.9% Rec 709...
UltraSharp Monitor Users Guide
Page 13
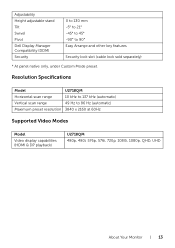
Resolution Specifications Model U2718QM Horizontal scan range 10 kHz to 137 kHz (automatic) Vertical scan range 49 Hz to 90° Easy Arrange and other key features Security lock slot (cable lock sold separately) * At panel native only, under Custom Mode preset. Adjustability Height adjustable stand Tilt Swivel Pivot Dell Display Manager Compatibility (DDM) Security 0 to 130 mm -5° to 21° -45° to 45° -90° to 86 Hz (automatic...
Resolution Specifications Model U2718QM Horizontal scan range 10 kHz to 137 kHz (automatic) Vertical scan range 49 Hz to 90° Easy Arrange and other key features Security lock slot (cable lock sold separately) * At panel native only, under Custom Mode preset. Adjustability Height adjustable stand Tilt Swivel Pivot Dell Display Manager Compatibility (DDM) Security 0 to 130 mm -5° to 21° -45° to 45° -90° to 86 Hz (automatic...
UltraSharp Monitor Users Guide
Page 14
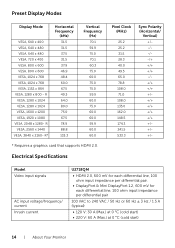
....0 60.0 60.0 59.9 60.0 60.0 * Requires a graphics card that supports HDMI 2.0. Electrical Specifications Pixel Clock (MHz) 25.2 25.2 31.5 28.3 40.0 49.5 65.0 78.8 108.0 71.0 108.0 135.0 162.0 148.5 174.3 241.5 533.3 Sync Polarity (Horizontal/ Vertical) Model Video input signals AC input voltage/frequency/ current Inrush current U2718QM • HDMI 2.0, 600 mV for each differential line, 100 ohm input impedance per differential pair. • DisplayPort & Mini...
....0 60.0 60.0 59.9 60.0 60.0 * Requires a graphics card that supports HDMI 2.0. Electrical Specifications Pixel Clock (MHz) 25.2 25.2 31.5 28.3 40.0 49.5 65.0 78.8 108.0 71.0 108.0 135.0 162.0 148.5 174.3 241.5 533.3 Sync Polarity (Horizontal/ Vertical) Model Video input signals AC input voltage/frequency/ current Inrush current U2718QM • HDMI 2.0, 600 mV for each differential line, 100 ohm input impedance per differential pair. • DisplayPort & Mini...

UltraSharp Monitor Users Guide
Page 16
....36 BTU/hour (typical) Power Management Modes If you have VESA's DPM™ compliance display card or software installed in your PC, the monitor can automatically reduce its power consumption when not in use. VESA Modes Horizontal Vertical Video Sync Sync Power Indicator Power Consumption Normal operation Active Active Active White 99 W (maximum)** 30 W (typical) Active-off - - - Off Less than 0.3 W Switch off mode Inactive Inactive Blanked White (blinking) Less than 0.3 W Power Consumption Pon Total Energy...
....36 BTU/hour (typical) Power Management Modes If you have VESA's DPM™ compliance display card or software installed in your PC, the monitor can automatically reduce its power consumption when not in use. VESA Modes Horizontal Vertical Video Sync Sync Power Indicator Power Consumption Normal operation Active Active Active White 99 W (maximum)** 30 W (typical) Active-off - - - Off Less than 0.3 W Switch off mode Inactive Inactive Blanked White (blinking) Less than 0.3 W Power Consumption Pon Total Energy...
UltraSharp Monitor Users Guide
Page 29
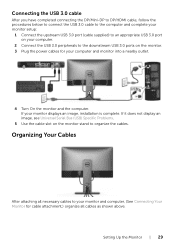
... complete your monitor setup: 1 Connect the upstream USB 3.0 port (cable supplied) to an appropriate USB 3.0 port on your computer. 2 Connect the USB 3.0 peripherals to the downstream USB 3.0 ports on the monitor stand to your monitor and computer, (See Connecting Your Monitor for your computer and monitor into a nearby outlet. 4 Turn On the monitor and the computer. If it does not display an image, see Universal Serial Bus (USB) Specific Problems. 5 Use the cable slot on the monitor. 3 Plug the power cables for cable attachment...
... complete your monitor setup: 1 Connect the upstream USB 3.0 port (cable supplied) to an appropriate USB 3.0 port on your computer. 2 Connect the USB 3.0 peripherals to the downstream USB 3.0 ports on the monitor stand to your monitor and computer, (See Connecting Your Monitor for your computer and monitor into a nearby outlet. 4 Turn On the monitor and the computer. If it does not display an image, see Universal Serial Bus (USB) Specific Problems. 5 Use the cable slot on the monitor. 3 Plug the power cables for cable attachment...
UltraSharp Monitor Users Guide
Page 33
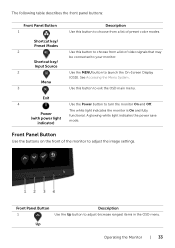
... describes the front panel buttons: Front Panel Button 1 Shortcut key/ Preset Modes 2 Shortcut key/ Input Source 2 Menu 3 Exit 4 Power (with power light indicator) Description Use this button to choose from a list of preset color modes. Use the MENU button to adjust the image settings. Front Panel Button Use the buttons on the front of the monitor to launch the On-Screen Display (OSD). See Accessing the Menu System. Up Operating the Monitor | 33 A glowing white light indicates the power save mode. Use this button to exit the OSD main menu.
... describes the front panel buttons: Front Panel Button 1 Shortcut key/ Preset Modes 2 Shortcut key/ Input Source 2 Menu 3 Exit 4 Power (with power light indicator) Description Use this button to choose from a list of preset color modes. Use the MENU button to adjust the image settings. Front Panel Button Use the buttons on the front of the monitor to launch the On-Screen Display (OSD). See Accessing the Menu System. Up Operating the Monitor | 33 A glowing white light indicates the power save mode. Use this button to exit the OSD main menu.

UltraSharp Monitor Users Guide
Page 36
Turning on the function allows you are using the DisplayPort (DP) connector. Reset your monitor. Input Source Use the Input Source menu to select between the different video signals that may be connected to your monitor input settings to the factory settings. DP mDP HDMI Auto Select Reset Input Source Color Select the DP input when you are using the Mini DisplayPort (mDP) connector. Select the HDMI input when you are using the HDMI connector. Select the mDP input when you to adjust the color setting mode. 36 | Operating...
Turning on the function allows you are using the DisplayPort (DP) connector. Reset your monitor. Input Source Use the Input Source menu to select between the different video signals that may be connected to your monitor input settings to the factory settings. DP mDP HDMI Auto Select Reset Input Source Color Select the DP input when you are using the Mini DisplayPort (mDP) connector. Select the HDMI input when you are using the HDMI connector. Select the mDP input when you to adjust the color setting mode. 36 | Operating...

UltraSharp Monitor Users Guide
Page 38
... preset mode. Input Color Format Allows you to set the video input mode to: RGB: Select this option if your DVD player supports only YPbPr output. Use or to adjust the hue from '0' to a computer (or DVD player) using an HDMI cable (or DisplayPort cable). Resets your monitor is used to increase the green shade of the video image. Use or to adjust the saturation from '0' to increase the purple shade of the video image. Use...
... preset mode. Input Color Format Allows you to set the video input mode to: RGB: Select this option if your DVD player supports only YPbPr output. Use or to adjust the hue from '0' to a computer (or DVD player) using an HDMI cable (or DisplayPort cable). Resets your monitor is used to increase the green shade of the video image. Use or to adjust the saturation from '0' to increase the purple shade of the video image. Use...
UltraSharp Monitor Users Guide
Page 39
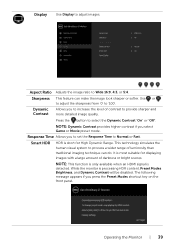
.... Aspect Ratio Adjusts the image ratio to adjust images. Dynamic Contrast Allows you select Game or Movie preset mode. NOTE: Dynamic Contrast provides higher contrast if you to increase the level of darkness or bright scenes. NOTE: This function is only available when an HDMI signal is processing HDR content, Preset Modes Brightness, and Dynamic Contrast will be disabled. While the monitor is detected. Display Use Display to Wide 16...
.... Aspect Ratio Adjusts the image ratio to adjust images. Dynamic Contrast Allows you select Game or Movie preset mode. NOTE: Dynamic Contrast provides higher contrast if you to increase the level of darkness or bright scenes. NOTE: This function is only available when an HDMI signal is processing HDR content, Preset Modes Brightness, and Dynamic Contrast will be disabled. While the monitor is detected. Display Use Display to Wide 16...

UltraSharp Monitor Users Guide
Page 46
If you have a Dell desktop or portable computer: • Go to http://www.dell.com/support, enter your service tag, and download the latest driver for your computer and download the latest graphic drivers. • Go to the support site for your graphics card website and download the latest graphic drivers. 46 | Operating the Monitor Depending on your computer, complete one of the following procedures: If you are using a non-Dell computer (portable or desktop): • Go to your graphics card.
If you have a Dell desktop or portable computer: • Go to http://www.dell.com/support, enter your service tag, and download the latest driver for your computer and download the latest graphic drivers. • Go to the support site for your graphics card website and download the latest graphic drivers. 46 | Operating the Monitor Depending on your computer, complete one of the following procedures: If you are using a non-Dell computer (portable or desktop): • Go to your graphics card.
UltraSharp Monitor Users Guide
Page 50
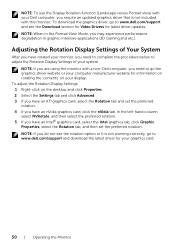
....dell.com/support and download the latest driver for latest driver updates. To adjust the Rotation Display Settings: 1 Right-click on the desktop and click Properties. 2 Select the Settings tab and click Advanced. 3 If you have an ATI graphics card, select the Rotation tab and set the preferred rotation. 4 If you do not see the Download section for Video Drivers for your system. NOTE: To use...
....dell.com/support and download the latest driver for latest driver updates. To adjust the Rotation Display Settings: 1 Right-click on the desktop and click Properties. 2 Select the Settings tab and click Advanced. 3 If you have an ATI graphics card, select the Rotation tab and set the preferred rotation. 4 If you do not see the Download section for Video Drivers for your system. NOTE: To use...
UltraSharp Monitor Users Guide
Page 51
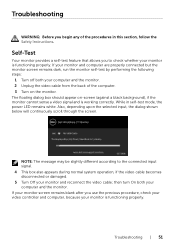
... use the previous procedure, check your video controller and computer, because your monitor is functioning properly. Also, depending upon the selected input, the dialog shown below will continuously scroll through the screen. Troubleshooting WARNING: Before you begin any of the computer. 3 Turn on -screen (against a black background), if the monitor cannot sense a video signal and is working correctly. While in this section, follow the Safety Instructions...
... use the previous procedure, check your video controller and computer, because your monitor is functioning properly. Also, depending upon the selected input, the dialog shown below will continuously scroll through the screen. Troubleshooting WARNING: Before you begin any of the computer. 3 Turn on -screen (against a black background), if the monitor cannot sense a video signal and is working correctly. While in this section, follow the Safety Instructions...

UltraSharp Monitor Users Guide
Page 52
... monitor is functioning properly. The color of the computer or monitor. The test is complete when the text screen appears. Check the video card and computer. 52 | Troubleshooting The monitor then goes into the self-test mode. 3 Press and hold Button 1 on the front panel for abnormalities. 5 Press Button 1 on the surface of the screen). 2 Unplug the video cable(s) from the back of the screen changes to red. 6 Inspect the display...
... monitor is functioning properly. The color of the computer or monitor. The test is complete when the text screen appears. Check the video card and computer. 52 | Troubleshooting The monitor then goes into the self-test mode. 3 Press and hold Button 1 on the front panel for abnormalities. 5 Press Button 1 on the surface of the screen). 2 Unplug the video cable(s) from the back of the screen changes to red. 6 Inspect the display...

UltraSharp Monitor Users Guide
Page 53
... power button is pressed fully. • Ensure that the correct input source is selected in the Input Source menu. • Increase brightness & contrast controls via OSD. • Perform monitor self-test feature check. • Check for bent or broken pins in the video cable connector. • Run the built-in diagnostics. • Ensure that the correct input source is selected in the Input Source menu. • Eliminate video extension cables. • Reset the monitor to factory settings. • Change...
... power button is pressed fully. • Ensure that the correct input source is selected in the Input Source menu. • Increase brightness & contrast controls via OSD. • Perform monitor self-test feature check. • Check for bent or broken pins in the video cable connector. • Run the built-in diagnostics. • Ensure that the correct input source is selected in the Input Source menu. • Eliminate video extension cables. • Reset the monitor to factory settings. • Change...

UltraSharp Monitor Users Guide
Page 54
... video cable connector. • Change the settings of the Preset Modes in the Color menu OSD depending on the application. • Adjust R/G/B value under Custom Color in Color menu OSD. • Change the Input Color Format to RGB or YPbPr in the Color menu OSD. • Run the built-in diagnostics. • Use the Power Management feature to turn off the monitor at all times when not in use (for more information, see Power Management Modes). • Alternatively, use...
... video cable connector. • Change the settings of the Preset Modes in the Color menu OSD depending on the application. • Adjust R/G/B value under Custom Color in Color menu OSD. • Change the Input Color Format to RGB or YPbPr in the Color menu OSD. • Run the built-in diagnostics. • Use the Power Management feature to turn off the monitor at all times when not in use (for more information, see Power Management Modes). • Alternatively, use...
UltraSharp Monitor Users Guide
Page 55
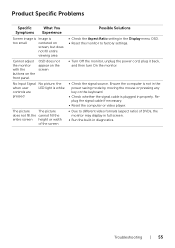
...; Reset the monitor to factory settings. • Turn Off the monitor, unplug the power cord, plug it back, and then turn On the monitor. • Check the signal source. Troubleshooting | 55 Product Specific Problems Specific Symptoms What You Experience Screen image is Image is too small centered on screen, but does not fill entire viewing area Cannot adjust the monitor with the buttons on the front panel OSD does not appear on the keyboard. • Check whether the signal cable is white controls...
...; Reset the monitor to factory settings. • Turn Off the monitor, unplug the power cord, plug it back, and then turn On the monitor. • Check the signal source. Troubleshooting | 55 Product Specific Problems Specific Symptoms What You Experience Screen image is Image is too small centered on screen, but does not fill entire viewing area Cannot adjust the monitor with the buttons on the front panel OSD does not appear on the keyboard. • Check whether the signal cable is white controls...
UltraSharp Monitor Users Guide
Page 56
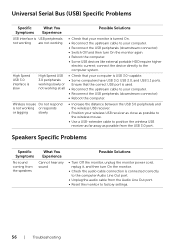
... You Experience Cannot hear any sound Possible Solutions • Turn Off the monitor, unplug the monitor power cord, replug it, and then turn On the monitor again. • Reboot the computer. • Some USB devices like external portable HDD require higher electric current; connect the device directly to factory settings. 56 | Troubleshooting Speakers Specific Problems Specific Symptoms No sound coming from the USB 3.0 port. Ensure that your computer. • Reconnect...
... You Experience Cannot hear any sound Possible Solutions • Turn Off the monitor, unplug the monitor power cord, replug it, and then turn On the monitor again. • Reboot the computer. • Some USB devices like external portable HDD require higher electric current; connect the device directly to factory settings. 56 | Troubleshooting Speakers Specific Problems Specific Symptoms No sound coming from the USB 3.0 port. Ensure that your computer. • Reconnect...


