
Users Guide
Page 3
Contents About Your Monitor 5 Package Contents 5 Product Features 7 Identifying Parts and Controls 8 Monitor Specifications 12 Plug and Play Capability 21 Universal Serial Bus (USB) Interface 21 LCD Monitor Quality and Pixel Policy 22 Maintenance Guidelines 23 Setting Up the Monitor 24 Attaching the Stand 24 Connecting Your Monitor 27 Organizing Your Cables 31 Removing the Monitor Stand 32 Wall Mounting (Optional 32 Operating the Monitor 34 Power On the Monitor 34 Using the Front Panel Controls 34 Contents | 3
Contents About Your Monitor 5 Package Contents 5 Product Features 7 Identifying Parts and Controls 8 Monitor Specifications 12 Plug and Play Capability 21 Universal Serial Bus (USB) Interface 21 LCD Monitor Quality and Pixel Policy 22 Maintenance Guidelines 23 Setting Up the Monitor 24 Attaching the Stand 24 Connecting Your Monitor 27 Organizing Your Cables 31 Removing the Monitor Stand 32 Wall Mounting (Optional 32 Operating the Monitor 34 Power On the Monitor 34 Using the Front Panel Controls 34 Contents | 3

Users Guide
Page 5
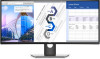
NOTE: Some items may be optional and may not be available in certain countries. NOTE: To set up with the components shown below. Some features or media may not ship with your monitor. About Your Monitor Package Contents Your monitor ships with any other stand, please refer to the respective stand setup guide for setup instructions. Monitor Stand Riser Stand Base About Your Monitor | 5 Ensure that you have received all the components and Contact Dell if something is missing.
NOTE: Some items may be optional and may not be available in certain countries. NOTE: To set up with the components shown below. Some features or media may not ship with your monitor. About Your Monitor Package Contents Your monitor ships with any other stand, please refer to the respective stand setup guide for setup instructions. Monitor Stand Riser Stand Base About Your Monitor | 5 Ensure that you have received all the components and Contact Dell if something is missing.

Users Guide
Page 6
Power Cable (Varies by Country) HDMI Cable DP Cable (Mini-DP to DP) USB 3.0 Upstream Cable (Enables the USB Ports on the Monitor) • Quick Setup Guide • Factory Calibration Report • Safety, Environmental, and Regulatory Information 6 | About Your Monitor
Power Cable (Varies by Country) HDMI Cable DP Cable (Mini-DP to DP) USB 3.0 Upstream Cable (Enables the USB Ports on the Monitor) • Quick Setup Guide • Factory Calibration Report • Safety, Environmental, and Regulatory Information 6 | About Your Monitor
Users Guide
Page 7
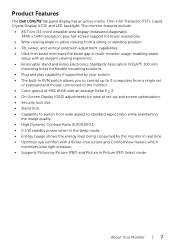
Product Features The Dell U3417W flat panel display has an active matrix, Thin-Film Transistor (TFT), Liquid Crystal Display (LCD) and LED backlight. About Your Monitor | 7 The monitor features include: • 86.7 cm (34-inch) viewable area display (measured diagonally). 3440 x 1440 resolution, ... position. • Tilt, swivel, and vertical extension adjustment capabilities. • Ultra-thin bezel minimizes the bezel gap in multi-monitor usage, enabling easier setup with an elegant viewing experience. • Removable stand and Video Electronics Standards Association (VESA™) 100 ...
Product Features The Dell U3417W flat panel display has an active matrix, Thin-Film Transistor (TFT), Liquid Crystal Display (LCD) and LED backlight. About Your Monitor | 7 The monitor features include: • 86.7 cm (34-inch) viewable area display (measured diagonally). 3440 x 1440 resolution, ... position. • Tilt, swivel, and vertical extension adjustment capabilities. • Ultra-thin bezel minimizes the bezel gap in multi-monitor usage, enabling easier setup with an elegant viewing experience. • Removable stand and Video Electronics Standards Association (VESA™) 100 ...

Users Guide
Page 8
Identifying Parts and Controls Front View Front panel controls Label Description 1 Function buttons (For more information, see Operating the Monitor) 2 Power On/Off button (with LED indicator) 8 | About Your Monitor
Identifying Parts and Controls Front View Front panel controls Label Description 1 Function buttons (For more information, see Operating the Monitor) 2 Power On/Off button (with LED indicator) 8 | About Your Monitor
Users Guide
Page 9
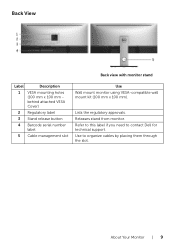
Lists the regulatory approvals. Use to contact Dell for technical support. Refer to this label if you need to organize cables by placing them through the slot. About Your Monitor | 9 Back View Back view with monitor stand Label Description 1 VESA mounting holes (100 mm x 100 mm behind attached VESA Cover) 2 Regulatory label 3 Stand release button 4 Barcode serial number label 5 Cable management slot Use Wall mount monitor using VESA-compatible wall mount kit (100 mm x 100 mm). Releases stand from monitor.
Lists the regulatory approvals. Use to contact Dell for technical support. Refer to this label if you need to organize cables by placing them through the slot. About Your Monitor | 9 Back View Back view with monitor stand Label Description 1 VESA mounting holes (100 mm x 100 mm behind attached VESA Cover) 2 Regulatory label 3 Stand release button 4 Barcode serial number label 5 Cable management slot Use Wall mount monitor using VESA-compatible wall mount kit (100 mm x 100 mm). Releases stand from monitor.

Users Guide
Page 10
Side View Label Description 1 USB downstream port 2 USB downstream port with Power Charging Use Connect your device. * To avoid signal interference, when a wireless USB device has been connected to a USB downstream port, it is NOT recommended to connect any other USB devices to charge your USB device. You can only use this connector after you have connected the USB cable to the computer and USB upstream connector on the monitor.* Connect to the adjacent port(s). 10 | About Your Monitor
Side View Label Description 1 USB downstream port 2 USB downstream port with Power Charging Use Connect your device. * To avoid signal interference, when a wireless USB device has been connected to a USB downstream port, it is NOT recommended to connect any other USB devices to charge your USB device. You can only use this connector after you have connected the USB cable to the computer and USB upstream connector on the monitor.* Connect to the adjacent port(s). 10 | About Your Monitor

Users Guide
Page 11
... is connected, you have connected the USB cable to DP cable. To enable MST, refer to the computer. Connect your monitor to instruction on the monitor. Connect your speakers.* Connect the USB cable that came with your computer with HDMI cable. Connect your USB device. Once... this connector after you can only be connected as the last monitor in connector 6 DisplayPort out (MST) connector 7 Audio-Line out 8 USB upstream port (1, 2) 9-1 USB downstream port Use Connect the power cable...
... is connected, you have connected the USB cable to DP cable. To enable MST, refer to the computer. Connect your monitor to instruction on the monitor. Connect your speakers.* Connect the USB cable that came with your computer with HDMI cable. Connect your USB device. Once... this connector after you can only be connected as the last monitor in connector 6 DisplayPort out (MST) connector 7 Audio-Line out 8 USB upstream port (1, 2) 9-1 USB downstream port Use Connect the power cable...
Users Guide
Page 12
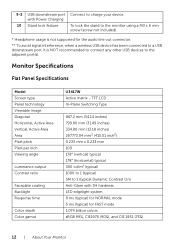
... 1.074 billion colors sRGB 99%, CIE1976 (90%), and CIE 1931 (75%) 12 | About Your Monitor 9-2 USB downstream port Connect to the adjacent port(s). TFT LCD In-Plane Switching Type 867.2 mm...) Anti-Glare with Power Charging 10 Stand lock feature To lock the stand to the monitor using a M3 x 6 mm screw (screw not included). * Headphone usage is NOT recommended to connect... any other USB devices to charge your device. Monitor Specifications Flat Panel Specifications Model Screen type Panel technology Viewable image Diagonal Horizontal, Active ...
... 1.074 billion colors sRGB 99%, CIE1976 (90%), and CIE 1931 (75%) 12 | About Your Monitor 9-2 USB downstream port Connect to the adjacent port(s). TFT LCD In-Plane Switching Type 867.2 mm...) Anti-Glare with Power Charging 10 Stand lock feature To lock the stand to the monitor using a M3 x 6 mm screw (screw not included). * Headphone usage is NOT recommended to connect... any other USB devices to charge your device. Monitor Specifications Flat Panel Specifications Model Screen type Panel technology Viewable image Diagonal Horizontal, Active ...

Users Guide
Page 13
Dell Display Manager Yes Compatibility Security • Security lock slot (cable lock sold separately) • Anti-theft stand lock slot (to panel) Resolution Specifications Model U3417W Horizontal scan range 30 kHz to 134 kHz (automatic) Vertical scan range 48 Hz to 30° Pivot N/A NOTE: Do not mount or use this monitor...resolution 3440 x 1440 at 60 Hz Supported Video Modes Model Video display capabilities (HDMI & DP playback) U3417W 480p, 480i, 576p, 720p, 1080p, 576i, 1080i About Your Monitor | 13 Upstream • 2 x USB 3.0 port - Side • 2 x USB 3.0 ...
Dell Display Manager Yes Compatibility Security • Security lock slot (cable lock sold separately) • Anti-theft stand lock slot (to panel) Resolution Specifications Model U3417W Horizontal scan range 30 kHz to 134 kHz (automatic) Vertical scan range 48 Hz to 30° Pivot N/A NOTE: Do not mount or use this monitor...resolution 3440 x 1440 at 60 Hz Supported Video Modes Model Video display capabilities (HDMI & DP playback) U3417W 480p, 480i, 576p, 720p, 1080p, 576i, 1080i About Your Monitor | 13 Upstream • 2 x USB 3.0 port - Side • 2 x USB 3.0 ...

Users Guide
Page 14
... x 480 VESA, 720 x 400 VESA, 800 x 600 VESA, 800 x 600 VESA, 1024 x 768 VESA, 1024 x 768 VESA, 1152 x 864 VESA, 1280 x 800 - See Connecting the monitor for DP Multi-Stream Transport (MST) function for Multi-Stream Transport mode is DP1.2. Multi-Stream Transport (MST) Modes MST Source... be supported 3440 x 1440 at 60Hz 1920 x 1080 at 60Hz 1 2 NOTE: The default for details. 14 | About Your Monitor R VESA, 1280 x 1024 VESA, 1280 x 1024 VESA, 1600 x 1200 VESA, 1920 x 1080 VESA, 2560 x 1440 VESA, 3440 x 1440* 31.47 31.47 37.50 31....
... x 480 VESA, 720 x 400 VESA, 800 x 600 VESA, 800 x 600 VESA, 1024 x 768 VESA, 1024 x 768 VESA, 1152 x 864 VESA, 1280 x 800 - See Connecting the monitor for DP Multi-Stream Transport (MST) function for Multi-Stream Transport mode is DP1.2. Multi-Stream Transport (MST) Modes MST Source... be supported 3440 x 1440 at 60Hz 1920 x 1080 at 60Hz 1 2 NOTE: The default for details. 14 | About Your Monitor R VESA, 1280 x 1024 VESA, 1280 x 1024 VESA, 1600 x 1200 VESA, 1920 x 1080 VESA, 2560 x 1440 VESA, 3440 x 1440* 31.47 31.47 37.50 31....
Users Guide
Page 15
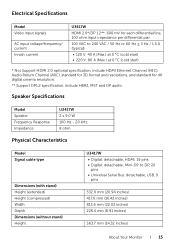
... 8 ohm Physical Characteristics Model Signal cable type Dimensions (with stand) Height (extended) Height (compressed) Width Depth Dimensions (without stand) Height U3417W • Digital: detachable, HDMI, 19 pins • Digital: detachable, Mini-DP to 240 VAC / 50 Hz or 60 Hz ...HBR2, MST and DP audio. Electrical Specifications Model Video input signals AC input voltage/frequency/ current Inrush current U3417W HDMI 2.0*/DP 1.2**, 600 mV for each differential line, 100 ohm input impedance per differential pair. 100 VAC....4 mm (8.91 inches) 363.7 mm (14.32 inches) About Your Monitor | 15
... 8 ohm Physical Characteristics Model Signal cable type Dimensions (with stand) Height (extended) Height (compressed) Width Depth Dimensions (without stand) Height U3417W • Digital: detachable, HDMI, 19 pins • Digital: detachable, Mini-DP to 240 VAC / 50 Hz or 60 Hz ...HBR2, MST and DP audio. Electrical Specifications Model Video input signals AC input voltage/frequency/ current Inrush current U3417W HDMI 2.0*/DP 1.2**, 600 mV for each differential line, 100 ohm input impedance per differential pair. 100 VAC....4 mm (8.91 inches) 363.7 mm (14.32 inches) About Your Monitor | 15

Users Guide
Page 16
...m (40,000 ft) (maximum) Thermal dissipation • 443.58 BTU/hour (maximum) • 170.61 BTU/hour (typical) 16 | About Your Monitor Width 813.6 mm (32.03 inches) Depth 58.4 mm (2.30 inches) Stand dimensions Height (extended) 419.1 mm (16.50 inches) Height (compressed)...VESA mount considerations no cables) Weight of stand assembly 2.3 kg (5.07 lb) Front frame gloss 37%-57% gloss unit Environmental Characteristics Model U3417W Compliant Standards • BFR/PVC-free (Halogen-free) excluding external cables. • Meets NFPA 99 leakage current requirements. • Arsenic...
...m (40,000 ft) (maximum) Thermal dissipation • 443.58 BTU/hour (maximum) • 170.61 BTU/hour (typical) 16 | About Your Monitor Width 813.6 mm (32.03 inches) Depth 58.4 mm (2.30 inches) Stand dimensions Height (extended) 419.1 mm (16.50 inches) Height (compressed)...VESA mount considerations no cables) Weight of stand assembly 2.3 kg (5.07 lb) Front frame gloss 37%-57% gloss unit Environmental Characteristics Model U3417W Compliant Standards • BFR/PVC-free (Halogen-free) excluding external cables. • Meets NFPA 99 leakage current requirements. • Arsenic...

Users Guide
Page 17
... resumes functioning. When any button is referred to as Power Save Mode*. If the computer detects input from the monitor. ** Maximum power consumption with max luminance, and USB active. Off Less than 0.5 W Switch off mode, one of the following table shows the... If you have VESA's DPM™ compliance display card or software installed in your PC, the monitor can only be displayed: HDMI 1/HDMI 2/Mini DisplayPort/DP input or or About Your Monitor | 17 VESA Modes Horizontal Vertical Video Sync Sync Power Indicator Power Consumption Normal operation Active Active Active...
... resumes functioning. When any button is referred to as Power Save Mode*. If the computer detects input from the monitor. ** Maximum power consumption with max luminance, and USB active. Off Less than 0.5 W Switch off mode, one of the following table shows the... If you have VESA's DPM™ compliance display card or software installed in your PC, the monitor can only be displayed: HDMI 1/HDMI 2/Mini DisplayPort/DP input or or About Your Monitor | 17 VESA Modes Horizontal Vertical Video Sync Sync Power Indicator Power Consumption Normal operation Active Active Active...

Users Guide
Page 18
or Activate the computer and the monitor to gain access to the OSD. Pin Assignments DisplayPort Connector Pin 20-pin Side of the Number Connected Signal Cable 1 ML0(p) 2 GND 3 ML0(n) 4 ML1(p) 5 GND 6 ML1(n) 7 ML2(p) 8 GND 9 ML2(n) 18 | About Your Monitor
or Activate the computer and the monitor to gain access to the OSD. Pin Assignments DisplayPort Connector Pin 20-pin Side of the Number Connected Signal Cable 1 ML0(p) 2 GND 3 ML0(n) 4 ML1(p) 5 GND 6 ML1(n) 7 ML2(p) 8 GND 9 ML2(n) 18 | About Your Monitor

Users Guide
Page 19
10 ML3(p) 11 GND 12 ML3(n) 13 GND 14 GND 15 AUX(p) 16 GND 17 AUX(n) 18 GND 19 Re-PWR 20 +3.3 V DP_PWR Mini DisplayPort Connector Pin 20-pin Side of the Number Connected Signal Cable 1 GND 2 Hot Plug Detect 3 ML3(n) 4 GND 5 ML3(n) 6 GND 7 GND 8 GND 9 ML2(n) 10 ML0(p) 11 ML2(p) 12 ML0(p) 13 GND 14 GND 15 ML1(n) About Your Monitor | 19
10 ML3(p) 11 GND 12 ML3(n) 13 GND 14 GND 15 AUX(p) 16 GND 17 AUX(n) 18 GND 19 Re-PWR 20 +3.3 V DP_PWR Mini DisplayPort Connector Pin 20-pin Side of the Number Connected Signal Cable 1 GND 2 Hot Plug Detect 3 ML3(n) 4 GND 5 ML3(n) 6 GND 7 GND 8 GND 9 ML2(n) 10 ML0(p) 11 ML2(p) 12 ML0(p) 13 GND 14 GND 15 ML1(n) About Your Monitor | 19

Users Guide
Page 20
16 AUX(p) 17 ML1(p) 18 AUX(n) 19 GND 20 +3.3 V DP_PWR HDMI Connector Pin 19-pin Side of the Number Connected Signal Cable 1 TMDS DATA 2+ 2 TMDS DATA 2 SHIELD 3 TMDS DATA 2- 4 TMDS DATA 1+ 5 TMDS DATA 1 SHIELD 6 TMDS DATA 1- 7 TMDS DATA 0+ 8 TMDS DATA 0 SHIELD 9 TMDS DATA 0- 10 TMDS CLOCK+ 11 TMDS CLOCK SHIELD 12 TMDS CLOCK- 13 CEC 14 Reserved (N.C. on device) 15 DDC CLOCK (SCL) 16 DDC DATA (SDA) 17 DDC/CEC Ground 18 +5V POWER 19 HOT PLUG DETECT 20 | About Your Monitor
16 AUX(p) 17 ML1(p) 18 AUX(n) 19 GND 20 +3.3 V DP_PWR HDMI Connector Pin 19-pin Side of the Number Connected Signal Cable 1 TMDS DATA 2+ 2 TMDS DATA 2 SHIELD 3 TMDS DATA 2- 4 TMDS DATA 1+ 5 TMDS DATA 1 SHIELD 6 TMDS DATA 1- 7 TMDS DATA 0+ 8 TMDS DATA 0 SHIELD 9 TMDS DATA 0- 10 TMDS CLOCK+ 11 TMDS CLOCK SHIELD 12 TMDS CLOCK- 13 CEC 14 Reserved (N.C. on device) 15 DDC CLOCK (SCL) 16 DDC DATA (SDA) 17 DDC/CEC Ground 18 +5V POWER 19 HOT PLUG DETECT 20 | About Your Monitor

Users Guide
Page 21
...the USB ports that are automatic; Universal Serial Bus (USB) Interface This section gives you can select different settings if desired. Most monitor installations are available on USB downstream port (port with BC1.2 USB Upstream Connector Pin Number 1 2 3 4 5 6 9-pin Side... port) 4.5 W (Max, each port) 4.5 W (Max, each port) * Up to 2A on the monitor. you information about changing the monitor settings, see Operating the Monitor. The monitor automatically provides the computer system with its Extended Display Identification Data (EDID) using Display Data Channel (DDC) protocols so...
...the USB ports that are automatic; Universal Serial Bus (USB) Interface This section gives you can select different settings if desired. Most monitor installations are available on USB downstream port (port with BC1.2 USB Upstream Connector Pin Number 1 2 3 4 5 6 9-pin Side... port) 4.5 W (Max, each port) 4.5 W (Max, each port) * Up to 2A on the monitor. you information about changing the monitor settings, see Operating the Monitor. The monitor automatically provides the computer system with its Extended Display Identification Data (EDID) using Display Data Channel (DDC) protocols so...

Users Guide
Page 22
... then turn it is not uncommon for one or more information on Dell Monitor Quality and Pixel 22 | About Your Monitor bottom • 2 x USB 3.0 downstream - LCD Monitor Quality and Pixel Policy During the LCD Monitor manufacturing process, it On, the attached peripherals may take a few seconds to see ...and do not affect the display quality or usability. NOTE: The monitor's USB interface works only when the monitor is BC1.2 compatible. For more pixels to become fixed in the power save mode. 7 GND 8 SSRX- 9 SSRX+ ...
... then turn it is not uncommon for one or more information on Dell Monitor Quality and Pixel 22 | About Your Monitor bottom • 2 x USB 3.0 downstream - LCD Monitor Quality and Pixel Policy During the LCD Monitor manufacturing process, it On, the attached peripherals may take a few seconds to see ...and do not affect the display quality or usability. NOTE: The monitor's USB interface works only when the monitor is BC1.2 compatible. For more pixels to become fixed in the power save mode. 7 GND 8 SSRX- 9 SSRX+ ...

Users Guide
Page 23
...http://www.dell.com/support/monitors. About Your Monitor | 23 Do not use . For best practices, follow the Safety Instructions before cleaning the monitor. Avoid using detergent of any kind as a darker-colored monitor may get scratched and show white scuff marks more than a lighter-colored monitor. &#... soft, clean cloth with care as some detergents leave a milky film on the monitor. • If you notice white powder when you unpack your monitor, wipe it off with a cloth. • Handle your monitor when not in use benzene, thinner, ammonia, abrasive cleaners, or compressed air. ...
...http://www.dell.com/support/monitors. About Your Monitor | 23 Do not use . For best practices, follow the Safety Instructions before cleaning the monitor. Avoid using detergent of any kind as a darker-colored monitor may get scratched and show white scuff marks more than a lighter-colored monitor. &#... soft, clean cloth with care as some detergents leave a milky film on the monitor. • If you notice white powder when you unpack your monitor, wipe it off with a cloth. • Handle your monitor when not in use benzene, thinner, ammonia, abrasive cleaners, or compressed air. ...


