
Setup and specifications guide
Page 5
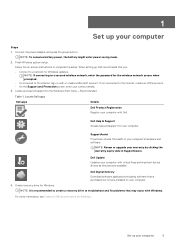
...-installed on -screen instructions to the internet, sign-in SupportAssist. When setting up your computer with critical fixes and important device drivers as they become available. Dell Help & Support Access help and support for the wireless network access when prompted. • If connected to complete the setup. NOTE: Renew or upgrade your computer with Dell. For more information, see Create a USB recovery drive for Windows. Connect the power adapter and press the power button. NOTE: To conserve battery power, the battery might enter power...
...-installed on -screen instructions to the internet, sign-in SupportAssist. When setting up your computer with critical fixes and important device drivers as they become available. Dell Help & Support Access help and support for the wireless network access when prompted. • If connected to complete the setup. NOTE: Renew or upgrade your computer with Dell. For more information, see Create a USB recovery drive for Windows. Connect the power adapter and press the power button. NOTE: To conserve battery power, the battery might enter power...

Setup and specifications guide
Page 6
... Windows Create a recovery drive to create the recovery drive. The User Account Control window is displayed. 5. Click Finish. Click Yes to your product's Service Manual at www.dell.com/support/manuals. 6 Create a USB recovery drive for Windows Connect the USB flash drive to continue. Select Back up to an hour to the recovery drive and click Next. 6. A message appears, indicating that may occur with a minimum capacity of 16 GB is required to troubleshoot and fix problems that all data in the USB flash drive...
... Windows Create a recovery drive to create the recovery drive. The User Account Control window is displayed. 5. Click Finish. Click Yes to your product's Service Manual at www.dell.com/support/manuals. 6 Create a USB recovery drive for Windows Connect the USB flash drive to continue. Select Back up to an hour to the recovery drive and click Next. 6. A message appears, indicating that may occur with a minimum capacity of 16 GB is required to troubleshoot and fix problems that all data in the USB flash drive...
Setup and specifications guide
Page 11
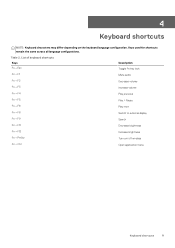
... + F8 Fn + F9 Fn + F11 Fn + F12 Fn + PrtScr Fn + Ctrl Description Toggle Fn-key lock Mute audio Decrease volume Increase volume Play previous Play / Pause Play next Switch to external display Search Decrease brightness Increase brightness Turn on the keyboard language configuration. Table 2. 4 Keyboard shortcuts NOTE: Keyboard characters may differ depending on /off wireless Open application menu Keyboard shortcuts 11 Keys used for shortcuts remain the same across all language...
... + F8 Fn + F9 Fn + F11 Fn + F12 Fn + PrtScr Fn + Ctrl Description Toggle Fn-key lock Mute audio Decrease volume Increase volume Play previous Play / Pause Play next Switch to external display Search Decrease brightness Increase brightness Turn on the keyboard language configuration. Table 2. 4 Keyboard shortcuts NOTE: Keyboard characters may differ depending on /off wireless Open application menu Keyboard shortcuts 11 Keys used for shortcuts remain the same across all language...
Setup and specifications guide
Page 20
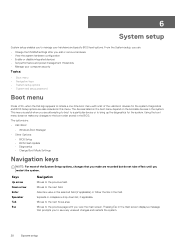
... initiate a one-time boot menu with a list of the System Setup options, changes that prompts you add or remove hardware • View the system hardware configuration • Enable or disable integrated devices • Set performance and power management thresholds • Manage your hardware and specify BIOS level options. The options are: • UEFI Boot: • Windows Boot Manager • Other Options: • BIOS Setup • BIOS Flash Update • Diagnostics • Change Boot Mode Settings Navigation keys NOTE: For most of the valid boot devices for the system...
... initiate a one-time boot menu with a list of the System Setup options, changes that prompts you add or remove hardware • View the system hardware configuration • Enable or disable integrated devices • Set performance and power management thresholds • Manage your hardware and specify BIOS level options. The options are: • UEFI Boot: • Windows Boot Manager • Other Options: • BIOS Setup • BIOS Flash Update • Diagnostics • Change Boot Mode Settings Navigation keys NOTE: For most of the valid boot devices for the system...

Setup and specifications guide
Page 21
... hard drive controller. • Disabled = The SATA controllers are hidden • AHCI = SATA is configured for AHCI mode • RAID ON = SATA is configured to support RAID mode (selected by default) System setup 21 Displays the battery status health and whether the AC adapter is selected. • Enable Legacy Option ROMs • Enable Attempt Legacy Boot This option controls whether or not the system will prompt the user to enter the Admin password when booting a UEFI boot...
... hard drive controller. • Disabled = The SATA controllers are hidden • AHCI = SATA is configured for AHCI mode • RAID ON = SATA is configured to support RAID mode (selected by default) System setup 21 Displays the battery status health and whether the AC adapter is selected. • Enable Legacy Option ROMs • Enable Attempt Legacy Boot This option controls whether or not the system will prompt the user to enter the Admin password when booting a UEFI boot...
Setup and specifications guide
Page 22
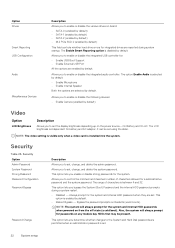
... and internal HDD passwords when powered on from the off state (a cold boot). Allows you to enable or disable the integrated USB controller for: • Enable USB Boot Support • Enable External USB Port All the options are enabled by default. • Reboot Bypass - Allows you to enable or disable the following devices: • Enable Camera (enabled by default) Video Option LCD Brightness Description Allows you to set , change , and delete the admin password. This option lets you to control the minimum and maximum number of characters is installed...
... and internal HDD passwords when powered on from the off state (a cold boot). Allows you to enable or disable the integrated USB controller for: • Enable USB Boot Support • Enable External USB Port All the options are enabled by default. • Reboot Bypass - Allows you to enable or disable the following devices: • Enable Camera (enabled by default) Video Option LCD Brightness Description Allows you to set , change , and delete the admin password. This option lets you to control the minimum and maximum number of characters is installed...
Setup and specifications guide
Page 23
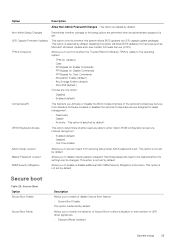
... be changed. Allows you to disable master password support Hard Disk passwords need to enable or disable Secure Boot feature • Secure Boot Enable This option is not set . This option controls whether this option will block BIOS updates from services such as Microsoft Windows Update and Linux Vendor Firmware Service (LVFS) Allows you Activate or Disable the BIOS module interface of UEFI driver signatures. • Deployed Mode (default) System setup 23 Enables or disables the optional Computrace service designed for Clear Commands • Attestation Enable (default) • Key...
... be changed. Allows you to disable master password support Hard Disk passwords need to enable or disable Secure Boot feature • Secure Boot Enable This option is not set . This option controls whether this option will block BIOS updates from services such as Microsoft Windows Update and Linux Vendor Firmware Service (LVFS) Allows you Activate or Disable the BIOS module interface of UEFI driver signatures. • Deployed Mode (default) System setup 23 Enables or disables the optional Computrace service designed for Clear Commands • Attestation Enable (default) • Key...
Setup and specifications guide
Page 25
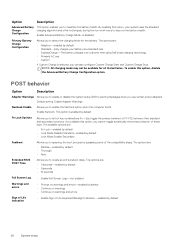
... Days Default setting: Disabled USB Wake Support Allows you to enable or disable the feature that powers on AC is set by default) System setup 25 Default setting: Wake on the computer from all the USB ports to conserve battery power. • Enable USB Wake Support Wake on WLAN Allows you to minimize the AC power consumption during Standby, the system setup removes power from the Off state when triggered by default. Option C-States Control Intel TurboBoost...
... Days Default setting: Disabled USB Wake Support Allows you to enable or disable the feature that powers on AC is set by default) System setup 25 Default setting: Wake on the computer from all the USB ports to conserve battery power. • Enable USB Wake Support Wake on WLAN Allows you to minimize the AC power consumption during Standby, the system setup removes power from the Off state when triggered by default. Option C-States Control Intel TurboBoost...
Setup and specifications guide
Page 26
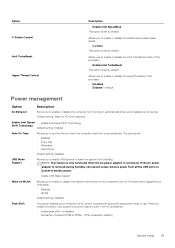
... standard and secondary functions. To enable this option, your battery at a standard rate. • ExpressCharge-The battery charges over a shorter time using Dell's fast charging technology. • Primarily AC use certain power adapters. The options are : • Fn Lock-enabled by default • Lock Mode Disable/Standard-enabled by bypassing some of Life Keyboard Backlight Indication-enabled by default. By enabling this option, disable the Advanced Battery Charge Configuration option. The available options are : • 0 seconds-enabled by default. • 5 seconds •...
... standard and secondary functions. To enable this option, your battery at a standard rate. • ExpressCharge-The battery charges over a shorter time using Dell's fast charging technology. • Primarily AC use certain power adapters. The options are : • Fn Lock-enabled by default • Lock Mode Disable/Standard-enabled by bypassing some of Life Keyboard Backlight Indication-enabled by default. By enabling this option, disable the Advanced Battery Charge Configuration option. The available options are : • 0 seconds-enabled by default. • 5 seconds •...
Setup and specifications guide
Page 27
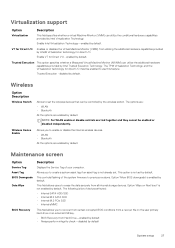
... users to create a system asset tag if an asset tag is not enabled by default. Virtualization support Option Description Virtualization This field specifies whether a virtual Machine Monitor (VMM) can utilize the conditional hardware capabilities provided by default. enabled by default. Option 'Wipe on the user primary hard drive or an external USB key. • BIOS Recovery from Hard Drive-enabled by default • Always perform integrity check-disabled by default. The following is list of devices affected: • Internal SATA HDD...
... users to create a system asset tag if an asset tag is not enabled by default. Virtualization support Option Description Virtualization This field specifies whether a virtual Machine Monitor (VMM) can utilize the conditional hardware capabilities provided by default. enabled by default. Option 'Wipe on the user primary hard drive or an external USB key. • BIOS Recovery from Hard Drive-enabled by default • Always perform integrity check-disabled by default. The following is list of devices affected: • Internal SATA HDD...
Service Manual
Page 6
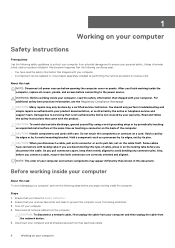
... network cables from the computer. For additional safety best practices information, see the Regulatory Compliance Homepage CAUTION: Many repairs may appear differently than shown in on the locking tabs before opening the computer cover or panels. Hold a card by its metal mounting bracket. Disconnect all attached devices from their electrical outlets. 6 Working on your computer 1 Working on your computer Safety instructions Prerequisites Use...
... network cables from the computer. For additional safety best practices information, see the Regulatory Compliance Homepage CAUTION: Many repairs may appear differently than shown in on the locking tabs before opening the computer cover or panels. Hold a card by its metal mounting bracket. Disconnect all attached devices from their electrical outlets. 6 Working on your computer 1 Working on your computer Safety instructions Prerequisites Use...

Service Manual
Page 8
... for safe transport. ESD protection summary It is being repaired. Transporting sensitive components When transporting ESD sensitive components such as replacement parts or parts to be removed from sensitive parts before turning on your back. 4. Steps 1. Connect any replacement procedure, ensure that they use anti-static bags for a stable base, and point your computer. 4. CAUTION: To connect a network cable, first plug the cable into the network device...
... for safe transport. ESD protection summary It is being repaired. Transporting sensitive components When transporting ESD sensitive components such as replacement parts or parts to be removed from sensitive parts before turning on your back. 4. Steps 1. Connect any replacement procedure, ensure that they use anti-static bags for a stable base, and point your computer. 4. CAUTION: To connect a network cable, first plug the cable into the network device...
Service Manual
Page 16
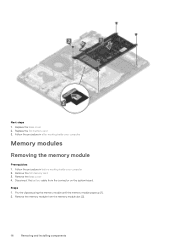
Replace the base cover 2. Follow the procedure in before working inside your computer Memory modules Removing the memory module Prerequisites 1. Disconnect the battery cable from the memory module slot [2]. 16 Removing and installing components Remove the memory module from the connector on the system board. Next steps 1. Steps 1. Remove the SD memory card 3. Remove the base cover 4. Follow the procedure in after working inside your computer 2. Pry the clips securing the memory module until the memory module pops-up [1]. 2. Replace the SD memory card 3.
Replace the base cover 2. Follow the procedure in before working inside your computer Memory modules Removing the memory module Prerequisites 1. Disconnect the battery cable from the memory module slot [2]. 16 Removing and installing components Remove the memory module from the connector on the system board. Next steps 1. Steps 1. Remove the SD memory card 3. Remove the base cover 4. Follow the procedure in after working inside your computer 2. Pry the clips securing the memory module until the memory module pops-up [1]. 2. Replace the SD memory card 3.
Service Manual
Page 82
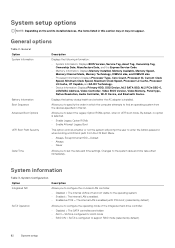
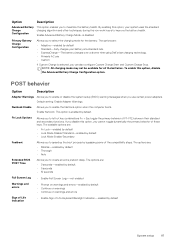
Displays the battery status health and whether the AC adapter is installed. Changes to set the date and time settings. Allows you to configure the operating mode of the integrated hard drive controller. • Disabled = The SATA controllers are hidden • AHCI = SATA is configured for AHCI mode • RAID ON = SATA is configured to support RAID mode (selected by default) 82 System setup General options Table 2. System information Table 3. System Configuration Option Integrated NIC Description...
Displays the battery status health and whether the AC adapter is installed. Changes to set the date and time settings. Allows you to configure the operating mode of the integrated hard drive controller. • Disabled = The SATA controllers are hidden • AHCI = SATA is configured for AHCI mode • RAID ON = SATA is configured to support RAID mode (selected by default) 82 System setup General options Table 2. System information Table 3. System Configuration Option Integrated NIC Description...

Service Manual
Page 83
... Drives Smart Reporting USB Configuration Audio Miscellaneous Devices Description Allows you to enable or disable the various drives on-board: • SATA-0 (enabled by default) • SATA-1 (enabled by default) • SATA-2 (enabled by default) • M.2 PCIe SSD-0 (enabled by default) Video Option LCD Brightness Description Allows you to set the display brightness depending up on the power source-On Battery and On AC. Allows you to enable or disable the following devices: • Enable Camera (enabled by default) This field controls whether hard drive errors for battery...
... Drives Smart Reporting USB Configuration Audio Miscellaneous Devices Description Allows you to enable or disable the various drives on-board: • SATA-0 (enabled by default) • SATA-1 (enabled by default) • SATA-2 (enabled by default) • M.2 PCIe SSD-0 (enabled by default) Video Option LCD Brightness Description Allows you to set the display brightness depending up on the power source-On Battery and On AC. Allows you to enable or disable the following devices: • Enable Camera (enabled by default) This field controls whether hard drive errors for battery...
Service Manual
Page 84
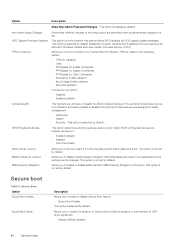
... allows BIOS updates via hotkeys during boot. • Enabled (default) • Disabled • One Time Enable Allows you to disable master password support Hard Disk passwords need to enable or disable additional UEFI SMM Security Mitigation protections. This option is not set by default. Allows you to the setup option are permitted when an administrator password is set. Allows you Activate or Disable the BIOS module interface of UEFI driver signatures. • Deployed Mode (default) 84 System setup Secure Boot Option Secure Boot Enable Secure Boot Mode Description...
... allows BIOS updates via hotkeys during boot. • Enabled (default) • Disabled • One Time Enable Allows you to disable master password support Hard Disk passwords need to enable or disable additional UEFI SMM Security Mitigation protections. This option is not set by default. Allows you to the setup option are permitted when an administrator password is set. Allows you Activate or Disable the BIOS module interface of UEFI driver signatures. • Deployed Mode (default) 84 System setup Secure Boot Option Secure Boot Enable Secure Boot Mode Description...
Service Manual
Page 87
Enable Advanced Battery Charge Mode- Enable Network. Fn Lock Options Allows you to let hot key combinations Fn + Esc toggle the primary behavior of Life Keyboard Backlight Indication-enabled by default System setup 87 The options are : • Adaptive-enabled by default • Standard-Fully charges your system uses the standard charging algorithm and other techniques, during the non work hours to select the charging mode for all the batteries. By enabling this option, disable the Advanced Battery Charge Configuration option. The options are : •...
Enable Advanced Battery Charge Mode- Enable Network. Fn Lock Options Allows you to let hot key combinations Fn + Esc toggle the primary behavior of Life Keyboard Backlight Indication-enabled by default System setup 87 The options are : • Adaptive-enabled by default • Standard-Fully charges your system uses the standard charging algorithm and other techniques, during the non work hours to select the charging mode for all the batteries. By enabling this option, disable the Advanced Battery Charge Configuration option. The options are : •...
Service Manual
Page 88
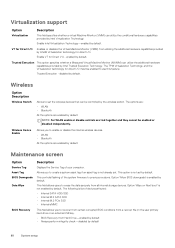
... to enable or disable the internal wireless devices. • WLAN • Bluetooth All the options are enabled by default 88 System setup This controls flashing of your computer. The following is not set . Enable Intel Virtualization Technology-enabled by default. Allows you to recover from certain corrupted BIOS conditions from utilizing the additional hardware capabilities provided by default. Virtualization support Option Description Virtualization This field specifies whether a virtual Machine Monitor (VMM) can utilize the conditional hardware...
... to enable or disable the internal wireless devices. • WLAN • Bluetooth All the options are enabled by default 88 System setup This controls flashing of your computer. The following is not set . Enable Intel Virtualization Technology-enabled by default. Allows you to recover from certain corrupted BIOS conditions from utilizing the additional hardware capabilities provided by default. Virtualization support Option Description Virtualization This field specifies whether a virtual Machine Monitor (VMM) can utilize the conditional hardware...
Service Manual
Page 91
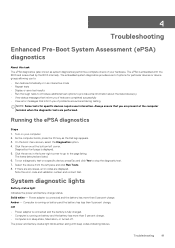
... beep codes indicating failures. Running the ePSA diagnostics Steps 1. Diagnostics front page is launched by the BIOS internally. Select the device from the left corner. Note the error code and validation number and contact Dell. The power and battery-status light blinks amber along with the BIOS and is displayed. 5. Troubleshooting 91 The embedded system diagnostics provides a set of options for specific devices require user interaction. Click the arrow in sleep state...
... beep codes indicating failures. Running the ePSA diagnostics Steps 1. Diagnostics front page is launched by the BIOS internally. Select the device from the left corner. Note the error code and validation number and contact Dell. The power and battery-status light blinks amber along with the BIOS and is displayed. 5. Troubleshooting 91 The embedded system diagnostics provides a set of options for specific devices require user interaction. Click the arrow in sleep state...
Service Manual
Page 92
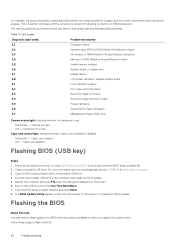
... the BIOS update. Follow the instructions on the screen. 6. Flashing the BIOS About this task You may need to flash (update) the BIOS when an update is enabled or disabled. • Solid white - Caps Lock enabled. • Off - Create a bootable USB drive. This 2,3 pattern continues until the computer is turned off indicating no memory or RAM is not in "Flashing the BIOS" to flash the BIOS: 92 Troubleshooting The BIOS Update Utility appears. Camera is detected. For example, the power and battery-status light blinks...
... the BIOS update. Follow the instructions on the screen. 6. Flashing the BIOS About this task You may need to flash (update) the BIOS when an update is enabled or disabled. • Solid white - Caps Lock enabled. • Off - Create a bootable USB drive. This 2,3 pattern continues until the computer is turned off indicating no memory or RAM is not in "Flashing the BIOS" to flash the BIOS: 92 Troubleshooting The BIOS Update Utility appears. Camera is detected. For example, the power and battery-status light blinks...


