
Service Manual
Page 8
Display assembly 11. Power-adapter port 14. These parts are available according to warranty coverages purchased by the customer. Solid-state drive shield 15. Touchpad 12. Heat sink NOTE: Dell provides a list of components and their part numbers for purchase options. 8 Major components of Vostro 5300 Solid-state drive 16. Speakers 13. Palm-rest and keyboard assembly 10. 9. Contact your Dell sales representative for the original system configuration purchased.
Display assembly 11. Power-adapter port 14. These parts are available according to warranty coverages purchased by the customer. Solid-state drive shield 15. Touchpad 12. Heat sink NOTE: Dell provides a list of components and their part numbers for purchase options. 8 Major components of Vostro 5300 Solid-state drive 16. Speakers 13. Palm-rest and keyboard assembly 10. 9. Contact your Dell sales representative for the original system configuration purchased.

Setup and Specifications
Page 3
... network for Windows updates. Locate and use Dell apps from your computer depending on -screen instructions to the internet, create an offline account. • On the Support and Protection screen, enter your contact details. 3. 1 Set up your Vostro 5300 NOTE: The images in color. NOTE: ...All pictures shown are for key Dell applications, help articles, and other important information about installing and configuring Ubuntu, see the knowledge base ...
... network for Windows updates. Locate and use Dell apps from your computer depending on -screen instructions to the internet, create an offline account. • On the Support and Protection screen, enter your contact details. 3. 1 Set up your Vostro 5300 NOTE: The images in color. NOTE: ...All pictures shown are for key Dell applications, help articles, and other important information about installing and configuring Ubuntu, see the knowledge base ...

Setup and Specifications
Page 4
..., see the knowledge base article 153764 at www.dell.com/support. For more information about using Dell Digital Delivery, see the knowledge base article SLN305843 at www.dell.com/ support. 4 Set up your computer with the operating system. Dell Update Updates your Vostro 5300 Dell Digital Delivery Download software applications, which are purchased but not pre-installed...
..., see the knowledge base article 153764 at www.dell.com/support. For more information about using Dell Digital Delivery, see the knowledge base article SLN305843 at www.dell.com/ support. 4 Set up your computer with the operating system. Dell Update Updates your Vostro 5300 Dell Digital Delivery Download software applications, which are purchased but not pre-installed...

Setup and Specifications
Page 5
.... NOTE: A USB Type-C to 5 Gbps. USB 3.2 Gen 1 port Connect peripherals such as external storage devices and printers. NOTE: The Dell Adapter USB-C to USB-A 3.0 is required to 5 Gbps. 4. Right 2 Views of Vostro 5300 5 Headset port Connect headphones or a headset (headphone and microphone combo). 3. Provides data transfer speeds up to connect a DisplayPort device. Supports...
.... NOTE: A USB Type-C to 5 Gbps. USB 3.2 Gen 1 port Connect peripherals such as external storage devices and printers. NOTE: The Dell Adapter USB-C to USB-A 3.0 is required to 5 Gbps. 4. Right 2 Views of Vostro 5300 5 Headset port Connect headphones or a headset (headphone and microphone combo). 3. Provides data transfer speeds up to connect a DisplayPort device. Supports...
Setup and Specifications
Page 6
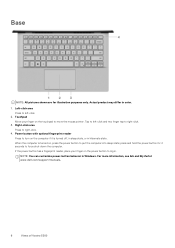
... may differ in Windows. press and hold the power button for illustration purposes only. For more information, see Me and My Dell at www.dell.com/support/manuals. 6 Views of Vostro 5300 Touchpad Move your finger on the touchpad to log in hibernate state. Right-click area Press to force shut-down the computer...
... may differ in Windows. press and hold the power button for illustration purposes only. For more information, see Me and My Dell at www.dell.com/support/manuals. 6 Views of Vostro 5300 Touchpad Move your finger on the touchpad to log in hibernate state. Right-click area Press to force shut-down the computer...

Setup and Specifications
Page 8
Fan vents Provides for entry of Vostro 5300 Speaker grills Provides audio output. 2. Service Tag label The Service Tag is a unique alphanumeric identifier that enables Dell service technicians to identify the hardware components in your computer and access warranty information. 8 Views of air intake. 3. Bottom 1.
Fan vents Provides for entry of Vostro 5300 Speaker grills Provides audio output. 2. Service Tag label The Service Tag is a unique alphanumeric identifier that enables Dell service technicians to identify the hardware components in your computer and access warranty information. 8 Views of air intake. 3. Bottom 1.
Setup and Specifications
Page 9
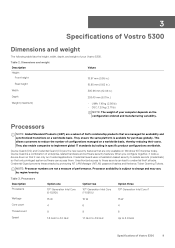
...product configurations worldwide. Credential Guard uses virtualization-based security to isolate secrets (credentials) so that are a subset of Dell's relationship products that only privileged system software can only run trusted applications. Processors NOTE: Global Standard Products (GSP) ...Enterprise today. Processor availability is a combination of enterprise-related hardware and software security features. Table 2. 3 Specifications of Vostro 5300 Dimensions and weight The following table lists the height, width, depth, and weight of your computer depends on a ...
...product configurations worldwide. Credential Guard uses virtualization-based security to isolate secrets (credentials) so that are a subset of Dell's relationship products that only privileged system software can only run trusted applications. Processors NOTE: Global Standard Products (GSP) ...Enterprise today. Processor availability is a combination of enterprise-related hardware and software security features. Table 2. 3 Specifications of Vostro 5300 Dimensions and weight The following table lists the height, width, depth, and weight of your computer depends on a ...

Setup and Specifications
Page 16
... capable. Display specifications Description Display type Values Full High Definition (FHD) 16 Specifications of your Vostro 5300. For more information on using the Dell Power Manger application. Enabling ExpressCharge requires that both the computer and the battery used be enabled.... Display The following table lists the display specifications of Vostro 5300 Description Storage Option one -40°C to 70°C...
... capable. Display specifications Description Display type Values Full High Definition (FHD) 16 Specifications of your Vostro 5300. For more information on using the Dell Power Manger application. Enabling ExpressCharge requires that both the computer and the battery used be enabled.... Display The following table lists the display specifications of Vostro 5300 Description Storage Option one -40°C to 70°C...

Setup and Specifications
Page 33
... the display adapter 1. Change the display settings as required. Click Device Manager. Table 44. Technology and components 33 Expand Display adapters. Press F2 when the Dell logo is displayed. 3. USB ports and their locations Ports One USB 3.2 Gen 1 (Type-A) port One USB 3.2 Gen 1 (Type-A) port One USB 3.2 Gen 1 ... Command Center. 2. Turn on the screen to enter the BIOS setup program. The Device Manager window is displayed on or restart your Vostro 5300. Click Display. 3. GPU-Integrated The following table shows the USB ports available in BIOS setup program 1.
... the display adapter 1. Change the display settings as required. Click Device Manager. Table 44. Technology and components 33 Expand Display adapters. Press F2 when the Dell logo is displayed. 3. USB ports and their locations Ports One USB 3.2 Gen 1 (Type-A) port One USB 3.2 Gen 1 (Type-A) port One USB 3.2 Gen 1 ... Command Center. 2. Turn on the screen to enter the BIOS setup program. The Device Manager window is displayed on or restart your Vostro 5300. Click Display. 3. GPU-Integrated The following table shows the USB ports available in BIOS setup program 1.
Setup and Specifications
Page 34
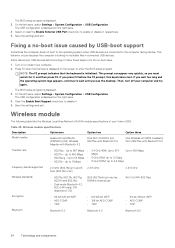
... F2 before booting or follow these steps to 433 Mbps • 802.11n - This behavior occurs because the computer is lost. Then, turn off your Vostro 5300. Table 45. Up to 867 Mbps • 2.4 GHz 40M: Up to 574 Up to fix the no -boot issue caused by USB-boot support... The BIOS setup program is displayed. 3. Save the settings and exit. On the left pane, select Settings > System Configuration > USB Configuration. Press F2 when the Dell logo is displayed on OS) IEEE 802.11a/b/g/n/ac/ax, 160MHz channel use Wi-Fi 5 (WiFi 802.11ac) Encryption • 64-bit/128-bit WEP...
... F2 before booting or follow these steps to 433 Mbps • 802.11n - This behavior occurs because the computer is lost. Then, turn off your Vostro 5300. Table 45. Up to 867 Mbps • 2.4 GHz 40M: Up to 574 Up to fix the no -boot issue caused by USB-boot support... The BIOS setup program is displayed. 3. Save the settings and exit. On the left pane, select Settings > System Configuration > USB Configuration. Press F2 when the Dell logo is displayed on OS) IEEE 802.11a/b/g/n/ac/ax, 160MHz channel use Wi-Fi 5 (WiFi 802.11ac) Encryption • 64-bit/128-bit WEP...

Setup and Specifications
Page 42
...; 8 GB, 1 x 8 GB, Single-Channel DDR4, 2666 MHz Checking the system memory in BIOS setup program 1. Press F2 when the Dell logo is displayed to highlight the Diagnostics menu option and press Enter. 4. The memory information is displayed on the right pane. Press F12 after ...see the desktop. Click Start . 2. Turn on the screen to access the boot menu. 3. Testing memory using ePSA diagnostics 1. Turn off your Vostro 5300. Turn on or restart your computer. 2. Checking the system memory in Windows 1. On the left pane, select Settings > General > System Information....
...; 8 GB, 1 x 8 GB, Single-Channel DDR4, 2666 MHz Checking the system memory in BIOS setup program 1. Press F2 when the Dell logo is displayed to highlight the Diagnostics menu option and press Enter. 4. The memory information is displayed on the right pane. Press F12 after ...see the desktop. Click Start . 2. Turn on the screen to access the boot menu. 3. Testing memory using ePSA diagnostics 1. Turn off your Vostro 5300. Turn on or restart your computer. 2. Checking the system memory in Windows 1. On the left pane, select Settings > General > System Information....

