Owner's Manual
Page 1
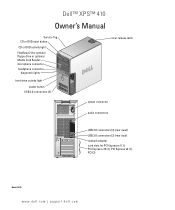
Dell™ XPS™ 410 Owner's Manual Service Tag CD or DVD eject button CD or DVD activity light FlexBays (2) for optional floppy drive or optional Media Card Reader microphone connector headphone connector diagnostic lights hard drive activity light power button USB 2.0 connectors (2) cover release latch power connector audio connectors USB 2.0 connectors (4) (rear quad) USB 2.0 connectors (2) (rear dual) network adapter card slots for PCI Express x1 (1), PCI Express x16 (1), PCI Express x4 (1), PCI (3) Model DCTA www.dell.com | support.dell.com
Dell™ XPS™ 410 Owner's Manual Service Tag CD or DVD eject button CD or DVD activity light FlexBays (2) for optional floppy drive or optional Media Card Reader microphone connector headphone connector diagnostic lights hard drive activity light power button USB 2.0 connectors (2) cover release latch power connector audio connectors USB 2.0 connectors (4) (rear quad) USB 2.0 connectors (2) (rear dual) network adapter card slots for PCI Express x1 (1), PCI Express x16 (1), PCI Express x4 (1), PCI (3) Model DCTA www.dell.com | support.dell.com

Owner's Manual
Page 11
... Are You Looking For? Troubleshooting hints and tips, articles from technicians, online courses, and frequently asked questions Dell Support Website - Certified drivers, patches, and software updates • Desktop System Software (DSS)- updates for your problem. 4 Follow the instructions on the screen. support.dell.com NOTE: Select your region or business segment to personalize my desktop Windows Help and Support Center 1 Click Start→ Help and Support. 2 Type a word or phrase that...
... Are You Looking For? Troubleshooting hints and tips, articles from technicians, online courses, and frequently asked questions Dell Support Website - Certified drivers, patches, and software updates • Desktop System Software (DSS)- updates for your problem. 4 Follow the instructions on the screen. support.dell.com NOTE: Select your region or business segment to personalize my desktop Windows Help and Support Center 1 Click Start→ Help and Support. 2 Type a word or phrase that...

Owner's Manual
Page 17
.... Setting Up and Using Your Computer 17 On computers with a sound card, use the connector on the card. 8 line-out/headphone connector Use the (green) line-out connector to attach headphones and most speakers with a sound card, use the optional DVI-to provide extremely low bass extension. Connecting Monitors CAUTION: Before you are connecting two flat-panel monitors, at least one DVI connector. 5 USB 2.0 connectors (4) Use the back, rear-quad USB connectors for devices that typically remain (rear quad) connected...
.... Setting Up and Using Your Computer 17 On computers with a sound card, use the connector on the card. 8 line-out/headphone connector Use the (green) line-out connector to attach headphones and most speakers with a sound card, use the optional DVI-to provide extremely low bass extension. Connecting Monitors CAUTION: Before you are connecting two flat-panel monitors, at least one DVI connector. 5 USB 2.0 connectors (4) Use the back, rear-quad USB connectors for devices that typically remain (rear quad) connected...
Owner's Manual
Page 19
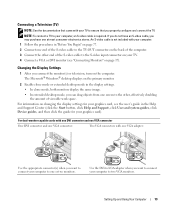
... and Support Center (click the Start button, click Help and Support, click User and system guides, click Device guides, and then click the guide for your computer, an S-video cable is not included with your TV to the other end of viewable work space. Setting Up and Using Your Computer 19 NOTE: To connect a TV to your graphics card). For dual-monitor capable cards with one DVI connector and one VGA connector One DVI connector...
... and Support Center (click the Start button, click Help and Support, click User and system guides, click Device guides, and then click the guide for your computer, an S-video cable is not included with your TV to the other end of viewable work space. Setting Up and Using Your Computer 19 NOTE: To connect a TV to your graphics card). For dual-monitor capable cards with one DVI connector and one VGA connector One DVI connector...

Owner's Manual
Page 20
... computer box. Setting Up a Printer NOTICE: Complete the operating system setup before you purchase a cable separately, ensure that came with your printer). 3 Attach the USB printer cable to the appropriate USB connector on your computer. Connecting a USB Printer NOTE: You can connect USB devices while the computer is compatible with your printer. The connectors fit only one of the connect two VGA monitors to the monitors. If you...
... computer box. Setting Up a Printer NOTICE: Complete the operating system setup before you purchase a cable separately, ensure that came with your printer). 3 Attach the USB printer cable to the appropriate USB connector on your computer. Connecting a USB Printer NOTE: You can connect USB devices while the computer is compatible with your printer. The connectors fit only one of the connect two VGA monitors to the monitors. If you...

Owner's Manual
Page 29
..., you experience recording problems, check for more information). The DVD-writable drives installed in the upper-right corner of the window. Use blank CD-RWs if you have two CD/DVD drives, select the drive into which you plan to erase, rewrite, or update information on the disc later. Blank DVD+/-Rs can write to and read DVD-RAM or DVD-R DL media. When prompted, insert...
..., you experience recording problems, check for more information). The DVD-writable drives installed in the upper-right corner of the window. Use blank CD-RWs if you have two CD/DVD drives, select the drive into which you plan to erase, rewrite, or update information on the disc later. Blank DVD+/-Rs can write to and read DVD-RAM or DVD-R DL media. When prompted, insert...

Owner's Manual
Page 55
... problem, use Windows XP Device Driver Rollback to replace the driver with the previously installed version. 1 Click Start, then click Control Panel. 2 Click System. 3 In the System Properties window, click the Hardware tab. 4 Click Device Manager. 5 Right-click the device for which you are installing the driver. 6 Click the Driver tab, then click Update Driver. 7 Click Install from other sources, your computer might not work correctly. Manually Reinstalling Drivers 1 After copying the required driver files to your hard drive...
... problem, use Windows XP Device Driver Rollback to replace the driver with the previously installed version. 1 Click Start, then click Control Panel. 2 Click System. 3 In the System Properties window, click the Hardware tab. 4 Click Device Manager. 5 Right-click the device for which you are installing the driver. 6 Click the Driver tab, then click Update Driver. 7 Click Install from other sources, your computer might not work correctly. Manually Reinstalling Drivers 1 After copying the required driver files to your hard drive...

Owner's Manual
Page 57
... enabled: 1 Click Start, then click Control Panel. 2 Click Performance and Maintenance.Click System. The Restoration Complete screen appears after you to resolve the problem. If two or more restore points are available, click the restore point that allows you install a device driver, use System Restore. Enabling System Restore If you can either repeat the steps using a different restore point, or you reinstall Windows XP with available restore points appear in boldface type. 4 Select a restore...
... enabled: 1 Click Start, then click Control Panel. 2 Click Performance and Maintenance.Click System. The Restoration Complete screen appears after you to resolve the problem. If two or more restore points are available, click the restore point that allows you install a device driver, use System Restore. Enabling System Restore If you can either repeat the steps using a different restore point, or you reinstall Windows XP with available restore points appear in boldface type. 4 Select a restore...

Owner's Manual
Page 99
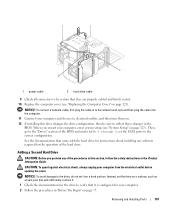
... are removing the card permanently, install a filler bracket in the card documentation. b Connect the network cable to the integrated connector on . 11 Remove the card driver from the operating system. 12 If you release the securing tab to unseat the card. NOTICE: Ensure that you removed a sound card: a Enter system setup, select Integrated Audio Controller, and then change the setting to On. NOTICE: To connect a network cable, first plug the cable into the network device and then plug the cable into...
... are removing the card permanently, install a filler bracket in the card documentation. b Connect the network cable to the integrated connector on . 11 Remove the card driver from the operating system. 12 If you release the securing tab to unseat the card. NOTICE: Ensure that you removed a sound card: a Enter system setup, select Integrated Audio Controller, and then change the setting to On. NOTICE: To connect a network cable, first plug the cable into the network device and then plug the cable into...
Owner's Manual
Page 107
... connect a network cable, first plug the cable in to the network wall jack and then plug the cable into the computer. 11 Connect your computer. 2 Follow the procedures in the BIOS. Then, go to the "Drives" section of the BIOS and under SATA 0 through 5, set it is configured for the operation of the procedures in this drive changes the drive configuration, then be certain that came with the hard drive for instructions about installing...
... connect a network cable, first plug the cable in to the network wall jack and then plug the cable into the computer. 11 Connect your computer. 2 Follow the procedures in the BIOS. Then, go to the "Drives" section of the BIOS and under SATA 0 through 5, set it is configured for the operation of the procedures in this drive changes the drive configuration, then be certain that came with the hard drive for instructions about installing...

Owner's Manual
Page 109
... SATA port to "ON" for drive operation. Floppy Drive CAUTION: Before you restart your computer, enter system setup (see "System Setup" on page 111. Remove the floppy drive cable from the clips on page 121). This enables the drive. NOTICE: To connect a network cable, first plug the cable into the network wall jack and then plug it into the computer. 10 Connect your computer from the electrical outlet before opening the cover. Removing a Floppy Drive...
... SATA port to "ON" for drive operation. Floppy Drive CAUTION: Before you restart your computer, enter system setup (see "System Setup" on page 111. Remove the floppy drive cable from the clips on page 121). This enables the drive. NOTICE: To connect a network cable, first plug the cable into the network wall jack and then plug it into the computer. 10 Connect your computer from the electrical outlet before opening the cover. Removing a Floppy Drive...
Owner's Manual
Page 111
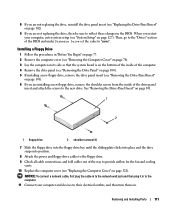
... these changes in the BIOS. When you restart your computer and devices to their electrical outlets, and then turn them on page 121). Removing and Installing Parts 111 8 If you are installing a new floppy drive, remove the shoulder screws from the inside of the computer. 4 Remove the drive panel (see "Removing the Drive Panel" on page 100). 5 If installing a new floppy drive, remove the drive panel insert (see "Replacing the Computer Cover" on . See "Removing the Drive-Panel Insert...
... these changes in the BIOS. When you restart your computer and devices to their electrical outlets, and then turn them on page 121). Removing and Installing Parts 111 8 If you are installing a new floppy drive, remove the shoulder screws from the inside of the computer. 4 Remove the drive panel (see "Removing the Drive Panel" on page 100). 5 If installing a new floppy drive, remove the drive panel insert (see "Replacing the Computer Cover" on . See "Removing the Drive-Panel Insert...

Owner's Manual
Page 120
... 77. 3 Remove the computer cover (see "Removing the Computer Cover" on page 78). 4 Locate the battery socket (see "System Setup" on page 81). 120 Removing and Installing Parts Battery Replacing the Battery CAUTION: Before you touch any of your computer, enter system setup (see "System Board Components" on page 127). You can restore the correct settings after turning on the computer. NOTICE: To connect a network cable, first plug the cable in this drive. CAUTION: A new battery can...
... 77. 3 Remove the computer cover (see "Removing the Computer Cover" on page 78). 4 Locate the battery socket (see "System Setup" on page 81). 120 Removing and Installing Parts Battery Replacing the Battery CAUTION: Before you touch any of your computer, enter system setup (see "System Board Components" on page 127). You can restore the correct settings after turning on the computer. NOTICE: To connect a network cable, first plug the cable in this drive. CAUTION: A new battery can...

Owner's Manual
Page 121
.... 6 Insert the new battery into the socket with the object. Replacing the Computer Cover CAUTION: Before you perform any of the procedures in this section, follow the safety instructions in step 1 (see "Entering System Setup" on . 9 Enter system setup and restore the settings you recorded in the Product Information Guide. 1 Ensure that all cables are left inside the computer. Gently pull the power cables toward you...
.... 6 Insert the new battery into the socket with the object. Replacing the Computer Cover CAUTION: Before you perform any of the procedures in this section, follow the safety instructions in step 1 (see "Entering System Setup" on . 9 Enter system setup and restore the settings you recorded in the Product Information Guide. 1 Ensure that all cables are left inside the computer. Gently pull the power cables toward you...
Owner's Manual
Page 135
NOTICE: To connect a network cable, first plug the cable into the computer. 4 Connect your computer. Dell provides limited technical support for the computer and any of the customer in "Before You Begin" on page 77. 2 Reset the current CMOS settings: a Locate the 2-pin CMOS jumper (CLRCMOS) on the system board (see "Replacing the Computer Cover" on page 121). b Remove the jumper plug from Dell, as well as the verification of appropriate functionality of the...
NOTICE: To connect a network cable, first plug the cable into the computer. 4 Connect your computer. Dell provides limited technical support for the computer and any of the customer in "Before You Begin" on page 77. 2 Reset the current CMOS settings: a Locate the 2-pin CMOS jumper (CLRCMOS) on the system board (see "Replacing the Computer Cover" on page 121). b Remove the jumper plug from Dell, as well as the verification of appropriate functionality of the...
Owner's Manual
Page 161
... line. electromagnetic interference - A display setting that includes special circuitry for distributed desktop, network, enterprise, and Internet environments. digital video interface - A type of your Dell™ computer. enhanced parallel port - expansion card - DVD rewritable - Many devices do not work properly if the correct driver is different from DVD-RW technology.) DVD+RW drive - DVD+RW - docking device - domain - Electrical interference caused by a specific group of users. ExpressCards support both the PCI Express and USB 2.0 standard.
... line. electromagnetic interference - A display setting that includes special circuitry for distributed desktop, network, enterprise, and Internet environments. digital video interface - A type of your Dell™ computer. enhanced parallel port - expansion card - DVD rewritable - Many devices do not work properly if the correct driver is different from DVD-RW technology.) DVD+RW drive - DVD+RW - docking device - domain - Electrical interference caused by a specific group of users. ExpressCards support both the PCI Express and USB 2.0 standard.
Owner's Manual
Page 166
... used for video cards and controllers. super-video graphics array - real-time clock reset - A jumper on your computer when you access Dell Support at support.dell.com or when you place a shortcut on the system board of video memory installed in rpm. SATA - small computer system interface - Each device is embedded with most Windows software packages. synchronous dynamic random-access memory - A bar code label on the SCSI controller bus. setup program - An icon that can open its drivers...
... used for video cards and controllers. super-video graphics array - real-time clock reset - A jumper on your computer when you access Dell Support at support.dell.com or when you place a shortcut on the system board of video memory installed in rpm. SATA - small computer system interface - Each device is embedded with most Windows software packages. synchronous dynamic random-access memory - A bar code label on the SCSI controller bus. setup program - An icon that can open its drivers...
Owner's Manual
Page 167
... running for video cards and controllers that supports resolutions up to your computer. USB - video memory - Devices are twisted to create and edit files that serves as a USB-compatible keyboard, mouse, joystick, scanner, set of wires to shut down your computer. A video standard for a limited amount of a portable computer to configure userselectable options in your computer. Also known as file and e-mail protection. UTP - A connector used when the electrical power...
... running for video cards and controllers that supports resolutions up to your computer. USB - video memory - Devices are twisted to create and edit files that serves as a USB-compatible keyboard, mouse, joystick, scanner, set of wires to shut down your computer. A video standard for a limited amount of a portable computer to configure userselectable options in your computer. Also known as file and e-mail protection. UTP - A connector used when the electrical power...
Owner's Manual
Page 170
...Internet connection, about, 21 connection, options, 21 connection, setting up , 22 Network Setup Wizard, 23 O operating system reinstalling, 12 reinstalling Windows XP, 56 Operating System CD, 12 P password clearing, 134 jumper, 134 PC Restore, 58 170 Index See system board mouse problems, 69 N network Network Setup Wizard, 23 problems, 70 setting up , 21 problems, 63 K keyboard problems, 66 L labels Microsoft Windows, 10 Service Tag, 10 lights diagnostic, 49 front of computer, 49 M Media Card Reader installing, 112, 115 problems, 66 removing, 112 using, 31 memory problems, 69 messages error...
...Internet connection, about, 21 connection, options, 21 connection, setting up , 22 Network Setup Wizard, 23 O operating system reinstalling, 12 reinstalling Windows XP, 56 Operating System CD, 12 P password clearing, 134 jumper, 134 PC Restore, 58 170 Index See system board mouse problems, 69 N network Network Setup Wizard, 23 problems, 70 setting up , 21 problems, 63 K keyboard problems, 66 L labels Microsoft Windows, 10 Service Tag, 10 lights diagnostic, 49 front of computer, 49 M Media Card Reader installing, 112, 115 problems, 66 removing, 112 using, 31 memory problems, 69 messages error...

Owner's Manual
Page 171
... cable, 20 connecting, 20 problems, 72 setting up, 20 USB, 20 problems battery, 61 blue screen, 68 CD drive, 62 CD-RW drive, 63 computer crashes, 67-68 computer stops responding, 67 Dell Diagnostics, 52 diagnostic lights, 49 drives, 62 DVD drive, 62 problems (continued) e-mail, 63 error messages, 65 general, 67 hard drive, 63 Internet, 63 keyboard, 66 Media Card Reader, 66 memory, 69 modem, 63 monitor is blank, 74 monitor is hard to read, 75 mouse, 69 network, 70 power, 71 power light...
... cable, 20 connecting, 20 problems, 72 setting up, 20 USB, 20 problems battery, 61 blue screen, 68 CD drive, 62 CD-RW drive, 63 computer crashes, 67-68 computer stops responding, 67 Dell Diagnostics, 52 diagnostic lights, 49 drives, 62 DVD drive, 62 problems (continued) e-mail, 63 error messages, 65 general, 67 hard drive, 63 Internet, 63 keyboard, 66 Media Card Reader, 66 memory, 69 modem, 63 monitor is blank, 74 monitor is hard to read, 75 mouse, 69 network, 70 power, 71 power light...


