Owner's Manual
Page 1
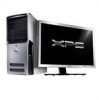
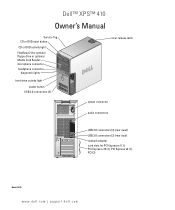
Dell™ XPS™ 410 Owner's Manual Service Tag CD or DVD eject button CD or DVD activity light FlexBays (2) for optional floppy drive or optional Media Card Reader microphone connector headphone connector diagnostic lights hard drive activity light power button USB 2.0 connectors (2) cover release latch power connector audio connectors USB 2.0 connectors (4) (rear quad) USB 2.0 connectors (2) (rear dual) network adapter card slots for PCI Express x1 (1), PCI Express x16 (1), PCI Express x4 (1), PCI (3) Model DCTA www.dell.com | support.dell.com
Dell™ XPS™ 410 Owner's Manual Service Tag CD or DVD eject button CD or DVD activity light FlexBays (2) for optional floppy drive or optional Media Card Reader microphone connector headphone connector diagnostic lights hard drive activity light power button USB 2.0 connectors (2) cover release latch power connector audio connectors USB 2.0 connectors (4) (rear quad) USB 2.0 connectors (2) (rear dual) network adapter card slots for PCI Express x1 (1), PCI Express x16 (1), PCI Express x4 (1), PCI (3) Model DCTA www.dell.com | support.dell.com
Owner's Manual
Page 2
Trademarks used in this text: Dell, the DELL logo, Inspiron, Dell Precision, Dimension, OptiPlex, Latitude, PowerEdge, PowerVault, PowerApp, PowerConnect, XPS, DellNet, Dell TravelLite, Dell OpenManage, and StrikeZone are either trademarks or registered trademarks of Dell Inc.; Microsoft, Windows, and Outlook are trademarks...a registered trademark of your computer. the Bluetooth word mark is trademark of such marks by Bluetooth SIG, Inc. Dell Inc. Reproduction in trademarks and trade names other countries; Intel, Pentium, Intel SpeedStep, Celeron, and Viiv are ...
Trademarks used in this text: Dell, the DELL logo, Inspiron, Dell Precision, Dimension, OptiPlex, Latitude, PowerEdge, PowerVault, PowerApp, PowerConnect, XPS, DellNet, Dell TravelLite, Dell OpenManage, and StrikeZone are either trademarks or registered trademarks of Dell Inc.; Microsoft, Windows, and Outlook are trademarks...a registered trademark of your computer. the Bluetooth word mark is trademark of such marks by Bluetooth SIG, Inc. Dell Inc. Reproduction in trademarks and trade names other countries; Intel, Pentium, Intel SpeedStep, Celeron, and Viiv are ...
Owner's Manual
Page 3
Contents Finding Information 9 1 Setting Up and Using Your Computer 13 Front View of the Computer 13 Back View of the Computer 15 Back Panel Connectors 16 Connecting Monitors 17 Connecting Two Monitors With VGA Connectors 18 Connecting One Monitor With a VGA connector and One Monitor With a DVI Connector 18 Connecting a Television (TV 19 Changing the Display Settings 19 Setting Up a Printer 20 Printer Cable 20 Connecting a USB Printer 20 Connecting to the Internet 21 Setting Up Your Internet Connection 21 Setting Up a Home and Office Network 22 Connecting to a Network Adapter ...
Contents Finding Information 9 1 Setting Up and Using Your Computer 13 Front View of the Computer 13 Back View of the Computer 15 Back Panel Connectors 16 Connecting Monitors 17 Connecting Two Monitors With VGA Connectors 18 Connecting One Monitor With a VGA connector and One Monitor With a DVI Connector 18 Connecting a Television (TV 19 Changing the Display Settings 19 Setting Up a Printer 20 Printer Cable 20 Connecting a USB Printer 20 Connecting to the Internet 21 Setting Up Your Internet Connection 21 Setting Up a Home and Office Network 22 Connecting to a Network Adapter ...

Owner's Manual
Page 4
... Level 1 Configuration 38 Configuring Your Computer for RAID 39 Using the Intel® RAID Option ROM Utility 40 Using the Intel® Application Accelerator 42 Dell DataSafe (Optional 46 Intel® Viiv™ Technology (Optional 46 Using Intel® Viiv™ Quick Resume Technology (QRT 46 Enabling the QRT Feature in...
... Level 1 Configuration 38 Configuring Your Computer for RAID 39 Using the Intel® RAID Option ROM Utility 40 Using the Intel® Application Accelerator 42 Dell DataSafe (Optional 46 Intel® Viiv™ Technology (Optional 46 Using Intel® Viiv™ Quick Resume Technology (QRT 46 Enabling the QRT Feature in...

Owner's Manual
Page 5
... Is a Driver 54 Identifying Drivers 54 Reinstalling Drivers 55 Resolving Software and Hardware Incompatibilities 56 Restoring Your Operating System 56 Using Microsoft Windows XP System Restore 56 Using Dell PC Restore by Symantec 58 4 Solving Problems 61 Troubleshooting Tips 61 Battery Problems 61 Drive Problems 62 CD and DVD drive problems 62...
... Is a Driver 54 Identifying Drivers 54 Reinstalling Drivers 55 Resolving Software and Hardware Incompatibilities 56 Restoring Your Operating System 56 Using Microsoft Windows XP System Restore 56 Using Dell PC Restore by Symantec 58 4 Solving Problems 61 Troubleshooting Tips 61 Battery Problems 61 Drive Problems 62 CD and DVD drive problems 62...

Owner's Manual
Page 6
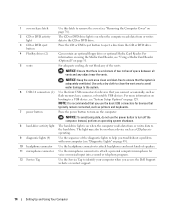
Mouse Problems 69 Network Problems 70 Power Problems 71 Printer Problems 72 Scanner Problems 72 Sound and Speaker Problems 73 No sound from speakers 73 No sound from headphones 74 Video and Monitor Problems 74 The screen is blank 74 The screen is difficult to read 75 5 Removing and Installing Parts 77 Before You Begin 77 Recommended Tools 77 Turning Off Your Computer 77 Before Working Inside Your Computer 78 Removing the Computer Cover 78 Inside View of Your Computer 80 System Board Components 81 Memory 82 Memory Overview 82 Installing Memory 83 Removing Memory 85 Cards...
Mouse Problems 69 Network Problems 70 Power Problems 71 Printer Problems 72 Scanner Problems 72 Sound and Speaker Problems 73 No sound from speakers 73 No sound from headphones 74 Video and Monitor Problems 74 The screen is blank 74 The screen is difficult to read 75 5 Removing and Installing Parts 77 Before You Begin 77 Recommended Tools 77 Turning Off Your Computer 77 Before Working Inside Your Computer 78 Removing the Computer Cover 78 Inside View of Your Computer 80 System Board Components 81 Memory 82 Memory Overview 82 Installing Memory 83 Removing Memory 85 Cards...

Owner's Manual
Page 7
... 123 System Setup 127 Overview 127 Entering System Setup 127 System Setup Options 129 Boot Sequence 132 Clearing Forgotten Passwords 134 Clearing CMOS Settings 135 Dell Technical Support Policy (U.S. Only 135 Definition of "Dell-Installed" Software and Peripherals 136 Definition of "Third-Party" Software and Peripherals 136 Contents 7
... 123 System Setup 127 Overview 127 Entering System Setup 127 System Setup Options 129 Boot Sequence 132 Clearing Forgotten Passwords 134 Clearing CMOS Settings 135 Dell Technical Support Policy (U.S. Only 135 Definition of "Dell-Installed" Software and Peripherals 136 Definition of "Third-Party" Software and Peripherals 136 Contents 7
Owner's Manual
Page 8
Only 136 FCC Class B 136 Contacting Dell 137 Glossary 159 Index 169 8 Contents FCC Notice (U.S.
Only 136 FCC Class B 136 Contacting Dell 137 Glossary 159 Index 169 8 Contents FCC Notice (U.S.
Owner's Manual
Page 9
...about technical changes to reinstall drivers (see "Drivers" on page 54), run the Dell diagnostics (see "Dell Diagnostics" on your computer. NOTE: This Owner's Manual is available as a PDF at support.dell.com. Documentation and drivers are already installed on page 52), or access your ...Here Drivers and Utilities CD (ResourceCD) NOTE: The Drivers and Utilities CD may be optional and may be available in certain countries. Dell™ Product Information Guide Finding Information 9 Readme files may not ship with your computer. Finding Information NOTE: Some features or media ...
...about technical changes to reinstall drivers (see "Drivers" on page 54), run the Dell diagnostics (see "Dell Diagnostics" on your computer. NOTE: This Owner's Manual is available as a PDF at support.dell.com. Documentation and drivers are already installed on page 52), or access your ...Here Drivers and Utilities CD (ResourceCD) NOTE: The Drivers and Utilities CD may be optional and may be available in certain countries. Dell™ Product Information Guide Finding Information 9 Readme files may not ship with your computer. Finding Information NOTE: Some features or media ...
Owner's Manual
Page 10
What Are You Looking For? • How to set up my computer Find It Here Setup Diagram • Service Tag and Express Service Code • Microsoft® Windows® Product Key Label Service Tag and Microsoft Windows Product Key These labels are located on your computer. • Use the Service Tag to identify your computer when you use support.dell.com or contact support. • Enter the Express Service Code to direct your call when contacting support. 10 Finding Information
What Are You Looking For? • How to set up my computer Find It Here Setup Diagram • Service Tag and Express Service Code • Microsoft® Windows® Product Key Label Service Tag and Microsoft Windows Product Key These labels are located on your computer. • Use the Service Tag to identify your computer when you use support.dell.com or contact support. • Enter the Express Service Code to direct your call when contacting support. 10 Finding Information

Owner's Manual
Page 11
...Here • Solutions - Troubleshooting hints and tips, articles from technicians, online courses, and frequently asked questions Dell Support Website - If you reinstall the operating system for Dell™ 2 Select Drivers & Downloads, then click Go. 3.5-inch USB floppy drives, Intel® processors, ... with programs and files • How to work with other Dell customers • Upgrades - NOTE: The support.dell.com user interface may vary depending on your selections. • How to use Windows XP • How to personalize my desktop Windows Help and Support Center...
...Here • Solutions - Troubleshooting hints and tips, articles from technicians, online courses, and frequently asked questions Dell Support Website - If you reinstall the operating system for Dell™ 2 Select Drivers & Downloads, then click Go. 3.5-inch USB floppy drives, Intel® processors, ... with programs and files • How to work with other Dell customers • Upgrades - NOTE: The support.dell.com user interface may vary depending on your selections. • How to use Windows XP • How to personalize my desktop Windows Help and Support Center...
Owner's Manual
Page 12
...see "Restoring Your Operating System" on page 56 After you ordered. NOTE: The color of Dell Precision™ products and the Linux operating system • Additional information regarding Linux and my Dell Precision computer Find It Here Operating System CD NOTE: The Operating System CD may be optional ... computer. The operating system is located on your computer. Your operating system product key label is already installed on your computer. Dell Supported Linux Sites • linux.dell.com • lists.us.dell.com/mailman/listinfo/linux-precision 12 Finding Information
...see "Restoring Your Operating System" on page 56 After you ordered. NOTE: The color of Dell Precision™ products and the Linux operating system • Additional information regarding Linux and my Dell Precision computer Find It Here Operating System CD NOTE: The Operating System CD may be optional ... computer. The operating system is located on your computer. Your operating system product key label is already installed on your computer. Dell Supported Linux Sites • linux.dell.com • lists.us.dell.com/mailman/listinfo/linux-precision 12 Finding Information
Owner's Manual
Page 13
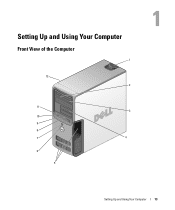
Setting Up and Using Your Computer Front View of the Computer 1 12 2 11 3 10 9 8 7 4 6 5 Setting Up and Using Your Computer 13
Setting Up and Using Your Computer Front View of the Computer 1 12 2 11 3 10 9 8 7 4 6 5 Setting Up and Using Your Computer 13
Owner's Manual
Page 14
... also be on when a device such as a CD player is operating. 9 diagnostic lights (4) Use the sequence of the diagnostic lights to help you access the Dell Support website or contact support. 14 Setting Up and Using Your Computer NOTICE: To avoid losing data, do not block any object near the vents...
... also be on when a device such as a CD player is operating. 9 diagnostic lights (4) Use the sequence of the diagnostic lights to help you access the Dell Support website or contact support. 14 Setting Up and Using Your Computer NOTICE: To avoid losing data, do not block any object near the vents...

Owner's Manual
Page 15
Back View of the Computer 1 4 2 3 1 power connector Insert the power cable. 2 back I/O connectors Plug USB, network, S/PDIF, and audio devices into the appropriate connectors (see "Back Panel Connectors" on page 16). 3 card slots (6) Access connectors for any installed PCI or PCI Express cards. 4 power selection switch Manually select AC input power: 115 volts or 230 volts Setting Up and Using Your Computer 15
Back View of the Computer 1 4 2 3 1 power connector Insert the power cable. 2 back I/O connectors Plug USB, network, S/PDIF, and audio devices into the appropriate connectors (see "Back Panel Connectors" on page 16). 3 card slots (6) Access connectors for any installed PCI or PCI Express cards. 4 power selection switch Manually select AC input power: 115 volts or 230 volts Setting Up and Using Your Computer 15

Owner's Manual
Page 16
On computers with an additional network connector card, use Category 3 wiring, force the network speed to 10 Mbps to the network adapter connector on " state. 4 USB 2.0 connectors (2) Use the back, rear-dual USB connectors for devices that typically remain (rear dual) connected, such as printers and keyboards. and extranet). The computer is recommended that you must use the connectors on the card and on the back of network traffic may make this light appear to be in a steady "on your computer to a network or broadband device. A click indicates that you connect occasionally...
On computers with an additional network connector card, use Category 3 wiring, force the network speed to 10 Mbps to the network adapter connector on " state. 4 USB 2.0 connectors (2) Use the back, rear-dual USB connectors for devices that typically remain (rear dual) connected, such as printers and keyboards. and extranet). The computer is recommended that you must use the connectors on the card and on the back of network traffic may make this light appear to be in a steady "on your computer to a network or broadband device. A click indicates that you connect occasionally...

Owner's Manual
Page 17
NOTE: The LFE (Low Frequency Effects) Audio channel, found in digital surround sound audio schemes, carries only low frequency information of them must use the front USB connectors for devices that you connect occasionally, such as joysticks, cameras, or bootable USB devices. 6 surround sound connector Use the (black) surround sound connector to the television. On computers with a sound card, use the connector on the card. 10 center/subwoofer LFE Use the (orange) center/subwoofer connector to attach a personal computer microphone for voice or musical input into a ...
NOTE: The LFE (Low Frequency Effects) Audio channel, found in digital surround sound audio schemes, carries only low frequency information of them must use the front USB connectors for devices that you connect occasionally, such as joysticks, cameras, or bootable USB devices. 6 surround sound connector Use the (black) surround sound connector to the television. On computers with a sound card, use the connector on the card. 10 center/subwoofer LFE Use the (orange) center/subwoofer connector to attach a personal computer microphone for voice or musical input into a ...
Owner's Manual
Page 18
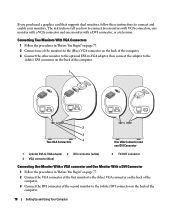
The instructions tell you purchased a graphics card that supports dual monitors, follow these instructions to connect and enable your monitors. Connecting Two Monitors With VGA Connectors 1 Follow the procedures in "Before You Begin" on page 77. 2 Connect one of the monitors to the (blue) VGA connector on the back of the computer. 3 Connect the other monitor to the optional DVI-to-VGA adapter, then connect the adapter to the (white) DVI connector on the back of the computer. 18 Setting Up and Using Your Computer If you how to connect two monitors with VGA connectors, one monitor with a ...
The instructions tell you purchased a graphics card that supports dual monitors, follow these instructions to connect and enable your monitors. Connecting Two Monitors With VGA Connectors 1 Follow the procedures in "Before You Begin" on page 77. 2 Connect one of the monitors to the (blue) VGA connector on the back of the computer. 3 Connect the other monitor to the optional DVI-to-VGA adapter, then connect the adapter to the (white) DVI connector on the back of the computer. 18 Setting Up and Using Your Computer If you how to connect two monitors with VGA connectors, one monitor with a ...
Owner's Manual
Page 19
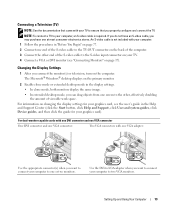
Changing the Display Settings 1 After you connect the monitor(s) or television, turn on the back of the computer. 3 Connect the other , effectively doubling the amount of the S-video cable to two VGA monitors. The Microsoft® Windows® desktop displays on the primary monitor. 2 Enable clone mode or extended desktop mode in the display settings. • In clone mode, both monitors display the same image. • In extended desktop mode, you can drag objects from one screen to ensure that came with your TV to the other end of viewable work space. Setting Up and ...
Changing the Display Settings 1 After you connect the monitor(s) or television, turn on the back of the computer. 3 Connect the other , effectively doubling the amount of the S-video cable to two VGA monitors. The Microsoft® Windows® desktop displays on the primary monitor. 2 Enable clone mode or extended desktop mode in the display settings. • In clone mode, both monitors display the same image. • In extended desktop mode, you can drag objects from one screen to ensure that came with your TV to the other end of viewable work space. Setting Up and ...

Owner's Manual
Page 20
Connecting a USB Printer NOTE: You can connect USB devices while the computer is compatible with your printer. Your printer may arrive in the computer box. The connectors fit only one of the connect two VGA monitors to the monitors. If you purchased a printer cable at the same time you purchased your computer, the cable may not come with a printer cable, so if you purchase a cable separately, ensure that it is turned on. 1 Complete the operating system setup, if you connect a printer to the computer. See the documentation that came with the printer for setup information, ...
Connecting a USB Printer NOTE: You can connect USB devices while the computer is compatible with your printer. Your printer may arrive in the computer box. The connectors fit only one of the connect two VGA monitors to the monitors. If you purchased a printer cable at the same time you purchased your computer, the cable may not come with a printer cable, so if you purchase a cable separately, ensure that it is turned on. 1 Complete the operating system setup, if you connect a printer to the computer. See the documentation that came with the printer for setup information, ...
