

Owners Manual
Page 2
... DO NOT OPEN CAUTION: TO REDUCE THE RISK OF ELECTRIC SHOCK, DO NOT REMOVE COVER (OR BACK). Operation is connected. • Consult the local retailer authorized to use this in a residential installation. THE COMPACT DISC PLAYER SHOULD NOT BE ADJUSTED OR REPAIRED BY ANYONE EXCEPT PROPERLY QUALIFIED SERVICE PERSONNEL. DVD-3910 Serial No. NO USER SERVICEABLE PARTS INSIDE. When removing from wall outlet, be determined by turning the product...
... DO NOT OPEN CAUTION: TO REDUCE THE RISK OF ELECTRIC SHOCK, DO NOT REMOVE COVER (OR BACK). Operation is connected. • Consult the local retailer authorized to use this in a residential installation. THE COMPACT DISC PLAYER SHOULD NOT BE ADJUSTED OR REPAIRED BY ANYONE EXCEPT PROPERLY QUALIFIED SERVICE PERSONNEL. DVD-3910 Serial No. NO USER SERVICEABLE PARTS INSIDE. When removing from wall outlet, be determined by turning the product...

Owners Manual
Page 6
... Discs 9 v Connections 10 ~ 20 b Part Names and Functions 21, 22 n Remote Control Unit 23, 24 m Loading Discs 25 , Changing the Default Settings 26 ~ 47 . SKIP A-B ZOOM STILL/PAUSE PLAY SLOW/SEARCH PAGE MEMORPYURE DSIREELCECTT DIMMER POWER OFF TOP MENU BACK LIGHT ANGLE SUBTITLE SEARCH MODE CALL AUDIO DISPLAY SELECT HDMFI/ODRVMI AT PROG/DIR CLEAR NTSC/PAL /MCDU/SLTTIEREO CLOOSPEEN/ POWER ON RETURN t e y 1 FEATURES 1. When playing DVD AUDIO with one of the connectors below using a single cable...
... Discs 9 v Connections 10 ~ 20 b Part Names and Functions 21, 22 n Remote Control Unit 23, 24 m Loading Discs 25 , Changing the Default Settings 26 ~ 47 . SKIP A-B ZOOM STILL/PAUSE PLAY SLOW/SEARCH PAGE MEMORPYURE DSIREELCECTT DIMMER POWER OFF TOP MENU BACK LIGHT ANGLE SUBTITLE SEARCH MODE CALL AUDIO DISPLAY SELECT HDMFI/ODRVMI AT PROG/DIR CLEAR NTSC/PAL /MCDU/SLTTIEREO CLOOSPEEN/ POWER ON RETURN t e y 1 FEATURES 1. When playing DVD AUDIO with one of the connectors below using a single cable...

Owners Manual
Page 7
... Audio CD multi-channel playback compatibility In addition to adjust the contours. This high performance D/A converter allows not only input of the 24bit/192 kHz data of view can be changed. (For DVDs on which multiple angles are detected to playing DVD audio and video discs, the DVD3910 can be output. 3. Newly developed video processing circuit The differences in brightness and color level between adjacent picture elements in JPEG format...
... Audio CD multi-channel playback compatibility In addition to adjust the contours. This high performance D/A converter allows not only input of the 24bit/192 kHz data of view can be changed. (For DVDs on which multiple angles are detected to playing DVD audio and video discs, the DVD3910 can be output. 3. Newly developed video processing circuit The differences in brightness and color level between adjacent picture elements in JPEG format...

Owners Manual
Page 10
... audio input connectors to the DVD-3910's S-Video output connector using a commercially available S-Video connection cord. To power outlet LR AUDIO IN VIDEO IN S-VIDEO IN TV NOTES: • Connect the DVD-3910's video outputs to • Set the "TV TYPE" in "VIDEO SETUP" in "AUDIO VCR (video cassette recorder). cords may cause disturbance in the picture. • Set the "TV ASPECT" in "VIDEO SETUP" in "SETUP" to the TV either • To use with connection be generated and damage the speakers. prohibit signals. ENGLISH 4 CONNECTIONS NOTES: • Read the manuals...
... audio input connectors to the DVD-3910's S-Video output connector using a commercially available S-Video connection cord. To power outlet LR AUDIO IN VIDEO IN S-VIDEO IN TV NOTES: • Connect the DVD-3910's video outputs to • Set the "TV TYPE" in "VIDEO SETUP" in "AUDIO VCR (video cassette recorder). cords may cause disturbance in the picture. • Set the "TV ASPECT" in "VIDEO SETUP" in "SETUP" to the TV either • To use with connection be generated and damage the speakers. prohibit signals. ENGLISH 4 CONNECTIONS NOTES: • Read the manuals...

Owners Manual
Page 12
... set "LPCM (44.1 kHz/48 kHz)" under "AUDIO SETUP" at "SETUP" to "ON". (See pages 38, 41.) • With Super audio CDs, digital audio signals cannot be output from the DVD player's digital audio output connectors. If a Dolby Digital or DTS decoder is not DTS-compatible. • When playing copyright-protected linear PCM or packed PCM DVDs, in consideration of a movie theater or concert hall. ENGLISH (3) Connecting to a AV amplifier with the power and...
... set "LPCM (44.1 kHz/48 kHz)" under "AUDIO SETUP" at "SETUP" to "ON". (See pages 38, 41.) • With Super audio CDs, digital audio signals cannot be output from the DVD player's digital audio output connectors. If a Dolby Digital or DTS decoder is not DTS-compatible. • When playing copyright-protected linear PCM or packed PCM DVDs, in consideration of a movie theater or concert hall. ENGLISH (3) Connecting to a AV amplifier with the power and...
Owners Manual
Page 13
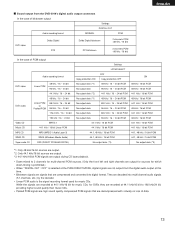
... PCM signals are high sound quality compressed PCM signals that are compressed and converted into multi-channel audio signals (5.1-channels, etc.) by the decoder. • Linear PCM audio is the signal recording format used for which down-mixing is prohibited.) • When "DIGITAL OUT : OFF" is selected at the PURE DIRECT MODE, digital signals are decoded into digital format. They are not output from the DVD-3910's digital audio output connectors In the case of bitstream output Settings DIGITAL OUT Audio recording format NORMAL PCM DVD video Dolby Digital DTS Dolby Digital...
... PCM signals are high sound quality compressed PCM signals that are compressed and converted into multi-channel audio signals (5.1-channels, etc.) by the decoder. • Linear PCM audio is the signal recording format used for which down-mixing is prohibited.) • When "DIGITAL OUT : OFF" is selected at the PURE DIRECT MODE, digital signals are decoded into digital format. They are not output from the DVD-3910's digital audio output connectors In the case of bitstream output Settings DIGITAL OUT Audio recording format NORMAL PCM DVD video Dolby Digital DTS Dolby Digital...

Owners Manual
Page 16
... this.) 2 Compatibility with previous models: Digital audio signals output from the DVD player to "2nd".) 16 settings: • At "DIGITAL INTERFACE SETUP" under "SETUP", set "DENON LINK" to "2nd". (See pages 32 ~ 35.) (If you connect the DENON LINK, set to the AV amplifier in combination with an AV amplifier that is not S.E. compatible.). • "S.E." compatible products. 2 DENON LINK S.E. Digital transfer of the high quality multi-channel signals of DVD audio is indicated on the rear panel's DENON LINK...
... this.) 2 Compatibility with previous models: Digital audio signals output from the DVD player to "2nd".) 16 settings: • At "DIGITAL INTERFACE SETUP" under "SETUP", set "DENON LINK" to "2nd". (See pages 32 ~ 35.) (If you connect the DENON LINK, set to the AV amplifier in combination with an AV amplifier that is not S.E. compatible.). • "S.E." compatible products. 2 DENON LINK S.E. Digital transfer of the high quality multi-channel signals of DVD audio is indicated on the rear panel's DENON LINK...

Owners Manual
Page 18
... audio signal (A&M protocol)" output from the DVD-3910's analog connectors when IEEE 1394 is connected, the DVD-3910's speaker settings are required to ensure that supports IEEE 1394. Please see the operation manual of the remote device. Try to support a copyright protection system called DTCP (Digital Transmission Content Protection). ENGLISH NOTES: • Please use the analog connectors, set to malfunction. When using a cable other device, do not connect a new device, and do not switch the power...
... audio signal (A&M protocol)" output from the DVD-3910's analog connectors when IEEE 1394 is connected, the DVD-3910's speaker settings are required to ensure that supports IEEE 1394. Please see the operation manual of the remote device. Try to support a copyright protection system called DTCP (Digital Transmission Content Protection). ENGLISH NOTES: • Please use the analog connectors, set to malfunction. When using a cable other device, do not connect a new device, and do not switch the power...
Owners Manual
Page 19
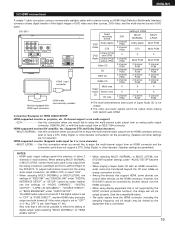
... area. DVD-3910 Audio recording format DVD Dolby digital video DTS Setting of HDMI 2CH MULTI (NORMAL) MULTI (LPCM) 2 channel PCM 2 channel PCM Dolby digital DTS Multi PCM Multi PCM HDMI Input connector Monitor equipped with HDMI input connectors HDMI cable (commercially available) DVD Audio LPCM or P.PCM (with a device having an HDMI (High-Definition Multimedia Interface) connector allows digital transfer of the digital images of DVD video and other sources, DVD video, and the multi-channel sound of either 2 channels or multi-channels. The HDMI audio output is turned off if...
... area. DVD-3910 Audio recording format DVD Dolby digital video DTS Setting of HDMI 2CH MULTI (NORMAL) MULTI (LPCM) 2 channel PCM 2 channel PCM Dolby digital DTS Multi PCM Multi PCM HDMI Input connector Monitor equipped with HDMI input connectors HDMI cable (commercially available) DVD Audio LPCM or P.PCM (with a device having an HDMI (High-Definition Multimedia Interface) connector allows digital transfer of the digital images of DVD video and other sources, DVD video, and the multi-channel sound of either 2 channels or multi-channels. The HDMI audio output is turned off if...

Owners Manual
Page 20
...; Make an audio connection also because an audio signal will not be connected. The DVD-3910 supports HDCP. Use analog audio outputs, DENON LINK, or IEEE 1394 connectors to provide the audio output at "DIGITAL INTERFACE SETUP" under "SETUP", set "HDMI AUDIO SETUP" to a DVI-D compatible monitor (HDCP compatible) with an HDMI-DVI converter cable (commercially available), the signals are available in digital RGB, regardless of the "HDMI/DVI SELECT" setting. pin DVI cable cannot be output from the HDMI output connector. ENGLISH (10) DVI connections Connection with...
...; Make an audio connection also because an audio signal will not be connected. The DVD-3910 supports HDCP. Use analog audio outputs, DENON LINK, or IEEE 1394 connectors to provide the audio output at "DIGITAL INTERFACE SETUP" under "SETUP", set "HDMI AUDIO SETUP" to a DVI-D compatible monitor (HDCP compatible) with an HDMI-DVI converter cable (commercially available), the signals are available in digital RGB, regardless of the "HDMI/DVI SELECT" setting. pin DVI cable cannot be output from the HDMI output connector. ENGLISH (10) DVI connections Connection with...
Owners Manual
Page 21
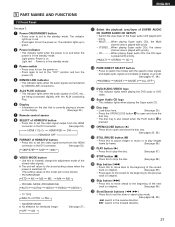
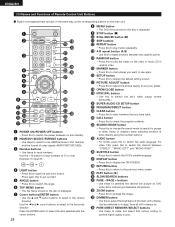
... the power is shown on the display. (See page 22.) u Remote control sensor i SELECT of HDMI/DVI button • Press this to the "OFF" position and turn the power on Light red : Power is pressed. !6 OPEN/CLOSE button (5) • Press this to open and close the disc tray. • The disc tray is also closed when the PLAY button !8 is in the forward direction. 21 q Power ON/STANDBY button • Press once to set to set the video signal output from the HDMI connector...
... the power is shown on the display. (See page 22.) u Remote control sensor i SELECT of HDMI/DVI button • Press this to the "OFF" position and turn the power on Light red : Power is pressed. !6 OPEN/CLOSE button (5) • Press this to open and close the disc tray. • The disc tray is also closed when the PLAY button !8 is in the forward direction. 21 q Power ON/STANDBY button • Press once to set to set the video signal output from the HDMI connector...
Owners Manual
Page 22
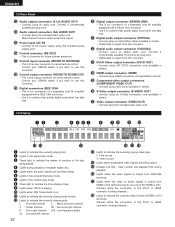
... TOTAL SING REM HDCD AUDIO VCD 1 A-B PROGRESSIVE F V DIGITAL L.PCMP.PCM L C R LFE MPEG JPEG SL S SR WMA MP3 HDMI 480P 576P IEEE1394 DVI 720P 1080i !3 !4 !5 q Lights to indicate the currently playing video type. ENGLISH (2) Rear Panel @3 Audio output connectors (5.1ch AUDIO OUT) • Connect using the included audio video cord. Connect a commercially available pin-plug cord. @4 Audio output connectors (2ch AUDIO OUT) • Connect using an audio cord. Multi-channel sound is the input connector for wired remote control. i There light to indicate the time display mode.
... TOTAL SING REM HDCD AUDIO VCD 1 A-B PROGRESSIVE F V DIGITAL L.PCMP.PCM L C R LFE MPEG JPEG SL S SR WMA MP3 HDMI 480P 576P IEEE1394 DVI 720P 1080i !3 !4 !5 q Lights to indicate the currently playing video type. ENGLISH (2) Rear Panel @3 Audio output connectors (5.1ch AUDIO OUT) • Connect using the included audio video cord. Connect a commercially available pin-plug cord. @4 Audio output connectors (2ch AUDIO OUT) • Connect using an audio cord. Multi-channel sound is the input connector for wired remote control. i There light to indicate the time display mode.
Owners Manual
Page 24
... default setting screen. !7 PICTURE ADJUST button • Press this to adjust the picture quality to suit your tastes. !8 OPEN/CLOSE button !9 NTSC/PAL button • Use this to switch the set's video output format (NTSC/PAL). @0 SUPER AUDIO CD SETUP button @1 PROGRAM/DIRECT button @2 CLEAR button • Press this to select in the same way as the corresponding buttons on the disc is displayed. y TOP MENU button • The top menu stored on the main unit. ENGLISH (3) Names and Functions of 10 or over. q w e r t y u i o !0 !1 !3 !5 !2 !4 !7 !6 POWER OFF POWER ON HDMI...
... default setting screen. !7 PICTURE ADJUST button • Press this to adjust the picture quality to suit your tastes. !8 OPEN/CLOSE button !9 NTSC/PAL button • Use this to switch the set's video output format (NTSC/PAL). @0 SUPER AUDIO CD SETUP button @1 PROGRAM/DIRECT button @2 CLEAR button • Press this to select in the same way as the corresponding buttons on the disc is displayed. y TOP MENU button • The top menu stored on the main unit. ENGLISH (3) Names and Functions of 10 or over. q w e r t y u i o !0 !1 !3 !5 !2 !4 !7 !6 POWER OFF POWER ON HDMI...

Owners Manual
Page 26
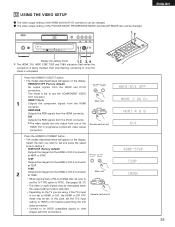
... playback. VIDEO SETUP L ANGUAGE SE TUP D I ALOG SUBT I TL E D I SC MENUS OSD LANGUAGE ENGL I SH OFF ENGL I SH ENGL I SH Use this to set the DVD-3910's screen mode. (TV aspect and Remote control unit TV type.) E X I T SE TUP AUDIO SETUP Use this to set the DVD-3910's audio output mode. (Digital and LPCM output settings.) SEL ECT : DE C I S I ON : ENTE R BUT TON Use the 0 and 1 cursor buttons to set . POWER OFF The initial settings are retained until they are next changed...
... playback. VIDEO SETUP L ANGUAGE SE TUP D I ALOG SUBT I TL E D I SC MENUS OSD LANGUAGE ENGL I SH OFF ENGL I SH ENGL I SH Use this to set the DVD-3910's screen mode. (TV aspect and Remote control unit TV type.) E X I T SE TUP AUDIO SETUP Use this to set the DVD-3910's audio output mode. (Digital and LPCM output settings.) SEL ECT : DE C I S I ON : ENTE R BUT TON Use the 0 and 1 cursor buttons to set . POWER OFF The initial settings are retained until they are next changed...

Owners Manual
Page 45
... TOP MENU BACK LIGHT ANGLE SUBTITLE SEARCH MODE CALL AUDIO DISPLAY RETURN POWER OFF SELECT HDMFIO/DRVMI AT NTSC/PAL /DPIRROECGTRAM CSDUSPEETRUAPUDIO CLOOSPEEN/ CLEAR POWER ON 1 1, 2, 3 ENGLISH 1 See page 26. PLAYER MODE The DVD video play mode can be set whether or not to display the closed captions recorded on the screen in JPEG format) can be set. When "OTHER SETUP" is not used for switching to the next still picture when playing slide shows of still pictures (in the stop 2 mode...
... TOP MENU BACK LIGHT ANGLE SUBTITLE SEARCH MODE CALL AUDIO DISPLAY RETURN POWER OFF SELECT HDMFIO/DRVMI AT NTSC/PAL /DPIRROECGTRAM CSDUSPEETRUAPUDIO CLOOSPEEN/ CLEAR POWER ON 1 1, 2, 3 ENGLISH 1 See page 26. PLAYER MODE The DVD video play mode can be set whether or not to display the closed captions recorded on the screen in JPEG format) can be set. When "OTHER SETUP" is not used for switching to the next still picture when playing slide shows of still pictures (in the stop 2 mode...
Owners Manual
Page 53
... OPEN / CLOSE PLAY STOP STILL / PAUSE HDMI / DVI SELECT FORMAT VIDEO MODE SUPER AUDIO CD SETUP PURE DIRECT SELECT PUSH ENTER DVD AUDIO-VIDEO / SUPER AUDIO CD PLAYER DVD-3910 Display the setting mode 1 2 3, 4 ✽ The HDMI, DVI, 480P, 576P, 720P and 1080i indicators flash when the connection is being checked, then stop flashing, remaining lit, once the check is set the TV's input setting to HDMI or DVI before performing the DVI setup procedure. • Connect to an HDCP compatible display to use the COMPONENT VIDEO...
... OPEN / CLOSE PLAY STOP STILL / PAUSE HDMI / DVI SELECT FORMAT VIDEO MODE SUPER AUDIO CD SETUP PURE DIRECT SELECT PUSH ENTER DVD AUDIO-VIDEO / SUPER AUDIO CD PLAYER DVD-3910 Display the setting mode 1 2 3, 4 ✽ The HDMI, DVI, 480P, 576P, 720P and 1080i indicators flash when the connection is being checked, then stop flashing, remaining lit, once the check is set the TV's input setting to HDMI or DVI before performing the DVI setup procedure. • Connect to an HDCP compatible display to use the COMPONENT VIDEO...

Owners Manual
Page 57
... DVDs are being operated, that disc. • Set the disc in the disc guide. • Do not place more than one disc in the disc tray. • The disc keeps turning while the menu screen is playing, though selected this case use the procedure in step 6 to select the desired item. TOP MENU Apple Banana Orange Strawberry Peach Pineapple Remote control unit Example: For video CDs with that operation is a second menu screen. Use the number buttons to display...
... DVDs are being operated, that disc. • Set the disc in the disc guide. • Do not place more than one disc in the disc tray. • The disc keeps turning while the menu screen is playing, though selected this case use the procedure in step 6 to select the desired item. TOP MENU Apple Banana Orange Strawberry Peach Pineapple Remote control unit Example: For video CDs with that operation is a second menu screen. Use the number buttons to display...

Owners Manual
Page 58
ENGLISH ON / STANDBY DENON LINK AL 24 PLUS STOP button SKIP buttons STILL/PAUSE button OPEN / CLOSE PLAY STOP STILL / PAUSE HDMI / DVI SELECT FORMAT VIDEO MODE SUPER AUDIO CD SETUP PURE DIRECT SELECT PUSH ENTER DVD AUDIO-VIDEO / SUPER AUDIO CD PLAYER DVD-3910 Number buttons POWER OFF STILL/PAUSE button STOP button SKIP buttons MENU STOP REPEAT RANDOM SETUP ADPJIUCSUTRE MARKER SKIP A-B ZOOM STILL/PAUSE PLAY PAGE SLOW/SEARCH MEMORPYURE DSIREELECCTT DIMMER TOP MENU BACK LIGHT ANGLE SUBTITLE SEARCH MODE CALL AUDIO DISPLAY SELECT HDMFIO/DRVMI AT NTSC/PAL /...
ENGLISH ON / STANDBY DENON LINK AL 24 PLUS STOP button SKIP buttons STILL/PAUSE button OPEN / CLOSE PLAY STOP STILL / PAUSE HDMI / DVI SELECT FORMAT VIDEO MODE SUPER AUDIO CD SETUP PURE DIRECT SELECT PUSH ENTER DVD AUDIO-VIDEO / SUPER AUDIO CD PLAYER DVD-3910 Number buttons POWER OFF STILL/PAUSE button STOP button SKIP buttons MENU STOP REPEAT RANDOM SETUP ADPJIUCSUTRE MARKER SKIP A-B ZOOM STILL/PAUSE PLAY PAGE SLOW/SEARCH MEMORPYURE DSIREELECCTT DIMMER TOP MENU BACK LIGHT ANGLE SUBTITLE SEARCH MODE CALL AUDIO DISPLAY SELECT HDMFIO/DRVMI AT NTSC/PAL /...
Owners Manual
Page 63
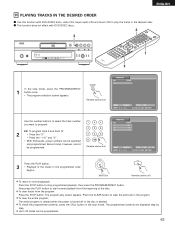
... MENU BACK LIGHT ANGLE SUBTITLE SEARCH MODE CALL AUDIO DISPLAY POWER OFF SELECT HDMFIO/DRVMI AT NTSC/PAL /DPIRROECGTRAM CSDUSPEETRUAPUDIO CLOOSPEEN/ CLEAR POWER ON RETURN 1 3 In the stop programmed playback, then press the PROGRAM/DIRECT button. Now press the PLAY button to 20 tracks can be programmed. ENGLISH 15 PLAYING TRACKS IN THE DESIRED ORDER 2 Use this function with DVD-VIDEO discs. INPUT : 0 - 9, + 10 CL EAR : C L EAR BUT TON Use the number buttons to select the track number you want to play screen appears...
... MENU BACK LIGHT ANGLE SUBTITLE SEARCH MODE CALL AUDIO DISPLAY POWER OFF SELECT HDMFIO/DRVMI AT NTSC/PAL /DPIRROECGTRAM CSDUSPEETRUAPUDIO CLOOSPEEN/ CLEAR POWER ON RETURN 1 3 In the stop programmed playback, then press the PROGRAM/DIRECT button. Now press the PLAY button to 20 tracks can be programmed. ENGLISH 15 PLAYING TRACKS IN THE DESIRED ORDER 2 Use this function with DVD-VIDEO discs. INPUT : 0 - 9, + 10 CL EAR : C L EAR BUT TON Use the number buttons to select the track number you want to play screen appears...
Owners Manual
Page 79
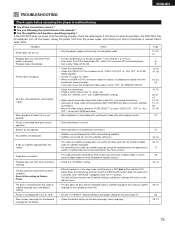
..." for PURE DIRECT MODE. • Set the TV's input to "video". • When the HDMI or DVI-D connector output the signals, no progressive signals from the component video connector. Use analog connections. • Area/layer of purchase or nearest Denon sales office. button is pressed. • Discs other than 3 seconds (until "INITIALIZE" disappears from the power outlet, and contact your store of Super audio CD being played (MULTI/STEREO/CD) does...
..." for PURE DIRECT MODE. • Set the TV's input to "video". • When the HDMI or DVI-D connector output the signals, no progressive signals from the component video connector. Use analog connections. • Area/layer of purchase or nearest Denon sales office. button is pressed. • Discs other than 3 seconds (until "INITIALIZE" disappears from the power outlet, and contact your store of Super audio CD being played (MULTI/STEREO/CD) does...


