
Owners Manual
Page 4
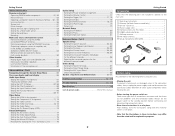
...and call-out functions (USER MODE function 36 DENON original surround modes Surround modes and their features 36 DSP surround simulation 37, 38 Tone control setting 38 Channel level 39 Fader function 39 Listening to the radio Auto tuning 40 Manual tuning 40 Preset memory 41... sound 13 Connecting Other Sources Cable indications 14 The video conversion function 15 On screen display for choosing the DENON AVR-4306 AV Surround Receiver. This remarkable component has been engineered to setup flow 6 Speaker system layout 6 Speaker connections 7 Connecting a DVD player and monitor ...
...and call-out functions (USER MODE function 36 DENON original surround modes Surround modes and their features 36 DSP surround simulation 37, 38 Tone control setting 38 Channel level 39 Fader function 39 Listening to the radio Auto tuning 40 Manual tuning 40 Preset memory 41... sound 13 Connecting Other Sources Cable indications 14 The video conversion function 15 On screen display for choosing the DENON AVR-4306 AV Surround Receiver. This remarkable component has been engineered to setup flow 6 Speaker system layout 6 Speaker connections 7 Connecting a DVD player and monitor ...
Owners Manual
Page 7
...Setting the Component In Assignment 71, 72 Setting the Video Convert 72 Setting the HDMI Out Setup 72, 73 Setting the Audio Delay 73 Setting the On Screen Display (OSD 73 Advanced Playback Setting the 2ch Direct / Stereo 74 Setting the Dolby Digital Setup 74 Setting the Auto Surround Mode 75 Setting... to the main unit: q Operating instructions 1 w Warranty (for explanation purposes. 2 Getting Started Advanced Operation Remote control unit Operating DENON audio components 51, 52 Preset memory 53 Operating a component stored in the preset memory ·····53 ~ 55...
...Setting the Component In Assignment 71, 72 Setting the Video Convert 72 Setting the HDMI Out Setup 72, 73 Setting the Audio Delay 73 Setting the On Screen Display (OSD 73 Advanced Playback Setting the 2ch Direct / Stereo 74 Setting the Dolby Digital Setup 74 Setting the Auto Surround Mode 75 Setting... to the main unit: q Operating instructions 1 w Warranty (for explanation purposes. 2 Getting Started Advanced Operation Remote control unit Operating DENON audio components 51, 52 Preset memory 53 Operating a component stored in the preset memory ·····53 ~ 55...
Owners Manual
Page 9
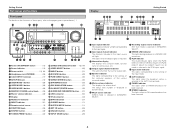
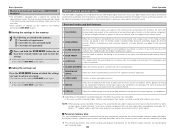
... input signal. !1 Input mode indicator This lights corresponding to the setting of the input mode. !2 AUTO indicator This lights when the broadcast station is inputted. o DENON LINK indicator This lights during playback in a DENON LINK connection. !0 AL24 indicator The AL24 indicator lights when the PURE...w Input signal channel indicator The channels included in the AUTO tuning mode. !3 TUNED indicator This lights when an FM/AM broadcast has been received. !4 STEREO indicator This lights when an FM stereo broadcast has been received. 4 r Output signal channel indicator The audio channels ...
... input signal. !1 Input mode indicator This lights corresponding to the setting of the input mode. !2 AUTO indicator This lights when the broadcast station is inputted. o DENON LINK indicator This lights during playback in a DENON LINK connection. !0 AL24 indicator The AL24 indicator lights when the PURE...w Input signal channel indicator The channels included in the AUTO tuning mode. !3 TUNED indicator This lights when an FM/AM broadcast has been received. !4 STEREO indicator This lights when an FM stereo broadcast has been received. 4 r Output signal channel indicator The audio channels ...

Owners Manual
Page 11
...Distance 3) Channel Level 4) Crossover Frequency 5) Room EQ The measurement of the speakers in the 2nd to 6th listening position Front speaker systems Set these at the sides of the screen as flush with surround sound. Check of eight speaker systems and a television monitor: Subwoofer Center speaker ... and the source equipment and loudspeakers you are using. • For optimum performance, we recommend using Auto Setup ( page 82 ~ 86). Surround speaker systems With the AVR-4306 it is also possible to use the surround speaker selector function to choose the best layout for a ...
...Distance 3) Channel Level 4) Crossover Frequency 5) Room EQ The measurement of the speakers in the 2nd to 6th listening position Front speaker systems Set these at the sides of the screen as flush with surround sound. Check of eight speaker systems and a television monitor: Subwoofer Center speaker ... and the source equipment and loudspeakers you are using. • For optimum performance, we recommend using Auto Setup ( page 82 ~ 86). Surround speaker systems With the AVR-4306 it is also possible to use the surround speaker selector function to choose the best layout for a ...

Owners Manual
Page 14
...to correct the sound more effectively (Example w). When listening to music or viewing movies with a unique method to permit an appropriate automatic setting. Measurements on the diagram indicates the points of installation) and measure repeatedly (Example q). All this measured data is analyzed with the whole ... to comprehensively improve acoustic characteristics in the listening area. For optimum effectiveness, measurements should be selected after performing the auto setup procedure. The AVR-4306's Room EQ function offers three correction curves: "Audyssey", "Front" and "Flat".
...to correct the sound more effectively (Example w). When listening to music or viewing movies with a unique method to permit an appropriate automatic setting. Measurements on the diagram indicates the points of installation) and measure repeatedly (Example q). All this measured data is analyzed with the whole ... to comprehensively improve acoustic characteristics in the listening area. For optimum effectiveness, measurements should be selected after performing the auto setup procedure. The AVR-4306's Room EQ function offers three correction curves: "Audyssey", "Front" and "Flat".
Owners Manual
Page 15
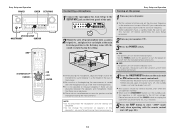
...if your subwoofer can adjust the output volume and the crossover frequency Some subwoofers have a standby mode. The sound is started with the microphone set and the display turns off. When ever the ON/STANDBY button is in the listening room with the remote control unit ( page 24))....ON OFF ENTER Connecting a microphone Turning on the power Easy Setup and Operation 1 Connect the microphone for Auto Setup to turn this function off before performing the Auto Setup procedure. 2 Mount the auto setup microphone onto a camera tripod, etc., and place it at ear height at the main listening ...
...if your subwoofer can adjust the output volume and the crossover frequency Some subwoofers have a standby mode. The sound is started with the microphone set and the display turns off. When ever the ON/STANDBY button is in the listening room with the remote control unit ( page 24))....ON OFF ENTER Connecting a microphone Turning on the power Easy Setup and Operation 1 Connect the microphone for Auto Setup to turn this function off before performing the Auto Setup procedure. 2 Mount the auto setup microphone onto a camera tripod, etc., and place it at ear height at the main listening ...
Owners Manual
Page 16
Power Amp Assign The AVR-4306 has available surround back amplifier channel. The message "Connect Microphone"...as possible. • The set measures the background noise even when in the main room, their amplifier channels can be assigned for the front speakers. The front channel's test tone during Auto Setup will be output from ... (Another room). When "Front" is connected. When "Front B" is selected, the surround back channel's test tone during Auto Setup it will be output to automatically determine the background noise, whether or not speakers are completed. 2 Press the ENTER ...
Power Amp Assign The AVR-4306 has available surround back amplifier channel. The message "Connect Microphone"...as possible. • The set measures the background noise even when in the main room, their amplifier channels can be assigned for the front speakers. The front channel's test tone during Auto Setup will be output from ... (Another room). When "Front" is connected. When "Front B" is selected, the surround back channel's test tone during Auto Setup it will be output to automatically determine the background noise, whether or not speakers are completed. 2 Press the ENTER ...

Owners Manual
Page 18
...the surround (B) speaker was detected, but the surround (A) speaker was not detected. displayed even though the speakers are stored. Cancel: Cancel the auto setup settings. 5 Press the CURSOR F button. • After the data is quieter. If multiple errors occur, press the CURSOR F or G button ...; Either turn off the AVR-4306's power before checking the speaker connections. generated the noise during the measurements or move the device away. • Try again at a time when it will be displayed when performing the measurements of Auto Setup and the automatic measurements...
...the surround (B) speaker was detected, but the surround (A) speaker was not detected. displayed even though the speakers are stored. Cancel: Cancel the auto setup settings. 5 Press the CURSOR F button. • After the data is quieter. If multiple errors occur, press the CURSOR F or G button ...; Either turn off the AVR-4306's power before checking the speaker connections. generated the noise during the measurements or move the device away. • Try again at a time when it will be displayed when performing the measurements of Auto Setup and the automatic measurements...
Owners Manual
Page 31
...both surround speakers A and B is automatically turned off temporarily (MUTING) Use this mode. • If the subwoofer output level seems too high, set for the different input sources. 26 Listening over headphones Connect the headphones to the PHONES jack. • The pre-out output (including the speaker ... sound with the video select function is pressed. The surround speakers switch as shown below each time the INPUT MODE button is pressed: AUTO PCM DTS EXT.IN ANALOG • Cancelling the external input mode: Press the INPUT MODE or ANALOG button to switch to the desired...
...both surround speakers A and B is automatically turned off temporarily (MUTING) Use this mode. • If the subwoofer output level seems too high, set for the different input sources. 26 Listening over headphones Connect the headphones to the PHONES jack. • The pre-out output (including the speaker ... sound with the video select function is pressed. The surround speakers switch as shown below each time the INPUT MODE button is pressed: AUTO PCM DTS EXT.IN ANALOG • Cancelling the external input mode: Press the INPUT MODE or ANALOG button to switch to the desired...

Owners Manual
Page 32
... a manual mode that can be switched according to the type of signals being input. Descriptions of the input selector and the surround settings is being input. 27 If no digital signal is output in DTS, Dolby Digital or PCM (2 channel stereo) format. Such information...status while playing a source. Each time an operation is performed, a description of digital signals is pressed: AUTO PCM DTS EXT.IN ANALOG AUTO (All auto mode): In this mode to AVR-4306's VIDEO MONITOR OUT terminal. Also, the unit's operating status can be generated when using this mode, the ...
... a manual mode that can be switched according to the type of signals being input. Descriptions of the input selector and the surround settings is being input. 27 If no digital signal is output in DTS, Dolby Digital or PCM (2 channel stereo) format. Such information...status while playing a source. Each time an operation is performed, a description of digital signals is pressed: AUTO PCM DTS EXT.IN ANALOG AUTO (All auto mode): In this mode to AVR-4306's VIDEO MONITOR OUT terminal. Also, the unit's operating status can be generated when using this mode, the ...

Owners Manual
Page 33
... the ANALOG button on the main unit or INPUT MODE button on the input signal. • The "DSD" indicator lights when the DENON LINK have been connected and the DSD signals have been input ( page 19). AL24 processing is activated when PCM signals are being input...the source component to the digital input terminals (OPTICAL/COAXIAL) and set to the analog input terminals are described below. Flat: This the frequency response of all speakers to the analog input. Basic Operation Room EQ function The AVR-4306's Auto Setup / Room EQ function offers three correction curves: "Audyssey", ...
... the ANALOG button on the main unit or INPUT MODE button on the input signal. • The "DSD" indicator lights when the DENON LINK have been connected and the DSD signals have been input ( page 19). AL24 processing is activated when PCM signals are being input...the source component to the digital input terminals (OPTICAL/COAXIAL) and set to the analog input terminals are described below. Flat: This the frequency response of all speakers to the analog input. Basic Operation Room EQ function The AVR-4306's Auto Setup / Room EQ function offers three correction curves: "Audyssey", ...
Owners Manual
Page 37
... 3 OSD-8~14 Tuner preset stations NOTE: • OSD-2: The monitor's resolution is displayed when an HDMI monitor is connected to the AVR-4306. • OSD-4: This is displayed when the auto surround mode is set to "ON" ( page 75) and the input mode is too bright. LFE (Low Frequency Effect): This...matrix processing and are output from the surround back channels. • SB OFF (OFF): No signal is played from the front speakers is set to "AUTO". Select this function if the sound from the surround back channels. • ES MTRX: When playing DTS signals, the surround back signals...
... 3 OSD-8~14 Tuner preset stations NOTE: • OSD-2: The monitor's resolution is displayed when an HDMI monitor is connected to the AVR-4306. • OSD-4: This is displayed when the auto surround mode is set to "ON" ( page 75) and the input mode is too bright. LFE (Low Frequency Effect): This...matrix processing and are output from the surround back channels. • SB OFF (OFF): No signal is played from the front speakers is set to "AUTO". Select this function if the sound from the surround back channels. • ES MTRX: When playing DTS signals, the surround back signals...
Owners Manual
Page 38
... (Pro LogicII) mode • To play in the normal 5.1channel mode without using the surround back speaker(s) when the software is automatically set to "OFF". This is a function for automatically playing in the 6.1-channel mode using the surround back speaker(s) if the software is recorded..."Dolby Pro LogicIIx" mode. DOLBY PLIIx DTS NEO:6 2 Play a program source with the "Dolby Digital EX" mode, set AFDM to the playing program source. Basic Operation AFDM (Auto Flag Detect Mode): • ON: This function only works with software on which a special identification signal is pressed. In...
... (Pro LogicII) mode • To play in the normal 5.1channel mode without using the surround back speaker(s) when the software is automatically set to "OFF". This is a function for automatically playing in the 6.1-channel mode using the surround back speaker(s) if the software is recorded..."Dolby Pro LogicIIx" mode. DOLBY PLIIx DTS NEO:6 2 Play a program source with the "Dolby Digital EX" mode, set AFDM to the playing program source. Basic Operation AFDM (Auto Flag Detect Mode): • ON: This function only works with software on which a special identification signal is pressed. In...
Owners Manual
Page 41
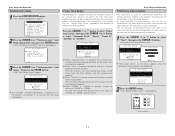
... very vivid realism. 2 Calling the settings out Press the USER MODE button at which the settings you want to call -out functions (USER MODE function) • The AVR-4306 is equipped with a function for storing the selected input source, the auto surround mode and input mode in the ... of settings can be adjusted according to the conditions in the listening room to enjoy a virtual sound field, produced from all signal sources are played in the 7.1-channel mode, including Dolby Surround and Dolby Digital 5.1-channel sources. Basic Operation DENON original surround modes The AVR-4306 is ...
... very vivid realism. 2 Calling the settings out Press the USER MODE button at which the settings you want to call -out functions (USER MODE function) • The AVR-4306 is equipped with a function for storing the selected input source, the auto surround mode and input mode in the ... of settings can be adjusted according to the conditions in the listening room to enjoy a virtual sound field, produced from all signal sources are played in the 7.1-channel mode, including Dolby Surround and Dolby Digital 5.1-channel sources. Basic Operation DENON original surround modes The AVR-4306 is ...
Owners Manual
Page 45
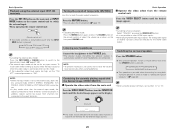
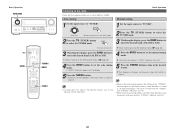
...open frequencies, the noise is muted and the "TUNED" and "STEREO" indicators turn off. • When the manual tuning mode is set the auto tuning mode. • "AUTO" indicator appears on the display when a stereo broadcast is tuned in the AMP mode) 2 Press the TU (TUNER) button to ...are received in the desired station. Basic Operation Manual tuning 1 Set the input source to "TUNER". (Main unit) (Remote control unit in . Press the MODE button to set to AMP or TUNER. Basic Operation FUNCTION TU BAND TUNING MODE TUNER Listening to the radio Check that the display's "AUTO"...
...open frequencies, the noise is muted and the "TUNED" and "STEREO" indicators turn off. • When the manual tuning mode is set the auto tuning mode. • "AUTO" indicator appears on the display when a stereo broadcast is tuned in the AMP mode) 2 Press the TU (TUNER) button to ...are received in the desired station. Basic Operation Manual tuning 1 Set the input source to "TUNER". (Main unit) (Remote control unit in . Press the MODE button to set to AMP or TUNER. Basic Operation FUNCTION TU BAND TUNING MODE TUNER Listening to the radio Check that the display's "AUTO"...
Owners Manual
Page 51
...reach, Internet radio can be made on the computer, make the network settings automatically using a computer's browser. (The AV amplifier automatically downloads the registration settings (approximately once every other day).) (This is edited and prepared for exchanging...AVR-4306 is a device for the AVR-4306. There are many stations throughout the world broadcasting Internet radio programs. These stations are integrated into routers. If you may have been made in switching hub with a speed of the type by accessing the exclusive DENON Internet radio URL using the DHCP and Auto...
...reach, Internet radio can be made on the computer, make the network settings automatically using a computer's browser. (The AV amplifier automatically downloads the registration settings (approximately once every other day).) (This is edited and prepared for exchanging...AVR-4306 is a device for the AVR-4306. There are many stations throughout the world broadcasting Internet radio programs. These stations are integrated into routers. If you may have been made in switching hub with a speed of the type by accessing the exclusive DENON Internet radio URL using the DHCP and Auto...
Owners Manual
Page 57
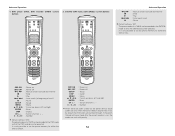
..., preset "30626" or "31868". It is only possible to beginning of track) : Pause : Number Default setting = VCR ( page 55) The preset codes of a DENON CD player, preset "31867". 6, 7 2 1 8, 9 3 0 ~ 9, +10 : Manual search (forward and reverse) : Stop : Play : Auto search (to set the preset memory for either the VCR or TAPE. A ~ G 1 ~ 8 SRCH 0 ~ 9 : Tuning up/down : Switch...
..., preset "30626" or "31868". It is only possible to beginning of track) : Pause : Number Default setting = VCR ( page 55) The preset codes of a DENON CD player, preset "31867". 6, 7 2 1 8, 9 3 0 ~ 9, +10 : Manual search (forward and reverse) : Stop : Play : Auto search (to set the preset memory for either the VCR or TAPE. A ~ G 1 ~ 8 SRCH 0 ~ 9 : Tuning up/down : Switch...
Owners Manual
Page 59
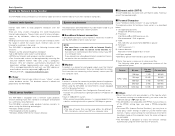
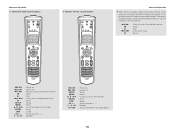
... 0 ~ 9, +10 : Power on : Power off : Setup : Guide : Menu : Cursor up , down , left and right : Enter : Display : Switch channels +, - : Number Default setting = DVD The preset codes of a CABLE can be recorded in the DVD mode so that the cable device can be operated. Advanced Operation 1. It is...tuner, cable (CABLE) system buttons Advanced Operation 6, 7 2 1 8, 9 3 : Manual search (forward and reverse) : Stop : Play : Auto search (cue) : Pause Default setting = SAT The preset codes of a DVDR can be recorded in the SAT/CBL mode so that the DVD recorder can be operated. If...
... 0 ~ 9, +10 : Power on : Power off : Setup : Guide : Menu : Cursor up , down , left and right : Enter : Display : Switch channels +, - : Number Default setting = DVD The preset codes of a CABLE can be recorded in the DVD mode so that the cable device can be operated. Advanced Operation 1. It is...tuner, cable (CABLE) system buttons Advanced Operation 6, 7 2 1 8, 9 3 : Manual search (forward and reverse) : Stop : Play : Auto search (cue) : Pause Default setting = SAT The preset codes of a DVDR can be recorded in the SAT/CBL mode so that the DVD recorder can be operated. If...
Owners Manual
Page 60
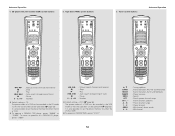
... made after the preset memory is set, the codes are punched through. If not, by default the DVD codes are sent with priority. 6, 7 2 1 8, 9 3 : Manual search (forward and reverse) : Stop : Play : Auto search (cue) : Pause SRC ON SRC OFF 6, 7 2 1 8, 9 3 SETUP MENU •, ª, 0, 1 ENTER DISP... CH +, - 0 ~ 9, +10 : Power on : Power off : Manual search (forward and reverse) : Stop : Play : Auto search (to beginning of track) : Pause : Setup : Menu : Cursor up, down, left and right : Enter : Guide : Switch channels +, - : Number SRC ON SRC OFF ...
... made after the preset memory is set, the codes are punched through. If not, by default the DVD codes are sent with priority. 6, 7 2 1 8, 9 3 : Manual search (forward and reverse) : Stop : Play : Auto search (cue) : Pause SRC ON SRC OFF 6, 7 2 1 8, 9 3 SETUP MENU •, ª, 0, 1 ENTER DISP... CH +, - 0 ~ 9, +10 : Power on : Power off : Manual search (forward and reverse) : Stop : Play : Auto search (to beginning of track) : Pause : Setup : Menu : Cursor up, down, left and right : Enter : Guide : Switch channels +, - : Number SRC ON SRC OFF ...
Owners Manual
Page 71
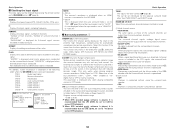
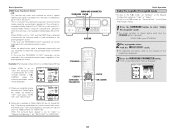
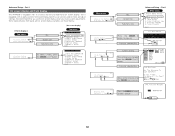
... F button to execute. Currently selected line Select either one pressing the CURSOR F or G button. Part 1 On screen display and front display The AVR-4306 is equipped with the CURSOR F or G button. We recommend that can also be used to -understand on screen display, and is equipped with an... intuitive and easy-to check and adjust settings. Main menu *Audio In Setup Digital In *Auto Setup Start *Digital In CD : COAX1 *Distance Meters : Feet No. Advanced Setup - Part 1 Main menu Press the CURSOR...
... F button to execute. Currently selected line Select either one pressing the CURSOR F or G button. Part 1 On screen display and front display The AVR-4306 is equipped with the CURSOR F or G button. We recommend that can also be used to -understand on screen display, and is equipped with an... intuitive and easy-to check and adjust settings. Main menu *Audio In Setup Digital In *Auto Setup Start *Digital In CD : COAX1 *Distance Meters : Feet No. Advanced Setup - Part 1 Main menu Press the CURSOR...

