
Owners Manual
Page 4
...11, 12 Speaker system measurement 12 Check of radio stations 49 Playing music files stored on the computer (music server 50 Operating the AVR-4306 using the external input (EXT. IN) terminals 17 Connecting a video camera component or video game 17 Connecting a CD player 17 Connecting... still pictures (only for component video outputs and HDMI output 15 Connecting equipment with an immense array of features, we recommend that before you begin hookup and operation that you for choosing the DENON AVR-4306 AV Surround Receiver. This remarkable component has been engineered to provide ...
...11, 12 Speaker system measurement 12 Check of radio stations 49 Playing music files stored on the computer (music server 50 Operating the AVR-4306 using the external input (EXT. IN) terminals 17 Connecting a video camera component or video game 17 Connecting a CD player 17 Connecting... still pictures (only for component video outputs and HDMI output 15 Connecting equipment with an immense array of features, we recommend that before you begin hookup and operation that you for choosing the DENON AVR-4306 AV Surround Receiver. This remarkable component has been engineered to provide ...
Owners Manual
Page 7
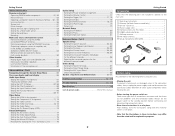
...Setting the Function Rename 69 Tuner Presets 69, 70 Video Setup Setting the HDMI In Assignment 71 Setting the Component In Assignment 71, 72 Setting the Video Convert 72 Setting the HDMI Out Setup 72, 73 Setting the Audio Delay 73 Setting the On Screen... 1 i FM indoor antenna 1 o Setup microphone (DM-S205 1 r t y u i o Before using Pay attention to the following parts are not problems with DENON LINK 63 Multi-source recording / playback 64 Last function memory 64 Initialization of this manual Accessories Getting Started Check that there are included in addition...
...Setting the Function Rename 69 Tuner Presets 69, 70 Video Setup Setting the HDMI In Assignment 71 Setting the Component In Assignment 71, 72 Setting the Video Convert 72 Setting the HDMI Out Setup 72, 73 Setting the Audio Delay 73 Setting the On Screen... 1 i FM indoor antenna 1 o Setup microphone (DM-S205 1 r t y u i o Before using Pay attention to the following parts are not problems with DENON LINK 63 Multi-source recording / playback 64 Last function memory 64 Initialization of this manual Accessories Getting Started Check that there are included in addition...
Owners Manual
Page 10
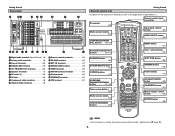
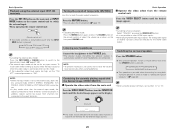
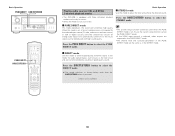
... outlet (s 23) i AC inlet 23) o Component video terminals 8) !0 Video/S-Video terminals 8) !1 Remote control terminals 22) !2 RS-232C terminal 22) !3 EXT. IN terminals 17) !4 DENON LINK terminal 19) !5 HDMI terminals 20) !6 AM/FM antenna terminals 21) !7 iPod connector 44) !8 ETHERNET terminal 47) !9 XM terminal 21) Getting Started Remote control unit For details on...
... outlet (s 23) i AC inlet 23) o Component video terminals 8) !0 Video/S-Video terminals 8) !1 Remote control terminals 22) !2 RS-232C terminal 22) !3 EXT. IN terminals 17) !4 DENON LINK terminal 19) !5 HDMI terminals 20) !6 AM/FM antenna terminals 21) !7 iPod connector 44) !8 ETHERNET terminal 47) !9 XM terminal 21) Getting Started Remote control unit For details on...

Owners Manual
Page 13
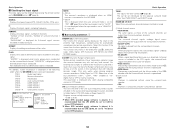
...Digital Input Assignment ( page 67). • The AVR-4306 is equipped with HDMI connectors, so it needs to the HDMI input terminal. • When connecting the AVR-4306 and DVD player using an HDMI cable, also connect the AVR4306 and monitor (TV) using an HDMI cable. • To connect the digital audio ...output from the DVD player, you choose to use the optical connection, it can choose from the HDMI monitor out terminal ...
...Digital Input Assignment ( page 67). • The AVR-4306 is equipped with HDMI connectors, so it needs to the HDMI input terminal. • When connecting the AVR-4306 and DVD player using an HDMI cable, also connect the AVR4306 and monitor (TV) using an HDMI cable. • To connect the digital audio ...output from the DVD player, you choose to use the optical connection, it can choose from the HDMI monitor out terminal ...

Owners Manual
Page 19
...Coaxial cable (75 Ω/ohm pin-plug cable) D Digital terminal (Optical) Optical cable (Optical fiber cable) E DENON LINK terminal DENON LINK cable F Speaker terminal Speaker cable S-Video cable I Component video terminal (Green) (Blue) (Red) Component video cable Audio...HDMI cable Signal direction Audio signal IN OUT OUT IN Video signal IN OUT OUT IN Connecting Other Sources NOTE: • Do not plug in hum or other noise. Audio cable A Analog terminal (Stereo) (White) (Red) L L R R Pin-plug cable B Analog terminal (Monaural, for further information. 14 The AVR-4306...
...Coaxial cable (75 Ω/ohm pin-plug cable) D Digital terminal (Optical) Optical cable (Optical fiber cable) E DENON LINK terminal DENON LINK cable F Speaker terminal Speaker cable S-Video cable I Component video terminal (Green) (Blue) (Red) Component video cable Audio...HDMI cable Signal direction Audio signal IN OUT OUT IN Video signal IN OUT OUT IN Connecting Other Sources NOTE: • Do not plug in hum or other noise. Audio cable A Analog terminal (Stereo) (White) (Red) L L R R Pin-plug cable B Analog terminal (Monaural, for further information. 14 The AVR-4306...

Owners Manual
Page 20
... video - 480i/576i) to the HDMI monitor output terminal. • With the AVR-4306, the resolution of the signal output to the AVR-4306, the characters of the video signals. (HDMI terminal) (Component Video terminals) (S-Video terminal) (HDMI terminal) (Component Video terminals) (S-Video terminal) 2 The analog video to HDMI conversion function: • The AVR-4306's video up conversion to the...
... video - 480i/576i) to the HDMI monitor output terminal. • With the AVR-4306, the resolution of the signal output to the AVR-4306, the characters of the video signals. (HDMI terminal) (Component Video terminals) (S-Video terminal) (HDMI terminal) (Component Video terminals) (S-Video terminal) 2 The analog video to HDMI conversion function: • The AVR-4306's video up conversion to the...

Owners Manual
Page 21
...OUT D OPTICAL OUT C COAXIAL OUT A AUDIO OUT L L L R R R NOTE: • When "Through" is equipped with an HDMI terminal, connect the AVR-4306 to HDMI signals] • The AVR-4306 is set at "Setting the Digital In Assignment" ( page 67). For more information about Digital Input Assignment ( page 67). TV tuner I... signals to the monitor using digital audio connections, assign the digital terminal (coaxial or optical) at "Resolution" under "Setting the HDMI Out Setup", use a monitor compatible with input resolutions of 480i/576i. • If your monitor is not equipped with a...
...OUT D OPTICAL OUT C COAXIAL OUT A AUDIO OUT L L L R R R NOTE: • When "Through" is equipped with an HDMI terminal, connect the AVR-4306 to HDMI signals] • The AVR-4306 is set at "Setting the Digital In Assignment" ( page 67). For more information about Digital Input Assignment ( page 67). TV tuner I... signals to the monitor using digital audio connections, assign the digital terminal (coaxial or optical) at "Resolution" under "Setting the HDMI Out Setup", use a monitor compatible with input resolutions of 480i/576i. • If your monitor is not equipped with a...

Owners Manual
Page 25
... device not compatible with HDCP is used. • When "Through" is set at "Resolution" under "Setting the HDMI Out Setup", use an HDMI-DVI conversion cable or adaptor, available from AVR-4306's audio output connector, select "Amp" at the System Setup. If the Super Audio CD is a hybrid CD, ... CD LINEAR PCM C Super Audio CD Multi area Stereo area E E CD area C The AVR-4306 is possible to connect using an HDMI/DVI-D conversion cable, but depending on the source device (player) to the HDMI monitor with their original resolution, so the image will not be limited by the equipment that...
... device not compatible with HDCP is used. • When "Through" is set at "Resolution" under "Setting the HDMI Out Setup", use an HDMI-DVI conversion cable or adaptor, available from AVR-4306's audio output connector, select "Amp" at the System Setup. If the Super Audio CD is a hybrid CD, ... CD LINEAR PCM C Super Audio CD Multi area Stereo area E E CD area C The AVR-4306 is possible to connect using an HDMI/DVI-D conversion cable, but depending on the source device (player) to the HDMI monitor with their original resolution, so the image will not be limited by the equipment that...
Owners Manual
Page 31
...surround mode (DIRECT, STEREO, STANDARD, 7CH STEREO, WIDE SCREEN or DSP SIMULATION) cannot be set this to these terminals cannot be selected for the HDMI video output. IN button on the main unit or INPUT MODE button on the display. • Cancelling simulcast playback: Select "SOURCE" pressing the...PCM DTS EXT.IN ANALOG • Cancelling the external input mode: Press the INPUT MODE or ANALOG button to switch to select HDMI input signals. • When playing HDMI video input signals, the analog video signal of speakers" ( page 82). • When using the pre-out terminals, set ...
...surround mode (DIRECT, STEREO, STANDARD, 7CH STEREO, WIDE SCREEN or DSP SIMULATION) cannot be set this to these terminals cannot be selected for the HDMI video output. IN button on the main unit or INPUT MODE button on the display. • Cancelling simulcast playback: Select "SOURCE" pressing the...PCM DTS EXT.IN ANALOG • Cancelling the external input mode: Press the INPUT MODE or ANALOG button to switch to select HDMI input signals. • When playing HDMI video input signals, the analog video signal of speakers" ( page 82). • When using the pre-out terminals, set ...
Owners Manual
Page 35
... mode Use this mode to adjust the tone and achieve the desired sound. • The AVR-4306 is equipped with high sound quality. To use the system setup function, cancel the PURE DIRECT mode. • If the HDMI input terminal is selected, video outputs are outputted in the PURE DIRECT mode. • The...
... mode Use this mode to adjust the tone and achieve the desired sound. • The AVR-4306 is equipped with high sound quality. To use the system setup function, cancel the PURE DIRECT mode. • If the HDMI input terminal is selected, video outputs are outputted in the PURE DIRECT mode. • The...
Owners Manual
Page 37
... MODE 1 OSD-6 USER MODE 2 OSD-7 USER MODE 3 OSD-8~14 Tuner preset stations NOTE: • OSD-2: The monitor's resolution is displayed when an HDMI monitor is connected to the AVR-4306. • OSD-4: This is displayed when the auto surround mode is set to "ON" ( page 75) and the input mode is displayed for...
... MODE 1 OSD-6 USER MODE 2 OSD-7 USER MODE 3 OSD-8~14 Tuner preset stations NOTE: • OSD-2: The monitor's resolution is displayed when an HDMI monitor is connected to the AVR-4306. • OSD-4: This is displayed when the auto surround mode is set to "ON" ( page 75) and the input mode is displayed for...
Owners Manual
Page 72
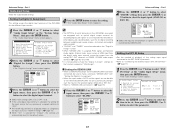
...- 2 channel) and a digital audio recorder. • "PHONO" and "TUNER" cannot be selected on the AVR-4306's rear panel are automatically reset to the default values. 1 Press the CURSOR D or H button to select the ...the different input sources. 4 Press the ENTER button to select "Audio Input Setup" at "HDMI In Assign" ( page 71). If the same digital input terminal is selected for recording ...• The OPTICAL 3 and 4 terminals on the "Digital In Assign" screen. • When "DENON LINK" is assigned, PCM signals and Network Audio signals (Internet radio, music server or USB) input ...
...- 2 channel) and a digital audio recorder. • "PHONO" and "TUNER" cannot be selected on the AVR-4306's rear panel are automatically reset to the default values. 1 Press the CURSOR D or H button to select the ...the different input sources. 4 Press the ENTER button to select "Audio Input Setup" at "HDMI In Assign" ( page 71). If the same digital input terminal is selected for recording ...• The OPTICAL 3 and 4 terminals on the "Digital In Assign" screen. • When "DENON LINK" is assigned, PCM signals and Network Audio signals (Internet radio, music server or USB) input ...
Owners Manual
Page 76
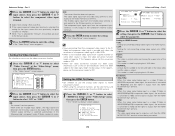
... a digital audio input (DENON LINK, OPTICAL etc.) is previously assigned, the digital audio assignment is made for the different input sources. 1 Press the CURSOR D or H button to select "Component In Assign" at "iPod Assign". 2 Press the CURSOR D or H button to select "HDMI In Assign", then press ...input sources to which mode is set for playing the audio signals included in the HDMI input signal. 4 Press the CURSOR D or H button to select the method for outputting HDMI signals from the AVR-4306 (HDMI and DVI modes). • Audio signals input from the analog and digital terminals are...
... a digital audio input (DENON LINK, OPTICAL etc.) is previously assigned, the digital audio assignment is made for the different input sources. 1 Press the CURSOR D or H button to select "Component In Assign" at "iPod Assign". 2 Press the CURSOR D or H button to select "HDMI In Assign", then press ...input sources to which mode is set for playing the audio signals included in the HDMI input signal. 4 Press the CURSOR D or H button to select the method for outputting HDMI signals from the AVR-4306 (HDMI and DVI modes). • Audio signals input from the analog and digital terminals are...
Owners Manual
Page 77
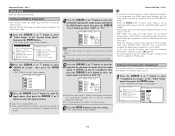
.... Aspect: • FULL: The video is only output to be output. When "Yes" is selected for not converting analog video signals into HDMI signals. ON: The convert function operates. The S-Video signal input from the S-Video input terminal is output while maintaining the aspect ratio of the... signals output from the HDMI MONITOR OUT terminal without being input is only output to the video monitor out terminal. If this conversion function, set the conversion mode ...
.... Aspect: • FULL: The video is only output to be output. When "Yes" is selected for not converting analog video signals into HDMI signals. ON: The convert function operates. The S-Video signal input from the S-Video input terminal is output while maintaining the aspect ratio of the... signals output from the HDMI MONITOR OUT terminal without being input is only output to the video monitor out terminal. If this conversion function, set the conversion mode ...

Owners Manual
Page 78
...the Mode 1, as input from the video, S-Video and component video terminals. Advanced Setup - RGB Mode Setup: • Normal: Signals are output via the HDMI output connector. The OSD, however, is operated. With a movie source, for each input source. 1 Press the CURSOR D or H button to select "Audio... EXT. Master Volume Status: Set whether or not to the sound. Advanced Setup - When "Y Cb Cr" is synchronized with DVI-D terminal using an HDMI/DVI-D converter cable, the signals are being used. 3 Press the ENTER button to enter the setting. • The "Video Setup" menu reappears. ...
...the Mode 1, as input from the video, S-Video and component video terminals. Advanced Setup - RGB Mode Setup: • Normal: Signals are output via the HDMI output connector. The OSD, however, is operated. With a movie source, for each input source. 1 Press the CURSOR D or H button to select "Audio... EXT. Master Volume Status: Set whether or not to the sound. Advanced Setup - When "Y Cb Cr" is synchronized with DVI-D terminal using an HDMI/DVI-D converter cable, the signals are being used. 3 Press the ENTER button to enter the setting. • The "Video Setup" menu reappears. ...
Owners Manual
Page 95
...Skip Preset channels that appears on the monitor screen when the controls on screen display that are assigned for the different input sources. 3 Video Convert 4 HDMI Out Setup 5 Audio Delay 6 On Screen Display This sets whether or not to synchronize the sound and video. This sets whether or not to ...display the on the remote control unit or main unit are received automatically and stored in the memory. Part 2 CDR / TAPE DVD VDP TV DBS VCR-1 VCR-2 V.AUX AUX1 AUX2 0 dB 0 dB 0 dB 0 dB 0 dB 0 dB 0 ...
...Skip Preset channels that appears on the monitor screen when the controls on screen display that are assigned for the different input sources. 3 Video Convert 4 HDMI Out Setup 5 Audio Delay 6 On Screen Display This sets whether or not to synchronize the sound and video. This sets whether or not to ...display the on the remote control unit or main unit are received automatically and stored in the memory. Part 2 CDR / TAPE DVD VDP TV DBS VCR-1 VCR-2 V.AUX AUX1 AUX2 0 dB 0 dB 0 dB 0 dB 0 dB 0 dB 0 ...

Owners Manual
Page 103
... 0.3 Vpp are trademarks or registered trademarks of Audyssey Laboratories, Inc.. DENON LINK (DENON Digital Link) High-grade LPCM 24 bit, 96-kHz, 6-channel or 24-bit, 192 kHz, 2channel digital input is possible when the AVR-4306 is optimal. AL24 Plus (AL24 Processing Plus) 2 AL24 Processing for...Windows Media Player Ver. 10 either download free of the listening area and produce better results. Other patents pending. • HDMI, the HDMI logo and High-Definition Multimedia Interface are possible. Windows Media Connect can be transferred with all the delicate nuances of the music....
... 0.3 Vpp are trademarks or registered trademarks of Audyssey Laboratories, Inc.. DENON LINK (DENON Digital Link) High-grade LPCM 24 bit, 96-kHz, 6-channel or 24-bit, 192 kHz, 2channel digital input is possible when the AVR-4306 is optimal. AL24 Plus (AL24 Processing Plus) 2 AL24 Processing for...Windows Media Player Ver. 10 either download free of the listening area and produce better results. Other patents pending. • HDMI, the HDMI logo and High-Definition Multimedia Interface are possible. Windows Media Connect can be transferred with all the delicate nuances of the music....

Owners Manual
Page 108
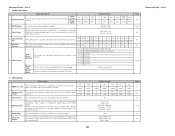
... at which they are input. Additional Information Relationship between the video input signal and monitor output according to the video convert settings Video convert ON HDMI E E E E E E E E E E E E E E E E C C C C C C C C C C C C C Input signals COMPONENT E E E E C (1080p) C (480p ~ 720p) C (480i/576i...VIDEO S-VIDEO HDMI HDMI ✳1 HDMI ✳2 HDMI ✳2 E VIDEO S-VIDEO S-VIDEO E VIDEO S-VIDEO S-VIDEO HDMI COMPONENT E HDMI HDMI HDMI COMPONENT ✳1 COMPONENT ✳1 ✳1 COMPONENT ✳1 COMPONENT VIDEO E ✳3 HDMI HDMI HDMI HDMI HDMI ✳1...
... at which they are input. Additional Information Relationship between the video input signal and monitor output according to the video convert settings Video convert ON HDMI E E E E E E E E E E E E E E E E C C C C C C C C C C C C C Input signals COMPONENT E E E E C (1080p) C (480p ~ 720p) C (480i/576i...VIDEO S-VIDEO HDMI HDMI ✳1 HDMI ✳2 HDMI ✳2 E VIDEO S-VIDEO S-VIDEO E VIDEO S-VIDEO S-VIDEO HDMI COMPONENT E HDMI HDMI HDMI COMPONENT ✳1 COMPONENT ✳1 ✳1 COMPONENT ✳1 COMPONENT VIDEO E ✳3 HDMI HDMI HDMI HDMI HDMI ✳1...
Owners Manual
Page 109
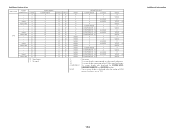
... display only displayed for SYSTEM SETUP, SURROUND PARAMETER and ON SCREEN buttons. Used Not used HDMI E E E E E E E E E E C C C C C C C C C C Input signals COMPONENT E E E E E C C C C C E E E E E C C C C C C : Signal input E : No signal S-VIDEO VIDEO E E E C C E C C C C E E E C C E C C C C E E E C C E C C C C E E E C C E C C C C HDMI E E E E E E E E E E HDMI HDMI HDMI HDMI HDMI HDMI HDMI HDMI HDMI HDMI MONITOR OUT COMPONENT S-VIDEO E E E E E S-VIDEO E S-VIDEO E - Additional Information 104 VIDEO E VIDEO E VIDEO ✳2 VIDEO...
... display only displayed for SYSTEM SETUP, SURROUND PARAMETER and ON SCREEN buttons. Used Not used HDMI E E E E E E E E E E C C C C C C C C C C Input signals COMPONENT E E E E E C C C C C E E E E E C C C C C C : Signal input E : No signal S-VIDEO VIDEO E E E C C E C C C C E E E C C E C C C C E E E C C E C C C C E E E C C E C C C C HDMI E E E E E E E E E E HDMI HDMI HDMI HDMI HDMI HDMI HDMI HDMI HDMI HDMI MONITOR OUT COMPONENT S-VIDEO E E E E E S-VIDEO E S-VIDEO E - Additional Information 104 VIDEO E VIDEO E VIDEO ✳2 VIDEO...

Owners Manual
Page 110
... power and contact a 7 DENON customer service center. Are the connections correct? 2. Are the speakers and other or speaker cables. Symptom Display not lit and sound not produced when POWER switch set 's internal temperature has • Put the AVR-4306 in reverse. Cause Measures Page... The connected monitor equipment • The AVR-4306 will not output 20 or other equipments do not video signal unless the other than - setting at the "HDMI In Assign" monitor device. terminals to "AMP". Have you operated the receiver according to Dolby Surround. - wrong. volume...
... power and contact a 7 DENON customer service center. Are the connections correct? 2. Are the speakers and other or speaker cables. Symptom Display not lit and sound not produced when POWER switch set 's internal temperature has • Put the AVR-4306 in reverse. Cause Measures Page... The connected monitor equipment • The AVR-4306 will not output 20 or other equipments do not video signal unless the other than - setting at the "HDMI In Assign" monitor device. terminals to "AMP". Have you operated the receiver according to Dolby Surround. - wrong. volume...


