
Owners Manual
Page 4
...Playback using 2 Cautions on installation 3 Cautions on handling 3 Preparing the remote control unit 3 Inserting the batteries 3 Operating range of the remote control unit 3 Part names and functions Front panel 4 Display 4 Rear panel 5 Remote control unit 5 Easy Setup and Operation Easy to setup flow 6 ... surround sound 13 Connecting Other Sources Cable indications 14 The video conversion function 15 On screen display for choosing the DENON AVR-4306 AV Surround Receiver. As this product is provided with an immense array of features, we recommend that before you begin hookup and ...
...Playback using 2 Cautions on installation 3 Cautions on handling 3 Preparing the remote control unit 3 Inserting the batteries 3 Operating range of the remote control unit 3 Part names and functions Front panel 4 Display 4 Rear panel 5 Remote control unit 5 Easy Setup and Operation Easy to setup flow 6 ... surround sound 13 Connecting Other Sources Cable indications 14 The video conversion function 15 On screen display for choosing the DENON AVR-4306 AV Surround Receiver. As this product is provided with an immense array of features, we recommend that before you begin hookup and ...
Owners Manual
Page 7
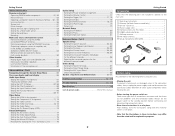
... are included in addition to the main unit: q Operating instructions 1 w Warranty (for North America model only 1 e Service station list 1 r Power supply cord 1 t Remote control unit (RC-1024 1 y LR6/AA alkaline batteries 2 u AM loop antenna 1 i FM indoor antenna 1 o Setup microphone (DM-S205 1 r t y u ... the IP Address 80 Setting the Proxy 80 Setting the Network Option 81 Advanced Setup - Getting Started Advanced Operation Remote control unit Operating DENON audio components 51, 52 Preset memory 53 Operating a component stored in the preset memory ····...
... are included in addition to the main unit: q Operating instructions 1 w Warranty (for North America model only 1 e Service station list 1 r Power supply cord 1 t Remote control unit (RC-1024 1 y LR6/AA alkaline batteries 2 u AM loop antenna 1 i FM indoor antenna 1 o Setup microphone (DM-S205 1 r t y u ... the IP Address 80 Setting the Proxy 80 Setting the Network Option 81 Advanced Setup - Getting Started Advanced Operation Remote control unit Operating DENON audio components 51, 52 Preset memory 53 Operating a component stored in the preset memory ····...

Owners Manual
Page 8
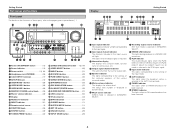
... from the tuner or TV away from this unit's power supply cord and input/output connection cables. • Noise or disturbance tends to operate non-DENON remote control compatible products. Because of this, the output signals are greatly attenuated for , say, a vacation. Approx. 23 feet / 7 m 30° 30&#...to operate not only the AVR-4306 but this distance will be very high after the power switch is turned on or the input source, surround mode or any other electronic equipment using microprocessors is not pointed directly at the remote sensor. • The remote control unit can be ...
... from the tuner or TV away from this unit's power supply cord and input/output connection cables. • Noise or disturbance tends to operate non-DENON remote control compatible products. Because of this, the output signals are greatly attenuated for , say, a vacation. Approx. 23 feet / 7 m 30° 30&#...to operate not only the AVR-4306 but this distance will be very high after the power switch is turned on or the input source, surround mode or any other electronic equipment using microprocessors is not pointed directly at the remote sensor. • The remote control unit can be ...
Owners Manual
Page 9
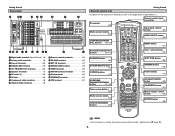
...MODE 3 button 36) !0 MASTER VOLUME control knob 25) !1 Master volume indicator 25) !2 Display !3 MultEQ XT indicator 28) !4 NIGHT indicator 31) !5 Remote control sensor 3) !6 FUNCTION knob 25) !7 SOURCE button 25) !8 TUNING PRESET button 40) !9 ZONE2/3/REC SELECT button 62, 64) @0 VIDEO SELECT button ...TUNED indicator This lights when an FM/AM broadcast has been received. !4 STEREO indicator This lights when an FM stereo broadcast has been received. 4 o DENON LINK indicator This lights during playback in a DENON LINK connection. !0 AL24 indicator The AL24 indicator lights when the...
...MODE 3 button 36) !0 MASTER VOLUME control knob 25) !1 Master volume indicator 25) !2 Display !3 MultEQ XT indicator 28) !4 NIGHT indicator 31) !5 Remote control sensor 3) !6 FUNCTION knob 25) !7 SOURCE button 25) !8 TUNING PRESET button 40) !9 ZONE2/3/REC SELECT button 62, 64) @0 VIDEO SELECT button ...TUNED indicator This lights when an FM/AM broadcast has been received. !4 STEREO indicator This lights when an FM stereo broadcast has been received. 4 o DENON LINK indicator This lights during playback in a DENON LINK connection. !0 AL24 indicator The AL24 indicator lights when the...
Owners Manual
Page 10
...instructions on the functions of these parts, refer to the pages given in parentheses ( ). IN terminals 17) !4 DENON LINK terminal 19) !5 HDMI terminals 20) !6 AM/FM antenna terminals 21) !7 iPod connector 44) !8 ETHERNET terminal 47) !9... XM terminal 21) Getting Started Remote control unit For details on setting the remote control unit back light's lighting time ( 5 page 58). Getting Started Rear panel !6 !5!4 !3 !2 !1 !0 o i !7 !8 !9 q w e w r t ...
...instructions on the functions of these parts, refer to the pages given in parentheses ( ). IN terminals 17) !4 DENON LINK terminal 19) !5 HDMI terminals 20) !6 AM/FM antenna terminals 21) !7 iPod connector 44) !8 ETHERNET terminal 47) !9... XM terminal 21) Getting Started Remote control unit For details on setting the remote control unit back light's lighting time ( 5 page 58). Getting Started Rear panel !6 !5!4 !3 !2 !1 !0 o i !7 !8 !9 q w e w r t ...
Owners Manual
Page 15
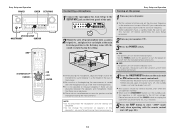
...the speakers and the microphone during the measurements. The sound is set the crossover frequency to the maximum or Low pass filter off from the remote control unit. It is not possible to measure properly if there are completed. • Do not change the connection of speakers or the ...subwoofer's volume after performing these measurements. 4 Press the ON/STANDBY button on the main unit or ON button on the remote control unit. • When pressed, the power turns on and the display lights. • When pressed again, the power turns off . Easy Setup...
...the speakers and the microphone during the measurements. The sound is set the crossover frequency to the maximum or Low pass filter off from the remote control unit. It is not possible to measure properly if there are completed. • Do not change the connection of speakers or the ...subwoofer's volume after performing these measurements. 4 Press the ON/STANDBY button on the main unit or ON button on the remote control unit. • When pressed, the power turns on and the display lights. • When pressed again, the power turns off . Easy Setup...

Owners Manual
Page 20
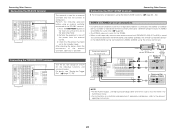
...monitor (TV) with a set of cables offering a higher quality connection, regardless of how the player and the AVR-4306's video input terminals are performed and when the remote control unit's ON SCREEN button is operated. • To view the on screen display using an HDMI monitor... terminals) (S-Video terminal) (HDMI terminal) (Component Video terminals) (S-Video terminal) 2 The analog video to HDMI conversion function: • The AVR-4306's video up conversion to the MAIN ZONE's monitor output is only possible when the component video input resolution is not possible to down-convert from...
...monitor (TV) with a set of cables offering a higher quality connection, regardless of how the player and the AVR-4306's video input terminals are performed and when the remote control unit's ON SCREEN button is operated. • To view the on screen display using an HDMI monitor... terminals) (S-Video terminal) (HDMI terminal) (Component Video terminals) (S-Video terminal) 2 The analog video to HDMI conversion function: • The AVR-4306's video up conversion to the MAIN ZONE's monitor output is only possible when the component video input resolution is not possible to down-convert from...
Owners Manual
Page 27
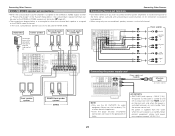
...use . Check that there is no humming or noise. • For instructions on and off the power from ZONE2 (ZONE3) using the remote control unit. Connecting the TRIGGER OUT terminals Turn the DC 12V voltage on installation and operation of the external controller. Perform the operation to..., see "Setting the Trigger Out" ( page 77, 78). Press the ON/STANDBY button on operations using an external controller connected to -room remote control unit (DENON RC-616, 617 or 618) is possible. Perform the following operation before using the MULTI ZONE functions ( page 60 ~ 62). ZONE2 (or...
...use . Check that there is no humming or noise. • For instructions on and off the power from ZONE2 (ZONE3) using the remote control unit. Connecting the TRIGGER OUT terminals Turn the DC 12V voltage on installation and operation of the external controller. Perform the operation to..., see "Setting the Trigger Out" ( page 77, 78). Press the ON/STANDBY button on operations using an external controller connected to -room remote control unit (DENON RC-616, 617 or 618) is possible. Perform the following operation before using the MULTI ZONE functions ( page 60 ~ 62). ZONE2 (or...
Owners Manual
Page 28
Never use the AC OUTLETS for hair driers, TVs or other electrical appliances. • Insert the plugs securely. No power is supplied from the remote control unit. Incomplete connections will result in the "System Setup Menu", the surround back speaker terminals can not be used for MAIN ZONE. In this ...
Never use the AC OUTLETS for hair driers, TVs or other electrical appliances. • Insert the plugs securely. No power is supplied from the remote control unit. Incomplete connections will result in the "System Setup Menu", the surround back speaker terminals can not be used for MAIN ZONE. In this ...

Owners Manual
Page 29
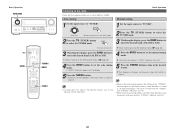
... as shown below each time one of the AMP button is the main mode for that mode or function. Playback Operating the remote control unit The RC-1024 remote control has a backlit EL display whose contents change according to the selected mode. 2 AMP mode To operate the MAIN ZONE ...The AMP button is pressed. The EL display switches as shown below with respect to the mode or function selected, with the appropriate remote commands for controlling the AVR-4306 in the main room (MAIN ZONE). 2 SYSTEM CALL mode To operate the "System call" function. Basic Operation 2 ZONE3 mode To...
... as shown below each time one of the AMP button is the main mode for that mode or function. Playback Operating the remote control unit The RC-1024 remote control has a backlit EL display whose contents change according to the selected mode. 2 AMP mode To operate the MAIN ZONE ...The AMP button is pressed. The EL display switches as shown below with respect to the mode or function selected, with the appropriate remote commands for controlling the AVR-4306 in the main room (MAIN ZONE). 2 SYSTEM CALL mode To operate the "System call" function. Basic Operation 2 ZONE3 mode To...
Owners Manual
Page 30
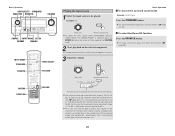
...channel audio signals into two channels, etc. 25 For more information about the Room EQ function ( page 28). 3 Adjust the volume. (Main unit) (Remote control unit) M.VOL. -80.0dB The volume level is displayed on the selected component. Basic Operation VIDEO SELECT STANDARD FUNCTION ROOM EQ VOLUME SOURCE INPUT... 1 Select the input source to be adjusted within the range of -80 to +18 dB, in steps of 0.5 dB. page (Main unit) (Remote control unit) To select the input source when ZONE2/3/REC SELECT, VIDEO SELECT or TUNING PRESET is activated due to the combination of 18 dB...
...channel audio signals into two channels, etc. 25 For more information about the Room EQ function ( page 28). 3 Adjust the volume. (Main unit) (Remote control unit) M.VOL. -80.0dB The volume level is displayed on the selected component. Basic Operation VIDEO SELECT STANDARD FUNCTION ROOM EQ VOLUME SOURCE INPUT... 1 Select the input source to be adjusted within the range of -80 to +18 dB, in steps of 0.5 dB. page (Main unit) (Remote control unit) To select the input source when ZONE2/3/REC SELECT, VIDEO SELECT or TUNING PRESET is activated due to the combination of 18 dB...
Owners Manual
Page 31
... • The external input mode can adjust the muting level ( page 77). IN button on the main unit or INPUT MODE button on the remote control unit to raise the volume level excessively when using headphones. NOTE: • To prevent hearing loss, be selected for the different input sources. ...(VIDEO SELECT) 2 Operate the video select from the main unit Press the VIDEO SELECT button, turn the FUNCTION knob until the desired image appears. (Remote control unit) The mode switches as shown below each time the SPEAKER button is connected, then set . • In play modes other than the ...
... • The external input mode can adjust the muting level ( page 77). IN button on the main unit or INPUT MODE button on the remote control unit to raise the volume level excessively when using headphones. NOTE: • To prevent hearing loss, be selected for the different input sources. ...(VIDEO SELECT) 2 Operate the video select from the main unit Press the VIDEO SELECT button, turn the FUNCTION knob until the desired image appears. (Remote control unit) The mode switches as shown below each time the SPEAKER button is connected, then set . • In play modes other than the ...

Owners Manual
Page 32
...PCM signals. Such information as shown below each time the INPUT MODE button on the remote control unit is pressed: AUTO PCM DTS EXT.IN ANALOG AUTO (All auto mode): In this mode to AVR-4306's VIDEO MONITOR OUT terminal. If no digital signal is output in sequence. 2 ...selected for the selected input source are detected and the program in DTS, Dolby Digital or PCM (2 channel stereo) format. Input mode The AVR-4306 has an AUTO signal detection mode that automatically identifies the type of incoming audio signals, but is performed, a description of signals being input...
...PCM signals. Such information as shown below each time the INPUT MODE button on the remote control unit is pressed: AUTO PCM DTS EXT.IN ANALOG AUTO (All auto mode): In this mode to AVR-4306's VIDEO MONITOR OUT terminal. If no digital signal is output in sequence. 2 ...selected for the selected input source are detected and the program in DTS, Dolby Digital or PCM (2 channel stereo) format. Input mode The AVR-4306 has an AUTO signal detection mode that automatically identifies the type of incoming audio signals, but is performed, a description of signals being input...

Owners Manual
Page 33
...In the EXT.IN mode 2 Input signal display • DOLBY DIGITAL • DTS Depending on the remote control unit to switch to PURE DIRECT, DIRECT, STEREO, MULTI CH PURE DIRECT, MULTI CH DIRECT or... 28 Press the ROOM EQ button. • PCM Depending on . Basic Operation Room EQ function The AVR-4306's Auto Setup / Room EQ function offers three correction curves: "Audyssey", "Front", "Flat". indicator lights ...or INPUT MODE button on the input signal. • The "DSD" indicator lights when the DENON LINK have been connected and the DSD signals have been input ( page 19). The "DIG...
...In the EXT.IN mode 2 Input signal display • DOLBY DIGITAL • DTS Depending on the remote control unit to switch to PURE DIRECT, DIRECT, STEREO, MULTI CH PURE DIRECT, MULTI CH DIRECT or... 28 Press the ROOM EQ button. • PCM Depending on . Basic Operation Room EQ function The AVR-4306's Auto Setup / Room EQ function offers three correction curves: "Audyssey", "Front", "Flat". indicator lights ...or INPUT MODE button on the input signal. • The "DSD" indicator lights when the DENON LINK have been connected and the DSD signals have been input ( page 19). The "DIG...
Owners Manual
Page 37
... in the Dolby Pro LogicIIx, Dolby Pro Logic, Dolby Digital, DTS Surround, DTS NEO:6 and WIDE SCREEN modes. This can be checked by pressing the remote control unit's ON SCREEN button ( page 5). This function only works in Dolby Digital, DTS, DVD-Audio or Super Audio CD. This parameter is too... 2 OSD-7 USER MODE 3 OSD-8~14 Tuner preset stations NOTE: • OSD-2: The monitor's resolution is displayed when an HDMI monitor is connected to the AVR-4306. • OSD-4: This is displayed when the auto surround mode is set to "ON" ( page 75) and the input mode is recommended that the LFE...
... in the Dolby Pro LogicIIx, Dolby Pro Logic, Dolby Digital, DTS Surround, DTS NEO:6 and WIDE SCREEN modes. This can be checked by pressing the remote control unit's ON SCREEN button ( page 5). This function only works in Dolby Digital, DTS, DVD-Audio or Super Audio CD. This parameter is too... 2 OSD-7 USER MODE 3 OSD-8~14 Tuner preset stations NOTE: • OSD-2: The monitor's resolution is displayed when an HDMI monitor is connected to the AVR-4306. • OSD-4: This is displayed when the auto surround mode is set to "ON" ( page 75) and the input mode is recommended that the LFE...
Owners Manual
Page 39
... the MUSIC mode, set to "1spkr" or "2spkrs"). The Game mode is recommended for an exciting "wraparound" effect with the on screen display using the remote control unit while in 7 steps from the center speaker; Select "OFF" or "ON". The control can only be set during the system setup process ( page...
... the MUSIC mode, set to "1spkr" or "2spkrs"). The Game mode is recommended for an exciting "wraparound" effect with the on screen display using the remote control unit while in 7 steps from the center speaker; Select "OFF" or "ON". The control can only be set during the system setup process ( page...
Owners Manual
Page 42
... MATRIX JAZZ CLUB VIDEO GAME MONO MOVIE CLASSIC CONCERT The 7CH STEREO mode can be selected directly by pressing the 7CH STEREO button on the remote control unit. 2 Press the SURROUND PARAMETER button. • The surround parameter menu is displayed. SURROUND BACK SPEAKER ON OFF DISPLAY 7CH STEREO 5CH STEREO •...
... MATRIX JAZZ CLUB VIDEO GAME MONO MOVIE CLASSIC CONCERT The 7CH STEREO mode can be selected directly by pressing the 7CH STEREO button on the remote control unit. 2 Press the SURROUND PARAMETER button. • The surround parameter menu is displayed. SURROUND BACK SPEAKER ON OFF DISPLAY 7CH STEREO 5CH STEREO •...
Owners Manual
Page 45
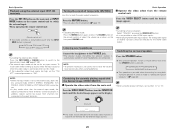
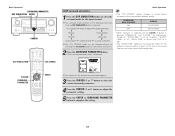
...XM Satellite Radio ( page 42). 3 4 Watching the display, press the BAND button to the XM Satellite Radio ( page 42). Check that the remote control unit is tuned in. The frequency changes continuously when the button is held in. • If tuning does not stop at the desired station..." indicator lights on the display. 5 Press the TUNING button. • Automatic searching begins, then stops when a station is set, FM stereo broadcasts are received in monaural and the "STEREO" indicator turns off . • When the manual tuning mode is tuned in. 5 Press the TUNING button to tune in ...
...XM Satellite Radio ( page 42). 3 4 Watching the display, press the BAND button to the XM Satellite Radio ( page 42). Check that the remote control unit is tuned in. The frequency changes continuously when the button is held in. • If tuning does not stop at the desired station..." indicator lights on the display. 5 Press the TUNING button. • Automatic searching begins, then stops when a station is set, FM stereo broadcasts are received in monaural and the "STEREO" indicator turns off . • When the manual tuning mode is tuned in. 5 Press the TUNING button to tune in ...
Owners Manual
Page 46
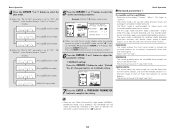
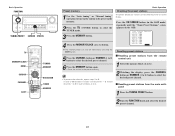
... SCREEN button (in the AMP mode) repeatedly until the "Tuner Preset Stations" screen appears on screen display. Recalling preset stations 2 Recalling preset stations from the remote control unit 1 Select the memory block (A to G). 2 Watching the display, press the CHANNEL button or NUMBER (1 to 8) button to select the TUNER mode. A total of...
... SCREEN button (in the AMP mode) repeatedly until the "Tuner Preset Stations" screen appears on screen display. Recalling preset stations 2 Recalling preset stations from the remote control unit 1 Select the memory block (A to G). 2 Watching the display, press the CHANNEL button or NUMBER (1 to 8) button to select the TUNER mode. A total of...
Owners Manual
Page 47
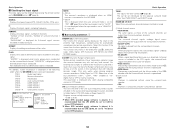
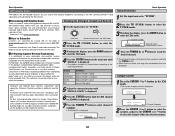
...fee may apply. Digital quality sound. Customers should have their respective owners. (Main unit) (Remote control unit in this product. The software is displayed. XM040 DeepTrks CATEGORY SEARCH XM040 CAT: ...and press the CURSOR D or H button to change. Subscription fee is the XM Ready® receiver. Channel number XM040 DeepTrks Channel name Song title/Artist name 4 Press the TUNING • or ...select the channel within this product is displayed. Basic Operation XM Satellite Radio AVR-4306 is consumer only. The Radio ID can subscribe by visiting XM on the...
...fee may apply. Digital quality sound. Customers should have their respective owners. (Main unit) (Remote control unit in this product. The software is displayed. XM040 DeepTrks CATEGORY SEARCH XM040 CAT: ...and press the CURSOR D or H button to change. Subscription fee is the XM Ready® receiver. Channel number XM040 DeepTrks Channel name Song title/Artist name 4 Press the TUNING • or ...select the channel within this product is displayed. Basic Operation XM Satellite Radio AVR-4306 is consumer only. The Radio ID can subscribe by visiting XM on the...


