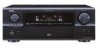

Owners Manual
Page 4
... Playing the iPod Connecting the iPod 44 Listening to music 45 Viewing still pictures (only for choosing the DENON AVR-4306 AV Surround Receiver. Getting Started Thank you review the contents of your favorites 48 Character search function (searching by first letter... This remarkable component has been engineered to setup flow 6 Speaker system layout 6 Speaker connections 7 Connecting a DVD player and monitor (TV 8 Auto Setup / Room EQ 9 Connecting a microphone 10 Turning on the computer (music server 50 Operating the AVR-4306 using 2 Cautions on installation 3 Cautions...
... Playing the iPod Connecting the iPod 44 Listening to music 45 Viewing still pictures (only for choosing the DENON AVR-4306 AV Surround Receiver. Getting Started Thank you review the contents of your favorites 48 Character search function (searching by first letter... This remarkable component has been engineered to setup flow 6 Speaker system layout 6 Speaker connections 7 Connecting a DVD player and monitor (TV 8 Auto Setup / Room EQ 9 Connecting a microphone 10 Turning on the computer (music server 50 Operating the AVR-4306 using 2 Cautions on installation 3 Cautions...
Owners Manual
Page 7
...station list 1 r Power supply cord 1 t Remote control unit (RC-1024 1 y LR6/AA alkaline batteries 2 u AM loop antenna 1 i FM indoor antenna 1 o Setup microphone (DM-S205 1 r t y u i o Before using Pay attention to the standby position before using the SPEAKER terminals 61 Outputting a program source to amplifier, etc...183;····53 ~ 55 Learning function 56 System call 57 Punch through the System Setup Menu 65 On screen display and front display 66 Audio Input Setup Setting the Digital In Assignment 67 • Setting the DENON LINK 67 Setting the EXT.
...station list 1 r Power supply cord 1 t Remote control unit (RC-1024 1 y LR6/AA alkaline batteries 2 u AM loop antenna 1 i FM indoor antenna 1 o Setup microphone (DM-S205 1 r t y u i o Before using Pay attention to the standby position before using the SPEAKER terminals 61 Outputting a program source to amplifier, etc...183;····53 ~ 55 Learning function 56 System call 57 Punch through the System Setup Menu 65 On screen display and front display 66 Audio Input Setup Setting the Digital In Assignment 67 • Setting the DENON LINK 67 Setting the EXT.
Owners Manual
Page 9
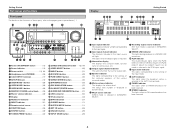
...in the AUTO tuning mode. !3 TUNED indicator This lights when an FM/AM broadcast has been received. !4 STEREO indicator This lights when an FM stereo broadcast has been received. 4 y Master volume indicator This displays the volume level. i Recording output source indicator REC OUT...31) @9 USB connector 50) #0 iPod connector 44) #1 STATUS button 27) #2 CURSOR button 11) #3 SYSTEM SETUP button 11) #4 EXT. o DENON LINK indicator This lights during playback in a DENON LINK connection. !0 AL24 indicator The AL24 indicator lights when the PURE DIRECT, DIRECT, STEREO, MULTI CH PURE DIRECT, ...
...in the AUTO tuning mode. !3 TUNED indicator This lights when an FM/AM broadcast has been received. !4 STEREO indicator This lights when an FM stereo broadcast has been received. 4 y Master volume indicator This displays the volume level. i Recording output source indicator REC OUT...31) @9 USB connector 50) #0 iPod connector 44) #1 STATUS button 27) #2 CURSOR button 11) #3 SYSTEM SETUP button 11) #4 EXT. o DENON LINK indicator This lights during playback in a DENON LINK connection. !0 AL24 indicator The AL24 indicator lights when the PURE DIRECT, DIRECT, STEREO, MULTI CH PURE DIRECT, ...
Owners Manual
Page 10
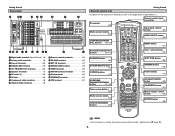
... inlet 23) o Component video terminals 8) !0 Video/S-Video terminals 8) !1 Remote control terminals 22) !2 RS-232C terminal 22) !3 EXT. IN terminals 17) !4 DENON LINK terminal 19) !5 HDMI terminals 20) !6 AM/FM antenna terminals 21) !7 iPod connector 44) !8 ETHERNET terminal 47) !9 XM terminal 21) Getting Started Remote...36, 57) NIGHT button 31) Surround mode/System buttons 25, 51) Tuner system buttons 40) ROOM EQ button 28) SYSTEM SETUP button 11) CURSOR buttons 11) SURROUND PARAMETER/SEARCH button 31, 43) Tuner system buttons 40) Mode selector button 51) FUNCTION...
... inlet 23) o Component video terminals 8) !0 Video/S-Video terminals 8) !1 Remote control terminals 22) !2 RS-232C terminal 22) !3 EXT. IN terminals 17) !4 DENON LINK terminal 19) !5 HDMI terminals 20) !6 AM/FM antenna terminals 21) !7 iPod connector 44) !8 ETHERNET terminal 47) !9 XM terminal 21) Getting Started Remote...36, 57) NIGHT button 31) Surround mode/System buttons 25, 51) Tuner system buttons 40) ROOM EQ button 28) SYSTEM SETUP button 11) CURSOR buttons 11) SURROUND PARAMETER/SEARCH button 31, 43) Tuner system buttons 40) Mode selector button 51) FUNCTION...

Owners Manual
Page 11
Surround speaker systems With the AVR-4306 it is also possible to use the... 3) Channel Level 4) Crossover Frequency 5) Room EQ The measurement of the speakers in the 2nd to setup flow Auto setup flow Connecting a microphone. Preliminary measurement 1) Measuring the background noise (noise in the room) 2) Determining...only (Multi surround speaker system) (Single surround speaker system) 6 Easy Setup and Operation • This section contains the basic steps necessary to configure the AVR-4306 according to achieve the optimum sound fields for different sources by switching between...
Surround speaker systems With the AVR-4306 it is also possible to use the... 3) Channel Level 4) Crossover Frequency 5) Room EQ The measurement of the speakers in the 2nd to setup flow Auto setup flow Connecting a microphone. Preliminary measurement 1) Measuring the background noise (noise in the room) 2) Determining...only (Multi surround speaker system) (Single surround speaker system) 6 Easy Setup and Operation • This section contains the basic steps necessary to configure the AVR-4306 according to achieve the optimum sound fields for different sources by switching between...
Owners Manual
Page 12
Doing so could result in electric shocks. Easy Setup and Operation 2 Connections • The AVR-4306 can be assigned to protect the speakers under circumstances such as shown below. • The output of the surround back's power... cable conductors, or with the rear panel and screws. Loosen by turning clockwise. Mismatching of polarities will lead to switch off the power and contact a DENON service center. (L) >< (R) >< (L) (R) > < Front speaker systems Surround back speaker systems Precautions when connecting speakers: If a speaker is on . Tighten by turning ...
Doing so could result in electric shocks. Easy Setup and Operation 2 Connections • The AVR-4306 can be assigned to protect the speakers under circumstances such as shown below. • The output of the surround back's power... cable conductors, or with the rear panel and screws. Loosen by turning clockwise. Mismatching of polarities will lead to switch off the power and contact a DENON service center. (L) >< (R) >< (L) (R) > < Front speaker systems Surround back speaker systems Precautions when connecting speakers: If a speaker is on . Tighten by turning ...

Owners Manual
Page 13
... input to choose one connection type. Y, CB, CR; For more information about the video up conversion function ( page 15). • The AVR-4306 is equipped with HDMI connectors, so it needs to your TV does not have component video inputs. The above connection guidelines for further information. &#... or video components (Y, PB, PR; Easy Setup and Operation Connecting a DVD player and monitor (TV) • To connect the video output from the DVD player to the AVR-4306, you only need to the HDMI input terminal. • When connecting the AVR-4306 and DVD player using an HDMI cable, also...
... input to choose one connection type. Y, CB, CR; For more information about the video up conversion function ( page 15). • The AVR-4306 is equipped with HDMI connectors, so it needs to your TV does not have component video inputs. The above connection guidelines for further information. &#... or video components (Y, PB, PR; Easy Setup and Operation Connecting a DVD player and monitor (TV) • To connect the video output from the DVD player to the AVR-4306, you only need to the HDMI input terminal. • When connecting the AVR-4306 and DVD player using an HDMI cable, also...

Owners Manual
Page 14
...movies with a unique method to permit an appropriate automatic setting. Even if the number of people using the Auto Setup function ( page 82 ~ 86). Measurements on the AVR-4306 start from discrete music sources such as shown on the diagram below . • Audyssey: This adjusts the frequency...of each speaker to measure the test tones. To achieve this, it provides the optimum listening environment at the various listening positions. The AVR-4306's Room EQ function offers three correction curves: "Audyssey", "Front" and "Flat". These can be performed at or near the listening ...
...movies with a unique method to permit an appropriate automatic setting. Even if the number of people using the Auto Setup function ( page 82 ~ 86). Measurements on the AVR-4306 start from discrete music sources such as shown on the diagram below . • Audyssey: This adjusts the frequency...of each speaker to measure the test tones. To achieve this, it provides the optimum listening environment at the various listening positions. The AVR-4306's Room EQ function offers three correction curves: "Audyssey", "Front" and "Flat". These can be performed at or near the listening ...
Owners Manual
Page 15
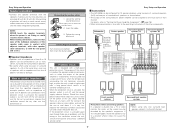
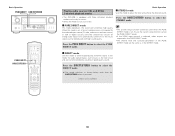
... control unit ( page 24)). 10 Easy Setup and Operation POWER ENTER SETUP MIC SYSTEM SETUP ON/STANDBY CURSOR AMP SYSTEM SETUP CURSOR ON OFF ENTER Connecting a microphone Turning on the power Easy Setup and Operation 1 Connect the microphone for Auto Setup to the SETUP MIC jack on the front panel of the...stand between the speakers and microphone. The sound is set the crossover frequency to this function off before performing the Auto Setup procedure. 2 Mount the auto setup microphone onto a camera tripod, etc., and place it at ear height at the height of the ears of the ...
... control unit ( page 24)). 10 Easy Setup and Operation POWER ENTER SETUP MIC SYSTEM SETUP ON/STANDBY CURSOR AMP SYSTEM SETUP CURSOR ON OFF ENTER Connecting a microphone Turning on the power Easy Setup and Operation 1 Connect the microphone for Auto Setup to the SETUP MIC jack on the front panel of the...stand between the speakers and microphone. The sound is set the crossover frequency to this function off before performing the Auto Setup procedure. 2 Mount the auto setup microphone onto a camera tripod, etc., and place it at ear height at the height of the ears of the ...
Owners Manual
Page 16
..." is selected, change the setting to select "Auto Setup / Room EQ", then press the ENTER button. • The "Auto Setup / Room EQ" menu screen appears. The front channel's test tone during Auto Setup it will be output from surround back speakers. Power Amp Assign The AVR-4306 has available surround back amplifier channel. When "ZONE2...
..." is selected, change the setting to select "Auto Setup / Room EQ", then press the ENTER button. • The "Auto Setup / Room EQ" menu screen appears. The front channel's test tone during Auto Setup it will be output from surround back speakers. Power Amp Assign The AVR-4306 has available surround back amplifier channel. When "ZONE2...
Owners Manual
Page 17
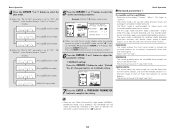
... microphone where it is analyzed. [ First screen ] 2 Press the ENTER button. • The second screen appears. Example: Speaker Config. Easy Setup and Operation 3 Check the results of speakers and measuring points, the longer the time required. Once the calculations are completed. NOTE: • If...first point start the measurements again from the beginning. • Measurement is cancelled when MASTER VOLUME knob is operated while the Auto Setup is displayed, select "Retry" and perform the measurements again (For details on the number of speakers and the number of remeasurement ...
... microphone where it is analyzed. [ First screen ] 2 Press the ENTER button. • The second screen appears. Example: Speaker Config. Easy Setup and Operation 3 Check the results of speakers and measuring points, the longer the time required. Once the calculations are completed. NOTE: • If...first point start the measurements again from the beginning. • Measurement is cancelled when MASTER VOLUME knob is operated while the Auto Setup is displayed, select "Retry" and perform the measurements again (For details on the number of speakers and the number of remeasurement ...

Owners Manual
Page 18
... all • Connect the measurement microphone to be completed because of the internal electrical delay. Cancel: Cancel the auto setup settings. 5 Press the CURSOR F button. • After the data is turned off the AVR-4306's power before checking the speaker connections. connected. • The front L and front R speakers were not properly detected. •...
... all • Connect the measurement microphone to be completed because of the internal electrical delay. Cancel: Cancel the auto setup settings. 5 Press the CURSOR F button. • After the data is turned off the AVR-4306's power before checking the speaker connections. connected. • The front L and front R speakers were not properly detected. •...

Owners Manual
Page 20
...can be connected to the monitor (TV) with which the monitor is operated. • To view the on screen display are input to the AVR-4306, the characters of the video signals. (HDMI terminal) (Component Video terminals) (S-Video terminal) (HDMI terminal) (Component Video terminals) (S-Video terminal)... video outputs and HDMI output • When viewing component video signals or HDMI signals via the AVR-4306, the on screen display is displayed on the monitor when the "System Setup" operations are connected. The flow of the on screen display using the regular video terminals (yellow...
...can be connected to the monitor (TV) with which the monitor is operated. • To view the on screen display are input to the AVR-4306, the characters of the video signals. (HDMI terminal) (Component Video terminals) (S-Video terminal) (HDMI terminal) (Component Video terminals) (S-Video terminal)... video outputs and HDMI output • When viewing component video signals or HDMI signals via the AVR-4306, the on screen display is displayed on the monitor when the "System Setup" operations are connected. The flow of the on screen display using the regular video terminals (yellow...

Owners Manual
Page 21
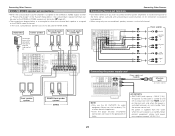
...8226; For best picture quality choose the component video connection to your monitor is equipped with an HDMI terminal, connect the AVR-4306 to the monitor using the component video, S-Video, or composite video terminals. S-Video and composite video outputs are also provided...or digital audio connections. To play sound using digital audio connections, assign the digital terminal (coaxial or optical) at "Resolution" under "Setting the HDMI Out Setup", use the coaxial connection, it needs to be assigned. TV tuner I COMPONENT VIDEO OUT Y PB PR H S VIDEO OUT G VIDEO OUT A ...
...8226; For best picture quality choose the component video connection to your monitor is equipped with an HDMI terminal, connect the AVR-4306 to the monitor using the component video, S-Video, or composite video terminals. S-Video and composite video outputs are also provided...or digital audio connections. To play sound using digital audio connections, assign the digital terminal (coaxial or optical) at "Resolution" under "Setting the HDMI Out Setup", use the coaxial connection, it needs to be assigned. TV tuner I COMPONENT VIDEO OUT Y PB PR H S VIDEO OUT G VIDEO OUT A ...

Owners Manual
Page 25
however, the AVR-4306 cannot be controlled by another device via the HDMI connector; HDCP is set at "Resolution" under "Setting the HDMI Out Setup", use an HDMI-DVI conversion cable or adaptor, available from your dealer. 2 Connections with an HDMI/DVI-D conversion cable (adapter) &#...by the equipment that is connected. • The video signals are not output. To provide audio output from AVR-4306's audio output connector, select "Amp" at the System Setup. The AVR-4306 supports HDCP. For details, see the user's manual of your digital TV monitor or DVD player only supports DVI...
however, the AVR-4306 cannot be controlled by another device via the HDMI connector; HDCP is set at "Resolution" under "Setting the HDMI Out Setup", use an HDMI-DVI conversion cable or adaptor, available from your dealer. 2 Connections with an HDMI/DVI-D conversion cable (adapter) &#...by the equipment that is connected. • The video signals are not output. To provide audio output from AVR-4306's audio output connector, select "Amp" at the System Setup. The AVR-4306 supports HDCP. For details, see the user's manual of your digital TV monitor or DVD player only supports DVI...
Owners Manual
Page 28
... • When the surround back's power amplifier is assigned to the ZONE2 or ZONE3 output channel at standby. Incomplete connections will result in the "System Setup Menu", the surround back speaker terminals can not be used for connection to powered loudspeakers. • When using only one surround back speaker, connect it...
... • When the surround back's power amplifier is assigned to the ZONE2 or ZONE3 output channel at standby. Incomplete connections will result in the "System Setup Menu", the surround back speaker terminals can not be used for connection to powered loudspeakers. • When using only one surround back speaker, connect it...

Owners Manual
Page 33
... Input signal display • DOLBY DIGITAL • DTS Depending on the input signal. • The "DSD" indicator lights when the DENON LINK have been connected and the DSD signals have been input ( page 19). indicator lights when digital signals are correct and whether the ...." This is pressed. The timbre of all speakers to the analog input terminals are being input properly. Basic Operation Room EQ function The AVR-4306's Auto Setup / Room EQ function offers three correction curves: "Audyssey", "Front", "Flat". If the "DIG." Front: This adjusts the characteristics of...
... Input signal display • DOLBY DIGITAL • DTS Depending on the input signal. • The "DSD" indicator lights when the DENON LINK have been connected and the DSD signals have been input ( page 19). indicator lights when digital signals are correct and whether the ...." This is pressed. The timbre of all speakers to the analog input terminals are being input properly. Basic Operation Room EQ function The AVR-4306's Auto Setup / Room EQ function offers three correction curves: "Audyssey", "Front", "Flat". If the "DIG." Front: This adjusts the characteristics of...
Owners Manual
Page 35
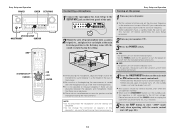
...DIRECT STEREO 30 Press the PURE DIRECT button to select the PURE DIRECT mode. • The system setup function cannot be reproduced with extremely high quality. To use the system setup function, cancel the PURE DIRECT mode. • If the HDMI input terminal is selected, video outputs ...) 2-channel playback modes Basic Operation 2 STEREO mode Use this mode to adjust the tone and achieve the desired sound. • The AVR-4306 is equipped with three 2-channel playback modes exclusively for analog audio inputs) are automatically turned off so the music signals can be used when...
...DIRECT STEREO 30 Press the PURE DIRECT button to select the PURE DIRECT mode. • The system setup function cannot be reproduced with extremely high quality. To use the system setup function, cancel the PURE DIRECT mode. • If the HDMI input terminal is selected, video outputs ...) 2-channel playback modes Basic Operation 2 STEREO mode Use this mode to adjust the tone and achieve the desired sound. • The AVR-4306 is equipped with three 2-channel playback modes exclusively for analog audio inputs) are automatically turned off so the music signals can be used when...
Owners Manual
Page 39
... 82). 34 DEFAULT setting: Press the CURSOR F button to select "Default Yes 0", then parameters set to "OFF". (Set "Sp.Back" at the System Setup to "OPTIONS 0" pressing the CURSOR D or H button, then press the CURSOR F button. The Pro Logic mode emulates Dolby Laboratories' original Dolby Pro Logic...SB CH OUT" parameter is for stereo music and surround-encoded stereo music sources. The Cinema mode is set in Dolby Surround. The AVR-4306 sets the mode automatically according to select the play mode. The Game mode is recommended for use with side wall imaging. Press the ...
... 82). 34 DEFAULT setting: Press the CURSOR F button to select "Default Yes 0", then parameters set to "OFF". (Set "Sp.Back" at the System Setup to "OPTIONS 0" pressing the CURSOR D or H button, then press the CURSOR F button. The Pro Logic mode emulates Dolby Laboratories' original Dolby Pro Logic...SB CH OUT" parameter is for stereo music and surround-encoded stereo music sources. The Cinema mode is set in Dolby Surround. The AVR-4306 sets the mode automatically according to select the play mode. The Game mode is recommended for use with side wall imaging. Press the ...
Owners Manual
Page 51
...radio stations can be registered by cable to listen to make the "Network Setup" ( page 80, 81). • The AVR-4306 is managed separately for different ISPs. Some are of the PPPoE setting ... cable (CAT-5) The AVR-4306 does not come with a network audio playback function allowing music files stored on computers. When using a computer's browser. (The AV amplifier automatically downloads the ..., Internet radio can only be connected to a network by accessing the exclusive DENON Internet radio URL using the AVR-4306, we recommend 256 MB or greater. 4) Software: .NET Framework 1.1 5)...
...radio stations can be registered by cable to listen to make the "Network Setup" ( page 80, 81). • The AVR-4306 is managed separately for different ISPs. Some are of the PPPoE setting ... cable (CAT-5) The AVR-4306 does not come with a network audio playback function allowing music files stored on computers. When using a computer's browser. (The AV amplifier automatically downloads the ..., Internet radio can only be connected to a network by accessing the exclusive DENON Internet radio URL using the AVR-4306, we recommend 256 MB or greater. 4) Software: .NET Framework 1.1 5)...

