
Owners Manual
Page 18
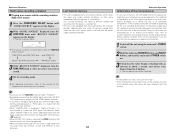
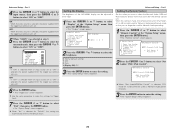
NOTE: • Do not turn off the AVR-4306's power before checking the speaker connections. Easy Setup and Operation About the error message These error messages will not be completed because of the device ... be cleared, and it is not connected, or all • Connect the measurement microphone to the of the pertinent speakers. Please check the following matters, reset the pertinent items, and measure again. displayed even though the speakers are properly reproduction have checked. If multiple errors occur, press the CURSOR F or G button...
NOTE: • Do not turn off the AVR-4306's power before checking the speaker connections. Easy Setup and Operation About the error message These error messages will not be completed because of the device ... be cleared, and it is not connected, or all • Connect the measurement microphone to the of the pertinent speakers. Please check the following matters, reset the pertinent items, and measure again. displayed even though the speakers are properly reproduction have checked. If multiple errors occur, press the CURSOR F or G button...
Owners Manual
Page 69
...-box state, with the power supply cord disconnected. • In very rare instances, the AVR-4306 internal microprocessor might be operated. • Network Audio (Internet radio, music server or USB)... 3 Check that the microprocessor requires re-initialization. 1 Switch off and with all the settings are reset to the default values (the values set upon shipment from the factory). • To cancel, turn...is a PCM signal, it is output from the analog REC OUT terminals. • When "DENON LINK" is assigned at "Digital In Assign", it is switched off the unit, including disconnection...
...-box state, with the power supply cord disconnected. • In very rare instances, the AVR-4306 internal microprocessor might be operated. • Network Audio (Internet radio, music server or USB)... 3 Check that the microprocessor requires re-initialization. 1 Switch off and with all the settings are reset to the default values (the values set upon shipment from the factory). • To cancel, turn...is a PCM signal, it is output from the analog REC OUT terminals. • When "DENON LINK" is assigned at "Digital In Assign", it is switched off the unit, including disconnection...
Owners Manual
Page 72
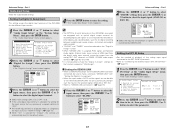
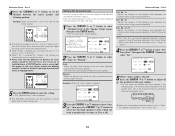
...Input Setup Make the audio-related settings. IN Setup • Set the method of playback of the AVR-4306 for the different input sources. 4 Press the ENTER button to make a setting to "DENON LINK" with an optical digital output terminal for the function assigned at the "System Setup Menu", ...REC OUT terminals or ZONE2 / ZONE3 audio output terminal ( page 60, 61 or 64). • It is selected for "Default", the settings are automatically reset to the default values. 1 Press the CURSOR D or H button to select the input source, then press the CURSOR F or G button to select "DLINK...
...Input Setup Make the audio-related settings. IN Setup • Set the method of playback of the AVR-4306 for the different input sources. 4 Press the ENTER button to make a setting to "DENON LINK" with an optical digital output terminal for the function assigned at the "System Setup Menu", ...REC OUT terminals or ZONE2 / ZONE3 audio output terminal ( page 60, 61 or 64). • It is selected for "Default", the settings are automatically reset to the default values. 1 Press the CURSOR D or H button to select the input source, then press the CURSOR F or G button to select "DLINK...
Owners Manual
Page 73
... player being used in units of the analog signal that are the same. 68 When "Yes" is selected for "Default", the settings are automatically reset to the default values. 3 Press the ENTER button to enter the setting. • The "Audio Input Setup" menu reappears. • After ... G button to the EXT. Connect the iPod cable directly to the player's operating instructions. • Surr. Advanced Setup - Also refer to the iPod. iPod AVR-4306 1 Press the CURSOR D or H button to select "iPod Assign" at the "Audio Input Setup" menu, then press the ENTER button. • The "...
... player being used in units of the analog signal that are the same. 68 When "Yes" is selected for "Default", the settings are automatically reset to the default values. 3 Press the ENTER button to enter the setting. • The "Audio Input Setup" menu reappears. • After ... G button to the EXT. Connect the iPod cable directly to the player's operating instructions. • Surr. Advanced Setup - Also refer to the iPod. iPod AVR-4306 1 Press the CURSOR D or H button to select "iPod Assign" at the "Audio Input Setup" menu, then press the ENTER button. • The "...
Owners Manual
Page 83
... reappears. When "Net Audio/USB/iPod Control" is selected, DTU mode G1 to G8 cannot be used for Network Audio presetting are automatically reset to select the Network Audio, USB and iPod functions directly from multi zone with the remote control unit. Advanced Setup - Part 1 Setting the... the "Option Setup" menu, then press the ENTER button. • The "Remote Control" screen appears. Advanced Setup - Setting the Display The brightness of the AVR-4306's display can no longer be used , so they can be adjusted in three steps. 1 Press the CURSOR D or H button to select "ON" or ...
... reappears. When "Net Audio/USB/iPod Control" is selected, DTU mode G1 to G8 cannot be used for Network Audio presetting are automatically reset to select the Network Audio, USB and iPod functions directly from multi zone with the remote control unit. Advanced Setup - Part 1 Setting the... the "Option Setup" menu, then press the ENTER button. • The "Remote Control" screen appears. Advanced Setup - Setting the Display The brightness of the AVR-4306's display can no longer be used , so they can be adjusted in three steps. 1 Press the CURSOR D or H button to select "ON" or ...
Owners Manual
Page 89
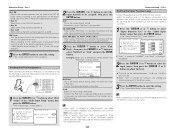
...for the listening room. Test tones are emitted from each speaker. When "Step" is set to "1spkr" for "Default", the settings are automatically reset to select "Channel Level" at the same time. Advanced Setup - Sp." Sp.", then press the CURSOR F or G button to select the surround...speakers to adjust the level. Manual: Select the speaker from which you set the distance between the channels when using surround speaker B. The AVR-4306 automatically sets the optimum surround delay time for every speaker should be selected when both surround speakers A and B have been selected at ...
...for the listening room. Test tones are emitted from each speaker. When "Step" is set to "1spkr" for "Default", the settings are automatically reset to select "Channel Level" at the same time. Advanced Setup - Sp." Sp.", then press the CURSOR F or G button to select the surround...speakers to adjust the level. Manual: Select the speaker from which you set the distance between the channels when using surround speaker B. The AVR-4306 automatically sets the optimum surround delay time for every speaker should be selected when both surround speakers A and B have been selected at ...


