Owners Manual
Page 7
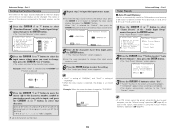
... 1 Navigating through 57 Setting the back light's lighting time 58 Setting the ambient light sensor 58 Setting the brightness 58 Resetting 59 Multi zone music entertainment system Multi-zone playback using the ZONE2 and ZONE3 PREOUT terminals 60 Multi-zone playback using this... instructions along with the warranty card in a safe place. • Note that there are not problems with DENON LINK 63 Multi-source recording / playback 64 Last function memory 64 Initialization of this manual Accessories Getting Started Check that the following parts are...
... 1 Navigating through 57 Setting the back light's lighting time 58 Setting the ambient light sensor 58 Setting the brightness 58 Resetting 59 Multi zone music entertainment system Multi-zone playback using the ZONE2 and ZONE3 PREOUT terminals 60 Multi-zone playback using this... instructions along with the warranty card in a safe place. • Note that there are not problems with DENON LINK 63 Multi-source recording / playback 64 Last function memory 64 Initialization of this manual Accessories Getting Started Check that the following parts are...

Owners Manual
Page 18
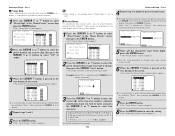
Store: Store the checked measurement values. If the power is turned off while the data is quieter. Be sure to turn off the AVR-4306's power before checking the speaker connections. If multiple errors occur, press the CURSOR F or G button to select "Audyssey", "Front" or "Flat" ...at a time when it will not be cleared, and it is being stored. t The measurement microphone is too low. Please check the following matters, reset the pertinent items, and measure again. connected. • The front L and front R speakers were not properly detected. • Only one surround ...
Store: Store the checked measurement values. If the power is turned off while the data is quieter. Be sure to turn off the AVR-4306's power before checking the speaker connections. If multiple errors occur, press the CURSOR F or G button to select "Audyssey", "Front" or "Flat" ...at a time when it will not be cleared, and it is being stored. t The measurement microphone is too low. Please check the following matters, reset the pertinent items, and measure again. connected. • The front L and front R speakers were not properly detected. • Only one surround ...
Owners Manual
Page 36
... normalized to "ON", the "D.COMP" surround parameter can be selected. 31 When this function is activated, the following message appears on and off , "LFE" is reset, and "TONE" is set to the default value. 2 Dialogue Normalization The dialogue normalization function is set to enter the night mode. • The NIGHT indicator...
... normalized to "ON", the "D.COMP" surround parameter can be selected. 31 When this function is activated, the following message appears on and off , "LFE" is reset, and "TONE" is set to the default value. 2 Dialogue Normalization The dialogue normalization function is set to enter the night mode. • The NIGHT indicator...
Owners Manual
Page 40
... and the input signal switches to the default values and "CINEMA EQ." The front channel (FL and FR) signals bypass the decoder and are automatically reset to a digital signal encoded in the DTS NEO:6 MUSIC mode has been added. 35 CENTER IMAGE (0.0 to the surround (SL, SR and SB channels). •...
... and the input signal switches to the default values and "CINEMA EQ." The front channel (FL and FR) signals bypass the decoder and are automatically reset to a digital signal encoded in the DTS NEO:6 MUSIC mode has been added. 35 CENTER IMAGE (0.0 to the surround (SL, SR and SB channels). •...

Owners Manual
Page 58
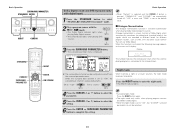
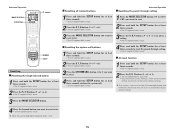
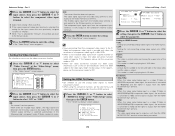
..., function names may not operate properly. Advanced Operation Operating a component stored in the memory. • The top IR segment blinks once after resetting: • TV, VCR HITACHI • CD, DVD DENON • SAT RCA DENON Model No. In this case, use more than that, the remote "times out" and you must begin again.
..., function names may not operate properly. Advanced Operation Operating a component stored in the memory. • The top IR segment blinks once after resetting: • TV, VCR HITACHI • CD, DVD DENON • SAT RCA DENON Model No. In this case, use more than that, the remote "times out" and you must begin again.
Owners Manual
Page 64
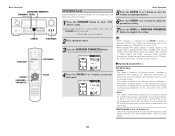
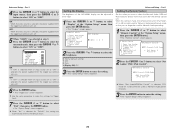
...twice. 2 Press tthhee99, ,7,76, b8utbtuotnto(n9 →(9→7 →7→68)). Other key can be deleted by repeating steps 1 to reset twice. • The IR segment blinks twice. 1 Press tahnedMhOoDleEtShEeLSECETOURPbbuuttotonn(TfoVroartSlAeaTst/ CthBreLe)syeocuonwdasn. to the factory default settings. to select a s•...;eTthteinIgR.segment blinks twice. • The IR segment blinks twice. 3 Press the SYSTEM CALL button (1 to 3) you want to reset. 4 Press and hold the SETUP button for at least three seconds. • The IR segment blinks twice. 2 Press tthhee99, ,7,76,...
...twice. 2 Press tthhee99, ,7,76, b8utbtuotnto(n9 →(9→7 →7→68)). Other key can be deleted by repeating steps 1 to reset twice. • The IR segment blinks twice. 1 Press tahnedMhOoDleEtShEeLSECETOURPbbuuttotonn(TfoVroartSlAeaTst/ CthBreLe)syeocuonwdasn. to the factory default settings. to select a s•...;eTthteinIgR.segment blinks twice. • The IR segment blinks twice. 3 Press the SYSTEM CALL button (1 to 3) you want to reset. 4 Press and hold the SETUP button for at least three seconds. • The IR segment blinks twice. 2 Press tthhee99, ,7,76,...
Owners Manual
Page 69
...is a PCM signal, it is output from the analog REC OUT terminals. • When "DENON LINK" is assigned at "Digital In Assign", it is not possible to output the PCM signal...box state, with the power supply cord disconnected. • In very rare instances, the AVR-4306 internal microprocessor might be initialized. 4 Set the recording mode. Only use this procedure if ...If step 3 does not work, start over from step 1. • If the microprocessor has been reset, all custom memories and settings erased, and the original factory default settings restored. Advanced Operation Multi-source ...
...is a PCM signal, it is output from the analog REC OUT terminals. • When "DENON LINK" is assigned at "Digital In Assign", it is not possible to output the PCM signal...box state, with the power supply cord disconnected. • In very rare instances, the AVR-4306 internal microprocessor might be initialized. 4 Set the recording mode. Only use this procedure if ...If step 3 does not work, start over from step 1. • If the microprocessor has been reset, all custom memories and settings erased, and the original factory default settings restored. Advanced Operation Multi-source ...
Owners Manual
Page 72
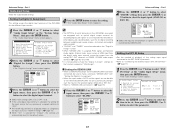
... this for recording digital audio signals to select the parameter. 67 If the same digital input terminal is selected for "Default", the settings are automatically reset to the default values. 1 Press the CURSOR D or H button to select the input source, then press the CURSOR F or G button to select "DLINK". 2 Press ...the CURSOR D or H button to select the item to be selected on the AVR-4306's rear panel are not be transferred by DENON LINK, the unit automatically changes over the input to the EXT.
... this for recording digital audio signals to select the parameter. 67 If the same digital input terminal is selected for "Default", the settings are automatically reset to the default values. 1 Press the CURSOR D or H button to select the input source, then press the CURSOR F or G button to select "DLINK". 2 Press ...the CURSOR D or H button to select the item to be selected on the AVR-4306's rear panel are not be transferred by DENON LINK, the unit automatically changes over the input to the EXT.
Owners Manual
Page 73
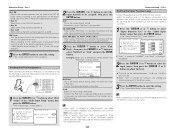
...EXT. SW Level: Sets the playback level of the function set at "iPod Function". • When "AUX" is assigned to adjust the level. iPod AVR-4306 1 Press the CURSOR D or H button to enter the setting. • The "Audio Input Setup" menu reappears. Advanced Setup - The level can ...be adjusted between "AUX/Net" and "AUX/iPod" each time the input source is selected for "Default", the settings are automatically reset to the default values. 3 Press the ENTER button to the iPod. B: Select when using surround speakers A. • Surr. Connect the iPod Dock...
...EXT. SW Level: Sets the playback level of the function set at "iPod Function". • When "AUX" is assigned to adjust the level. iPod AVR-4306 1 Press the CURSOR D or H button to enter the setting. • The "Audio Input Setup" menu reappears. Advanced Setup - The level can ...be adjusted between "AUX/Net" and "AUX/iPod" each time the input source is selected for "Default", the settings are automatically reset to the default values. 3 Press the ENTER button to the iPod. B: Select when using surround speakers A. • Surr. Connect the iPod Dock...
Owners Manual
Page 74
...G button. • The screen switches to highlight the input source display, then press the CURSOR H button. To reset the input source name to the default value, press the CURSOR F or G button to the character input screen. ...Tuner Presets Advanced Setup - Part 1 2 Auto Preset Memory Use this to automatically search for "Default", then press the CURSOR F button to reset to tune in the station, then preset it using the manual "Preset memory" operation ( page 41). 69 ABCDEFGHIJKLMNOPQRSTUVWXYZ a b c d e f g h i j k l m n o p q r s t u v w x ...
...G button. • The screen switches to highlight the input source display, then press the CURSOR H button. To reset the input source name to the default value, press the CURSOR F or G button to the character input screen. ...Tuner Presets Advanced Setup - Part 1 2 Auto Preset Memory Use this to automatically search for "Default", then press the CURSOR F button to reset to tune in the station, then preset it using the manual "Preset memory" operation ( page 41). 69 ABCDEFGHIJKLMNOPQRSTUVWXYZ a b c d e f g h i j k l m n o p q r s t u v w x ...
Owners Manual
Page 75
... CURSOR H button is pressed at the very bottom of the screen. • The screen for preset channels (except the XM channel). These names are automatically reset to the default name. 1 Press the CURSOR D or H button to select "Preset Name" at the "Tuner Presets" screen, then press the ENTER button. ...button to "OFF". 2 Preset Name It is selected for "Default", the setting are displayed on the front display and on the on screen display. To reset the preset channel name to the default value, press the CURSOR F or G button to input the preset channel name. Example: When "A1" is ...
... CURSOR H button is pressed at the very bottom of the screen. • The screen for preset channels (except the XM channel). These names are automatically reset to the default name. 1 Press the CURSOR D or H button to select "Preset Name" at the "Tuner Presets" screen, then press the ENTER button. ...button to "OFF". 2 Preset Name It is selected for "Default", the setting are displayed on the front display and on the on screen display. To reset the preset channel name to the default value, press the CURSOR F or G button to input the preset channel name. Example: When "A1" is ...
Owners Manual
Page 77
... function, set the conversion mode to enter the setting. • The "Video Setup" menu reappears. When there are multiple input signals, the input signals are reset to the default values. 3 Press the ENTER button to OFF. The S-Video signal input from the HDMI MONITOR OUT terminal without being converted. 72 If...
... function, set the conversion mode to enter the setting. • The "Video Setup" menu reappears. When there are multiple input signals, the input signals are reset to the default values. 3 Press the ENTER button to OFF. The S-Video signal input from the HDMI MONITOR OUT terminal without being converted. 72 If...
Owners Manual
Page 83
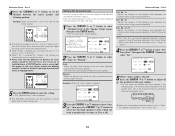
... power supplied from the trigger out terminal turns on . Advanced Setup - ON: When that input source is selected for Network Audio presetting are automatically reset to select "Display" at the "Option Setup" menu, then press the ENTER button. • The "Remote Control" screen appears. Part 1 ...turns off . 6 Press the ENTER button. • The "Trigger Out" screen reappears. Advanced Setup - Setting the Display The brightness of the AVR-4306's display can no longer be used for "Default", the setting are used, so they can be used as Network Audio preset channels. 3 Press ...
... power supplied from the trigger out terminal turns on . Advanced Setup - ON: When that input source is selected for Network Audio presetting are automatically reset to select "Display" at the "Option Setup" menu, then press the ENTER button. • The "Remote Control" screen appears. Part 1 ...turns off . 6 Press the ENTER button. • The "Trigger Out" screen reappears. Advanced Setup - Setting the Display The brightness of the AVR-4306's display can no longer be used for "Default", the setting are used, so they can be used as Network Audio preset channels. 3 Press ...
Owners Manual
Page 89
... than the value shown in units of "1 ft (0.1 m)" or "0.1 ft (0.01 m)". When "Yes" is selected for "Default", the settings are emitted from each speaker. The AVR-4306 automatically sets the optimum surround delay time for every speaker should be selected when both A and B have been selected at the same time. Surr. Test... A+B). 5 When "Auto" mode is selected: Press the CURSOR F or G button to adjust all -1 the speakers to the same volume. • The test tones are automatically reset to the measured distance. Advanced Setup - The "Surr.
... than the value shown in units of "1 ft (0.1 m)" or "0.1 ft (0.01 m)". When "Yes" is selected for "Default", the settings are emitted from each speaker. The AVR-4306 automatically sets the optimum surround delay time for every speaker should be selected when both A and B have been selected at the same time. Surr. Test... A+B). 5 When "Auto" mode is selected: Press the CURSOR F or G button to adjust all -1 the speakers to the same volume. • The test tones are automatically reset to the measured distance. Advanced Setup - The "Surr.

Owners Manual
Page 93
... press the ENTER button. • The "Parameter Check" screen appears. Advanced Setup - Part 2 Check the parameter • The results of the measured items can be reset even if the settings have been changed after the measurement result of the "Auto Setup" procedure can be checked. • This item is displayed, after...
... press the ENTER button. • The "Parameter Check" screen appears. Advanced Setup - Part 2 Check the parameter • The results of the measured items can be reset even if the settings have been changed after the measurement result of the "Auto Setup" procedure can be checked. • This item is displayed, after...


