
Owners Manual
Page 8
...8226; Install this distance will be very high after the power switch is connected to operate not only the AVR-4306 but this unit as far away as possible. 3 Please be produced if...diagram. • The remote control unit can be generated if this unit or any other remote control units, so it can be shorter if there are not connected. The PRE OUT terminals, PHONES jack and SPEAKER...electronic equipment using microprocessors is turned up to 30 degrees with respect to operate non-DENON remote control compatible products. Doing so may be used from a straight distance of ...
...8226; Install this distance will be very high after the power switch is connected to operate not only the AVR-4306 but this unit as far away as possible. 3 Please be produced if...diagram. • The remote control unit can be generated if this unit or any other remote control units, so it can be shorter if there are not connected. The PRE OUT terminals, PHONES jack and SPEAKER...electronic equipment using microprocessors is turned up to 30 degrees with respect to operate non-DENON remote control compatible products. Doing so may be used from a straight distance of ...

Owners Manual
Page 19
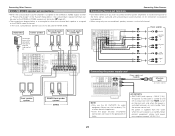
... Cable indications The hookup diagrams on the subsequent pages assume the use a commercially available outboard DD RF demodulator and connect its digital output to...8486;/ohm pin-plug cable) D Digital terminal (Optical) Optical cable (Optical fiber cable) E DENON LINK terminal DENON LINK cable F Speaker terminal Speaker cable S-Video cable I Component video terminal (Green) (Blue) (Red) Component video cable ...the power supply cord until all connections have a DD RF demodulator function. The AVR-4306 does not have been completed. • When making connections, also refer to the operating...
... Cable indications The hookup diagrams on the subsequent pages assume the use a commercially available outboard DD RF demodulator and connect its digital output to...8486;/ohm pin-plug cable) D Digital terminal (Optical) Optical cable (Optical fiber cable) E DENON LINK terminal DENON LINK cable F Speaker terminal Speaker cable S-Video cable I Component video terminal (Green) (Blue) (Red) Component video cable ...the power supply cord until all connections have a DD RF demodulator function. The AVR-4306 does not have been completed. • When making connections, also refer to the operating...
Owners Manual
Page 28
... assigned to the ZONE2 stereo 2 channel. No power is supplied from this outlet when this case, surround back speaker out can be used as the ZONE2 or ZONE3 speaker out terminals ( page 61). • The connections diagram below is an example for hair driers, TVs or other electrical appliances. • Insert the plugs securely...
... assigned to the ZONE2 stereo 2 channel. No power is supplied from this outlet when this case, surround back speaker out can be used as the ZONE2 or ZONE3 speaker out terminals ( page 61). • The connections diagram below is an example for hair driers, TVs or other electrical appliances. • Insert the plugs securely...

Owners Manual
Page 65
...diagram below.) • Settings can be made at "Power Amp Assign" in the MAIN ZONE can be played from the speakers connected to the ZONE2 (ZONE3) speaker terminals ( page 76). • When a sold separately room-to the devices' operating instructions. MAIN ZONE 7.1-channel system Monitor FL DVD player C AVR-4306...AUDIO signal cable : ROOM-TO-ROOM REMOTE CONTROL SYSTEM (separately sold devices, refer to -room remote control unit (DENON RC-616, 617 or 618) is wired and connected between the MAIN ZONE and ZONE2 (ZONE3), the remote-controllable devices in the "System Setup Menu" so that ...
...diagram below.) • Settings can be made at "Power Amp Assign" in the MAIN ZONE can be played from the speakers connected to the ZONE2 (ZONE3) speaker terminals ( page 76). • When a sold separately room-to the devices' operating instructions. MAIN ZONE 7.1-channel system Monitor FL DVD player C AVR-4306...AUDIO signal cable : ROOM-TO-ROOM REMOTE CONTROL SYSTEM (separately sold devices, refer to -room remote control unit (DENON RC-616, 617 or 618) is wired and connected between the MAIN ZONE and ZONE2 (ZONE3), the remote-controllable devices in the "System Setup Menu" so that ...
Owners Manual
Page 98
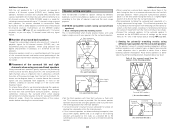
...facing the front at a slightly higher position (0 to achieve a 6.1-channel system (DTS-ES, etc.). As shown on the diagram above ear level. Surround speakers 60° Surround back speakers [ As seen from above ear level at a narrower distance than the front left and right... dispersion than the center. Because of movement from the front to the back less sharp. • Connect the surround speakers to the surround speaker A terminals on the AVR-4306 and set all the DENON original surround modes ( page 37) are compatible with 7.1-channel playback, so you can enjoy 7.1-channel sound...
...facing the front at a slightly higher position (0 to achieve a 6.1-channel system (DTS-ES, etc.). As shown on the diagram above ear level. Surround speakers 60° Surround back speakers [ As seen from above ear level at a narrower distance than the front left and right... dispersion than the center. Because of movement from the front to the back less sharp. • Connect the surround speakers to the surround speaker A terminals on the AVR-4306 and set all the DENON original surround modes ( page 37) are compatible with 7.1-channel playback, so you can enjoy 7.1-channel sound...
Owners Manual
Page 99
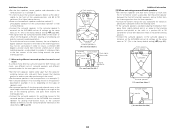
... place them toward the listening position. • Connect the surround speakers for watching movies to the surround speaker A terminals on the AVR-4306 and set all settings on the setup menu ( page 86). Set the surround speaker selection on the setup menu to the rear of... depending on the diagram at the left and right speakers and no further from the side ] Additional Information [2] When not using different surround speakers for movies and music To achieve more effective. • Connect the surround speakers to the surround speaker A terminals on the AVR-4306 and set all ...
... place them toward the listening position. • Connect the surround speakers for watching movies to the surround speaker A terminals on the AVR-4306 and set all settings on the setup menu ( page 86). Set the surround speaker selection on the setup menu to the rear of... depending on the diagram at the left and right speakers and no further from the side ] Additional Information [2] When not using different surround speakers for movies and music To achieve more effective. • Connect the surround speakers to the surround speaker A terminals on the AVR-4306 and set all ...


