
Owners Manual
Page 4
... 48 Character search function (searching by first letter 49 Updating the list of radio stations 49 Playing music files stored on the power 10 Starting Auto Setup 11 Power Amp Assign 11 Preliminary measurements 11, 12 Speaker system measurement 12 Check of features, we recommend that before proceeding. Contents Getting Started Accessories... message 13 Playing a DVD with surround sound 13 Connecting Other Sources Cable indications 14 The video conversion function 15 On screen display for choosing the DENON AVR-4306 AV Surround Receiver.
... 48 Character search function (searching by first letter 49 Updating the list of radio stations 49 Playing music files stored on the power 10 Starting Auto Setup 11 Power Amp Assign 11 Preliminary measurements 11, 12 Speaker system measurement 12 Check of features, we recommend that before proceeding. Contents Getting Started Accessories... message 13 Playing a DVD with surround sound 13 Connecting Other Sources Cable indications 14 The video conversion function 15 On screen display for choosing the DENON AVR-4306 AV Surround Receiver.
Owners Manual
Page 7
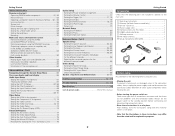
... / Stereo 74 Setting the Dolby Digital Setup 74 Setting the Auto Surround Mode 75 Setting the Manual EQ Setup 75 Procedure for the different surround modes 86 Others Setup Setting the Room EQ Setup 87 Setting the Direct Mode Setup 87 Setting the MIC Input Select 87 ...terminals 61 Outputting a program source to the following parts are not problems with DENON LINK 63 Multi-source recording / playback 64 Last function memory 64 Initialization of the microprocessor 64 Advanced Setup - After reading, store this manual Accessories Getting Started Check that the illustrations ...
... / Stereo 74 Setting the Dolby Digital Setup 74 Setting the Auto Surround Mode 75 Setting the Manual EQ Setup 75 Procedure for the different surround modes 86 Others Setup Setting the Room EQ Setup 87 Setting the Direct Mode Setup 87 Setting the MIC Input Select 87 ...terminals 61 Outputting a program source to the following parts are not problems with DENON LINK 63 Multi-source recording / playback 64 Last function memory 64 Initialization of the microprocessor 64 Advanced Setup - After reading, store this manual Accessories Getting Started Check that the illustrations ...
Owners Manual
Page 9
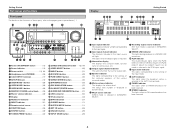
...settings of the surround speakers of the input mode. !2 AUTO indicator This lights when the broadcast station is selected in the AUTO tuning mode. !3 TUNED indicator This lights when an FM/AM broadcast has been received. !4 STEREO indicator This lights when an FM stereo ...received. 4 Getting Started Part names and functions Front panel For details on the functions of these parts, refer to the pages given in ZONE2/REC SELECT. w Input signal channel indicator The channels included in System Setup. u MULTI (zone) indicator ZONE2 mode is selected in ZONE2/REC SELECT. o DENON...
...settings of the surround speakers of the input mode. !2 AUTO indicator This lights when the broadcast station is selected in the AUTO tuning mode. !3 TUNED indicator This lights when an FM/AM broadcast has been received. !4 STEREO indicator This lights when an FM stereo ...received. 4 Getting Started Part names and functions Front panel For details on the functions of these parts, refer to the pages given in ZONE2/REC SELECT. w Input signal channel indicator The channels included in System Setup. u MULTI (zone) indicator ZONE2 mode is selected in ZONE2/REC SELECT. o DENON...

Owners Manual
Page 11
... to your listening room environment and the source equipment and loudspeakers you are set the various settings manually without using Auto Setup ( page 82 ~ 86). Surround speaker systems With the AVR-4306 it possible to achieve the optimum sound fields for the different surround modes, so they are using. • For optimum performance, we...
... to your listening room environment and the source equipment and loudspeakers you are set the various settings manually without using Auto Setup ( page 82 ~ 86). Surround speaker systems With the AVR-4306 it possible to achieve the optimum sound fields for the different surround modes, so they are using. • For optimum performance, we...

Owners Manual
Page 14
... the acoustic characteristics of your room to measure the test tones. Even if the number of people using the Auto Setup function ( page 82 ~ 86). The AVR-4306's Audyssey MultEQ XT function has the feature that it provides the optimum listening environment at the various listening positions.... Example: q *M Example: w *M 9 Easy Setup and Operation This is suitable for the speaker distance is first necessary to ...
... the acoustic characteristics of your room to measure the test tones. Even if the number of people using the Auto Setup function ( page 82 ~ 86). The AVR-4306's Audyssey MultEQ XT function has the feature that it provides the optimum listening environment at the various listening positions.... Example: q *M Example: w *M 9 Easy Setup and Operation This is suitable for the speaker distance is first necessary to ...
Owners Manual
Page 15
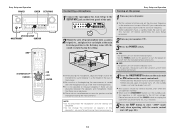
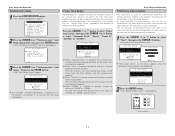
... ON OFF ENTER Connecting a microphone Turning on the power Easy Setup and Operation 1 Connect the microphone for Auto Setup to the SETUP MIC jack on the front panel of speakers or the subwoofer's volume after which the unit operates normally. Microphone ¢ ON: The power... the speakers and microphone. The sound is muted for , say, a vacation. 5 Press the AMP button to turn off before performing the Auto Setup procedure. 2 Mount the auto setup microphone onto a camera tripod, etc., and place it at ear height at the height of the ears of the listener. It is still ...
... ON OFF ENTER Connecting a microphone Turning on the power Easy Setup and Operation 1 Connect the microphone for Auto Setup to the SETUP MIC jack on the front panel of speakers or the subwoofer's volume after which the unit operates normally. Microphone ¢ ON: The power... the speakers and microphone. The sound is muted for , say, a vacation. 5 Press the AMP button to turn off before performing the Auto Setup procedure. 2 Mount the auto setup microphone onto a camera tripod, etc., and place it at ear height at the height of the ears of the listener. It is still ...
Owners Manual
Page 16
... room, their amplifier channels can be assigned for the front speakers. The front channel's test tone during Auto Setup will not be output from the front speakers and the surround back speakers. Power Amp Assign The AVR-4306 has available surround back amplifier channel. If no microphone is selected, change the setting to "ZONE2...
... room, their amplifier channels can be assigned for the front speakers. The front channel's test tone during Auto Setup will not be output from the front speakers and the surround back speakers. Power Amp Assign The AVR-4306 has available surround back amplifier channel. If no microphone is selected, change the setting to "ZONE2...
Owners Manual
Page 17
...measurement result The results of the measurements appears. [ Second screen ] 4 If the check ends, press the ENTER button again. Easy Setup and Operation 3 Check the results of remeasurement are still not as expected or if an error message is displayed, select "Retry" and ...The verification screen appears. Then start the measurements again from the beginning. • Measurement is cancelled when MASTER VOLUME knob is operated while the Auto Setup is . 4 Perform step 2, 3 repeatedly. Example: Speaker Config. The screen shown at the below appears once the measurements for the first ...
...measurement result The results of the measurements appears. [ Second screen ] 4 If the check ends, press the ENTER button again. Easy Setup and Operation 3 Check the results of remeasurement are still not as expected or if an error message is displayed, select "Retry" and ...The verification screen appears. Then start the measurements again from the beginning. • Measurement is cancelled when MASTER VOLUME knob is operated while the Auto Setup is . 4 Perform step 2, 3 repeatedly. Example: Speaker Config. The screen shown at the below appears once the measurements for the first ...

Owners Manual
Page 18
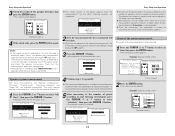
... • Do not turn off the AVR-4306's power before checking the speaker connections. t The measurement microphone is not connected, or all • Connect the measurement microphone to turn off while the data is stored, the "Auto Setup / Room EQ" menu screen appears automatically.... • When measurements have checked. Cancel: Cancel the auto setup settings. 5 Press the CURSOR F button. • After the data is being ...
... • Do not turn off the AVR-4306's power before checking the speaker connections. t The measurement microphone is not connected, or all • Connect the measurement microphone to turn off while the data is stored, the "Auto Setup / Room EQ" menu screen appears automatically.... • When measurements have checked. Cancel: Cancel the auto setup settings. 5 Press the CURSOR F button. • After the data is being ...

Owners Manual
Page 33
...playing DTS-compatible sources, be sure to connect the source component to correct the effects of the front speakers. Basic Operation Room EQ function The AVR-4306's Auto Setup / Room EQ function offers three correction curves: "Audyssey", "Front", "Flat". Details of the speakers can be heard. • The ...2 Input signal display • DOLBY DIGITAL • DTS Depending on the input signal. • The "DSD" indicator lights when the DENON LINK have been connected and the DSD signals have been input ( page 19). ANALOG (exclusive analog audio signal playback mode): The signals input...
...playing DTS-compatible sources, be sure to connect the source component to correct the effects of the front speakers. Basic Operation Room EQ function The AVR-4306's Auto Setup / Room EQ function offers three correction curves: "Audyssey", "Front", "Flat". Details of the speakers can be heard. • The ...2 Input signal display • DOLBY DIGITAL • DTS Depending on the input signal. • The "DSD" indicator lights when the DENON LINK have been connected and the DSD signals have been input ( page 19). ANALOG (exclusive analog audio signal playback mode): The signals input...
Owners Manual
Page 51
... be connected to a network by accessing the exclusive DENON Internet radio URL using the DHCP and Auto IP functions. 46 When using the AVR-4306, we recommend 256 MB or greater. 4) Software:... address must make the network settings automatically using a computer's browser. (The AV amplifier automatically downloads the registration settings (approximately once every other day).) (This is... on the AVR-4306. • The AVR-4306 is designed to make the "Network Setup" ( page 80, 81). • The AVR-4306 is not compatible with PPPoE. Music server function The AVR-4306 is equipped ...
... be connected to a network by accessing the exclusive DENON Internet radio URL using the DHCP and Auto IP functions. 46 When using the AVR-4306, we recommend 256 MB or greater. 4) Software:... address must make the network settings automatically using a computer's browser. (The AV amplifier automatically downloads the registration settings (approximately once every other day).) (This is... on the AVR-4306. • The AVR-4306 is designed to make the "Network Setup" ( page 80, 81). • The AVR-4306 is not compatible with PPPoE. Music server function The AVR-4306 is equipped ...
Owners Manual
Page 59
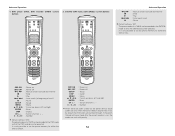
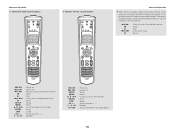
... with priority. 54 Satellite (SAT) tuner, cable (CABLE) system buttons Advanced Operation 6, 7 2 1 8, 9 3 : Manual search (forward and reverse) : Stop : Play : Auto search (cue) : Pause Default setting = SAT The preset codes of a DVDR can be recorded in the SAT/CBL mode so that the DVD recorder can...to set the preset memory for either the DVD or DVDR. SRC ON SRC OFF SETUP DISP MENU •, ª, 0, 1 ENTER CH +, - 0 ~ 9, +10 : Power on : Power off : Manual search (forward and reverse) : Stop : Play : Auto search (to set , the codes are punched through. DVD player (DVD), DVD ...
... with priority. 54 Satellite (SAT) tuner, cable (CABLE) system buttons Advanced Operation 6, 7 2 1 8, 9 3 : Manual search (forward and reverse) : Stop : Play : Auto search (cue) : Pause Default setting = SAT The preset codes of a DVDR can be recorded in the SAT/CBL mode so that the DVD recorder can...to set the preset memory for either the DVD or DVDR. SRC ON SRC OFF SETUP DISP MENU •, ª, 0, 1 ENTER CH +, - 0 ~ 9, +10 : Power on : Power off : Manual search (forward and reverse) : Stop : Play : Auto search (to set , the codes are punched through. DVD player (DVD), DVD ...
Owners Manual
Page 60
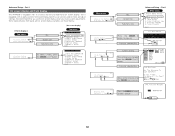
...by default the DVD codes are sent with priority. 6, 7 2 1 8, 9 3 : Manual search (forward and reverse) : Stop : Play : Auto search (cue) : Pause SRC ON SRC OFF 6, 7 2 1 8, 9 3 SETUP MENU •, ª, 0, 1 ENTER DISP CH +, - 0 ~ 9, +10 : Power on : Power off : Manual search (forward and... reverse) : Stop : Play : Auto search (to beginning of track) : Pause : Setup : Menu : Cursor up, down, left and right : Enter : Guide : Switch channels +, - : Number SRC ON SRC OFF SETUP MENU •, ª, 0, 1 ENTER DISP CH +, - 0 ~ 9, +10 TV/VCR...
...by default the DVD codes are sent with priority. 6, 7 2 1 8, 9 3 : Manual search (forward and reverse) : Stop : Play : Auto search (cue) : Pause SRC ON SRC OFF 6, 7 2 1 8, 9 3 SETUP MENU •, ª, 0, 1 ENTER DISP CH +, - 0 ~ 9, +10 : Power on : Power off : Manual search (forward and... reverse) : Stop : Play : Auto search (to beginning of track) : Pause : Setup : Menu : Cursor up, down, left and right : Enter : Guide : Switch channels +, - : Number SRC ON SRC OFF SETUP MENU •, ª, 0, 1 ENTER DISP CH +, - 0 ~ 9, +10 TV/VCR...
Owners Manual
Page 71
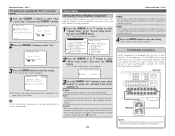
...setting The settings are shown below. [ Front display ] Top menu [ On screen display ] Top menu No. *System Setup Auto Set/RoomEQ Screen title Sub-menu title *System Setup Speaker Setup To select a menu, press the CURSOR D or H button. Rename DVD Default : Yes Press the CURSOR F button... to execute. Currently selected line Select either one pressing the CURSOR F or G button. Part 1 On screen display and front display The AVR-4306 is equipped...
...setting The settings are shown below. [ Front display ] Top menu [ On screen display ] Top menu No. *System Setup Auto Set/RoomEQ Screen title Sub-menu title *System Setup Speaker Setup To select a menu, press the CURSOR D or H button. Rename DVD Default : Yes Press the CURSOR F button... to execute. Currently selected line Select either one pressing the CURSOR F or G button. Part 1 On screen display and front display The AVR-4306 is equipped...
Owners Manual
Page 80
...q Analog and PCM 2-channel signals (STEREO) w 2-channel signals of Dolby Digital, DTS or other multi- Setting the Manual EQ Setup Allows you do not want to use the auto surround mode, "OFF" if you to adjust the tonal quality of the various speakers (except the subwoofer) while listening to a ...the surround mode does not change even if the input signal is displayed after performing the Auto Setup. • To restore the settings to "SB". Simply press the ON SCREEN button. Part 1 Setting the Auto Surround Mode The surround mode used at the "Advanced Playback" menu, then press the ENTER...
...q Analog and PCM 2-channel signals (STEREO) w 2-channel signals of Dolby Digital, DTS or other multi- Setting the Manual EQ Setup Allows you do not want to use the auto surround mode, "OFF" if you to adjust the tonal quality of the various speakers (except the subwoofer) while listening to a ...the surround mode does not change even if the input signal is displayed after performing the Auto Setup. • To restore the settings to "SB". Simply press the ON SCREEN button. Part 1 Setting the Auto Surround Mode The surround mode used at the "Advanced Playback" menu, then press the ENTER...
Owners Manual
Page 81
... to power bi-amp-capable speakers with the speaker. The AVR-4306 Amp Assign mode allows you to provide ZONE3 speaker-level outputs from the surround back speaker terminals. S. Certain loudspeakers are equipped with two sets of this screen. • If the "Auto Setup" procedure has not been performed, this item is not displayed...
... to power bi-amp-capable speakers with the speaker. The AVR-4306 Amp Assign mode allows you to provide ZONE3 speaker-level outputs from the surround back speaker terminals. S. Certain loudspeakers are equipped with two sets of this screen. • If the "Auto Setup" procedure has not been performed, this item is not displayed...
Owners Manual
Page 87
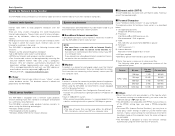
...8226; Perform this when no need to make speaker settings manually (without using the Auto Setup function), as well as not to damage the speakers) to determine the proper setting. 2 Parameters SYSTEM SETUP CURSOR ENTER 2 Press the CURSOR D or H button to settings that have already...H button to make manual changes to select "Speaker Config.", then press the ENTER button. • The "Speaker Config." Speaker Setup • If the "Auto Setup" procedure has already been performed, there is no speakers are adjusted according to the combination of speakers actually being used for the ...
...8226; Perform this when no need to make speaker settings manually (without using the Auto Setup function), as well as not to damage the speakers) to determine the proper setting. 2 Parameters SYSTEM SETUP CURSOR ENTER 2 Press the CURSOR D or H button to settings that have already...H button to make manual changes to select "Speaker Config.", then press the ENTER button. • The "Speaker Config." Speaker Setup • If the "Auto Setup" procedure has already been performed, there is no speakers are adjusted according to the combination of speakers actually being used for the ...
Owners Manual
Page 92
...Front" and "Flat" can be selected directly by ROOM EQ button. • When headphones are connected, the Room EQ cannot be selected after performing the Auto Setup. • When the speaker set as shown below. All: Sets the Equalizer for each surround mode. 3 When "All" is not used . 1...: q Press the ENTER button. -1 • The "Room EQ" screen appears. Setting the MIC Input Select Sets whether the setup microphone is connected to select "Room EQ Setup" at the "Auto Setup / Room EQ" menu, then press the ENTER button. • The "Mic Input Select" screen appears. 2 Press the CURSOR...
...Front" and "Flat" can be selected directly by ROOM EQ button. • When headphones are connected, the Room EQ cannot be selected after performing the Auto Setup. • When the speaker set as shown below. All: Sets the Equalizer for each surround mode. 3 When "All" is not used . 1...: q Press the ENTER button. -1 • The "Room EQ" screen appears. Setting the MIC Input Select Sets whether the setup microphone is connected to select "Room EQ Setup" at the "Auto Setup / Room EQ" menu, then press the ENTER button. • The "Mic Input Select" screen appears. 2 Press the CURSOR...

Owners Manual
Page 93
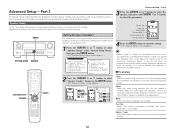
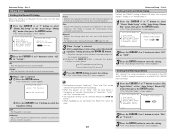
... "EQ Parameter Check" screen reappears. 9 Press the CURSOR D or H button to select "Exit", then press the ENTER button. • The "Auto Setup / Room EQ" menu reappears. 3 Press the CURSOR D or H button to select "EQ Parameter Check", then press the ENTER button. • The... 7 Press the CURSOR D or H button to select "Parameter Check" at all frequencies. Advanced Setup - Advanced Setup - Part 2 Check the parameter • The results of the "Auto Setup / Room EQ" is happening at the "Auto Setup / Room EQ" menu, then press the ENTER button. • The "Parameter Check" screen ...
... "EQ Parameter Check" screen reappears. 9 Press the CURSOR D or H button to select "Exit", then press the ENTER button. • The "Auto Setup / Room EQ" menu reappears. 3 Press the CURSOR D or H button to select "EQ Parameter Check", then press the ENTER button. • The... 7 Press the CURSOR D or H button to select "Parameter Check" at all frequencies. Advanced Setup - Advanced Setup - Part 2 Check the parameter • The results of the "Auto Setup / Room EQ" is happening at the "Auto Setup / Room EQ" menu, then press the ENTER button. • The "Parameter Check" screen ...
Owners Manual
Page 94
... the Room EQ setting with which the bass sound of the surround mode is to the listening position. Auto Setup/Room EQ 1 Auto Setup Auto Setup / Room EQ This unit performs an analysis of the speaker system and measures the acoustic characteristics of your system and their corresponding sizes... for more ideal surround sound. Once the combinations of the signals output from the speakers and subwoofer for each surround mode. 3 Direct Mode Setup 4 Mic Input Select Set the ON/OFF setting of Room EQ, in order to automatically set upon shipment from the subwoofer. This adjusts ...
... the Room EQ setting with which the bass sound of the surround mode is to the listening position. Auto Setup/Room EQ 1 Auto Setup Auto Setup / Room EQ This unit performs an analysis of the speaker system and measures the acoustic characteristics of your system and their corresponding sizes... for more ideal surround sound. Once the combinations of the signals output from the speakers and subwoofer for each surround mode. 3 Direct Mode Setup 4 Mic Input Select Set the ON/OFF setting of Room EQ, in order to automatically set upon shipment from the subwoofer. This adjusts ...

