
Owners Manual
Page 4
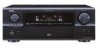
...providing outstanding high fidelity reproduction of radio stations 49 Playing music files stored on the computer (music server 50 Operating the AVR-4306 using the external input (EXT. IN) terminals 26 Turning the sound off temporarily (MUTING 26 Listening over headphones 26 Combining...Cable indications 14 The video conversion function 15 On screen display for choosing the DENON AVR-4306 AV Surround Receiver. As this product is provided with the slideshow function 45 Disconnecting the iPod 45 Using the Network Audio Function Internet radio function 46 Music server function 46...
...providing outstanding high fidelity reproduction of radio stations 49 Playing music files stored on the computer (music server 50 Operating the AVR-4306 using the external input (EXT. IN) terminals 26 Turning the sound off temporarily (MUTING 26 Listening over headphones 26 Combining...Cable indications 14 The video conversion function 15 On screen display for choosing the DENON AVR-4306 AV Surround Receiver. As this product is provided with the slideshow function 45 Disconnecting the iPod 45 Using the Network Audio Function Internet radio function 46 Music server function 46...
Owners Manual
Page 7
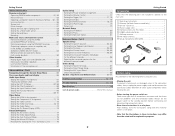
...Setup Setting the IP Address 80 Setting the Proxy 80 Setting the Network Option 81 Advanced Setup - IN Setup 67, 68 Setting the iPod Assignment 68 Setting the Input Function Level 68 Setting the Function Rename 69 Tuner Presets 69, 70 Video Setup Setting the HDMI In ...Setting the Auto Surround Mode 75 Setting the Manual EQ Setup 75 Procedure for explanation purposes. 2 Getting Started Advanced Operation Remote control unit Operating DENON audio components 51, 52 Preset memory 53 Operating a component stored in the preset memory ·····53 ~ 55 Learning ...
...Setup Setting the IP Address 80 Setting the Proxy 80 Setting the Network Option 81 Advanced Setup - IN Setup 67, 68 Setting the iPod Assignment 68 Setting the Input Function Level 68 Setting the Function Rename 69 Tuner Presets 69, 70 Video Setup Setting the HDMI In ...Setting the Auto Surround Mode 75 Setting the Manual EQ Setup 75 Procedure for explanation purposes. 2 Getting Started Advanced Operation Remote control unit Operating DENON audio components 51, 52 Preset memory 53 Operating a component stored in the preset memory ·····53 ~ 55 Learning ...
Owners Manual
Page 9
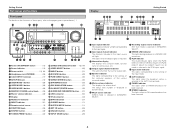
...indicator The audio channels that can be output light. o DENON LINK indicator This lights during playback in a DENON LINK connection. !0 AL24 indicator The AL24 indicator lights when.... !3 TUNED indicator This lights when an FM/AM broadcast has been received. !4 STEREO indicator This lights when an FM stereo broadcast has been received. 4 u MULTI (zone) indicator ZONE2 mode is inputted. This lights...) @7 CH SELECT/ENTER button 39) @8 SURROUND PARAMETER button 31) @9 USB connector 50) #0 iPod connector 44) #1 STATUS button 27) #2 CURSOR button 11) #3 SYSTEM SETUP button 11) #4 EXT...
...indicator The audio channels that can be output light. o DENON LINK indicator This lights during playback in a DENON LINK connection. !0 AL24 indicator The AL24 indicator lights when.... !3 TUNED indicator This lights when an FM/AM broadcast has been received. !4 STEREO indicator This lights when an FM stereo broadcast has been received. 4 u MULTI (zone) indicator ZONE2 mode is inputted. This lights...) @7 CH SELECT/ENTER button 39) @8 SURROUND PARAMETER button 31) @9 USB connector 50) #0 iPod connector 44) #1 STATUS button 27) #2 CURSOR button 11) #3 SYSTEM SETUP button 11) #4 EXT...
Owners Manual
Page 10
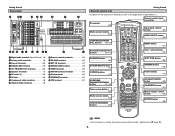
IN terminals 17) !4 DENON LINK terminal 19) !5 HDMI terminals 20) !6 AM/FM antenna terminals 21) !7 iPod connector 44) !8 ETHERNET terminal 47) !9 XM terminal 21) Getting Started Remote control unit For details on setting the remote control unit back light's lighting time ( 5 ...
IN terminals 17) !4 DENON LINK terminal 19) !5 HDMI terminals 20) !6 AM/FM antenna terminals 21) !7 iPod connector 44) !8 ETHERNET terminal 47) !9 XM terminal 21) Getting Started Remote control unit For details on setting the remote control unit back light's lighting time ( 5 ...
Owners Manual
Page 49
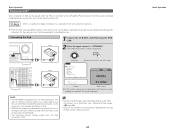
... the connectors at a time. • DENON will accept no responsibility whatsoever for their personal use. Connecting the iPod 1 Connect the AVR-4306 and iPod using the buttons on the main unit and the remote control unit. iPod (Main unit) (Remote control unit in the U.S. iPod 2 Select the input source to the AVR-4306's iPod connector. and other countries. It is...
... the connectors at a time. • DENON will accept no responsibility whatsoever for their personal use. Connecting the iPod 1 Connect the AVR-4306 and iPod using the buttons on the main unit and the remote control unit. iPod (Main unit) (Remote control unit in the U.S. iPod 2 Select the input source to the AVR-4306's iPod connector. and other countries. It is...
Owners Manual
Page 50
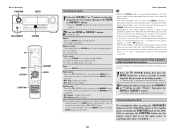
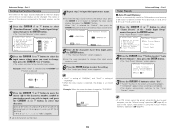
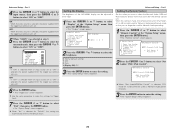
... during playback. mark is displayed in place of the software can be possible to operate the iPod from the Browse mode to the Remote mode. • "Remote iPod" is displayed on the AVR-4306's display. 2 Watching the iPod's screen, press the CURSOR D or H button to select "Photos", then press the ENTER... MODE button for at least 2 seconds after pressing the TU (TUNER) button. Viewing still pictures (only for iPods equipped with the slideshow function) Use this procedure to switch from the AVR-4306. Repeat play , then press the ENTER or CURSOR G button. • Press the CURSOR F button to ...
... during playback. mark is displayed in place of the software can be possible to operate the iPod from the Browse mode to the Remote mode. • "Remote iPod" is displayed on the AVR-4306's display. 2 Watching the iPod's screen, press the CURSOR D or H button to select "Photos", then press the ENTER... MODE button for at least 2 seconds after pressing the TU (TUNER) button. Viewing still pictures (only for iPods equipped with the slideshow function) Use this procedure to switch from the AVR-4306. Repeat play , then press the ENTER or CURSOR G button. • Press the CURSOR F button to ...
Owners Manual
Page 55
...ALL OFF RANDOM MODE: When the MEMORY button is pressed, the random mode switches as with normal Internet browsing to control the AVR-4306. NOTE: • DENON will accept no longer be played. *: Contents downloaded from the digital output terminal. NOTE: • Registered presettings are deleted ...of all USB devices is not guaranteed. • It is not possible to connect the AVR-4306 to a computer using a USB cable. • The AVR-4306 is not compatible with iPod shuffle. 50 Check the AVR-4306's IP address ( page 80) beforehand and input this IP address in FAT16 or FAT32 format...
...ALL OFF RANDOM MODE: When the MEMORY button is pressed, the random mode switches as with normal Internet browsing to control the AVR-4306. NOTE: • DENON will accept no longer be played. *: Contents downloaded from the digital output terminal. NOTE: • Registered presettings are deleted ...of all USB devices is not guaranteed. • It is not possible to connect the AVR-4306 to a computer using a USB cable. • The AVR-4306 is not compatible with iPod shuffle. 50 Check the AVR-4306's IP address ( page 80) beforehand and input this IP address in FAT16 or FAT32 format...
Owners Manual
Page 72
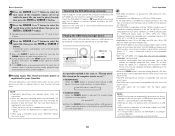
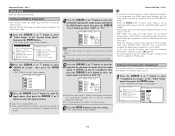
...audio source (stereo - 2 channel) and a digital audio recorder. • "PHONO" and "TUNER" cannot be selected on the AVR-4306's rear panel are not be transferred by DENON LINK, the unit automatically changes over the input to a CD recorder, MD recorder, or other digital audio recording deck. Use this ...Part 1 2 Press the CURSOR D or H button to select "DLINK" setting, then press the CURSOR F or G button to select "EXT. IN Setup" at "iPod Assign". IN Setup" screen appears. 3 Press the CURSOR D or H button to select the input source, then press the CURSOR F or G button to "Connecting the...
...audio source (stereo - 2 channel) and a digital audio recorder. • "PHONO" and "TUNER" cannot be selected on the AVR-4306's rear panel are not be transferred by DENON LINK, the unit automatically changes over the input to a CD recorder, MD recorder, or other digital audio recording deck. Use this ...Part 1 2 Press the CURSOR D or H button to select "DLINK" setting, then press the CURSOR F or G button to select "EXT. IN Setup" at "iPod Assign". IN Setup" screen appears. 3 Press the CURSOR D or H button to select the input source, then press the CURSOR F or G button to "Connecting the...
Owners Manual
Page 73
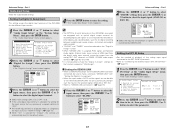
...; Surr. Select according to be assigned, then press the ENTER button. Also refer to select "iPod Assign" at the "Audio Input Setup" menu, then press the ENTER button. • The "Input Function Lev." iPod AVR-4306 1 Press the CURSOR D or H button to the player's operating instructions. +15dB (default) ... setting. Advanced Setup - Select this when using a iPod Dock. Connect the iPod cable directly to any input terminals on the AVR-4306 and play them. screen appears. Advanced Setup - Used: Select this when not using a iPod Dock. Sp: Presets the surround speakers that are the...
...; Surr. Select according to be assigned, then press the ENTER button. Also refer to select "iPod Assign" at the "Audio Input Setup" menu, then press the ENTER button. • The "Input Function Lev." iPod AVR-4306 1 Press the CURSOR D or H button to the player's operating instructions. +15dB (default) ... setting. Advanced Setup - Select this when using a iPod Dock. Connect the iPod cable directly to any input terminals on the AVR-4306 and play them. screen appears. Advanced Setup - Used: Select this when not using a iPod Dock. Sp: Presets the surround speakers that are the...
Owners Manual
Page 74
... procedure to change , then press the CURSOR F or G button. • The screen switches to the default input source name. The names or brands of "AUX/iPod". • When the input source is selected, the display is pressed 5 Once all the characters have been input, press the ENTER button. • The "Function...
... procedure to change , then press the CURSOR F or G button. • The screen switches to the default input source name. The names or brands of "AUX/iPod". • When the input source is selected, the display is pressed 5 Once all the characters have been input, press the ENTER button. • The "Function...
Owners Manual
Page 76
... terminals are not output to the AVR-4306. In this setting is made for input sources to which mode is not compatible with the video input. IN). 1~3 correspond to each HDMI 1~3 input terminal. 6 Press the ENTER button to check which a digital audio input (DENON LINK, OPTICAL etc.) is previously ... CURSOR F or G button to select the input terminal. When HDMI is not possible to make the "HDMI In Assign" settings for the function assigned at "iPod Assign". 2 Press the CURSOR D or H button to select "HDMI In Assign", then press the ENTER button. • The "HDMI In Assign" screen ...
... terminals are not output to the AVR-4306. In this setting is made for input sources to which mode is not compatible with the video input. IN). 1~3 correspond to each HDMI 1~3 input terminal. 6 Press the ENTER button to check which a digital audio input (DENON LINK, OPTICAL etc.) is previously ... CURSOR F or G button to select the input terminal. When HDMI is not possible to make the "HDMI In Assign" settings for the function assigned at "iPod Assign". 2 Press the CURSOR D or H button to select "HDMI In Assign", then press the ENTER button. • The "HDMI In Assign" screen ...
Owners Manual
Page 82
...on the rear panel can be used is displayed and the fixed level cannot be set to the AVR-4306's maximum volume (output) level of the ZONE2 and ZONE3 channels at the "Option Setup" menu, ... button to select "Trigger Out" at "Power Amp Assign", "-VAR-" (only variable) is stored in steps of "AUX/iPod". 3 Press the CURSOR F or G button to fix the output level for "Volume Level". • When the power ... within the range of -70 dB to +18 dB in the memory and set when the AVR-4306 was last used to select the parameter. The power supplied from the trigger out terminal turns on...
...on the rear panel can be used is displayed and the fixed level cannot be set to the AVR-4306's maximum volume (output) level of the ZONE2 and ZONE3 channels at the "Option Setup" menu, ... button to select "Trigger Out" at "Power Amp Assign", "-VAR-" (only variable) is stored in steps of "AUX/iPod". 3 Press the CURSOR F or G button to fix the output level for "Volume Level". • When the power ... within the range of -70 dB to +18 dB in the memory and set when the AVR-4306 was last used to select the parameter. The power supplied from the trigger out terminal turns on...
Owners Manual
Page 83
...is selected, DTU mode G1 to G8 cannot be adjusted in three steps. 1 Press the CURSOR D or H button to select "Net Audio / USB / iPod Control". ON: When that input source is selected, the power supplied from the trigger out terminal turns off . 5 When "MAIN" was selected at step ...the ENTER button. • The "Remote Control" screen appears. When "Net Audio/USB/iPod Control" is selected, the power supplied from multi zone with the remote control unit. Setting the Display The brightness of the AVR-4306's display can no longer be used for Network Audio presetting. 1 Press the CURSOR D...
...is selected, DTU mode G1 to G8 cannot be adjusted in three steps. 1 Press the CURSOR D or H button to select "Net Audio / USB / iPod Control". ON: When that input source is selected, the power supplied from the trigger out terminal turns off . 5 When "MAIN" was selected at step ...the ENTER button. • The "Remote Control" screen appears. When "Net Audio/USB/iPod Control" is selected, the power supplied from multi zone with the remote control unit. Setting the Display The brightness of the AVR-4306's display can no longer be used for Network Audio presetting. 1 Press the CURSOR D...

Owners Manual
Page 84
... charging. You can be locked so that they cannot be changed , and "SETUP LOCKED!" Standby: Set whether or not to charge the iPod when it is connected with the AVR-4306's power on the remote control unit 1 Press the DTU button to select the DTU mode. 2 Press the G button, then press the... button again and display the "Setup Lock" screen, then select "OFF" and press the ENTER button. • Depending on the connection status between the AVR-4306 and the iPod, the quality of the playback signals may be changed easily. 1 Press the CURSOR D or H button to "AUX/Net". Power On: Set whether or...
... charging. You can be locked so that they cannot be changed , and "SETUP LOCKED!" Standby: Set whether or not to charge the iPod when it is connected with the AVR-4306's power on the remote control unit 1 Press the DTU button to select the DTU mode. 2 Press the G button, then press the... button again and display the "Setup Lock" screen, then select "OFF" and press the ENTER button. • Depending on the connection status between the AVR-4306 and the iPod, the quality of the playback signals may be changed easily. 1 Press the CURSOR D or H button to "AUX/Net". Power On: Set whether or...
Owners Manual
Page 95
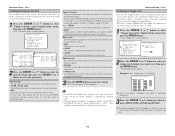
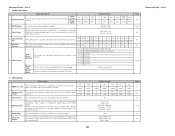
... 0 dB The names of the signals output from the HDMI terminal. Video Setup Video Setup 1 HDMI In Assign The HDMI input terminals are received automatically and stored in the memory. This sets whether or not to display the on screen display that are operated. Set the audio delay timing... 2 OPT 3 Surr.Sp = Surr.A SW Level = +15dB VCR-2 OFF CDR / TAPE OPT 4 V.AUX OPT 5 Page 67 67, 68 3 iPod Assign When connecting the iPod via a iPod Dock, it is corrected individually for the different input sources. Input source Digital Inputs 2 EXT.IN Setup Set the Ext.In terminals playback...
... 0 dB The names of the signals output from the HDMI terminal. Video Setup Video Setup 1 HDMI In Assign The HDMI input terminals are received automatically and stored in the memory. This sets whether or not to display the on screen display that are operated. Set the audio delay timing... 2 OPT 3 Surr.Sp = Surr.A SW Level = +15dB VCR-2 OFF CDR / TAPE OPT 4 V.AUX OPT 5 Page 67 67, 68 3 iPod Assign When connecting the iPod via a iPod Dock, it is corrected individually for the different input sources. Input source Digital Inputs 2 EXT.IN Setup Set the Ext.In terminals playback...

Owners Manual
Page 96
...3 Network Option Network Setup The IP address-related settings are connected. The proxy-related settings can be assigned to set iPod charging when the AVR-4306 and iPod are made for optimizing the Room EQ with which the audio signals are produced from multizone with the remote control unit.... = LAST Mute Lev. = FULL Vol.Lev. = VAR Vol.Limit = OFF P. Back 76 2 Volume Control This sets the volume level of the AVR-4306's display can be changed here. Part 2 5. Main Zone2 Zone3 Vol.Limit = OFF P. Advanced Playback Advanced Playback 1 2ch Direct/Stereo The speaker settings ...
...3 Network Option Network Setup The IP address-related settings are connected. The proxy-related settings can be assigned to set iPod charging when the AVR-4306 and iPod are made for optimizing the Room EQ with which the audio signals are produced from multizone with the remote control unit.... = LAST Mute Lev. = FULL Vol.Lev. = VAR Vol.Limit = OFF P. Back 76 2 Volume Control This sets the volume level of the AVR-4306's display can be changed here. Part 2 5. Main Zone2 Zone3 Vol.Limit = OFF P. Advanced Playback Advanced Playback 1 2ch Direct/Stereo The speaker settings ...

