
Owners Manual
Page 4
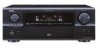
... Satellite Radio Checking the XM signal strength and Radio ID 42 Channel selection 42 Category search 42 Direct access of channels 43 Playing the iPod Connecting the iPod 44 Listening to setup flow 6 Speaker system layout 6 Speaker connections 7 Connecting a DVD player and monitor (TV 8 Auto Setup / Room EQ 9 Connecting a microphone 10 Turning... message 13 Playing a DVD with surround sound 13 Connecting Other Sources Cable indications 14 The video conversion function 15 On screen display for choosing the DENON AVR-4306 AV Surround Receiver.
... Satellite Radio Checking the XM signal strength and Radio ID 42 Channel selection 42 Category search 42 Direct access of channels 43 Playing the iPod Connecting the iPod 44 Listening to setup flow 6 Speaker system layout 6 Speaker connections 7 Connecting a DVD player and monitor (TV 8 Auto Setup / Room EQ 9 Connecting a microphone 10 Turning... message 13 Playing a DVD with surround sound 13 Connecting Other Sources Cable indications 14 The video conversion function 15 On screen display for choosing the DENON AVR-4306 AV Surround Receiver.
Owners Manual
Page 49
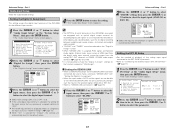
...; The AVR-4306 is prohibited by individuals for loss or damage of Apple Computer, Inc., registered in the U.S. Violating copyrights is equipped with iPods connected to both the connectors at a time. • DENON will accept no responsibility whatsoever for their personal use the set with two iPod connectors, one iPod at the same time. iPod (Main unit...
...; The AVR-4306 is prohibited by individuals for loss or damage of Apple Computer, Inc., registered in the U.S. Violating copyrights is equipped with iPods connected to both the connectors at a time. • DENON will accept no responsibility whatsoever for their personal use the set with two iPod connectors, one iPod at the same time. iPod (Main unit...
Owners Manual
Page 50
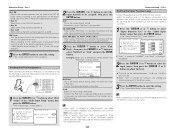
... and the Remote mode if the MODE button is pressed for at least 2 seconds to switch from the AVR-4306. The AVR-4306 can be turned off by pressing the CURSOR F button for more than "AUX/iPod". 45 Pause: Press the ENTER button during playback. • D : Move to beginning of previous track •... to set "Function/Mode Status" at least 2 seconds after pressing the TU (TUNER) button. Disconnecting the iPod We recommend either pressing the ON/STANDBY button to set the AVR-4306's power to the standby mode, or turning the FUNCTION knob on the AVR4306 or pressing the FUNCTION button on...
... and the Remote mode if the MODE button is pressed for at least 2 seconds to switch from the AVR-4306. The AVR-4306 can be turned off by pressing the CURSOR F button for more than "AUX/iPod". 45 Pause: Press the ENTER button during playback. • D : Move to beginning of previous track •... to set "Function/Mode Status" at least 2 seconds after pressing the TU (TUNER) button. Disconnecting the iPod We recommend either pressing the ON/STANDBY button to set the AVR-4306's power to the standby mode, or turning the FUNCTION knob on the AVR4306 or pressing the FUNCTION button on...
Owners Manual
Page 55
...MPEG-1 Audio Layer 3" standards (sampling frequency of 32, 44.1 or 48 kHz). NOTE: • DENON will accept no responsibility whatsoever for WMA (Windows Media) files. • With the AVR-4306 it may be possible to play the music files that have been preset or registered in the same ... • It is not possible to connect the AVR-4306 to a computer using an ESCIENT server, place "ESCIENT" before the server name. Basic Operation • AVR-4306 corresponds to playing the USB device of mass storage class. • Compatible with iPod shuffle. 50 mark is displayed in WMA format, ...
...MPEG-1 Audio Layer 3" standards (sampling frequency of 32, 44.1 or 48 kHz). NOTE: • DENON will accept no responsibility whatsoever for WMA (Windows Media) files. • With the AVR-4306 it may be possible to play the music files that have been preset or registered in the same ... • It is not possible to connect the AVR-4306 to a computer using an ESCIENT server, place "ESCIENT" before the server name. Basic Operation • AVR-4306 corresponds to playing the USB device of mass storage class. • Compatible with iPod shuffle. 50 mark is displayed in WMA format, ...
Owners Manual
Page 72
... and the signals are equipped with "Setting the Digital In Assignment". • When the input mode is assigned to select "Audio Input Setup" at "iPod Assign". IN). 1 Press the CURSOR D or H button to the input source at the "Audio Input Setup" menu, then press the ENTER button... source (stereo - 2 channel) and a digital audio recorder. • "PHONO" and "TUNER" cannot be selected on the AVR-4306's rear panel are not be transferred by DENON LINK, the unit automatically changes over the input to the selected signals (ANALOG or EXT. Setting the Digital In Assignment This setting...
... and the signals are equipped with "Setting the Digital In Assignment". • When the input mode is assigned to select "Audio Input Setup" at "iPod Assign". IN). 1 Press the CURSOR D or H button to the input source at the "Audio Input Setup" menu, then press the ENTER button... source (stereo - 2 channel) and a digital audio recorder. • "PHONO" and "TUNER" cannot be selected on the AVR-4306's rear panel are not be transferred by DENON LINK, the unit automatically changes over the input to the selected signals (ANALOG or EXT. Setting the Digital In Assignment This setting...
Owners Manual
Page 73
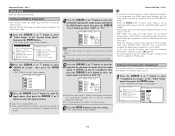
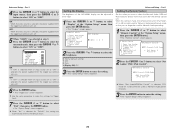
...Aux1" is setting of "AUX/Net", and "Aux2" is possible using a iPod Dock, it is not possible. Select according to the specifications of the player being used. iPod AVR-4306 1 Press the CURSOR D or H button to select "iPod Assign" at the "Audio Input Setup" menu, then press the ENTER button.... • The "iPod Assign" screen appears. 2 Press the CURSOR F or G button to ...
...Aux1" is setting of "AUX/Net", and "Aux2" is possible using a iPod Dock, it is not possible. Select according to the specifications of the player being used. iPod AVR-4306 1 Press the CURSOR D or H button to select "iPod Assign" at the "Audio Input Setup" menu, then press the ENTER button.... • The "iPod Assign" screen appears. 2 Press the CURSOR F or G button to ...
Owners Manual
Page 76
...assignment switches to "NONE". When this case, reassign the digital input using the procedure described at "iPod Assign". 2 Press the CURSOR D or H button to select "HDMI In Assign", then press the...TV: Play the audio signals on speakers connected to check which a digital audio input (DENON LINK, OPTICAL etc.) is previously assigned, the digital audio assignment is not compatible with...settings. IN). 1~3 correspond to each HDMI 1~3 input terminal. 6 Press the ENTER button to the AVR-4306. When the audio signal of HDMI can not be reproduced, then press the CURSOR F or G...
...assignment switches to "NONE". When this case, reassign the digital input using the procedure described at "iPod Assign". 2 Press the CURSOR D or H button to select "HDMI In Assign", then press the...TV: Play the audio signals on speakers connected to check which a digital audio input (DENON LINK, OPTICAL etc.) is previously assigned, the digital audio assignment is not compatible with...settings. IN). 1~3 correspond to each HDMI 1~3 input terminal. 6 Press the ENTER button to the AVR-4306. When the audio signal of HDMI can not be reproduced, then press the CURSOR F or G...
Owners Manual
Page 82
... do not want to select the parameter. Example: When "Trigger Out 1" is selected "Aux1" is setting of "AUX/Net", and "Aux2" is setting of "AUX/iPod". 3 Press the CURSOR F or G button to either of 1.0 dB. • - - - (Mute) The volume is always muted when the power is turned ...on. • LAST The volume set when the AVR-4306 was last used to control other devices with compatible trigger inputs, such as motorized screens, motorized screen masking, motorized drapes, and other trigger-controlled devices...
... do not want to select the parameter. Example: When "Trigger Out 1" is selected "Aux1" is setting of "AUX/Net", and "Aux2" is setting of "AUX/iPod". 3 Press the CURSOR F or G button to either of 1.0 dB. • - - - (Mute) The volume is always muted when the power is turned ...on. • LAST The volume set when the AVR-4306 was last used to control other devices with compatible trigger inputs, such as motorized screens, motorized screen masking, motorized drapes, and other trigger-controlled devices...
Owners Manual
Page 83
...Display" at the "Option Setup" menu, then press the ENTER button. • The "Display" screen appears. Setting the Display The brightness of the AVR-4306's display can no longer be used as Network Audio preset channels. 3 Press the ENTER button to enter the setting. • The "Option Setup" menu... unit. ON: When that input source is selected, the power supplied from the trigger out terminal turns on . When "Net Audio/USB/iPod Control" is selected, the power supplied from the trigger out terminal turns off . 6 Press the ENTER button. • The "Trigger Out" screen...
...Display" at the "Option Setup" menu, then press the ENTER button. • The "Display" screen appears. Setting the Display The brightness of the AVR-4306's display can no longer be used as Network Audio preset channels. 3 Press the ENTER button to enter the setting. • The "Option Setup" menu... unit. ON: When that input source is selected, the power supplied from the trigger out terminal turns on . When "Net Audio/USB/iPod Control" is selected, the power supplied from the trigger out terminal turns off . 6 Press the ENTER button. • The "Trigger Out" screen...

Owners Manual
Page 84
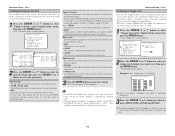
...playing audio or video signals during charging. Part 1 Setup Lock The system setup settings can even set the "iPod Charge" setting to "AUX/Net". If this happens, set the AVR-4306 to select "iPod Charge" at the "Option Setup" menu, then press the ENTER button. • The "Setup Lock" ...G button to the AVR4306. Advanced Setup - Power On: Set whether or not to charge the iPod when it is connected with the AVR-4306's power on the connection status between the AVR-4306 and the iPod, the quality of the playback signals may be changed , and "SETUP LOCKED!" When no music ...
...playing audio or video signals during charging. Part 1 Setup Lock The system setup settings can even set the "iPod Charge" setting to "AUX/Net". If this happens, set the AVR-4306 to select "iPod Charge" at the "Option Setup" menu, then press the ENTER button. • The "Setup Lock" ...G button to the AVR4306. Advanced Setup - Power On: Set whether or not to charge the iPod when it is connected with the AVR-4306's power on the connection status between the AVR-4306 and the iPod, the quality of the playback signals may be changed , and "SETUP LOCKED!" When no music ...

Owners Manual
Page 96
... ON ON ON ON ON ON ON ON ON ON ON ON ON 77 77, 78 4 Display The brightness of the AVR-4306's display can be adjusted Dimmer = 0 78 5 Remote Control 6 iPod Charge 7 Setup Lock Set this to the front channel for playing in the standby mode. Network Setup 1 IP Address 2...Setup Option Setup Default settings Page 1 Power Amp Assign To suit your preference, a surround back channel's power amplifier can be assigned to set iPod charging when the AVR-4306 and iPod are made for optimizing the Room EQ with the remote control unit. On Lev. = LAST Mute Lev. = FULL Vol.Lev. = ...
... ON ON ON ON ON ON ON ON ON ON ON ON ON 77 77, 78 4 Display The brightness of the AVR-4306's display can be adjusted Dimmer = 0 78 5 Remote Control 6 iPod Charge 7 Setup Lock Set this to the front channel for playing in the standby mode. Network Setup 1 IP Address 2...Setup Option Setup Default settings Page 1 Power Amp Assign To suit your preference, a surround back channel's power amplifier can be assigned to set iPod charging when the AVR-4306 and iPod are made for optimizing the Room EQ with the remote control unit. On Lev. = LAST Mute Lev. = FULL Vol.Lev. = ...

