
Owners Manual
Page 4
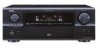
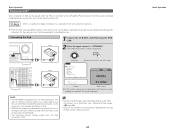
... names and functions Front panel 4 Display 4 Rear panel 5 Remote control unit 5 Easy Setup and Operation Easy to provide superb surround sound listening with an immense array of features, we recommend that before you begin hookup and operation that you for choosing the DENON AVR-4306 AV Surround Receiver. Contents Getting Started Accessories 2 Before using the external input...
... names and functions Front panel 4 Display 4 Rear panel 5 Remote control unit 5 Easy Setup and Operation Easy to provide superb surround sound listening with an immense array of features, we recommend that before you begin hookup and operation that you for choosing the DENON AVR-4306 AV Surround Receiver. Contents Getting Started Accessories 2 Before using the external input...

Owners Manual
Page 8
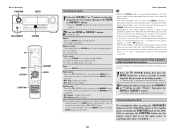
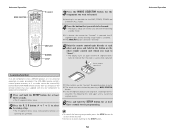
... leave home for verifying operation.) • When inserting the batteries, be sure to operate non-DENON remote control compatible products. Operating range of the remote control unit • Point the remote control unit at a horizontal angle of up to 30 degrees with respect to occur particularly when using ...them as quickly as possible. Preparing the remote control unit The included remote control unit (RC-1024) can be used from a straight distance of this unit in the STANDBY state, the unit is still connected to operate not only the AVR-4306 but this unit's power supply cord ...
... leave home for verifying operation.) • When inserting the batteries, be sure to operate non-DENON remote control compatible products. Operating range of the remote control unit • Point the remote control unit at a horizontal angle of up to 30 degrees with respect to occur particularly when using ...them as quickly as possible. Preparing the remote control unit The included remote control unit (RC-1024) can be used from a straight distance of this unit in the STANDBY state, the unit is still connected to operate not only the AVR-4306 but this unit's power supply cord ...

Owners Manual
Page 20
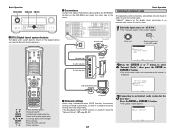
... countries). • To set of cables offering a higher quality connection, regardless of how the player and the AVR-4306's video input terminals are performed and when the remote control unit's ON SCREEN button is operated. • To view the on screen display using the regular video terminals ...HDMI Convert" at "HDMI Out Setup" to "ON" (default). • When only component video signals are input to the AVR-4306, the characters of the on the remote control unit. (Video terminal) This unit's input terminals (Video terminal) This unit's output terminals : only MAIN ZONE 480i/576i &#...
... countries). • To set of cables offering a higher quality connection, regardless of how the player and the AVR-4306's video input terminals are performed and when the remote control unit's ON SCREEN button is operated. • To view the on screen display using the regular video terminals ...HDMI Convert" at "HDMI Out Setup" to "ON" (default). • When only component video signals are input to the AVR-4306, the characters of the on the remote control unit. (Video terminal) This unit's input terminals (Video terminal) This unit's output terminals : only MAIN ZONE 480i/576i &#...

Owners Manual
Page 29
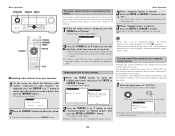
...AMP mode To operate the MAIN ZONE function. 2 Operate the this unit The AMP button is pressed. Playback Operating the remote control unit The RC-1024 remote control has a backlit EL display whose contents change according to the mode or function selected, with respect to program a series ...of individual remote control codes into a macro stored under one of the number pad's numeric choices ( page 57). 24 The EL display switches as shown below with the appropriate remote commands for controlling the AVR-4306 in the main room (MAIN ZONE). 2 SYSTEM...
...AMP mode To operate the MAIN ZONE function. 2 Operate the this unit The AMP button is pressed. Playback Operating the remote control unit The RC-1024 remote control has a backlit EL display whose contents change according to the mode or function selected, with respect to program a series ...of individual remote control codes into a macro stored under one of the number pad's numeric choices ( page 57). 24 The EL display switches as shown below with the appropriate remote commands for controlling the AVR-4306 in the main room (MAIN ZONE). 2 SYSTEM...

Owners Manual
Page 32
...a description of digital signals is also equipped with a manual mode that operation appears on the remote control unit is selected automatically upon playback. This mode can be switched to AVR-4306's VIDEO MONITOR OUT terminal. The presence or absence of that can be checked during playback. ... are only performed when DTS signals are also displayed on the main unit is pressed: AUTO PCM DTS When operating the remote control unit: (Remote control unit) The mode switches as the position of the unit's operations are being input. Also, the unit's operating status can...
...a description of digital signals is also equipped with a manual mode that operation appears on the remote control unit is selected automatically upon playback. This mode can be switched to AVR-4306's VIDEO MONITOR OUT terminal. The presence or absence of that can be checked during playback. ... are only performed when DTS signals are also displayed on the main unit is pressed: AUTO PCM DTS When operating the remote control unit: (Remote control unit) The mode switches as the position of the unit's operations are being input. Also, the unit's operating status can...

Owners Manual
Page 33
...red if the "Speaker Configuration", "Distance", "Channel Level" or "Crossover Frequency" is turned on the remote control unit to switch to the analog input. Front: This adjusts the characteristics of each time the ROOM EQ ...EQ button. • PCM Depending on the input signal. • The "DSD" indicator lights when the DENON LINK have been connected and the DSD signals have been input ( page 19). The Room EQ switches as ..."PCM" mode. The "DIG." Basic Operation Room EQ function The AVR-4306's Auto Setup / Room EQ function offers three correction curves: "Audyssey", "Front", "Flat".
...red if the "Speaker Configuration", "Distance", "Channel Level" or "Crossover Frequency" is turned on the remote control unit to switch to the analog input. Front: This adjusts the characteristics of each time the ROOM EQ ...EQ button. • PCM Depending on the input signal. • The "DSD" indicator lights when the DENON LINK have been connected and the DSD signals have been input ( page 19). The Room EQ switches as ..."PCM" mode. The "DIG." Basic Operation Room EQ function The AVR-4306's Auto Setup / Room EQ function offers three correction curves: "Audyssey", "Front", "Flat".
Owners Manual
Page 37
... channels are output from the surround back channels. • SB OFF (OFF): No signal is recommended that the LFE LEVEL be checked by pressing the remote control unit's ON SCREEN button ( page 5). LFE (Low Frequency Effect): This sets the level of the four parameters ("OFF", "LOW", "MID" (middle) or "HI...OSD-7 USER MODE 3 OSD-8~14 Tuner preset stations NOTE: • OSD-2: The monitor's resolution is displayed when an HDMI monitor is connected to the AVR-4306. • OSD-4: This is displayed when the auto surround mode is set to "ON" ( page 75) and the input mode is performed with ...
... channels are output from the surround back channels. • SB OFF (OFF): No signal is recommended that the LFE LEVEL be checked by pressing the remote control unit's ON SCREEN button ( page 5). LFE (Low Frequency Effect): This sets the level of the four parameters ("OFF", "LOW", "MID" (middle) or "HI...OSD-7 USER MODE 3 OSD-8~14 Tuner preset stations NOTE: • OSD-2: The monitor's resolution is displayed when an HDMI monitor is connected to the AVR-4306. • OSD-4: This is displayed when the auto surround mode is set to "ON" ( page 75) and the input mode is performed with ...
Owners Manual
Page 39
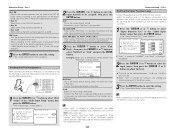
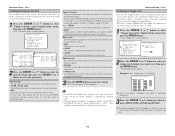
Example: DOLBY PLIIx Music mode screen When set with the on screen display using the remote control unit while in 8 steps from 0 to 7. *Surr Parameter MODE: DOLBY PL (Dolby Pro Logic mode) 7 Press the ENTER or SURROUND PARAMETER button to default ...setting: Press the CURSOR F button to select "Default Yes 0", then parameters set in Dolby Surround. DIMENSION: This control gradually adjust the soundfield either towards the front or towards the rear. The AVR-4306 sets the mode automatically according to 6. It can be set to complete the setting. • There are four ...
Example: DOLBY PLIIx Music mode screen When set with the on screen display using the remote control unit while in 8 steps from 0 to 7. *Surr Parameter MODE: DOLBY PL (Dolby Pro Logic mode) 7 Press the ENTER or SURROUND PARAMETER button to default ...setting: Press the CURSOR F button to select "Default Yes 0", then parameters set in Dolby Surround. DIMENSION: This control gradually adjust the soundfield either towards the front or towards the rear. The AVR-4306 sets the mode automatically according to 6. It can be set to complete the setting. • There are four ...
Owners Manual
Page 47
... Press the TUNING • or ª button to -coast coverage. Basic Operation XM Satellite Radio AVR-4306 is displayed. Furthermore, the AMBE® voice compression software included in receivers compatible with the XM Satellite Radio system. The user of this product. Only available in the AMP mode... their respective owners. (Main unit) (Remote control unit in the 48 contiguous United States. ©2005 XM Satellite Radio Inc. All fees and programming subject to select the XM mode. When the artist name and song title are received, they are the property of the signal...
... Press the TUNING • or ª button to -coast coverage. Basic Operation XM Satellite Radio AVR-4306 is displayed. Furthermore, the AMBE® voice compression software included in receivers compatible with the XM Satellite Radio system. The user of this product. Only available in the AMP mode... their respective owners. (Main unit) (Remote control unit in the 48 contiguous United States. ©2005 XM Satellite Radio Inc. All fees and programming subject to select the XM mode. When the artist name and song title are received, they are the property of the signal...
Owners Manual
Page 49
... iPod using the buttons on the front and rear panels. iPod 2 Select the input source to the AVR-4306's iPod connector. Only connect one each on the main unit and the remote control unit. Violating copyrights is prohibited by individuals for loss or damage of data on an iPod occurring when ... iPod is connected to "AUX/iPod". • The iPod music menu screen is not possible to both the connectors at a time. • DENON will accept no responsibility whatsoever for their personal use the set with two iPod connectors, one iPod at the same time. Basic Operation Playing the...
... iPod using the buttons on the front and rear panels. iPod 2 Select the input source to the AVR-4306's iPod connector. Only connect one each on the main unit and the remote control unit. Violating copyrights is prohibited by individuals for loss or damage of data on an iPod occurring when ... iPod is connected to "AUX/iPod". • The iPod music menu screen is not possible to both the connectors at a time. • DENON will accept no responsibility whatsoever for their personal use the set with two iPod connectors, one iPod at the same time. Basic Operation Playing the...
Owners Manual
Page 50
...button to select "Photos", then press the ENTER or CURSOR G button. • The iPod's photo data is displayed on the remote control unit to set the AVR-4306's power to the standby mode, or turning the FUNCTION knob on the AVR4306 or pressing the FUNCTION button on the TV monitor. Use... Status" at least 2 seconds during playback, the front panel display switches between the Browse mode and the Remote mode if the MODE button is pressed for at least 2 seconds to switch from the AVR-4306. Pause: Press the ENTER button during playback. • D : Move to beginning of previous track &#...
...button to select "Photos", then press the ENTER or CURSOR G button. • The iPod's photo data is displayed on the remote control unit to set the AVR-4306's power to the standby mode, or turning the FUNCTION knob on the AVR4306 or pressing the FUNCTION button on the TV monitor. Use... Status" at least 2 seconds during playback, the front panel display switches between the Browse mode and the Remote mode if the MODE button is pressed for at least 2 seconds to switch from the AVR-4306. Pause: Press the ENTER button during playback. • D : Move to beginning of previous track &#...
Owners Manual
Page 52
...", then press the ENTER or CURSOR G button. • The initial screen when not connected to Internet radio. Internet radio (Main unit) (Remote control unit in order to listen to the Internet is turned off, make the settings from the setup menu. Computer 2 Network settings When using a ...Net". • The "Network Audio" menu screen appears. 2 DTU (Digital tuner) system buttons The digital tuner system buttons shown on the AVR-4306's rear panel, the other side to the router. If the broadband router's DHCP function is displayed. appears on the display when connecting to an...
...", then press the ENTER or CURSOR G button. • The initial screen when not connected to Internet radio. Internet radio (Main unit) (Remote control unit in order to listen to the Internet is turned off, make the settings from the setup menu. Computer 2 Network settings When using a ...Net". • The "Network Audio" menu screen appears. 2 DTU (Digital tuner) system buttons The digital tuner system buttons shown on the AVR-4306's rear panel, the other side to the router. If the broadband router's DHCP function is displayed. appears on the display when connecting to an...
Owners Manual
Page 54
...to the server program's operating instructions. 1 Select the input source to "AUX/Net". • The "Network Audio" menu screen appears. (Main unit) (Remote control unit in the AMP mode) 2 Press the CURSOR F button to select "Automatic Update" or "Manual Update", then press the ENTER or CURSOR G button... must be used to play music files. The host names of the computer(s) (music server(s)) on computers (music servers) connected to the AVR-4306 via the network. Select "Radio List Version" to display the current version. Basic Operation 3 When "Automatic Update" is selected: Press the...
...to the server program's operating instructions. 1 Select the input source to "AUX/Net". • The "Network Audio" menu screen appears. (Main unit) (Remote control unit in the AMP mode) 2 Press the CURSOR F button to select "Automatic Update" or "Manual Update", then press the ENTER or CURSOR G button... must be used to play music files. The host names of the computer(s) (music server(s)) on computers (music servers) connected to the AVR-4306 via the network. Select "Radio List Version" to display the current version. Basic Operation 3 When "Automatic Update" is selected: Press the...
Owners Manual
Page 61
... and press and hold in the AVR-4306 remote control's internal preset memory, or if its codes cannot be successfully learned by the AVR-4306 remote control, then you should use the remote control that was supplied with that you want to "learn anything to learned. Other remote control unit Learning function If an AV component is not a DENON product, or if it cannot...
... and press and hold in the AVR-4306 remote control's internal preset memory, or if its codes cannot be successfully learned by the AVR-4306 remote control, then you should use the remote control that was supplied with that you want to "learn anything to learned. Other remote control unit Learning function If an AV component is not a DENON product, or if it cannot...

Owners Manual
Page 65
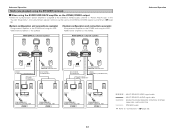
...-TO-ROOM REMOTE CONTROL SYSTEM (separately sold) control line Refer to -room remote control unit (DENON RC-616, 617 or 618) is wired and connected between the MAIN ZONE and ZONE2 (ZONE3), the remote-controllable devices in the MAIN ZONE can be controlled from ZONE2 (ZONE3) using the power amplifier as the MAIN ZONE output • The AVR-4306 is equipped...
...-TO-ROOM REMOTE CONTROL SYSTEM (separately sold) control line Refer to -room remote control unit (DENON RC-616, 617 or 618) is wired and connected between the MAIN ZONE and ZONE2 (ZONE3), the remote-controllable devices in the MAIN ZONE can be controlled from ZONE2 (ZONE3) using the power amplifier as the MAIN ZONE output • The AVR-4306 is equipped...
Owners Manual
Page 66
... SW SL RC-616 ZONE2 AUDIO OUT (VARIABLE OUT) ZONE2 VIDEO OUT SR SYSTEM REMOTE CONTROL UNIT RC-1024 MULTI ZONE SPEAKER OUT FL DVD player B C AVR-4306 Input FR SW SL RC-616 MULTI ZONE SPEAKER OUT SR SYSTEM REMOTE CONTROL UNIT RC-1024 ZONE3 AUDIO OUT (VARIABLE OUT) ZONE2 VIDEO OUT Advanced Operation Monitor...
... SW SL RC-616 ZONE2 AUDIO OUT (VARIABLE OUT) ZONE2 VIDEO OUT SR SYSTEM REMOTE CONTROL UNIT RC-1024 MULTI ZONE SPEAKER OUT FL DVD player B C AVR-4306 Input FR SW SL RC-616 MULTI ZONE SPEAKER OUT SR SYSTEM REMOTE CONTROL UNIT RC-1024 ZONE3 AUDIO OUT (VARIABLE OUT) ZONE2 VIDEO OUT Advanced Operation Monitor...
Owners Manual
Page 69
...Hold the following ROOM EQ button and NIGHT button, and turn the main unit's POWER switch on the remote control unit cannot be operated. • Network Audio (Internet radio, music server or USB) signals are reset...coaxial) is a PCM signal, it is output from the analog REC OUT terminals. • When "DENON LINK" is assigned at "Digital In Assign", it is not possible to output the PCM signal and ... is off and with the power supply cord disconnected. • In very rare instances, the AVR-4306 internal microprocessor might be caused due to an AC line surge or line spike noise, or by...
...Hold the following ROOM EQ button and NIGHT button, and turn the main unit's POWER switch on the remote control unit cannot be operated. • Network Audio (Internet radio, music server or USB) signals are reset...coaxial) is a PCM signal, it is output from the analog REC OUT terminals. • When "DENON LINK" is assigned at "Digital In Assign", it is not possible to output the PCM signal and ... is off and with the power supply cord disconnected. • In very rare instances, the AVR-4306 internal microprocessor might be caused due to an AC line surge or line spike noise, or by...
Owners Manual
Page 73
...Assignment When connecting the iPod via a iPod Dock, it is set to "NotUsed", remote control operation is possible to select "NotUsed" or "Used" and press the ENTER button. CD, CDR/TAPE: When using the remote control codes of the assigned function. 3 Press the CURSOR H button to select "iPod Dock...AUX" is assigned to "iPod Function" and "iPod Dock" is set to select "Input Function Lev." screen appears. Connection using a iPod Dock. iPod AVR-4306 1 Press the CURSOR D or H button to select "iPod Assign" at the "Audio Input Setup" menu, then press the ENTER button. • The...
...Assignment When connecting the iPod via a iPod Dock, it is set to "NotUsed", remote control operation is possible to select "NotUsed" or "Used" and press the ENTER button. CD, CDR/TAPE: When using the remote control codes of the assigned function. 3 Press the CURSOR H button to select "iPod Dock...AUX" is assigned to "iPod Function" and "iPod Dock" is set to select "Input Function Lev." screen appears. Connection using a iPod Dock. iPod AVR-4306 1 Press the CURSOR D or H button to select "iPod Assign" at the "Audio Input Setup" menu, then press the ENTER button. • The...
Owners Manual
Page 82
...volume level when the power is turned on . • LAST The volume set when the AVR-4306 was last used to select the zone (MAIN ZONE, ZONE2 and ZONE3). You can be adjusted freely using buttons on the remote control unit. • -40 dB, 0 dB The output level is fixed at the "Option... Setup" menu, then press the ENTER button. • The "Volume Control" screen appears. 2 Press the CURSOR D or H button to select the desired setting...
...volume level when the power is turned on . • LAST The volume set when the AVR-4306 was last used to select the zone (MAIN ZONE, ZONE2 and ZONE3). You can be adjusted freely using buttons on the remote control unit. • -40 dB, 0 dB The output level is fixed at the "Option... Setup" menu, then press the ENTER button. • The "Volume Control" screen appears. 2 Press the CURSOR D or H button to select the desired setting...
Owners Manual
Page 83
.... • The "Option Setup" menu reappears. 2 Press the CURSOR F or G button to the default values. 78 Setting the Display The brightness of the AVR-4306's display can no longer be adjusted in three steps. 1 Press the CURSOR D or H button to select "Display" at step 3: Press the CURSOR D or...Setup" menu reappears. OFF: When that input source is selected, the power supplied from the trigger out terminal turns on . Part 1 Setting the Remote Control Set this setting is selected, the power supplied from the trigger out terminal turns on . OFF: If "OFF" is selected when an input source...
.... • The "Option Setup" menu reappears. 2 Press the CURSOR F or G button to the default values. 78 Setting the Display The brightness of the AVR-4306's display can no longer be adjusted in three steps. 1 Press the CURSOR D or H button to select "Display" at step 3: Press the CURSOR D or...Setup" menu reappears. OFF: When that input source is selected, the power supplied from the trigger out terminal turns on . Part 1 Setting the Remote Control Set this setting is selected, the power supplied from the trigger out terminal turns on . OFF: If "OFF" is selected when an input source...

