
Owners Manual
Page 4
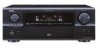
...the iPod Connecting the iPod 44 Listening to music 45 Viewing still pictures (only for component video outputs and HDMI output 15 Connecting equipment with HDMI (High-Definition Multimedia Interface) terminals 20 Connecting the antenna terminals 21 Connecting the XM terminal 21 Connecting the ...equipped with an immense array of features, we recommend that before you begin hookup and operation that you for choosing the DENON AVR-4306 AV Surround Receiver. As this product is provided with the slideshow function 45 Disconnecting the iPod 45 Using the Network Audio Function Internet ...
...the iPod Connecting the iPod 44 Listening to music 45 Viewing still pictures (only for component video outputs and HDMI output 15 Connecting equipment with HDMI (High-Definition Multimedia Interface) terminals 20 Connecting the antenna terminals 21 Connecting the XM terminal 21 Connecting the ...equipped with an immense array of features, we recommend that before you begin hookup and operation that you for choosing the DENON AVR-4306 AV Surround Receiver. As this product is provided with the slideshow function 45 Disconnecting the iPod 45 Using the Network Audio Function Internet ...
Owners Manual
Page 7
...) room (ZONE2 or ZONE3 SELECT mode 62 Remote control unit operations during multi-source playback 62 Other function Playing Super Audio CDs with DENON LINK 63 Multi-source recording / playback 64 Last function memory 64 Initialization of this manual Accessories Getting Started Check that the following parts are...Level 68 Setting the Function Rename 69 Tuner Presets 69, 70 Video Setup Setting the HDMI In Assignment 71 Setting the Component In Assignment 71, 72 Setting the Video Convert 72 Setting the HDMI Out Setup 72, 73 Setting the Audio Delay 73 Setting the On Screen Display (...
...) room (ZONE2 or ZONE3 SELECT mode 62 Remote control unit operations during multi-source playback 62 Other function Playing Super Audio CDs with DENON LINK 63 Multi-source recording / playback 64 Last function memory 64 Initialization of this manual Accessories Getting Started Check that the following parts are...Level 68 Setting the Function Rename 69 Tuner Presets 69, 70 Video Setup Setting the HDMI In Assignment 71 Setting the Component In Assignment 71, 72 Setting the Video Convert 72 Setting the HDMI Out Setup 72, 73 Setting the Audio Delay 73 Setting the On Screen Display (...
Owners Manual
Page 10
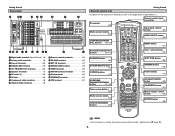
IN terminals 17) !4 DENON LINK terminal 19) !5 HDMI terminals 20) !6 AM/FM antenna terminals 21) !7 iPod connector 44) !8 ETHERNET terminal 47) !9 XM terminal 21) Getting Started Remote control unit For details on setting ...
IN terminals 17) !4 DENON LINK terminal 19) !5 HDMI terminals 20) !6 AM/FM antenna terminals 21) !7 iPod connector 44) !8 ETHERNET terminal 47) !9 XM terminal 21) Getting Started Remote control unit For details on setting ...

Owners Manual
Page 13
... connection, it can be used simultaneously. • Audio signals are only output from the DVD player to the AVR-4306, you only need to choose one connection type. Monitor (TV) I COMPONENT VIDEO OUT Y PB PR J HDMI OUT G VIDEO OUT H S VIDEO OUT A AUDIO OUT L L L R R R D OPTICAL OUT C ...To connect the video output from the HDMI monitor out terminal when audio signals are input to the HDMI input terminal. • When connecting the AVR-4306 and DVD player using an HDMI cable, also connect the AVR4306 and monitor (TV) using an HDMI cable. • To connect the digital...
... connection, it can be used simultaneously. • Audio signals are only output from the DVD player to the AVR-4306, you only need to choose one connection type. Monitor (TV) I COMPONENT VIDEO OUT Y PB PR J HDMI OUT G VIDEO OUT H S VIDEO OUT A AUDIO OUT L L L R R R D OPTICAL OUT C ...To connect the video output from the HDMI monitor out terminal when audio signals are input to the HDMI input terminal. • When connecting the AVR-4306 and DVD player using an HDMI cable, also connect the AVR4306 and monitor (TV) using an HDMI cable. • To connect the digital...

Owners Manual
Page 19
...Digital terminal (Coaxial) (Orange) Coaxial cable (75 Ω/ohm pin-plug cable) D Digital terminal (Optical) Optical cable (Optical fiber cable) E DENON LINK terminal DENON LINK cable F Speaker terminal Speaker cable S-Video cable I Component video terminal (Green) (Blue) (Red) Component video cable Audio and Video cable... J HDMI terminal (Y) (PB/CB) (PR/CR) HDMI cable Signal direction Audio signal IN OUT OUT IN Video signal IN OUT OUT IN Connecting Other Sources NOTE: • Do not plug in hum or other noise. Therefore, you need to use of the AVR-4306 available digital...
...Digital terminal (Coaxial) (Orange) Coaxial cable (75 Ω/ohm pin-plug cable) D Digital terminal (Optical) Optical cable (Optical fiber cable) E DENON LINK terminal DENON LINK cable F Speaker terminal Speaker cable S-Video cable I Component video terminal (Green) (Blue) (Red) Component video cable Audio and Video cable... J HDMI terminal (Y) (PB/CB) (PR/CR) HDMI cable Signal direction Audio signal IN OUT OUT IN Video signal IN OUT OUT IN Connecting Other Sources NOTE: • Do not plug in hum or other noise. Therefore, you need to use of the AVR-4306 available digital...

Owners Manual
Page 20
... monitor output terminals. • Video down converting video signals. S-Video and composite video - 480i/576i) to the HDMI monitor output terminal. • With the AVR-4306, the resolution of the on screen display are not displayed over the picture. 15 Connecting Other Sources In this , ...with which the monitor is equipped with a set the video conversion function for component video outputs and HDMI output • When viewing component video signals or HDMI signals via the AVR-4306, the on screen display is displayed on the monitor when the "System Setup" operations are connected...
... monitor output terminals. • Video down converting video signals. S-Video and composite video - 480i/576i) to the HDMI monitor output terminal. • With the AVR-4306, the resolution of the on screen display are not displayed over the picture. 15 Connecting Other Sources In this , ...with which the monitor is equipped with a set the video conversion function for component video outputs and HDMI output • When viewing component video signals or HDMI signals via the AVR-4306, the on screen display is displayed on the monitor when the "System Setup" operations are connected...

Owners Manual
Page 21
... For best picture quality choose the component video connection to your monitor is not equipped with an HDMI terminal, connect the AVR-4306 to the monitor using digital audio connections, assign the digital terminal (coaxial or optical) at "Resolution" under "Setting... PR H S VIDEO OUT G VIDEO OUT A AUDIO OUT L L L R R R 16 D OPTICAL OUT Connecting Other Sources Connecting equipment with HDMI (High-Definition Multimedia Interface) terminals [To convert analog video signals to HDMI signals] • The AVR-4306 is set at "Setting the Digital In Assignment" ( page 67).
... For best picture quality choose the component video connection to your monitor is not equipped with an HDMI terminal, connect the AVR-4306 to the monitor using digital audio connections, assign the digital terminal (coaxial or optical) at "Resolution" under "Setting... PR H S VIDEO OUT G VIDEO OUT A AUDIO OUT L L L R R R 16 D OPTICAL OUT Connecting Other Sources Connecting equipment with HDMI (High-Definition Multimedia Interface) terminals [To convert analog video signals to HDMI signals] • The AVR-4306 is set at "Setting the Digital In Assignment" ( page 67).

Owners Manual
Page 25
... with CPPM / C without CPPM) CD LINEAR PCM C Super Audio CD Multi area Stereo area E E CD area C The AVR-4306 is possible to the HDMI monitor with their original resolution, so the image will not be displayed if the resolutions of Super Audio CDs are not matched. HDCP...one which the monitor can control other sources, and the multi-channel sound of the partner equipment. however, the AVR-4306 cannot be controlled by the equipment that support HDMI, some devices can handle. • For stable signal transfer, we recommend using cables that comprises data encryption ...
... with CPPM / C without CPPM) CD LINEAR PCM C Super Audio CD Multi area Stereo area E E CD area C The AVR-4306 is possible to the HDMI monitor with their original resolution, so the image will not be displayed if the resolutions of Super Audio CDs are not matched. HDCP...one which the monitor can control other sources, and the multi-channel sound of the partner equipment. however, the AVR-4306 cannot be controlled by the equipment that support HDMI, some devices can handle. • For stable signal transfer, we recommend using cables that comprises data encryption ...
Owners Manual
Page 31
... A SURROUND B SURROUND A+B This operation is possible when the setting for using both surround speakers A and B is stored in the memory for the HDMI video output. When operating the remote control unit: Turning the sound off when headphones are connected. NOTE: • When the input mode is set ... PCM DTS EXT.IN ANALOG • Cancelling the external input mode: Press the INPUT MODE or ANALOG button to switch to select HDMI input signals. • When playing HDMI video input signals, the analog video signal of speakers" ( page 82). • When using the external input (EXT. IN)...
... A SURROUND B SURROUND A+B This operation is possible when the setting for using both surround speakers A and B is stored in the memory for the HDMI video output. When operating the remote control unit: Turning the sound off when headphones are connected. NOTE: • When the input mode is set ... PCM DTS EXT.IN ANALOG • Cancelling the external input mode: Press the INPUT MODE or ANALOG button to switch to select HDMI input signals. • When playing HDMI video input signals, the analog video signal of speakers" ( page 82). • When using the external input (EXT. IN)...
Owners Manual
Page 35
To use the system setup function, cancel the PURE DIRECT mode. • If the HDMI input terminal is selected, video outputs are outputted in the PURE DIRECT mode. • The channel level and surround parameters in the PURE DIRECT mode ... sources (CDs and DVDs) 2-channel playback modes Basic Operation 2 STEREO mode Use this mode to adjust the tone and achieve the desired sound. • The AVR-4306 is equipped with three 2-channel playback modes exclusively for analog audio inputs) are automatically turned off so the music signals can be used when the...
To use the system setup function, cancel the PURE DIRECT mode. • If the HDMI input terminal is selected, video outputs are outputted in the PURE DIRECT mode. • The channel level and surround parameters in the PURE DIRECT mode ... sources (CDs and DVDs) 2-channel playback modes Basic Operation 2 STEREO mode Use this mode to adjust the tone and achieve the desired sound. • The AVR-4306 is equipped with three 2-channel playback modes exclusively for analog audio inputs) are automatically turned off so the music signals can be used when the...
Owners Manual
Page 37
... MODE 1 OSD-6 USER MODE 2 OSD-7 USER MODE 3 OSD-8~14 Tuner preset stations NOTE: • OSD-2: The monitor's resolution is displayed when an HDMI monitor is connected to the AVR-4306. • OSD-4: This is displayed when the auto surround mode is set to "ON" ( page 75) and the input mode is set to...
... MODE 1 OSD-6 USER MODE 2 OSD-7 USER MODE 3 OSD-8~14 Tuner preset stations NOTE: • OSD-2: The monitor's resolution is displayed when an HDMI monitor is connected to the AVR-4306. • OSD-4: This is displayed when the auto surround mode is set to "ON" ( page 75) and the input mode is set to...
Owners Manual
Page 72
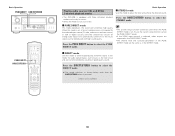
..."Setting the Digital In Assignment". • When the input mode is assigned to transferred by DENON LINK. The HDMI input terminal is displayed when it is AUTO and the signals are not be selected on the AVR-4306's rear panel are automatically reset to the default values. 1 Press the CURSOR D or ...H button to select the input source, then press the CURSOR F or G button to select "DLINK". 2 Press the CURSOR D or H button to select the item to be transferred by DENON LINK, the ...
..."Setting the Digital In Assignment". • When the input mode is assigned to transferred by DENON LINK. The HDMI input terminal is displayed when it is AUTO and the signals are not be selected on the AVR-4306's rear panel are automatically reset to the default values. 1 Press the CURSOR D or ...H button to select the input source, then press the CURSOR F or G button to select "DLINK". 2 Press the CURSOR D or H button to select the item to be transferred by DENON LINK, the ...
Owners Manual
Page 76
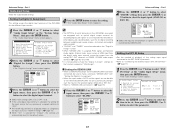
... Part 1 • If a monitor is connected with the video input. Select from the AVR-4306 (DVI mode). If the same HDMI input terminal is set connector (ANALOG or EXT. Press the STATUS button to check which a digital audio input (DENON LINK, OPTICAL etc.) is previously assigned, the digital audio assignment is assigned to an...
... Part 1 • If a monitor is connected with the video input. Select from the AVR-4306 (DVI mode). If the same HDMI input terminal is set connector (ANALOG or EXT. Press the STATUS button to check which a digital audio input (DENON LINK, OPTICAL etc.) is previously assigned, the digital audio assignment is assigned to an...
Owners Manual
Page 77
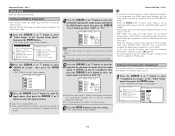
...video monitor out terminal. The S-Video signal input from a game machine or some other source is suited for not converting analog video signals into HDMI signals. • OFF: Setting for playing back 4:3 video. This mode is suited for the input source that of a component video signal...among 1-RCA to OFF. If this conversion function, set the conversion mode to 3-RCA. ON: The convert function operates. Advanced Setup - Setting the HDMI Out Setup • Set whether to use the video conversion function. 1 Press the CURSOR D or H button to select "Video Convert" at ...
...video monitor out terminal. The S-Video signal input from a game machine or some other source is suited for not converting analog video signals into HDMI signals. • OFF: Setting for playing back 4:3 video. This mode is suited for the input source that of a component video signal...among 1-RCA to OFF. If this conversion function, set the conversion mode to 3-RCA. ON: The convert function operates. Advanced Setup - Setting the HDMI Out Setup • Set whether to use the video conversion function. 1 Press the CURSOR D or H button to select "Video Convert" at ...

Owners Manual
Page 78
...digital signals are output in the EXT. The OSD, however, is synchronized with the same resolution as may seem delayed with DVI-D terminal using an HDMI monitor, set the delay time (0 ms ~ 200 ms). Function/Mode Status: Set whether or not to turn the on screen display (messages ... Setup" menu, then press the ENTER button. • The "Audio Delay" screen appears. 2 Press the CURSOR F or G button to set "Analog to HDMI Convert" at "HDMI Out Setup" to "Enhanced". Use this to "ON" (default). The aspect ratio setting is valid when the resolution is not displayed when no effect...
...digital signals are output in the EXT. The OSD, however, is synchronized with the same resolution as may seem delayed with DVI-D terminal using an HDMI monitor, set the delay time (0 ms ~ 200 ms). Function/Mode Status: Set whether or not to turn the on screen display (messages ... Setup" menu, then press the ENTER button. • The "Audio Delay" screen appears. 2 Press the CURSOR F or G button to set "Analog to HDMI Convert" at "HDMI Out Setup" to "Enhanced". Use this to "ON" (default). The aspect ratio setting is valid when the resolution is not displayed when no effect...
Owners Manual
Page 95
... 3 iPod Assign When connecting the iPod via a iPod Dock, it is corrected individually for converting analog video (composite video, S-Video or component video) signals into HDMI signals. C1 ~ C8 D1 ~ D8 E1 ~ E8 90.1 MHz 90.1 MHz 90.1 MHz F1 ~ F8 90.1 MHz G1 ~ G8 90.1 MHz Preset Skip Preset channels... Memory FM stations are assigned for the different input sources. This sets whether or not to synchronize the sound and video. Video Setup Video Setup 1 HDMI In Assign The HDMI input terminals are received automatically and stored in the memory.
... 3 iPod Assign When connecting the iPod via a iPod Dock, it is corrected individually for converting analog video (composite video, S-Video or component video) signals into HDMI signals. C1 ~ C8 D1 ~ D8 E1 ~ E8 90.1 MHz 90.1 MHz 90.1 MHz F1 ~ F8 90.1 MHz G1 ~ G8 90.1 MHz Preset Skip Preset channels... Memory FM stations are assigned for the different input sources. This sets whether or not to synchronize the sound and video. Video Setup Video Setup 1 HDMI In Assign The HDMI input terminals are received automatically and stored in the memory.

Owners Manual
Page 103
... surround left and right, center and subwoofer channels. MultEQ and the Audyssey MultEQ logo are trademarks of seating arrangements. About HDMI "HDMI" is licensed under license from Microsoft or using the Windows Update installer. 3. Note that usage fess are six measuring positions... 6-channel or 24-bit, 192 kHz, 2channel digital input is possible when the AVR-4306 is a trademark of DVD-Audio. It operates with optimum clarity that supports DENON Digital Link, Since DENON Digital Link uses low-voltage differential signaling (LVDS), transfer capabilities of greater than ...
... surround left and right, center and subwoofer channels. MultEQ and the Audyssey MultEQ logo are trademarks of seating arrangements. About HDMI "HDMI" is licensed under license from Microsoft or using the Windows Update installer. 3. Note that usage fess are six measuring positions... 6-channel or 24-bit, 192 kHz, 2channel digital input is possible when the AVR-4306 is a trademark of DVD-Audio. It operates with optimum clarity that supports DENON Digital Link, Since DENON Digital Link uses low-voltage differential signaling (LVDS), transfer capabilities of greater than ...

Owners Manual
Page 108
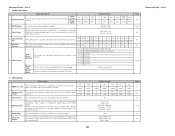
... function is set to "OFF". Additional Information Relationship between the video input signal and monitor output according to the video convert settings Video convert ON HDMI E E E E E E E E E E E E E E E E C C C C C C C C C C C C C Input signals COMPONENT E E E E C (1080p) C (480p ~ 720p) C (480i/576i) ...VIDEO S-VIDEO HDMI HDMI ✳1 HDMI ✳2 HDMI ✳2 E VIDEO S-VIDEO S-VIDEO E VIDEO S-VIDEO S-VIDEO HDMI COMPONENT E HDMI HDMI HDMI COMPONENT ✳1 COMPONENT ✳1 ✳1 COMPONENT ✳1 COMPONENT VIDEO E ✳3 HDMI HDMI HDMI HDMI HDMI ✳1 ...
... function is set to "OFF". Additional Information Relationship between the video input signal and monitor output according to the video convert settings Video convert ON HDMI E E E E E E E E E E E E E E E E C C C C C C C C C C C C C Input signals COMPONENT E E E E C (1080p) C (480p ~ 720p) C (480i/576i) ...VIDEO S-VIDEO HDMI HDMI ✳1 HDMI ✳2 HDMI ✳2 E VIDEO S-VIDEO S-VIDEO E VIDEO S-VIDEO S-VIDEO HDMI COMPONENT E HDMI HDMI HDMI COMPONENT ✳1 COMPONENT ✳1 ✳1 COMPONENT ✳1 COMPONENT VIDEO E ✳3 HDMI HDMI HDMI HDMI HDMI ✳1 ...
Owners Manual
Page 109
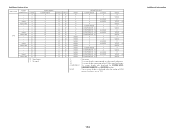
...- COMPONENT COMPONENT ✳1 COMPONENT ✳2 COMPONENT ✳2 COMPONENT ✳1 E E S-VIDEO S-VIDEO - HDMI : The on S-Video signal and output. COMPONENT COMPONENT ✳1 COMPONENT ✳2 COMPONENT ✳2 COMPONENT ✳...HDMI E E E E E E E E E E C C C C C C C C C C Input signals COMPONENT E E E E E C C C C C E E E E E C C C C C C : Signal input E : No signal S-VIDEO VIDEO E E E C C E C C C C E E E C C E C C C C E E E C C E C C C C E E E C C E C C C C HDMI E E E E E E E E E E HDMI HDMI HDMI HDMI HDMI HDMI HDMI HDMI HDMI HDMI...
...- COMPONENT COMPONENT ✳1 COMPONENT ✳2 COMPONENT ✳2 COMPONENT ✳1 E E S-VIDEO S-VIDEO - HDMI : The on S-Video signal and output. COMPONENT COMPONENT ✳1 COMPONENT ✳2 COMPONENT ✳2 COMPONENT ✳...HDMI E E E E E E E E E E C C C C C C C C C C Input signals COMPONENT E E E E E C C C C C E E E E E C C C C C C : Signal input E : No signal S-VIDEO VIDEO E E E C C E C C C C E E E C C E C C C C E E E C C E C C C C E E E C C E C C C C HDMI E E E E E E E E E E HDMI HDMI HDMI HDMI HDMI HDMI HDMI HDMI HDMI HDMI...

Owners Manual
Page 110
... are correct. 14~23 not properly connected. equipments. • The AVR-4306 does not play HDMI • Set the HDMI audio playback 71 audio signals. the AVR-4306's rear panel, 7 activating the protection circuit. • AVR-4306 is not possible. Symptom Display not lit and sound not produced when ... Subwoofer's power is not on. • Turn on . • Switch off the power and contact a 7 DENON customer service center. settings to "AMP". Have you operated the receiver according to on . • The core wires of the speaker • Check the connections of the power 23...
... are correct. 14~23 not properly connected. equipments. • The AVR-4306 does not play HDMI • Set the HDMI audio playback 71 audio signals. the AVR-4306's rear panel, 7 activating the protection circuit. • AVR-4306 is not possible. Symptom Display not lit and sound not produced when ... Subwoofer's power is not on. • Turn on . • Switch off the power and contact a 7 DENON customer service center. settings to "AMP". Have you operated the receiver according to on . • The core wires of the speaker • Check the connections of the power 23...


